
Oh, summer desserts are something else, aren’t they? When those bright, sweet strawberries finally show up, you just have to celebrate them! I used to love making the classic biscuit-style shortcake, but sometimes you just need something a little more elegant, something that screams ‘special occasion.’ That’s exactly how this strawberry shortcake cake was born in my kitchen.
I’m Aria Thompson, and I promise you, this isn’t some fussy bakery creation you need three pastry degrees to handle. This recipe takes that dreamy combination of fluffy cake, macerated berries, and cloud-like whipped cream and transforms it into a true showstopper layer cake. I designed this recipe after years of tinkering—it’s my way of proving that extraordinary desserts are absolutely accessible to the everyday home cook. Trust me, this version is going to be your new favorite easy summer classic!
- Why This is the Best Strawberry Shortcake Cake Recipe
- Ingredients for Your Showstopper Strawberry Shortcake Cake
- How to Make the Fluffy Sponge Cake for Berries
- Preparing the Macerated Berries and Stabilized Whipped Cream
- Assembling Your Perfect Strawberry Shortcake Cake
- Tips for Success with Your Strawberry Shortcake Cake
- Storage and Serving Suggestions for This Easy Strawberry Summer Dessert
- Frequently Asked Questions About Layered Strawberry Cake Ideas
- Share Your Culinary Confidence
Why This is the Best Strawberry Shortcake Cake Recipe
If you’re looking for the definitive guide, this truly is the Best Strawberry Shortcake Cake Recipe you’ll find. Why? Because we ditch the dense biscuit and replace it with something airy that soaks up all those sweet berry juices beautifully. It’s all about elevating that classic flavor profile!
Here’s what makes this recipe a guaranteed win for your next party or sweet craving:
- The Cake Base: It’s a wonderfully Fluffy Sponge Cake for Berries. It’s tender but sturdy enough to hold the layers without collapsing, which is the key to great Layered Strawberry Cake Ideas.
- The Frosting: We’re using Homemade Whipped Cream Cake Frosting that actually holds its shape! No weeping, no sliding—just pure, light perfection thanks to a little secret ingredient.
- The Result: You end up with a stunning, impressive dessert that looks like it came from a professional bakery. Seriously, it’s a natural for generating those ‘wow’ moments at a gathering! You can read more about my approach to classic strawberry bases over here: strawberry cake recipe from scratch.
Ingredients for Your Showstopper Strawberry Shortcake Cake
You know I always say that if you start with spectacular ingredients, you’re halfway to success! Since this is such a fresh dessert, every single component matters here. If you can find gorgeous, perfect, peak-season strawberries for this strawberry shortcake cake, please use them. Seriously, it makes all the difference between a good cake and an unforgettable one. Remember, great ingredients let you use less fuss later!
I’ve split these up so it’s super easy to keep track once you’re gathering things from the pantry and fridge. Check out my method for preserving those summer flavors if you want to try out some strawberry freezer jam later!
For the Fluffy Sponge Cake Layers
This is a really interesting cake batter because of the hot water—it makes a super light crumb, perfect for soaking up goodness. This is what turns it into that Fluffy Sponge Cake for Berries we love!
- 1 3/4 cups all-purpose flour
- 1 3/4 cups granulated sugar
- 1 tablespoon baking powder
- 1/2 teaspoon salt
- 1 cup whole milk
- 1/2 cup vegetable oil
- 2 teaspoons vanilla extract
- 4 large eggs
- 1/4 cup boiling water (Don’t skip this—it’s the magic catalyst!)
For the Macerated Strawberries
Maceration is just a fancy word for letting the fruit sit in sugar and acid, which draws out those amazing juices. That syrup that forms? We are using that directly on the cake layers, so pay attention to the time!
- 2 pounds fresh strawberries, hulled and sliced
- 1/2 cup granulated sugar (specifically for berries)
- 2 tablespoons lemon juice
For the Homemade Whipped Cream Cake Frosting
This is my secret to having gorgeous layers without the heavy feel of buttercream. We cheat just a tiny bit with cornstarch to make sure this Homemade Whipped Cream Cake Frosting stays stiff through assembly and slicing. No sad, sliding cream here!
- 2 cups heavy whipping cream, super cold
- 1/2 cup powdered sugar
- 1 teaspoon vanilla bean paste (Use the paste if you can; those little specks are gorgeous!)
- 1 tablespoon cornstarch (Our stability superhero!)
How to Make the Fluffy Sponge Cake for Berries
Alright, let’s get baking! The structure of this Fluffy Sponge Cake for Berries is what makes it so perfect for a layered cake. It’s forgiving, it’s light, and honestly, the process is so straightforward you’ll wonder why you haven’t made it sooner. You’re basically making a lovely vanilla cake, but that final bit of boiling water is what sets it apart and ensures it stays tender.
Before we even touch the whisks, preheat your oven to 350°F (175°C). Prep those two 8-inch cake pans—grease them well, dust them with flour, and absolutely make sure you cut out parchment circles for the bottoms. Nobody wants a cake stuck in the pan, especially a showstopper like this strawberry shortcake cake!
Mixing the Batter and Baking the Layers
We start by keeping our dry stuff separate. Grab a big bowl and just whisk together the flour, sugar, baking powder, and salt. Get it totally combined because those dry ingredients need to be perfectly distributed before we add any liquid!
Next, in a separate measuring cup or bowl, quickly whisk your milk, oil, vanilla, and all four eggs. Pour that wet mixture right into the dry stuff. Now, here’s the most important rule for tender cakes: mix this on low speed just until you see *most* of the flour disappear. Stop—do not keep going! Overmixing at this stage develops gluten, and we want airy, not tough.
Finally, get your 1/4 cup of boiling water ready. Carefully pour it in and mix just until it’s smooth. Yes, the batter is going to look thin, maybe even watery. Don’t panic! That thin consistency is exactly what we want; it leads to that delicate crumb. Divide everything between your two prepared pans and pop them into the preheated oven!
Bake these guys for about 30 to 35 minutes. You’re looking for that toothpick test to come out clean. I trust the toothpick, but I also visually check if the cake looks set and isn’t wobbly in the middle.
For my tips on variations of vanilla cakes perfect for fruit fillings, check out my guide on vanilla cake with fresh fruit filling.
Cooling the Cake Layers Properly
Patience is key here, even though your kitchen probably smells amazing already! Let those layers rest in their pans for just 10 minutes. This gives them time to firm up a little so they don’t break when you try to flip them out. Don’t leave them much longer than that, though, or they might stick.
After 10 minutes, gently invert them onto a wire cooling rack. Peel off that parchment paper immediately! They need to cool down completely—I mean totally, utterly cool to room temperature—before we even think about frosting or assembly. Trying to frost a warm cake guarantees warm, melted whipped cream, and that’s just chaos!
Preparing the Macerated Berries and Stabilized Whipped Cream
Okay, this is where we finally capture that classic shortcake experience, only elevated. We aren’t just slicing berries; we are coaxing out every bit of their summer flavor with a little time and sugar. This step is absolutely non-negotiable if you want the absolute best flavor for your strawberry shortcake cake, so don’t rush it!
And then there’s the frosting. We need that light, airy topping that melts beautifully in your mouth, but we are making a layer cake, so it has to *stay put*. My trick with the cornstarch gives us the most reliable Homemade Whipped Cream Cake Frosting, making this perfect for any Elegant Strawberry Dessert for Parties.
If you love simple, fresh fruit desserts, you should check out the inspiration I gathered over at fresh berry dessert recipes!
Macerating the Strawberries for Maximum Flavor
Maceration is just a fancy word for letting the fruit sit in sugar and acid, which draws out those amazing juices. That syrup that forms? We are using that directly on the cake layers, so pay attention to the time!
Here’s the deal: take your lovely, sliced strawberries and toss them gently with the ½ cup of granulated sugar and those two tablespoons of lemon juice. The sugar pulls the water out of the berries, creating this concentrated, amazing syrup that soaks right into our sponge cake. It concentrates the flavor, making the strawberries taste even *more* like themselves!
You need to let this mixture sit on the counter, just at room temperature, for a minimum of 30 minutes. Seriously, don’t skimp on that half-hour! That’s the minimum time needed for the magic to happen. If you can let them go for an hour, even better. When you are done, the bowl should have a lovely pool of pinkish-red syrup beneath the fruit.
Whipping the Homemade Whipped Cream Cake Frosting
This is my absolute favorite part because it feels decadent but it’s actually so simple. The secret weapon that turns regular whipped cream into a sturdy frosting that doesn’t deflate right before company arrives? A tiny bit of cornstarch.
First, extreme cold is your best friend. Make sure your heavy whipping cream is ice-cold, and if you have time, stick your mixing bowl and your whisk attachment (or beaters) in the freezer for 15 minutes. Cold fat whips up faster and holds its shape way better!
Start whipping that cold cream on medium speed until it gets a little foamy and starts to hold little peaks that flop over—that’s what we call soft peaks. Then, and only then, do you slowly rain in the powdered sugar, the vanilla bean paste, and our stabilizer, the cornstarch. Speed that mixer up to high and whip until you see stiff peaks. If you gently lift the whisk, the peak should stand straight up without drooping! That’s how you know you have bomb-proof frosting perfect for decorating your Elegant Strawberry Dessert for Parties.
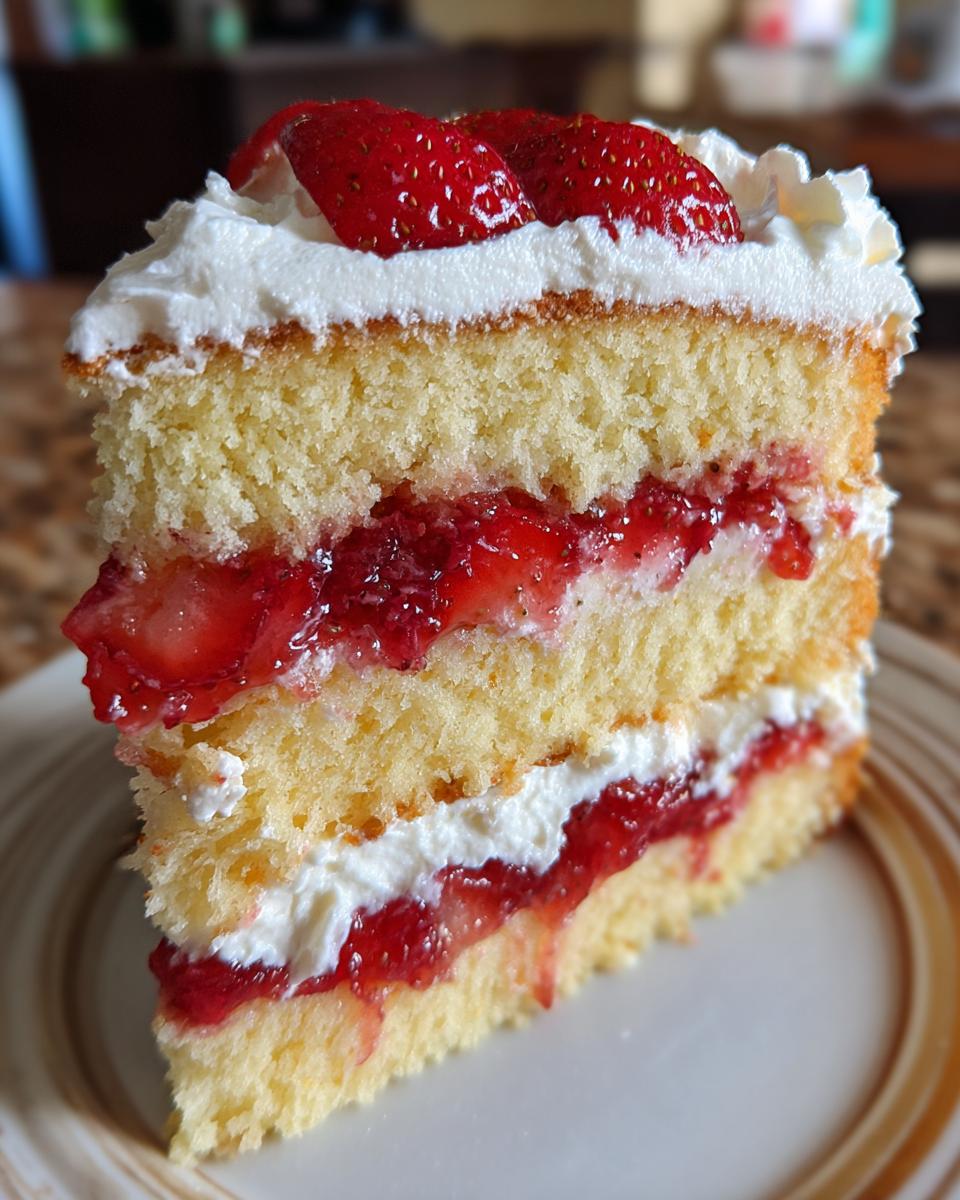
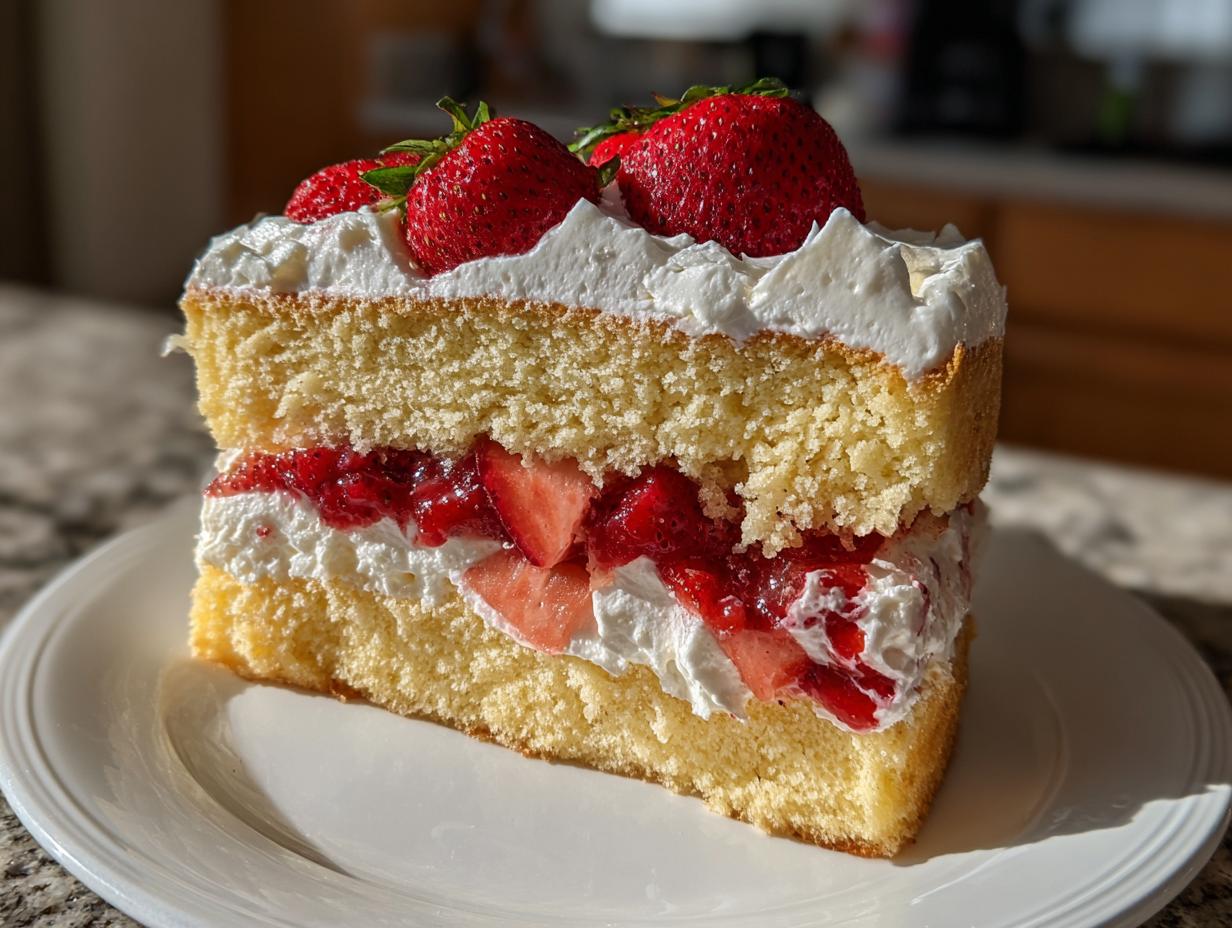
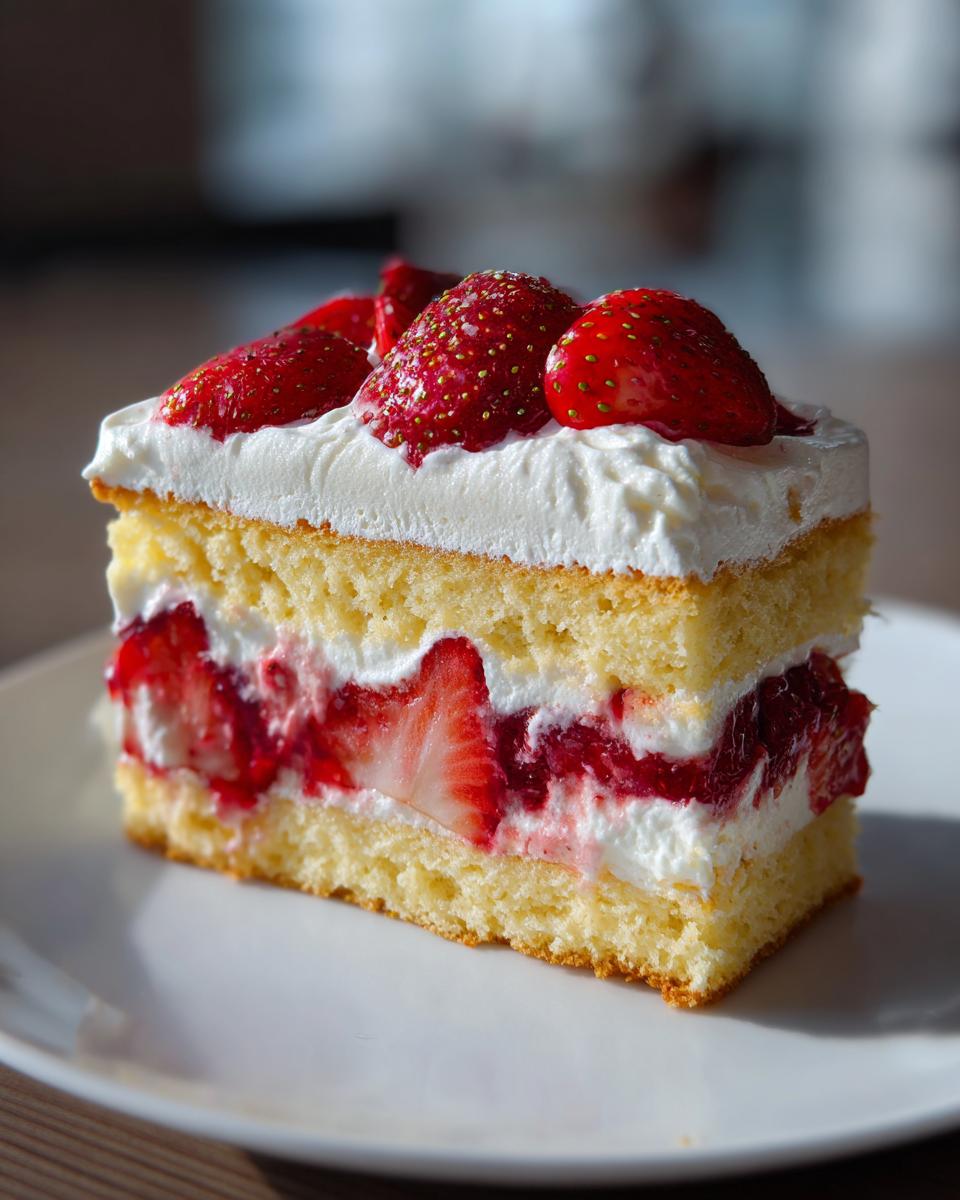
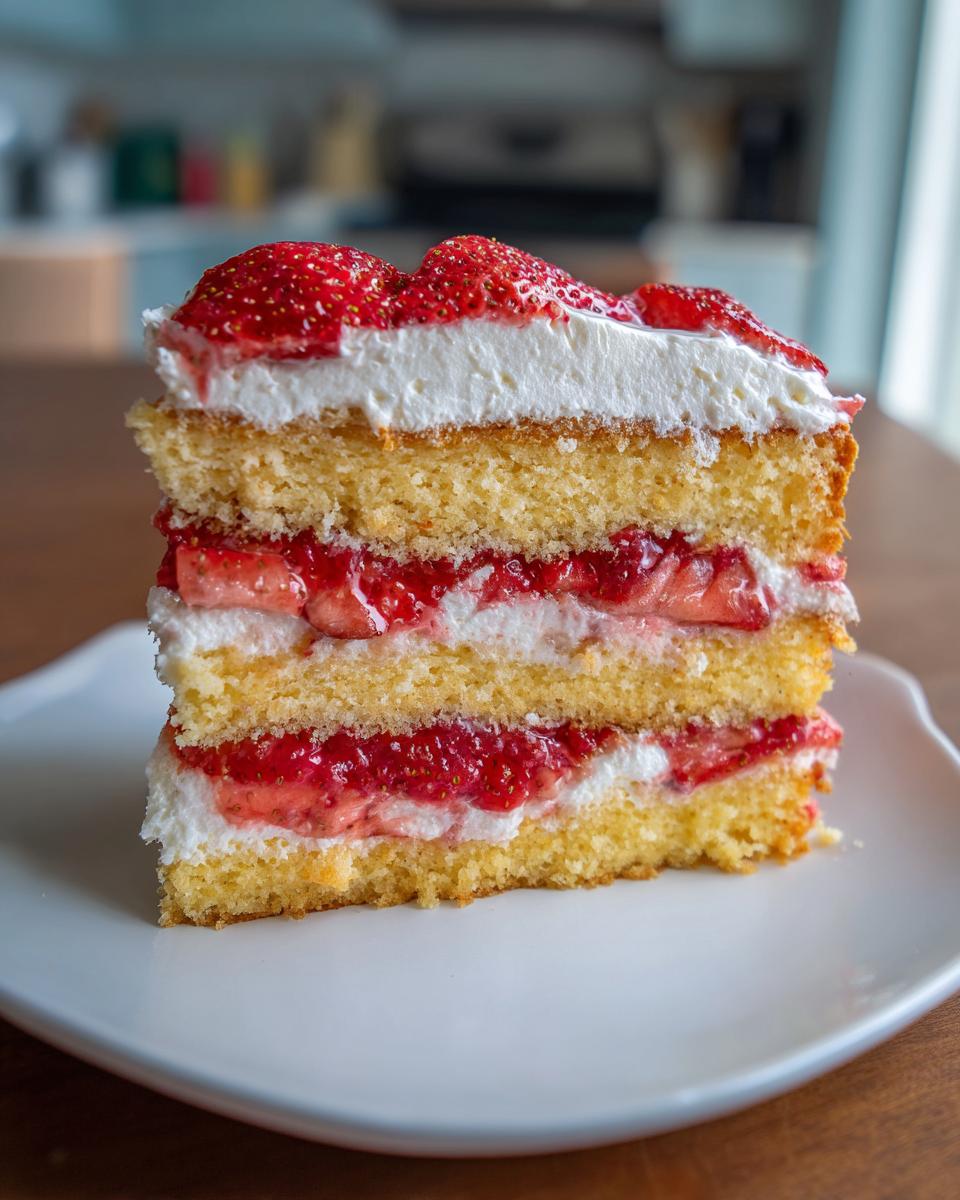
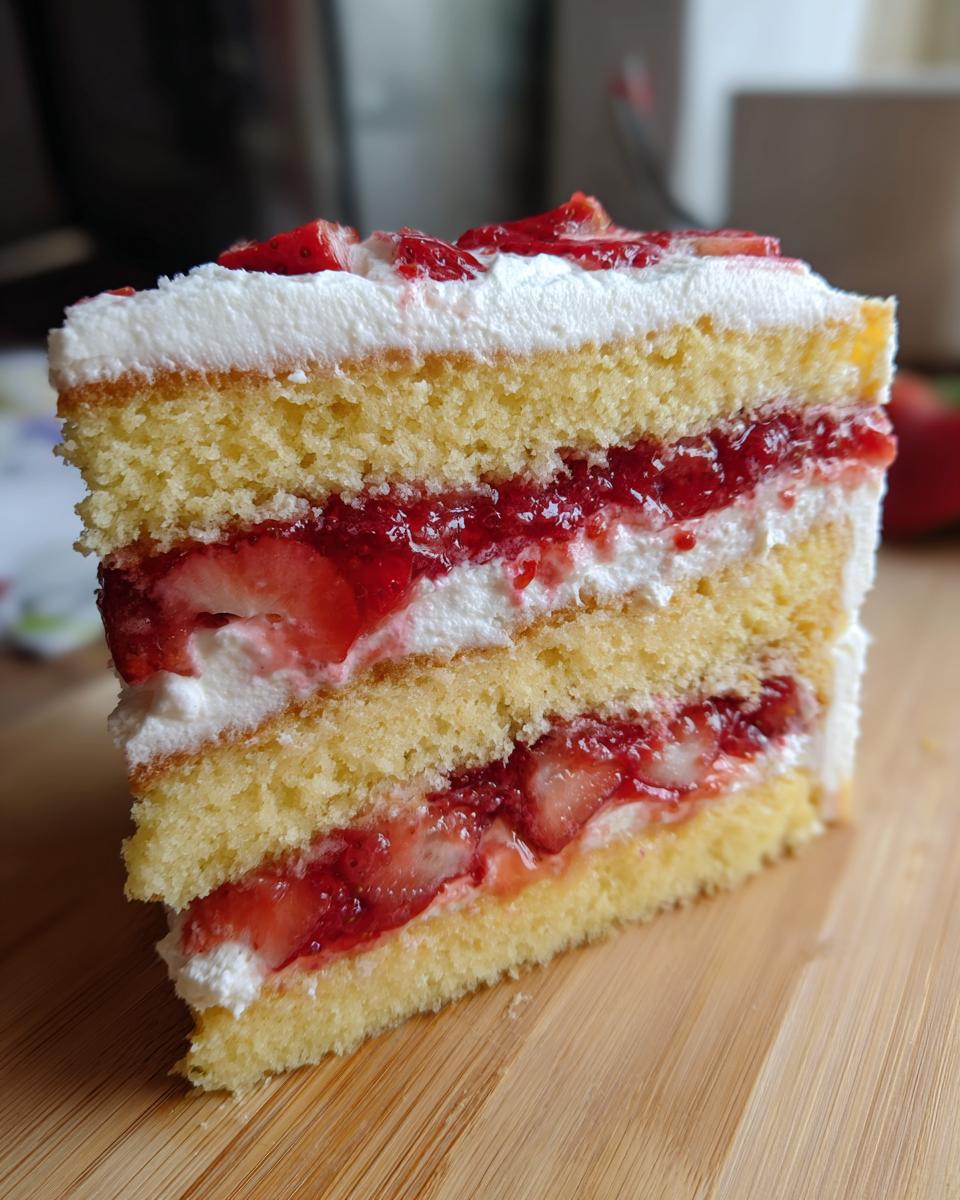
Assembling Your Perfect Strawberry Shortcake Cake
This is the grand finale, the moment we turn beautiful components into that ultimate Showstopper Strawberry Layer Cake! Don’t feel intimidated by the layers; because we used the fluffy sponge and stabilized the cream, this assembly actually goes quite smoothly. Remember, we are building a cake that tastes like the best elements of shortcake, so we want everything soft and luscious!
Once your cake layers are completely cool—and I mean *completely*—you are ready to build. Make sure your macerated berries have released plenty of that beautiful pink syrup, and your whipped cream is ready to go straight from the mixer to the cake.
Layering Technique for Stability
First things first: place your first cake layer—the bottom one—onto your final serving plate or cake stand. This is a great time to add just a little extra moisture protection and flavor boost. Take a spoon and lightly drizzle some of that sweet syrup we got from macerating the strawberries right over the top surface of this first layer. It sinks right in!
Now, grab about one-third of your stiff whipped cream. You want an even layer here; use an offset spatula to spread it gently from edge to edge, but don’t press so hard that you squash the cake down!
Next up are the berries! Spoon about half of your sliced, syrupy strawberries right over that layer of cream. Try to keep them relatively centered so they don’t squish out the sides when the next layer goes on. We want the strawberries nestled inside the cream, not decorating the edge just yet.
Carefully place your second cake layer on top of the berries. If that top layer looks a little domed, it’s okay! We’ll address that in the next step. If you happen to have any leftover syrup, drizzle a little on this top layer too—it ensures the whole strawberry shortcake cake is perfectly moist.
Final Frosting and Chilling
Since we are using whipped cream and not a firm buttercream, we aren’t worrying about a heavy crumb coat; we are going straight for the final presentation! Take the rest of your whipped cream and cover the top and sides of the entire cake. Use your offset spatula or a bench scraper to smooth the sides as best you can. It’s supposed to look light and a little rustic, so don’t stress about achieving total perfection!
Now, use the remaining berries to decorate the top however you wish! I usually pile them up high in the center for that dramatic look. This is what officially turns it into a gorgeous, recognizable **Showstopper Strawberry Layer Cake**.
This is the hardest part, but you absolutely have to do this: chill the assembled cake for at least one hour before you even think about slicing it. Chilling lets the cream firm up just enough, helps the layers settle, and makes cutting those beautiful slices so much cleaner. You can find some deeper assembly tips right here in my guide to strawberry cheesecake dump cake recipe for inspiration on component layering!
Tips for Success with Your Strawberry Shortcake Cake
We’ve come this far, and you have all the components for a fantastic dessert, but I want to send you off with a few little secrets I’ve learned over the years of making these delicate cakes. Even though this recipe is designed to be straightforward—one of those ultimate Moist Cake Recipes for Berry Topping—timing and temperature are everything when you’re dealing with whipped cream.
If you follow these few rules, you’re eliminating 90% of potential troubleshooting because your ingredients will be cooperating with you, not fighting you!
First, **Ingredient Temperature Control is King**. Remember how I stressed that heavy whipping cream needs to be ice cold? That’s a must. The colder the cream, the faster it whips into stiff peaks, and the more stable it stays. Don’t try to rush this by warming anything up!
Next, **Maceration Time is Flavor Time**. I know baking is often about speed, but truly, letting those strawberries sit for at least 30 minutes (or longer!) makes a huge difference. You aren’t just getting fruit; you’re creating a concentrated syrup that acts as the moisture for the cake layers. If your berries don’t have time to weep, your cake layers will taste dry.
Also, a quick word on substitutions: If you’re tempted to swap plant-based oils for the vegetable oil, be careful. Oil provides unmatched moisture, which is crucial since we aren’t using heavy butter in the cake itself. Stick to neutral oils; strong flavors like olive oil will totally clash with the vanilla and strawberry notes in this strawberry shortcake cake.
Finally, **The Wait is Worth It**. I mentioned it in the assembly, but I’ll say it again: Don’t skip the chilling time after you frost the cake! Whipped cream needs that cold time to set up against the syrup-soaked cake. If you serve it immediately, the knife drags, the cream smears, and suddenly, your beautiful creation looks… less like a showstopper. For more insights into achieving superior moisture in cakes, you can check out some of the techniques I applied to my ultimate moist carrot cake recipe.
Storage and Serving Suggestions for This Easy Strawberry Summer Dessert
Since this strawberry shortcake cake relies on fresh, beautiful whipped cream and juicy berries, storage is a little different than, say, a heavy frosting cake. We want to preserve that incredible, light texture, so we have to be mindful of moisture and temperature.
Here’s my straightforward guide to keeping this easy summer dessert tasting exactly how it should, even after being made a little ahead of time. If you’re looking for ways to preserve summer flavors year-round, check out my guide on easy homemade raspberry jam recipe!
Serving Temperature: You absolutely want to serve this chilled! Because the filling is pure whipped cream, it starts to soften quickly once it’s out of the fridge. Pull it out about 15 to 20 minutes before you plan to cut slices. That little bit of time takes the chill off the sponge cake layers just enough so they taste tender, but the cream stays perfectly firm.
Short-Term Storage (Up to 1 Day): If you’ve assembled the cake and need to store it overnight, cover it loosely with a cake dome or just lightly tent it with plastic wrap. Do not press the wrap onto the frosting; the goal is to keep fridge odors out while preventing the cream from drying out. Keep it on the main shelf of the refrigerator, not the door where the temperature fluctuates.
What to Avoid: Never, ever store this cake at room temperature once it’s assembled, especially if your house is warm. The combination of dairy and fresh fruit means we are looking at maximum food safety time of about four hours outside of refrigeration. For an overnight cake, it must stay cold!
Longer Storage (If Necessary): Frankly, you really shouldn’t keep this specific strawberry shortcake cake assembled for more than 24 hours. The moisture from the berries will start to make the delicate sponge layers too soggy, and the whipped cream loses its fantastic airy texture over time. If you need to prep components ahead, chill the baked and cooled cakes, and store the macerated berries and whipped cream separately in airtight containers in the fridge. Assemble everything just a few hours before serving for the very best results!
Frequently Asked Questions About Layered Strawberry Cake Ideas
It’s totally normal to have a few tricky questions when you’re trying a new recipe, especially when you’re aiming for a Showstopper Strawberry Layer Cake that’s a little different from the usual! I’ve pulled together the common things people ask me when they try to make their own strawberry shortcake cake. We want you to feel totally confident!
Can I make the cake layers ahead of time for this strawberry shortcake cake?
Oh, absolutely, you can get a head start! That is one of the best things about this Fluffy Sponge Cake for Berries—it freezes beautifully. Once the layers are completely cool, wrap each one tightly in plastic wrap, and then maybe wrap them again in foil to block out any freezer smells. They will last up to two months!
When you’re ready to assemble, pull them out of the freezer and let them thaw on the counter for about an hour while they are still wrapped. Then, unwrap them and proceed with the syrup drizzle and assembly. Just make sure they are fully thawed before you start brushing them with that sweet strawberry syrup!
What if I don’t want to use cornstarch in the whipped cream?
I get it, not everyone likes having a starch in their whipped cream, even if it’s just a tablespoon! If you skip the cornstarch, you are technically making classic whipped cream, which is lighter—but it won’t hold up quite as well for a tall layer cake.
If you absolutely skip the cornstarch, you have two choices to maintain that light texture while still stabilizing it: either use cream cheese mixed in (like the note suggests for a cream cheese frosting alternative), or use a gelatin-based stabilizer if you can find one! Some cooks use unflavored gelatin dissolved in a tiny bit of hot water, let it cool slightly, and whip it in when the cream reaches soft peaks. This gives you great *structure* without the powdery texture of cornstarch, keeping that dreamy, light pillow look we love for our Homemade Whipped Cream Cake Frosting in these Layered Strawberry Cake Ideas.
If you’re looking for other fun ways to use fresh fruit in drinks, you might enjoy my strawberry basil margarita recipe!
Share Your Culinary Confidence
I truly hope that by following these steps, you feel completely ready to tackle this breathtaking strawberry shortcake cake. Taking a classic idea and turning it into something show-stopping for your next gathering is what cooking is all about—it’s about making something beautiful that tastes incredible!
Once you’ve baked those fluffy layers and carefully stacked your fresh fruit and light vanilla cream, I absolutely want to hear about it! Did the cornstarch trick work wonders for your frosting? Did the kids love it?
Don’t be shy! Head down to the comments section below and leave me a star rating and tell me how it went. Even better, snap a picture of your gorgeous finished cake and share it on social media. Tag me so I can see your amazing creation! Knowing that I helped you elevate your everyday baking is the whole reason Cooking Zenith exists. If you ever want to learn more about my approach to home cooking and confidence, you can read all about my journey over at the About Page!
PrintElevated Layered Strawberry Shortcake Cake with Vanilla Bean Whipped Cream

Make this showstopper strawberry layer cake that combines a fluffy sponge cake with fresh macerated berries and light, homemade whipped cream frosting. This is the best strawberry shortcake cake recipe for celebrations.
- Prep Time: 45 min
- Cook Time: 35 min
- Total Time: 1 hour 20 min
- Yield: 10 servings 1x
- Category: Dessert
- Method: Baking
- Cuisine: American
- Diet: Vegetarian
Ingredients
- 1 3/4 cups all-purpose flour
- 1 3/4 cups granulated sugar
- 1 tablespoon baking powder
- 1/2 teaspoon salt
- 1 cup whole milk
- 1/2 cup vegetable oil
- 2 teaspoons vanilla extract
- 4 large eggs
- 1/4 cup boiling water
- 2 pounds fresh strawberries, hulled and sliced
- 1/2 cup granulated sugar (for berries)
- 2 tablespoons lemon juice
- 2 cups heavy whipping cream, cold
- 1/2 cup powdered sugar
- 1 teaspoon vanilla bean paste
- 1 tablespoon cornstarch (for stabilization)
Instructions
- Preheat your oven to 350°F (175°C). Grease and flour two 8-inch round cake pans. Line the bottoms with parchment paper.
- In a large bowl, whisk together the flour, 1 3/4 cups granulated sugar, baking powder, and salt.
- In a separate bowl, whisk together the milk, oil, vanilla extract, and eggs until combined.
- Pour the wet ingredients into the dry ingredients and mix on low speed until just combined. Do not overmix.
- Carefully pour the boiling water into the batter and mix briefly until smooth. The batter will be thin.
- Divide the batter evenly between the prepared pans. Bake for 30 to 35 minutes, or until a toothpick inserted into the center comes out clean.
- Let the cakes cool in the pans for 10 minutes before inverting them onto a wire rack to cool completely.
- While the cakes cool, prepare the berries: In a medium bowl, gently toss the sliced strawberries with 1/2 cup granulated sugar and lemon juice. Let them macerate at room temperature for at least 30 minutes.
- Prepare the whipped cream: Chill your mixing bowl and whisk attachment. Pour the cold heavy whipping cream into the chilled bowl. Begin whipping on medium speed.
- Once soft peaks form, gradually add the powdered sugar, vanilla bean paste, and cornstarch. Increase the speed to high and whip until stiff peaks form. The cornstarch helps create homemade whipped cream cake frosting that holds its shape.
- To assemble the cake: Place one cooled cake layer on your serving plate. If desired, brush the top lightly with some of the strawberry syrup from the macerated berries.
- Spread about one-third of the whipped cream over the first layer. Spoon half of the macerated strawberries evenly over the cream.
- Place the second cake layer on top. Frost the top and sides of the entire cake with the remaining whipped cream.
- Decorate the top with the remaining strawberries. Chill the cake for at least 1 hour before slicing for the best flavor and structure.
Notes
- For a moister cake, you can brush the layers with a simple syrup made from 1/4 cup water and 2 tablespoons sugar heated until dissolved, then cooled.
- If you prefer a cream cheese frosting alternative, substitute half of the heavy cream with 8 ounces of softened cream cheese, beating it until smooth before adding the remaining cream and sugar.
- Assemble this fresh berry dessert recipe the day you plan to serve it for the freshest taste and texture.
Nutrition
- Serving Size: 1 slice
- Calories: 410
- Sugar: 45
- Sodium: 180
- Fat: 20
- Saturated Fat: 11
- Unsaturated Fat: 9
- Trans Fat: 0
- Carbohydrates: 58
- Fiber: 2
- Protein: 5
- Cholesterol: 115