
Oh my goodness, if there is one Italian dessert that just screams celebration, happiness, and maybe a little bit of required effort, it has to be the cannoli! You know, those beautiful, crunchy little tubes filled with clouds of sweet, creamy sunshine? I get asked constantly about my cannoli recipe, and honestly, I always hesitated because I thought people were too scared of frying. But I’m Aria, and my whole mission here is to prove you can absolutely master that traditional Sicilian dessert right in your own kitchen. Forget those sad, floppy imitations! This comprehensive guide walks you through making both the perfectly crispy cannoli shells and that unbelievably smooth, cloud-like filling. Trust me, once you nail these steps, you’ll be planning Italian dinner parties just for an excuse to make them!
- Why This Cannoli Recipe Delivers Authentic Italian Dessert Recipe Perfection
- Gathering Ingredients for Your Homemade Italian Pastry
- Traditional Cannoli Instructions: Making the Dough
- Crafting the Ricotta Cream Recipe for the Filling
- Frying the Crispy Cannoli Shells from Scratch
- Assembling Your Best Cannoli: Filling and Garnishing
- Tips for Success Making This Sicilian Dessert
- Frequently Asked Questions About This Cannoli Recipe
- Nutritional Estimates for This Fried Pastry Dessert
- Share Your Homemade Italian Pastry Creations
- Nutritional Estimates for This Fried Pastry Dessert
- Share Your Homemade Italian Pastry Creations
Why This Cannoli Recipe Delivers Authentic Italian Dessert Recipe Perfection
It took me years—and yes, a few blistered fingers—to land on something that truly reminded me of the cannoli back home. So many recipes promise the world but deliver a soggy shell or a grainy filling. Not this one! When you use my tried-and-true cannoli recipe, you aren’t just making dessert; you’re making an event. We focus on that beautiful textural contrast that sets the best Italian dessert recipes apart.
If you’ve been looking for that truly amazing crunch followed by pure, sweet decadence, this is it. I promise, this recipe makes the authentic experience totally possible for a weeknight bake.
Key Features of Our Cannoli Recipe
- Achievable Crispy Shells: We nail the dough technique so your shells bubble up beautifully and stay shatteringly crisp. No more chewy pastry here!
- Ultra-Creamy Ricotta Filling: I’ll show you the draining secret, guaranteeing a filling that is silken smooth, not watery or lumpy.
- Perfectly Balanced Sweetness: We get that classic Sicilian flavor—sweet enough to satisfy, balanced enough to let that lovely ricotta shine through.
- Master The Technique: I link out to my best tips for handling delicate batters, which really helps when you wrap those little tubes!
Gathering Ingredients for Your Homemade Italian Pastry
Okay, now that you’re excited to make the cannoli recipe of your dreams, let’s talk supplies! Don’t be intimidated; once you have these items gathered, the assembly is surprisingly straightforward. Every great Italian pastry stands on the quality of its components, and cannoli are no exception. We’re dealing with two main players here: the dough that becomes the crispy shell, and the filling that makes it heavenly.
Listen to me on this one crucial point for the filling: you absolutely *must* drain your ricotta. If you skip this, your creamy ricotta filling will turn into sad, soupy disappointment. I know it seems like an extra step, but trust the process! We want rich, thick cream, not watery cheese. You can check out my recipe for the richest homemade creams for general texture tips, but for now, let’s look at what goes into this famous treat.
Ingredients for the Crispy Cannoli Shells
- Two cups of all-purpose flour—the standard workhorse!
- A quarter cup of granulated sugar, just to sweeten the shell slightly.
- A tiny pinch of salt.
- A quarter cup of unsalted butter, and here’s one of Aria’s Golden Rules: it must be cold and cubed. This makes the pastry flake right!
- One large egg yolk—this adds richness.
- Half a cup of dry Marsala wine. If Marsala is tricky to find, don’t panic; cold water or even a dry white wine works in a pinch.
- One tablespoon of white vinegar—this helps tenderize the dough just right.
- Vegetable oil or shortening for frying. Make sure you have plenty!
Ingredients for the Creamy Ricotta Filling
- One full pound of whole milk ricotta cheese. And yes, it needs to be drained overnight! Seriously, don’t skip that draining step, or your filling will run everywhere.
- One cup of powdered sugar, and it has to be sifted. Sifting is key to avoiding those tiny, annoying sugar lumps in your finished cream.
- A half teaspoon of ground cinnamon—the classic subtle warmth.
- One teaspoon of vanilla extract.
- For finishing touches: mini chocolate chips or finely chopped candied orange peel.
- And finally, powdered sugar just for dusting the tops!
Traditional Cannoli Instructions: Making the Dough
Alright, deep breath! We’re moving from the ingredient pile to the creation phase. This is where we transform flour and butter into those amazing, bubbly shells. Remember those cold, cubed butter pieces we talked about? We need to work quickly here, just like I had to learn when making my quick homemade French bread—speed matters when handling cold fat!
First, grab your bowl and whisk together the flour, the sugar, and the salt. Then, cut in that cold butter. I usually use a pastry blender for this part, pressing that butter into the flour until it looks like coarse sand, or maybe slightly larger peas. This friction creates those little pockets that will turn into air and crispness later on.
Next up is the liquid magic. Whisk your egg yolk, the Marsala wine (or whatever cold liquid you chose), and that splash of vinegar together separately. Pour that wet mix right into your dry stuff. Mix it with a spoon or your hands until it just starts to cling together into a shaggy mess. This is the point where you turn it out onto your lightly floured counter.
Now, here’s the most important part for the shell texture of your cannoli recipe: KNEAD BRIEFLY! I mean it. You only want to knead it maybe two minutes, max, until it settles into one smooth ball. If you knead it like bread dough, you develop gluten, and guess what you get? Chewy, tough tubes that won’t shatter when you bite them. We want flaky layers, not toughness!
Wrap that dough up tight in plastic wrap—it needs a good nap. It has to chill in the fridge for at least an hour. I often let mine go longer; waiting is the hardest part of making traditional cannoli instructions come to life, but that rest period lets the gluten relax, which leads right back to that perfect crispness!
Expert Tip: Achieving the Right Dough Consistency
People always ask why the wine and vinegar are non-negotiable for the dough, even if they swap the wine for water. Think of it this way: the alcohol in the Marsala evaporates super fast when it hits the hot oil, which encourages rapid puffing—hello, bubbles! The vinegar adds just a tiny bit of acid, which helps tenderize the dough structure itself, basically fighting off any premature gluten development we accidentally started during the quick knead. It’s all about creating steam and tenderness before the frying even begins!
Crafting the Ricotta Cream Recipe for the Filling
Now that your dough is having a nice, peaceful rest in the fridge, it’s time to tackle the heart of the cannoli: that glorious, sweet filling! This is the second secret weapon of a truly best cannoli, right after those shatteringly crisp shells. This part might seem easy—it’s just mixing stuff, right? Wrong! This is where we establish that velvety, non-grainy texture that separates the amateurs from the true pastry masters.
We are focusing on steps four and five here, and as I mentioned before, this all hinges on properly drained ricotta. If yours is still weeping liquid, stop right now and drain it more! I always recommend planning this out the day before so you can make the cheese component while you’re doing something else, like watching TV or doing dishes. Trust me, waiting for that drain is worth every single second.
Once your ricotta is firm and ready, grab your mixer. You need to beat that cheese until it’s completely, utterly smooth. I whip mine for a solid five minutes—don’t rush it! It should look less like grainy cottage cheese and more like smooth, thick yogurt. This is the foundation of a brilliant Ricotta cream recipe.
Only once the ricotta is perfect do you introduce the sugar, cinnamon, and vanilla. Add the sifted powdered sugar in waves, mixing slowly at first so you don’t create a cloud of white sugar dust that coats your entire kitchen (oops, speaking from experience there!). Once it’s all combined and looks like sweet cloud fluff, cover it up. It really needs to chill out in the refrigerator for at least half an hour before we even think about filling those shells. This chilling time helps the flavors meld together and firm up the cream just enough so it holds its shape beautifully when piped. If you want to see another amazing application of rich, creamy textures, check out my recipe for easy creamy homemade Alfredo; the mixing philosophy is surprisingly similar!
When you are ready to assemble, remember that timing is everything! Head over to this great resource if you need a quick refresher on why we keep the shells and filling separated until the absolute last minute.
Frying the Crispy Cannoli Shells from Scratch
This is the part where everyone gets that little nervous flutter—frying! I totally get it. Dealing with hot oil can be intimidating, but I promise you, mastering the frying process is what unlocks the magic of a truly crispy cannoli shells. We are moving through steps six through nine here, and safety and accuracy are non-negotiable. This is the key to making this cannoli recipe shine over any pre-bought shells!
First, let’s talk shaping. Take your chilled dough and roll it out thinner than you think you should. I shoot for about 1/16th of an inch—like paper! Use a 3-inch cutter—you can use a biscuit cutter or even a sturdy glass rim. Next, you need those metal cannoli tubes. Lightly grease them first; that’s step six. Then, wrap your dough circle around the tube. You need to overlap the edges slightly, maybe half an inch, and this is super important: brush that overlapping seam with a tiny bit of water or egg white. Press it firmly because if that seam pops open in the oil, you get a strange, sad-looking fried pancake instead of a tube!
Step seven is setting up your oil. You need at least two or three inches of vegetable oil or shortening in a deep, heavy pot, and for the love of all things sweet, you *must* use a thermometer! We need that oil sitting right at 375°F (190°C). If the oil is too cool, the dough soaks it up like a sponge, and boom—soggy shells. If it’s too hot, they burn before they even bubble.
Now, the fun part! Carefully place just two or three shells in at a time. Use tongs to hold the tube down initially so the dough doesn’t float up awkwardly. You want that dough submerged so it cooks evenly and puffs up! They cook fast, maybe a minute or two per side until they are that beautiful golden brown, like a perfect sunset. These are officially fried pastry desserts when they look like this!

Crucial Steps for Perfect Frying and Cooling
As soon that they look golden, gently lift them out with a slotted spoon. Immediately set them on paper towels to drain. Keep turning them occasionally so the excess oil drips off. Here’s where most people mess up, or where I messed up my very first time, making these shells for my Aunt Lucia’s name day party. I was so excited by the perfect bubbling that I left the tubes in too long. When I tried to slide them out, I ripped the side of the fragile pastry!
The trick, discovered through much trial and error (and a lot of slightly mangled shells!), is to let the shell cool for just about 30 seconds on the paper towels first—enough so it sets up but while it is still warm enough to slide. Then, gently, gently slide that metal tube right out. If you wait until it’s completely stone-cold, the pastry shrinks onto the metal, and you’ll tear it for sure. Once they are all cooled on the tray—completely cool—they are ready for filling.
For deep-diving into alternative crisping methods for other things, you might check out my guide on making air fryer chips crunchy, but honestly, for cannoli, frying gives you the texture you are chasing!
Also, if you ever want to see the technique for making just shells, this resource from Food Folks and Fun provides a great close-up look at how to shape the shells. But remember: fill them last minute!
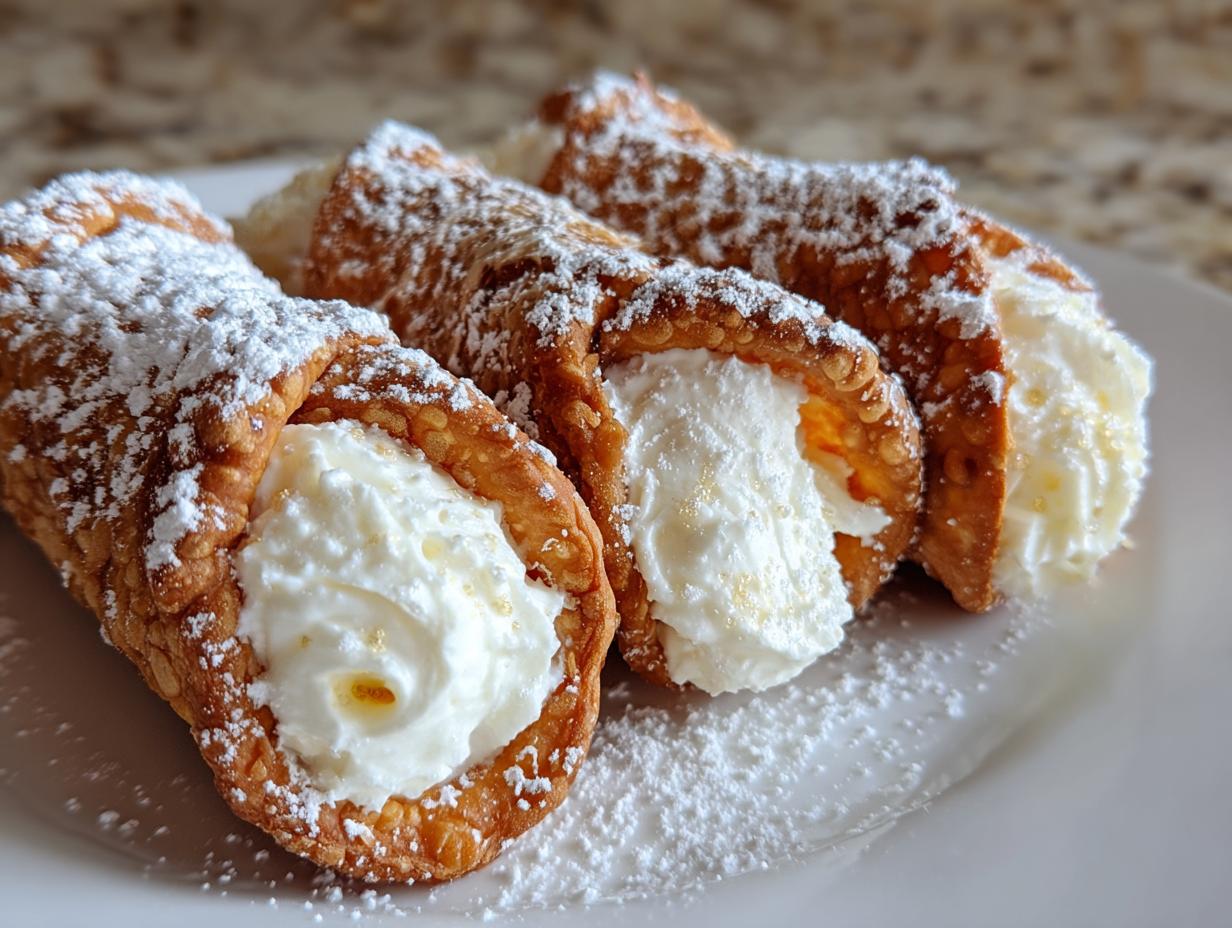
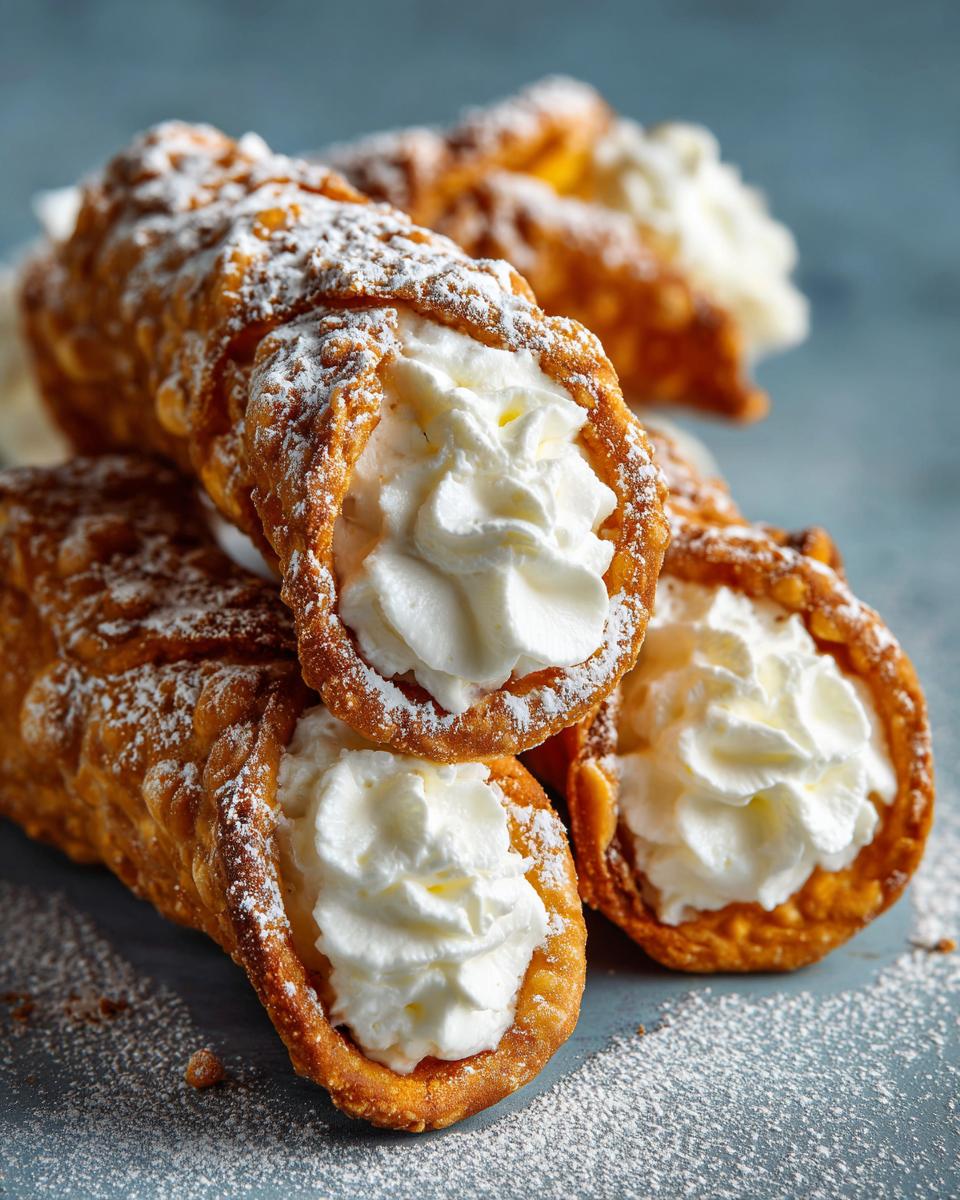
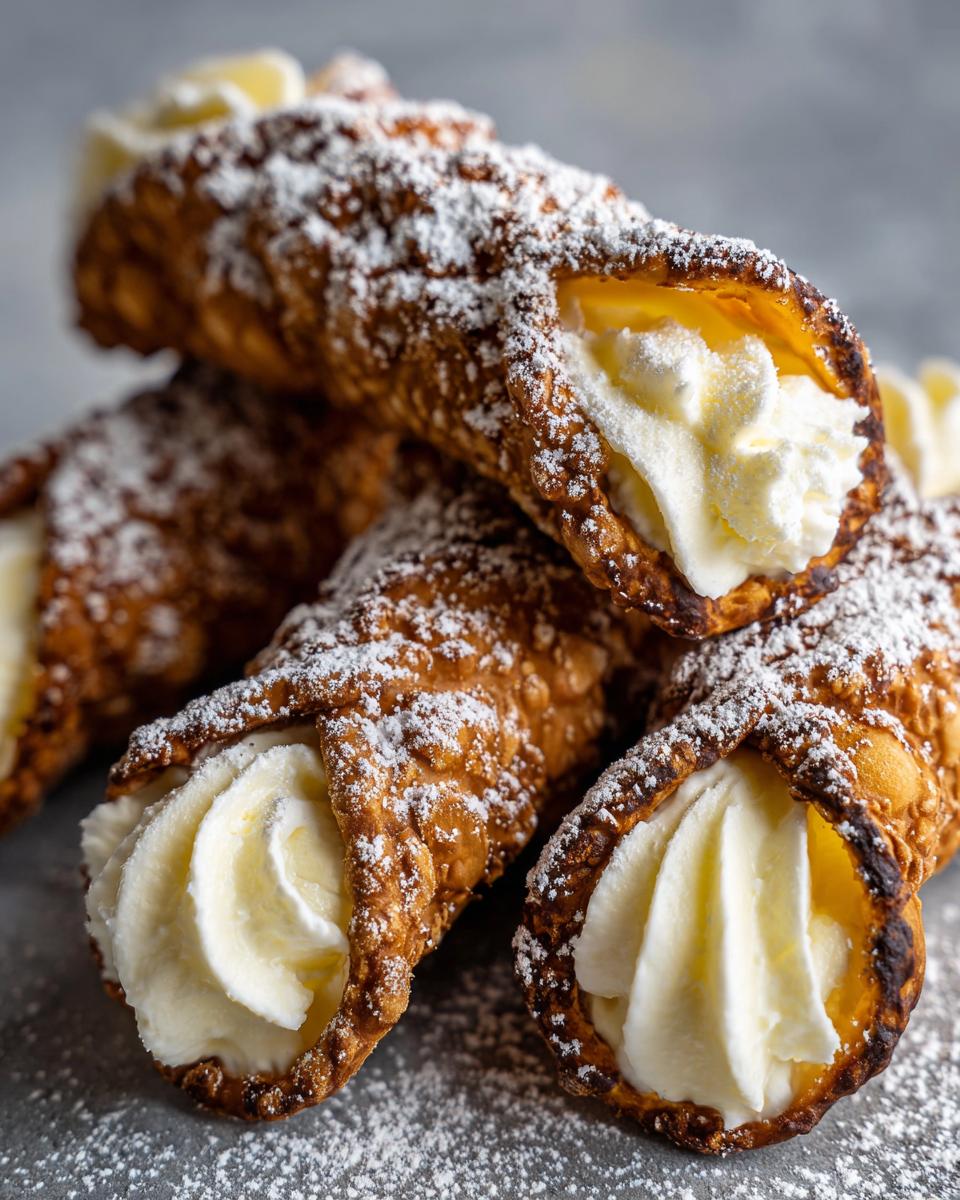
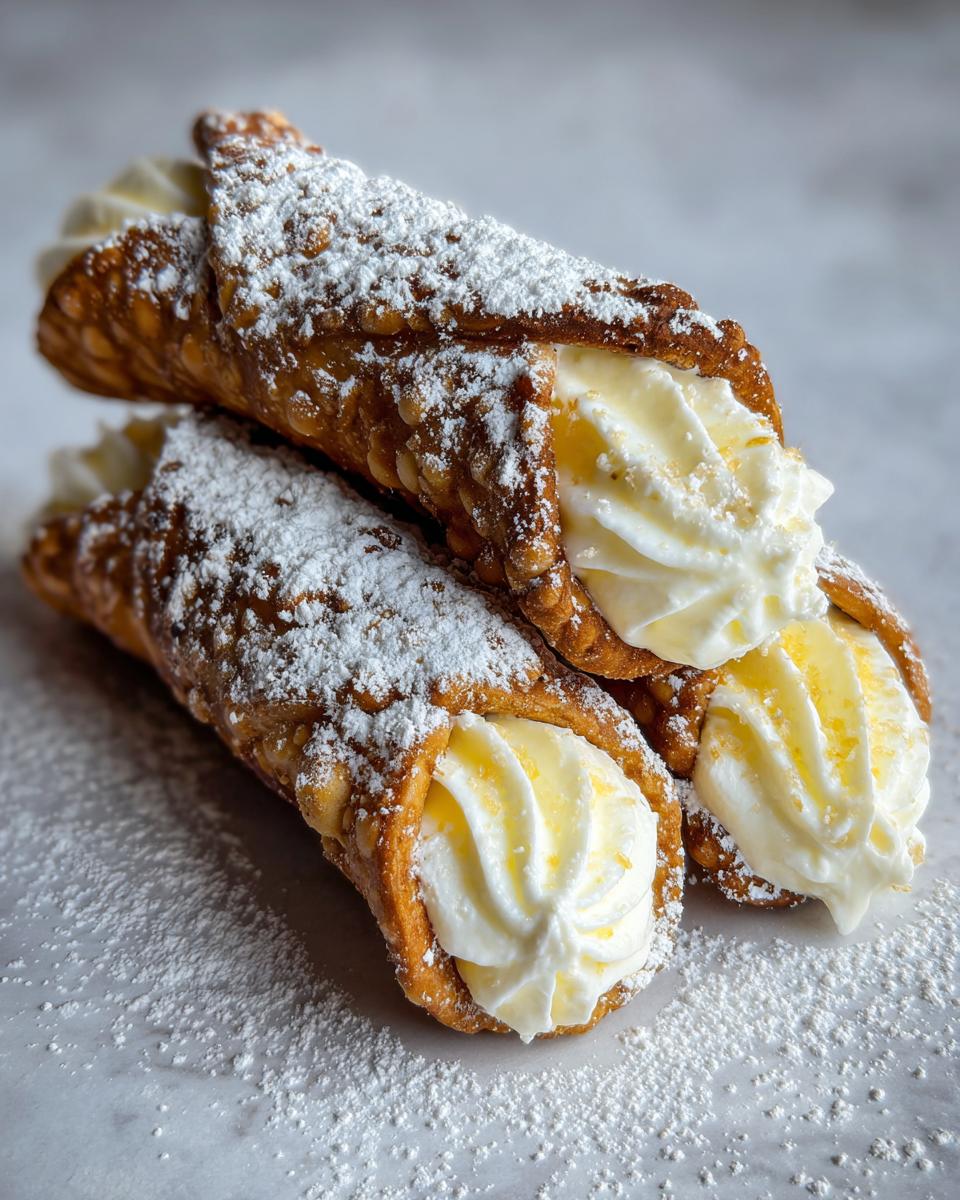
Assembling Your Best Cannoli: Filling and Garnishing
We’ve reached the grand finale! This is the moment you see all that hard work pay off. Remember, we are making the best cannoli here, which means we must obey the number one rule of pastry assembly: Timing is everything! If you fill these beautiful, crispy shells more than about an hour before serving, they will start to go soft. That crunch is fleeting, and we want that glorious shatter in every single bite of your amazing cannoli recipe.
We are wrapping up steps ten and eleven. Take your perfectly smooth, chilled ricotta cream and put it into a piping bag. If you don’t have a piping tip, honestly, just snip the corner off a sturdy Ziploc bag—it works just as well when you’re making something this rich. You want a nice, wide opening so the cream comes out easily without you having to squeeze until your hands cramp up!
Hold one cooled shell in your hand. Pipe the filling into one end until it’s firm and flush with the rim. Then, pipe the other end until it mounds up slightly. I always go heavy on the filling because, let’s be real, that’s the best part!
Now for the fun flair! This is where you customize everything. Dip each filled end gently—just the tips of the cream—into whatever topping you chose. Mini chocolate chips are a classic, of course, but if you want that truly bakery look, finely chopped candied orange peel or even chopped pistachios look stunning against the white cream. You can also keep some plain and just give them a huge, dramatic dusting of powdered sugar right before they hit the table.
If you want inspiration for other gorgeous, rich desserts that require layered texture and flavor, you have to check out my recipe for the chocolate caramel toffee crunch cake—it’s all about contrast, just like the cannoli!
Once they are garnished, they are ready to serve immediately. Stand them up tall on a platter, dust them one last time with powdered sugar, stand back, and admire your beautiful, authentic Italian pastry work. You made these! Enjoy every single crunchy, creamy moment!
Tips for Success Making This Sicilian Dessert
Look, making an amazing Sicilian dessert like this isn’t rocket science, but it does require you to pay attention to a few specific details. After all these years of cooking and developing this cannoli recipe, I’ve learned that the difference between a ‘good’ cannoli and a ‘stop-the-party, I-need-another-one’ cannoli comes down to just three critical things. These are the habits I want you to adopt to ensure success every single time you decide to take on this project!
First and foremost, let’s talk ricotta draining again. I know I sound completely bossy about it, but I can’t stress this enough: drain your whole milk ricotta overnight. I mean it. If you are using part-skim, you’ll need to drain it for two nights! I usually line a fine-mesh sieve with a few layers of cheesecloth, place that over a bowl, and leave it in the fridge. The goal is to remove as much whey as possible so your filling isn’t soupy. Poorly drained cheese is the number one reason why beautiful shells get ruined from the inside out.
Second, remember that frying temperature! That 375°F guideline is your best friend. If you don’t use a reliable thermometer, you are just guessing, and guessing with hot oil is dangerous and leads to greasy pastry. If you want to learn more about achieving perfectly creamy textures in other recipes, maybe try looking at the consistency I use for my classic New York Cheesecake; the principle of patience when using dairy is the same.
And finally, storage advice—this is about keeping your hard work glorious. Do not, under penalty of law from my Italian grandmother, fill these shells until you are physically ready to serve them within the hour. Once the filling touches the shell, the clock starts ticking on crispiness. Store the cooled, empty shells in an airtight container on the counter, and keep the filling tightly covered in the fridge. When you’re ready for dessert, pipe them up! It’s a quick process, but it preserves that perfect textural crunch that makes this Italian dessert recipe so legendary. If you ever doubt your method, just remember that folks making authentic versions over in Sicily are following these exact rules, just as you can see reflected in guides like this one focusing on authentic Sicilian cannoli recipes.
Frequently Asked Questions About This Cannoli Recipe
It’s so natural to have questions pop up when tackling a classic like this! I’ve answered a few things folks often ask me when they’re trying this cannoli recipe for the first time. Remember, we are aiming for that authentic, impressive treat, so let’s clear up any confusion so you feel totally ready to try making this Italian dessert recipe at home!
Can I make the cannoli shells ahead of time?
Oh yes, you absolutely can! And I highly encourage it, especially if you plan on making a huge batch for a party. The shell dough chills beautifully, but the shells themselves are best made a day ahead. Store your completely cooled, empty, and dry shells in an airtight container on the counter. They stay perfectly crisp for a good 24 hours this way. Just be sure they are 100% cool before you seal the container, or any trapped steam will soften them up.
What is the best substitute for Marsala wine in the cannoli recipe?
If you are trying to make this an Easy cannoli at home but can’t source Marsala, don’t let that stop you! Marsala adds a specific grape-y depth, but really, the liquid needs to be cold and ideally slightly acidic or alcoholic to help with that puffing action in the oil. My top suggestion is using a very cold, dry white wine—think Pinot Grigio. If you want to avoid alcohol entirely, use ice-cold water mixed with that tablespoon of white vinegar. The key takeaway across all substitutions is that the liquid must be ice-cold when mixing into the dough!
Can I bake the cannoli shells instead of frying?
This is where we hit the reality of traditional pastry! People often ask about a No fry cannoli filling option, but they usually mean baking the shells. And yes, you *can* bake them. You wrap the dough just the same way around the tubes and bake them at about 400°F until golden. However, I have to be honest: the texture is completely different. Frying quickly forces the water in the dough to turn to explosive steam, creating those signature large bubbles and that shatteringly crisp crunch. Baked shells end up being more like a dense, cracker-like pastry. For true, authentic cannoli, you must fry, but I understand the hesitation! If you’re short on time, store-bought shells are a decent starting point, but you simply won’t get the same incredible result as my fried version.
Speaking of easy mornings after sweet nights, if you ever need a quick, foolproof breakfast while the cannoli digest, check out my tips for super easy breakfast recipes!
Nutritional Estimates for This Fried Pastry Dessert
Now, I’m going to preface this by saying that anything deep-fried and filled with sweet ricotta and chocolate chips is not exactly health food, but when you make a Fried pastry dessert like this at home, you control the ingredients! The numbers below are just an estimate based on the recipe above, assuming standard sizing for 15 cannoli. Please treat these as fun guidelines, not strict medical advice!
- Serving Size: 1 cannoli (per estimate)
- Calories: Roughly 350 (This can jump up depending on how much chocolate you load on the ends!)
- Fat: About 18g (Remember, some oil drains away during the cooling process!)
- Carbohydrates: Around 40g
- Protein: About 10g
- Sugar: Approximately 25g (Mostly from the filling)
It’s clearly a treat, an indulgence, and the perfect ending to a wonderful Italian meal. Don’t stress the numbers; stress making sure your ricotta is drained well!
Share Your Homemade Italian Pastry Creations
Hearing from you folks is truly the best part of my day! When you take the time to dive into a project like this cannoli recipe, I want to see the results! Did your shells bubble up perfectly? Was your ricotta filling as smooth as velvet? Don’t be shy—jump down to the comments below and let me know how your batch turned out. If you managed to get a gorgeous picture of your finished Homemade Italian pastry masterpieces, I want to see them!
Leave me a rating, share your experience, and if you have any burning questions that didn’t get covered here, don’t hesitate to ask. You can always reach out to me directly via my contact page too. Happy baking, everyone, or should I say, happy frying!
Nutritional Estimates for This Fried Pastry Dessert
Now, I’m going to preface this by saying that anything deep-fried and filled with sweet ricotta and chocolate chips is not exactly health food, but when you make a Fried pastry dessert like this at home, you control the ingredients! The numbers below are just an estimate based on the recipe above, assuming standard sizing for 15 cannoli. Please treat these as fun guidelines, not strict medical advice! If you’re looking for something lighter to pair with these beauties, maybe bookmark my list of quick and healthy lunch ideas for the next day.
- Serving Size: 1 cannoli (per estimate)
- Calories: Roughly 350 (This can jump up depending on how much chocolate you load on the ends!)
- Fat: About 18g (Remember, some oil drains away during the cooling process!)
- Carbohydrates: Around 40g
- Protein: About 10g
- Sugar: Approximately 25g (Mostly from the filling)
It’s clearly a treat, an indulgence, and the perfect ending to a wonderful Italian meal. Don’t stress the numbers; stress making sure your ricotta is drained well!
Share Your Homemade Italian Pastry Creations
Hearing from you folks is truly the best part of my day! When you take the time to dive into a project like this cannoli recipe, I want to see the results! Did your shells bubble up perfectly? Was your ricotta filling as smooth as velvet? Don’t be shy—jump down to the comments below and let me know how your batch turned out. If you managed to get a gorgeous picture of your finished Homemade Italian pastry masterpieces, I want to see them!
Leave me a rating, share your experience, and if you have any burning questions that didn’t get covered here, don’t hesitate to ask. You can always reach out to me directly via my contact page too. Happy baking, everyone, or should I say, happy frying!
PrintAuthentic Homemade Cannoli Recipe with Crispy Shells and Creamy Ricotta Filling

Make traditional Sicilian cannoli from scratch. This recipe guides you through creating perfectly crispy fried shells and filling them with a smooth, sweet ricotta cream, perfect for an irresistible Italian dessert.
- Prep Time: 45 min
- Cook Time: 20 min
- Total Time: 105 min (plus ricotta draining time)
- Yield: 12-15 cannoli 1x
- Category: Dessert
- Method: Frying
- Cuisine: Italian
- Diet: Vegetarian
Ingredients
- 2 cups all-purpose flour
- 1/4 cup granulated sugar
- 1/4 teaspoon salt
- 1/4 cup unsalted butter, cold and cubed
- 1 large egg yolk
- 1/2 cup dry Marsala wine (or substitute with cold water or white wine)
- 1 tablespoon white vinegar
- Vegetable oil or shortening, for frying
- 1 pound whole milk ricotta cheese, drained overnight
- 1 cup powdered sugar, sifted
- 1/2 teaspoon ground cinnamon
- 1 teaspoon vanilla extract
- 1/4 cup mini chocolate chips or finely chopped candied orange peel, for garnish
- Powdered sugar, for dusting
Instructions
- Prepare the Dough: In a large bowl, whisk together the flour, granulated sugar, and salt. Cut in the cold butter using a pastry blender or your fingers until the mixture resembles coarse crumbs.
- Mix Wet Ingredients: In a separate small bowl, whisk the egg yolk, Marsala wine, and vinegar. Pour this mixture into the dry ingredients. Mix until a shaggy dough forms.
- Knead and Rest: Turn the dough onto a lightly floured surface and knead briefly, about 2 minutes, until it just comes together. Do not overwork. Wrap the dough tightly in plastic wrap and refrigerate for at least 1 hour.
- Make the Filling: While the dough chills, prepare the ricotta filling. Place the well-drained ricotta cheese in a bowl. Use a hand mixer or stand mixer to beat the ricotta until it is completely smooth, about 5 minutes.
- Sweeten the Filling: Gradually beat in the sifted powdered sugar, cinnamon, and vanilla extract until fully combined and creamy. Cover and chill the filling for at least 30 minutes.
- Shape the Shells: Remove the dough from the refrigerator. On a lightly floured surface, roll the dough out very thinly, aiming for about 1/16 inch thickness. Use a 3-inch round cutter to cut out circles.
- Form the Tubes: Lightly grease cannoli tubes. Wrap each dough circle around a tube, overlapping the edges slightly. Brush the overlapping seam with a little water or egg white to seal it firmly.
- Fry the Shells: Heat 2-3 inches of vegetable oil in a deep, heavy-bottomed pot to 375°F (190°C). Carefully place 2-3 shells at a time into the hot oil, using tongs to hold the tube down until the dough puffs and turns golden brown, about 1-2 minutes per side.
- Drain and Cool: Remove the shells with a slotted spoon and immediately slide them off the tubes onto a paper towel-lined tray to drain excess oil. Let them cool completely before attempting to remove the tubes.
- Fill the Cannoli: Once the shells are cool, use a piping bag fitted with a large round tip (or a plastic bag with the corner snipped off) to pipe the chilled ricotta filling into both ends of each shell.
- Garnish and Serve: Dip the ends of the filled cannoli into mini chocolate chips or candied fruit. Dust the finished cannoli generously with powdered sugar. Serve immediately for the best crispy texture.
Notes
- To ensure the ricotta filling is perfectly smooth, you must drain it in a fine-mesh sieve lined with cheesecloth in the refrigerator for at least 8 hours, or preferably overnight.
- For the crispiest shells, make sure your frying oil temperature is accurate. If the oil is too cool, the shells will absorb too much oil and become soft.
- Do not fill the cannoli shells until just before you plan to serve them. Filling them too early causes the shells to absorb moisture and lose their crunch.
Nutrition
- Serving Size: 1 cannoli
- Calories: 350
- Sugar: 25
- Sodium: 120
- Fat: 18
- Saturated Fat: 10
- Unsaturated Fat: 8
- Trans Fat: 0.5
- Carbohydrates: 40
- Fiber: 1
- Protein: 10
- Cholesterol: 55