
Oh, there is nothing—and I mean nothing—better than pulling a loaf of golden, fragrant bread out of your own oven. That smell alone is worth the effort, right? For years, people thought making delicious homemade yeast bread meant hours of kneading, waiting, and worrying that you’d end up with a dense doorstop instead of a satisfying loaf. Well, I’m here to tell you that feeling is officially behind us! I, Aria Thompson, spent so long trying to simplify the classics, and I finally cracked the code on The World’s Easiest No-Knead Yeast Bread Recipe (Ready in Under 90 Minutes). This isn’t intimidating baking; this is pure, simple joy. If you thought mastering yeast was hard, just wait until you see how easy it is to get that *soft fluffy bread* texture with zero heavy lifting. Trust me, this *yeast bread* is going to change weeknight dinners forever.
- Why This is the Easiest Yeast Bread Recipe You Will Ever Make
- Ingredients for Your Simple Yeast Bread
- Step-by-Step Instructions for Perfect Yeast Bread
- Expert Tips for Mastering Your Yeast Bread
- Ingredient Notes and Substitutions for Yeast Bread
- Storage and Reheating Instructions for Homemade Bread Recipe
- Frequently Asked Questions About Making Yeast Bread
- Nutritional Estimates for This Yeast Bread Loaf
- Share Your Experience Baking This Yeast Bread
Why This is the Easiest Yeast Bread Recipe You Will Ever Make
I know what you’re thinking: yeast means work! But seriously, this recipe is the absolute definition of *easy yeast bread*. My goal when creating this recipe was to take all the scary parts out of *baking from scratch*. We want the smell of a *fresh baked bread* without the fussy steps, and this formula delivers that every single time. You’ll feel like a total pro, even if this is your very first time making a loaf.
Here is why I call this the ultimate *beginner bread recipe*:
- No Kneading Required: That’s right! We skip the heavy workout. The gentle mixing is all the gluten development this dough needs to become amazingly soft.
- Instant Yeast Hero: We use instant yeast, which means no fiddling around waiting for a separate yeast bloom. It goes straight into the bowl and gets to work!
- Total Time Under 90 Minutes: Yes, you can have a golden, warm loaf ready in less time than ordering pizza. It’s perfect for those spontaneous cravings.
If you need a reliable, quick recipe, check out my guide to easy crusty Italian bread for another fast bake!
Ingredients for Your Simple Yeast Bread
When you are aiming for a *quick homemade loaf*, keeping the ingredients list straightforward is key. This recipe uses pantry staples, but precision with the water temperature is where the magic starts. Don’t swap anything out without testing first—we want that *soft fluffy bread* texture, and these exact amounts lead us there!
Grab these items for your simple yeast dough:
- 1 cup warm water (make sure it’s between 105-115°F—not too hot, not too cold!)
- 2 1/4 teaspoons instant yeast (the secret weapon for speed!)
- 1 tablespoon granulated sugar
- 2 1/2 cups all-purpose flour, plus a little more just for dusting later
- 1 teaspoon salt
- 2 tablespoons unsalted butter, melted
That’s it! Just six things to make the most amazing *yeast bread* you’ve ever smelled cooking.
Step-by-Step Instructions for Perfect Yeast Bread
Okay, let’s get baking! Since we’re using instant yeast, we jump right into the action. Baking this *yeast bread* is all about following the timeline I laid out—it just melts away those preparation worries. Don’t stress about getting a perfect ball of dough; remember, this is the no-knead route, so a slightly messy mixture is actually a good sign!
Activating the Yeast and Mixing the Simple Bread Dough
First things first: pay attention to your water temperature! This is vital. In a large bowl, mix that 1 cup of warm water (aiming right for 105°F to 115°F!) with the sugar and your instant yeast. Give it about 5 minutes. If you see it getting a little foamy or bubbly on top, that’s your cue—the yeast is alive and ready to go! That five-minute wait shows your yeast is happy before we begin the *baking from scratch* process.
Next, grab 2 cups of your flour, the salt, and your melted butter. Stir it all into the foamy yeast mixture using a sturdy wooden spoon. You are aiming for a shaggy looking dough. Just keep mixing until everything comes together loosely.
Slowly add the last half cup of flour until the dough just holds onto itself and feels manageable, even if it’s still a tiny bit sticky. That’s the *simple bread dough* we want! Do not try to knead it beyond just bringing it together into one mass. Trust me, skipping the hard kneading work is the secret to this loaf.
The Quick Rise and Oven Preparation for Your Yeast Bread
Now we let the yeast do the heavy lifting for our *quick bread baking*. Take a clean bowl, grease it lightly with oil, and tuck your dough mass inside, flipping it over so it gets a little coating. Cover that bowl really tightly with plastic wrap or a clean towel. Place it somewhere warm—if your kitchen is chilly, try setting it inside your oven with just the light turned on. Let it sit there for a full 45 minutes. You need to watch it grow; it should double in size!
Once doubled, it’s time for a gentle little workout. Just lightly punch the dough down to knock the air out. Shape it gently into a log shape and tuck it neatly into your greased 9×5 inch loaf pan. Now, cover it again, but loosely this time. This second rise is shorter—only 20 minutes. While that’s happening, crank your oven up to 375°F (190°C). Getting that oven hot is essential for a *quick homemade loaf*.
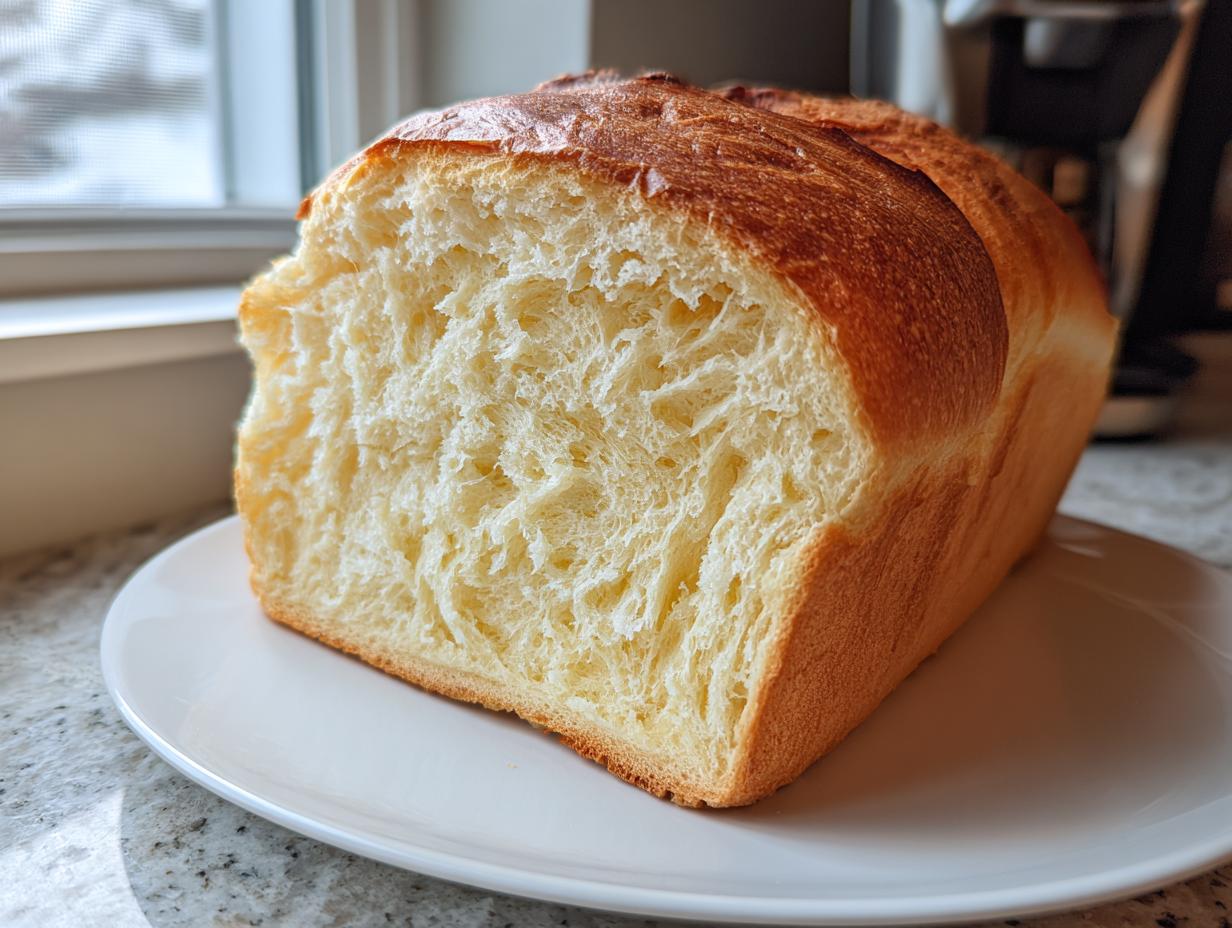
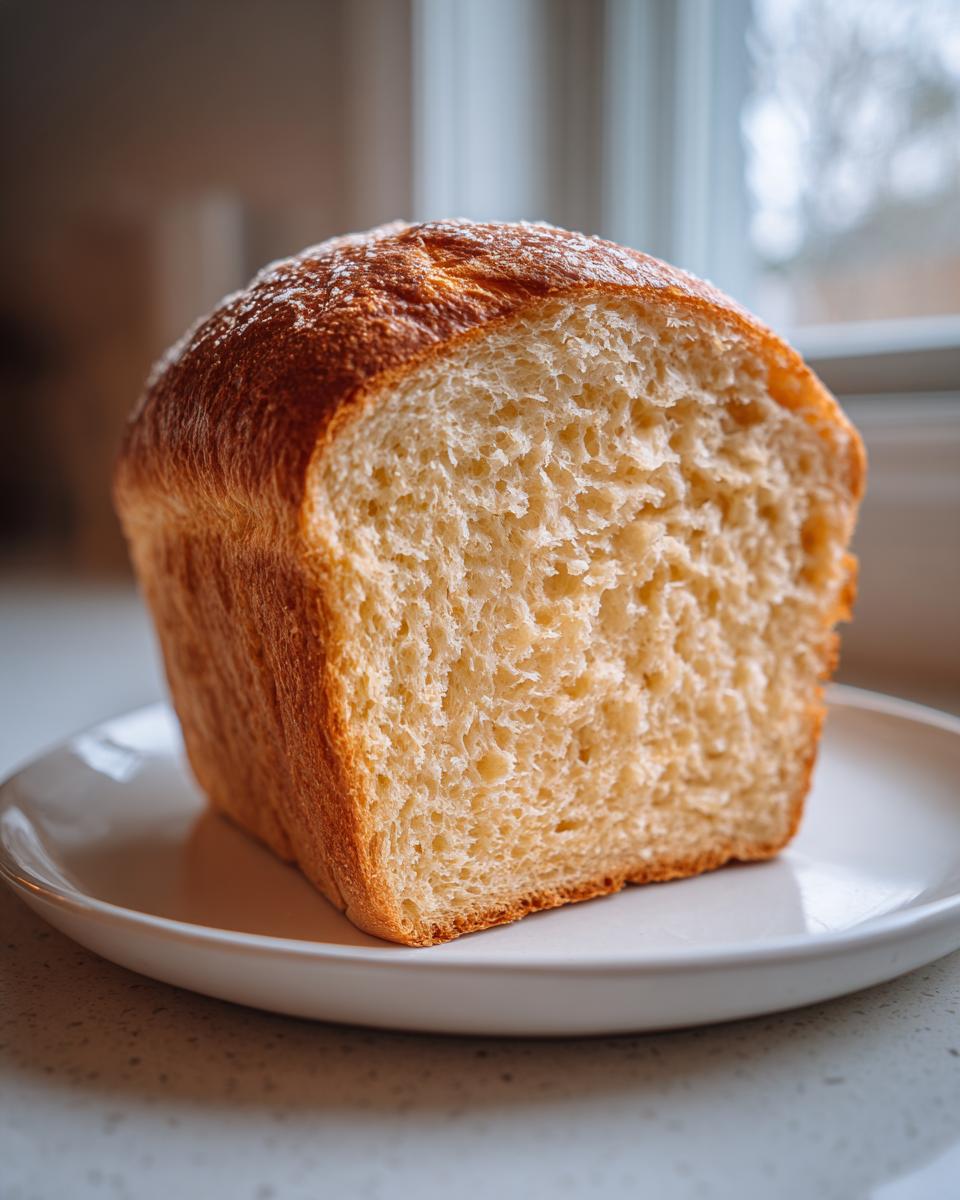
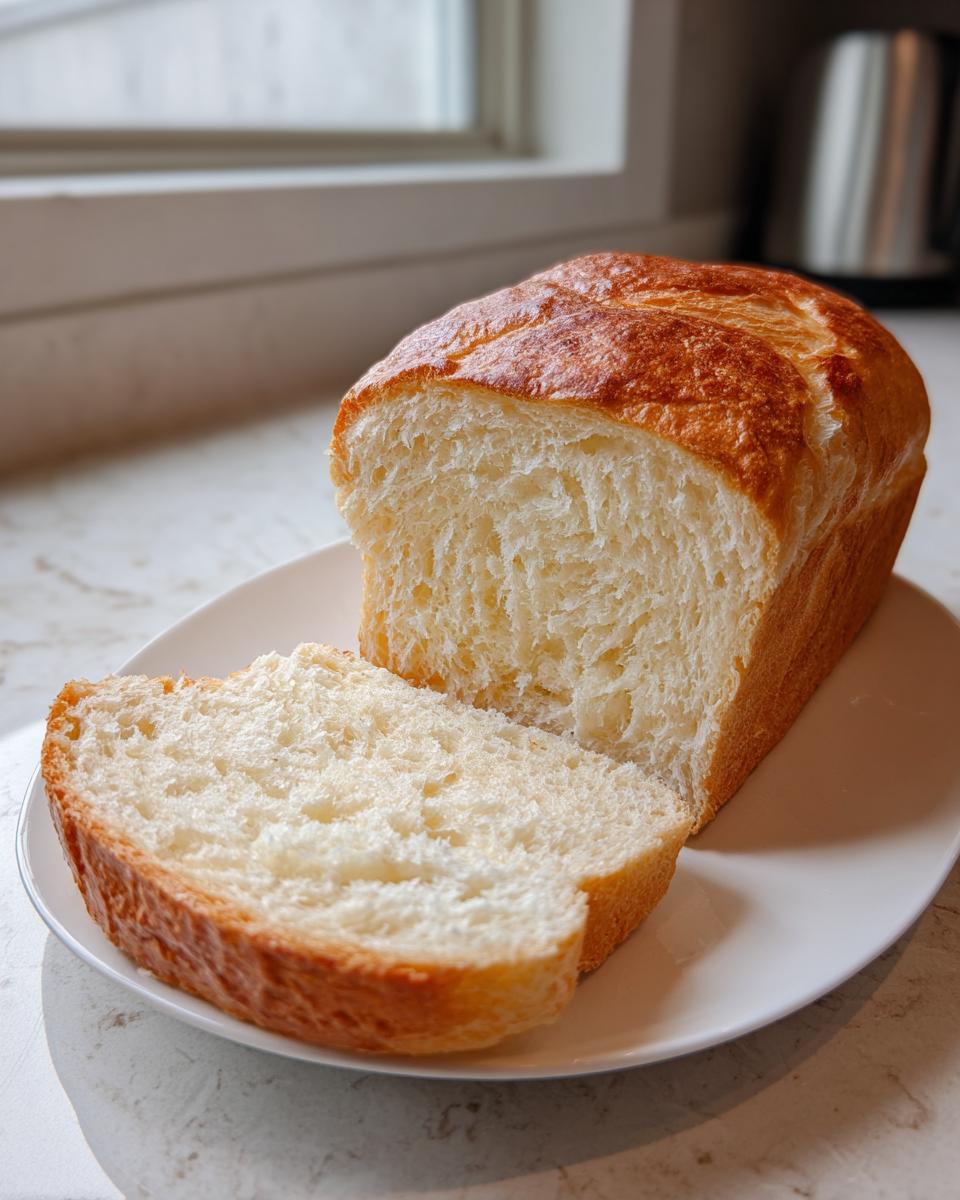
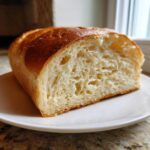
Baking and Cooling the Soft Fluffy Bread
It’s bake time! Slide that loaf into the preheated oven and set a timer for 30 minutes. You are looking for a beautiful golden-brown color on top. For true certainty, especially if you want that melt-in-your-mouth texture, test the innermost part with an instant-read thermometer. When it hits 200°F (93°C), it is done! That’s my little expert trick for foolproof bread baking.

The final rule for the perfect interior: get it out of the pan immediately! Place the hot loaf right onto a wire cooling rack. Don’t let it sit in that hot metal pan, or the bottom will steam and get gummy. Let it cool completely before slicing. Patience here guarantees that perfect, *soft fluffy bread* experience!
If you want other fast dough recipes, check out my tips for homemade breadsticks!
Expert Tips for Mastering Your Yeast Bread
Now that you see how straightforward this *yeast bread* is, I want to give you a few little secrets I picked up along the way to guarantee *foolproof bread baking*. Even though we use instant yeast—which is amazing because it saves us from that tedious initial proofing step—we still need to give it the right environment to thrive so we get that *soft fluffy bread* we are aiming for.
What if your kitchen is chilly, like mine often is in the winter? Don’t fret about the rise time! My trick is to place the covered bowl into your turned-off oven, but switch on the oven light. That small glow creates the perfect, low, warm incubator for your dough to double beautifully in 45 minutes. It’s simple, gentle heat, and it works wonders.
Once the loaf comes out golden and smelling incredible, here’s the final touch for maximum softness: brush the entire top crust lightly with a little extra melted unsalted butter right when it comes out of the oven. It seals in a little steam and makes the crust incredibly soft and tender. You can see another fantastic recipe that gets that fluffy texture right using milk here: easy condensed milk bread!
Ingredient Notes and Substitutions for Yeast Bread
Even though this is the *easiest yeast bread* ever, the success hinges on a couple of key ingredients behaving just right. The water temperature is non-negotiable, my friends! If it’s much hotter than 115°F, you’ll accidentally kill your active yeast, and then you’ll have sad, flat dough, which is the opposite of the *quick homemade loaf* we want. Stick to warm, not hot!
Now, let’s talk flour. The recipe calls for all-purpose flour because it’s what most people have, and it provides that lovely soft texture that works so well with the no-knead method. Can you swap in bread flour? Absolutely! Since bread flour has higher protein, it will create a slightly chewier crumb, which is really nice if you prefer something closer to a traditional *artisan yeast bread tutorial*. Just know that you might need a splash more water, as bread flour soaks up liquid faster.
Storage and Reheating Instructions for Homemade Bread Recipe
The only downside to enjoying this amazing *homemade bread recipe* is when the loaf disappears too fast! Honestly, this bread is best eaten the same day it comes out of the oven, but if you are lucky enough to have leftovers, you need to treat them right.
Don’t put it in the fridge! Refrigerators are the sworn enemy of soft bread because they make it go stale so quickly. Keep your loaf tightly wrapped in plastic wrap or tucked into a sealed plastic bag at cool room temperature for about three days. That’s about as long as this simple recipe stays perfectly soft.
If you want that *fresh baked bread* magic back? Pop a thick slice onto a plate and microwave it for about 10 to 15 seconds. It softens right back up! For a whole loaf, wrap it loosely in foil and briefly warm it in a low oven—around 300°F for about ten minutes. If you are looking for other sweet quick breads that store well, check out my moist date nut bread recipe!
Frequently Asked Questions About Making Yeast Bread
I get so many questions about yeast, which is totally understandable since it can feel a little temperamental! But once you understand the basics of *how to make yeast bread* with this simple recipe, you’ll be unstoppable. Here are the things folks ask me most often when they are finally ready to ditch the store-bought stuff and bake their first *artisan yeast bread tutorial*-style loaf at home.
Can I use active dry yeast instead of instant yeast?
You can, but you have to treat it a little differently! Instant yeast is preferred here because it can be mixed right in with the dry ingredients, saving us that first 5-minute step. If you only have active dry yeast, you must proof it first. Mix your active dry yeast with the warm water and sugar, and let it sit until it’s super foamy—usually 10 minutes. If it doesn’t foam, your yeast is dead, and you need to start over with fresh yeast! That’s the main adjustment.
Why didn’t my bread dough rise?
Nine times out of ten, this comes down to temperature. Either your water was too hot and killed the yeast, or your kitchen was too cold, making the yeast sluggish. Remember, we need that warm spot for the 45-minute primary rise—the oven light trick is your best friend here. If you checked that your water was 105-115°F and it still didn’t bubble up, you might need a fresh packet of yeast.
Can I skip the sugar in this yeast bread recipe?
You certainly can skip the sugar if you’re trying to cut back, but I highly advise leaving in that one tablespoon. Even though the final loaf isn’t overtly sweet, the yeast uses that sugar as its food source to produce the carbon dioxide bubbles that make the bread nice and fluffy! Without it, your yeast won’t activate properly, leading to a very dense result.
If you’re looking into other fun, fast recipes that skip the baking marathon entirely, you might want to check out my easy no-bake bourbon balls!
Nutritional Estimates for This Yeast Bread Loaf
I’m always digging into the details, and while we are focused on flavor and simplicity here, I know some of you are watching macros! So, here are the estimated nutritional facts for a single slice of this unbelievably easy *yeast bread*. Remember, because we are *baking from scratch*, your numbers will shift just a tiny bit depending on the brand of butter or the exact amount of flour you used when bringing the dough together.
Think of this as a guideline for enjoying a slice of that *soft fluffy bread* guilt-free!
- Serving Size: 1 slice
- Calories: Around 140
- Total Fat: About 3g (with 2g of that coming from saturated fat – thank you, real butter!)
- Carbohydrates: Roughly 26g
- Protein: 4g
- Sugar: Only 2g (natural sweetness from the carrots and a touch of added sugar for the yeast!)
- Sodium: Approximately 180mg
It’s a wholesome base for any meal, perfect for breakfast toast or a side for dinner. Enjoy knowing exactly what’s in your home-baked classic!
Share Your Experience Baking This Yeast Bread
Now that your kitchen smells exactly like my house did when I first mastered this *yeast bread*—warm, comforting, and unbelievably fresh—I need to hear from you! The biggest compliment you can give me is knowing that this recipe worked its magic for you too. Did you achieve that beautiful, pillow-soft crumb we talked about? Where you able to get that golden crust on your *quick homemade loaf*?
Please, don’t be shy! Take a moment to leave a star rating right below! Five stars is always wonderful, but if you had a question or a small hiccup, sharing that detail helps every other baker reading this. Seeing your attempts makes this whole Community of *baking from scratch* so much stronger.
If you snap a picture of your perfect loaf—maybe you’re dipping it in soup or buttering a thick slice for breakfast—tag me on social media! I absolutely love seeing this *homemade bread recipe* come to life in different kitchens. You can also check out some of my less conventional, but equally simple, recipes like my easy fudge recipe for a different kind of treat!
If you want to see the recipe that inspired this quick turnaround method, you can check out the original source here: The World’s Easiest Yeast Bread. Happy baking until your next *fresh baked bread*! I can’t wait to hear about your success!
PrintThe World’s Easiest Yeast Bread: Soft, Fluffy Homemade Loaf in Under 90 Minutes
Learn how to make incredibly soft, fluffy homemade yeast bread using simple ingredients and instant yeast. This beginner-friendly, no-knead recipe guides you through the quick steps to bake a delicious loaf from scratch in about 90 minutes total time.
- Prep Time: 15 min
- Cook Time: 35 min
- Total Time: 90 min
- Yield: 1 loaf 1x
- Category: Baking
- Method: Baking
- Cuisine: American
- Diet: Vegetarian
Ingredients
- 1 cup warm water (105-115°F)
- 2 1/4 teaspoons instant yeast
- 1 tablespoon granulated sugar
- 2 1/2 cups all-purpose flour, plus more for dusting
- 1 teaspoon salt
- 2 tablespoons unsalted butter, melted
Instructions
- In a large bowl, combine the warm water, instant yeast, and sugar. Let this mixture sit for 5 minutes until it becomes foamy. This shows your yeast is active.
- Add 2 cups of the flour, salt, and melted butter to the yeast mixture. Mix with a wooden spoon until a shaggy dough forms.
- Gradually add the remaining 1/2 cup of flour until the dough comes together and is slightly sticky but manageable. You do not need to knead this dough extensively; just bring it together.
- Lightly grease a clean bowl with oil. Place the dough in the bowl, turning it once to coat. Cover the bowl tightly with plastic wrap or a clean kitchen towel.
- Let the dough rise in a warm place for 45 minutes, or until it has doubled in size. This quick rise works well with instant yeast.
- Gently punch down the risen dough to release the air. Shape it into a loaf and place it in a greased 9×5 inch loaf pan.
- Cover the pan loosely and let the dough rise again for 20 minutes. Preheat your oven to 375°F (190°C) during this time.
- Bake for 30 to 35 minutes, or until the top is golden brown and the internal temperature reaches 200°F (93°C).
- Remove the bread from the pan immediately and let it cool on a wire rack before slicing.
Notes
- Using instant yeast allows you to skip the separate step of proofing the yeast in water first, saving you time.
- For a softer crust, brush the top of the loaf with a little melted butter immediately after it comes out of the oven.
- If your kitchen is cool, place the covered dough in the oven with just the light on to create a warm proofing spot.
Nutrition
- Serving Size: 1 slice
- Calories: 140
- Sugar: 2
- Sodium: 180
- Fat: 3
- Saturated Fat: 2
- Unsaturated Fat: 1
- Trans Fat: 0
- Carbohydrates: 26
- Fiber: 1
- Protein: 4
- Cholesterol: 5