
When big celebrations hit—whether it’s a wild birthday bash or just surviving the heat of a long summer weekend—you need a dessert that wows but doesn’t stress you out. That’s precisely why I developed this easy no-bake Oreo ice cream cake. Forget complicated baking; this is pure excitement layered in a springform pan! We’re talking about transforming simple store-bought ice cream into the ultimate ice cream cake centerpiece. Trust me when I say that extraordinary flavor never has to require extravagant effort. This recipe brings that joyful, satisfying crunch everyone expects, minus turning on the oven. It’s my go-to frozen dessert idea when I need something amazing that I can assemble entirely ahead of time!
- Why This Easy Ice Cream Cake Recipe is a Crowd-Pleaser
- Gathering Ingredients for Your Oreo Ice Cream Cake
- Step-by-Step Instructions for the Easiest Ice Cream Cake Recipe
- Tips for a Perfect Homemade Ice Cream Cake Every Time
- Variations on the Classic Ice Cream Cake
- Serving Suggestions for Your Frozen Dessert Recipes
- Storage and Reheating Instructions for Ice Cream Cake
- Frequently Asked Questions About Making Ice Cream Cake
- Share Your Ultimate Ice Cream Cake Creations
- Share Your Ultimate Ice Cream Cake Creations
Why This Easy Ice Cream Cake Recipe is a Crowd-Pleaser
If you’re looking for a showstopper that takes zero actual baking, you’ve found the right place. This layered dessert is designed for maximum impact with minimum fuss. It’s easily my favorite type of make ahead cake because you build it while it’s soft and let the freezer do all the hard work!
-
No Oven Required: The Ultimate No Bake Ice Cream Cake
Let’s face it: standing over a hot stove when it’s sunny outside is just not appealing. Since this is strictly one of those frozen dessert recipes, you skip the oven entirely. It keeps your kitchen cool and your stress level low. Perfect!
-
Perfect for Birthdays and Summer Parties
This is the quintessential birthday ice cream cake! Because you assemble it in a springform pan, it looks grand and elegant when you release it. The layers mean everyone gets a perfect bite of cookie, vanilla, and chocolate every time.
Gathering Ingredients for Your Oreo Ice Cream Cake
Okay, let’s talk inventory! Since this is an Oreo ice cream cake, Oreos are having a major moment here, but really, the beauty of this recipe is how few specific items you need. We rely on store-bought goodness, so don’t feel pressured to make everything from scratch! You need the cookies for the base and for that awesome hidden crunch layer. The second biggest player, obviously, is the ice cream. We’re using two full quarts here, so make sure you have the freezer space!
Just a heads up before you run to the store: when it says “softened slightly” for the ice cream, I truly mean *slightly*. If it melts into soup, your layers will bleed, and that’s messy! You want it just soft enough to scoop easily from the carton and spread without tearing up your crust underneath. Same thing with the fudge—warmed fudge topping is key for drizzling; cold fudge will just rip the vanilla layer!
-
Ingredient Notes and Substitution Tips
While the classic vanilla/chocolate combo reigns supreme, feel free to customize your easy ice cream cake recipe! If you love mint, swap the chocolate ice cream for mint chocolate chip. If you’re a peanut butter fanatic, layer in some peanut butter cups along with those crushed Oreos for an elevated experience. The main thing to watch is the ice cream itself. You need good quality stuff! Cheaper ice creams often have too many stabilizers, and they don’t soften evenly, which messes up the texture of your easy ice cream cake. It’s worth spending a tiny bit more here for that creamy frozen dessert result you want.
Step-by-Step Instructions for the Easiest Ice Cream Cake Recipe
We’re diving into the assembly now, and I promise this is where the magic happens! Even though we are making a homemade ice cream cake, the process is so straightforward. The secret to avoiding any melty disasters is patience during the freezing steps. Don’t rush! We’re building a fortress of frozen goodness here, so every layer needs to set up properly before we move on. Grab that 9-inch springform pan; let’s get started! If you’ve ever made a great no-cook homemade pizza sauce, you know the layering logic is similar—patience is key!
-
Building the Cookie Crust and First Ice Cream Layer
First things first, line that pan correctly—parchment paper on the bottom is your best friend for easy release later. Crush those Oreos until they look like fine dirt, then mix them with the melted butter. Press that mix—really press it!—into the bottom of your pan. Pop it in the freezer for just 15 minutes. That little chill ensures the crust doesn’t crumble when you hit it with the ice cream. Once the crust is firm, gently spread that slightly softened vanilla ice cream evenly over the top. I like to use an offset spatula for this part! Then, put it back in the freezer for a full hour until that vanilla layer is hard as a rock.
-
Layering the Middle Crunch and Final Ice Cream
This layer adds that fantastic texture! Once that vanilla is firm, sprinkle on your extra crushed cookies and drizzle about half of that warm fudge right over them. Back into the freezer for 30 minutes! See the pattern? Chilling between layers is crucial for a successful layered ice cream dessert. Once that crunchy layer is set, go ahead and spread your chocolate ice cream on top. This is the biggest layer, so give yourself a good 4 hours or, even better, let this ice cream cake freeze solid overnight before you move to topping it.
-
Finishing and Decorating Your Homemade Ice Cream Cake
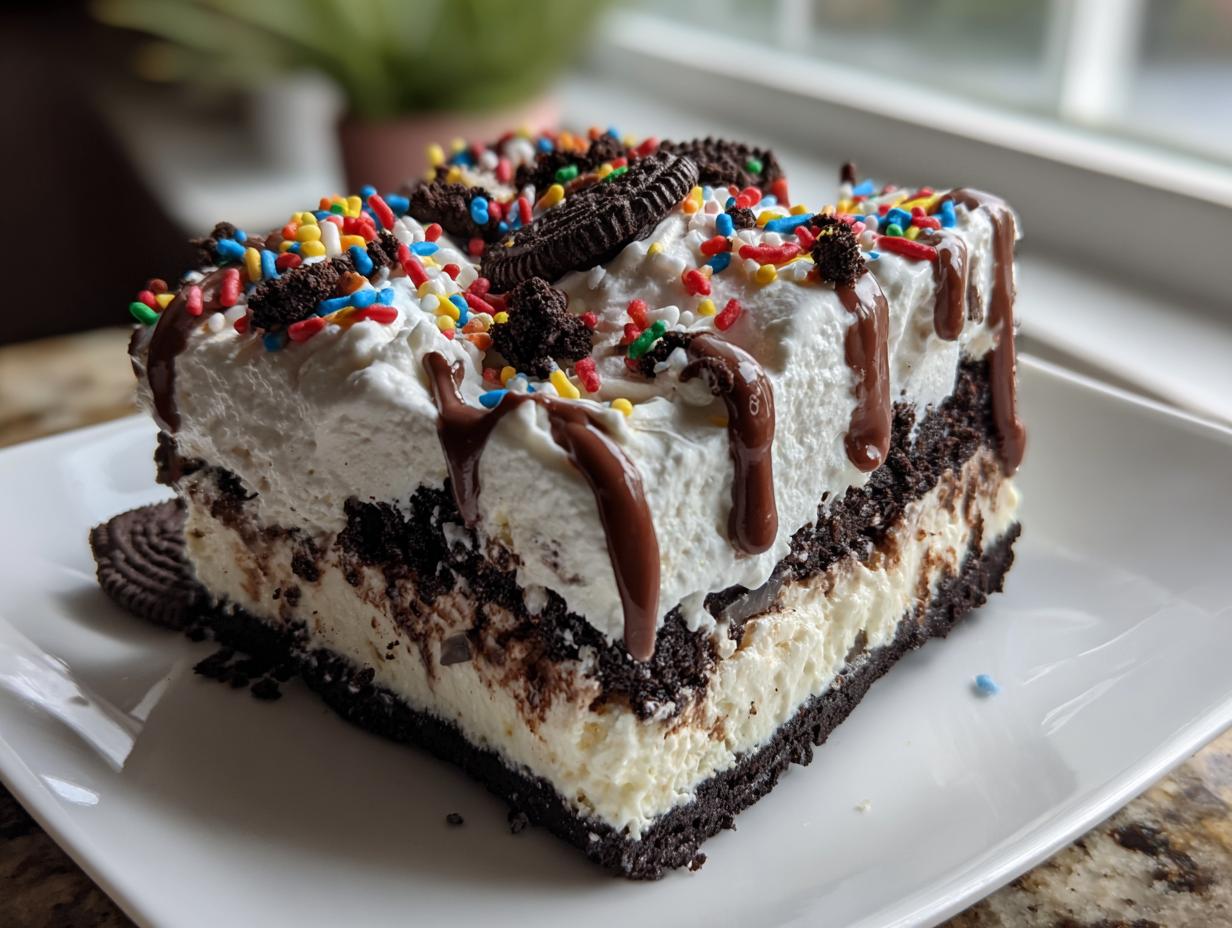
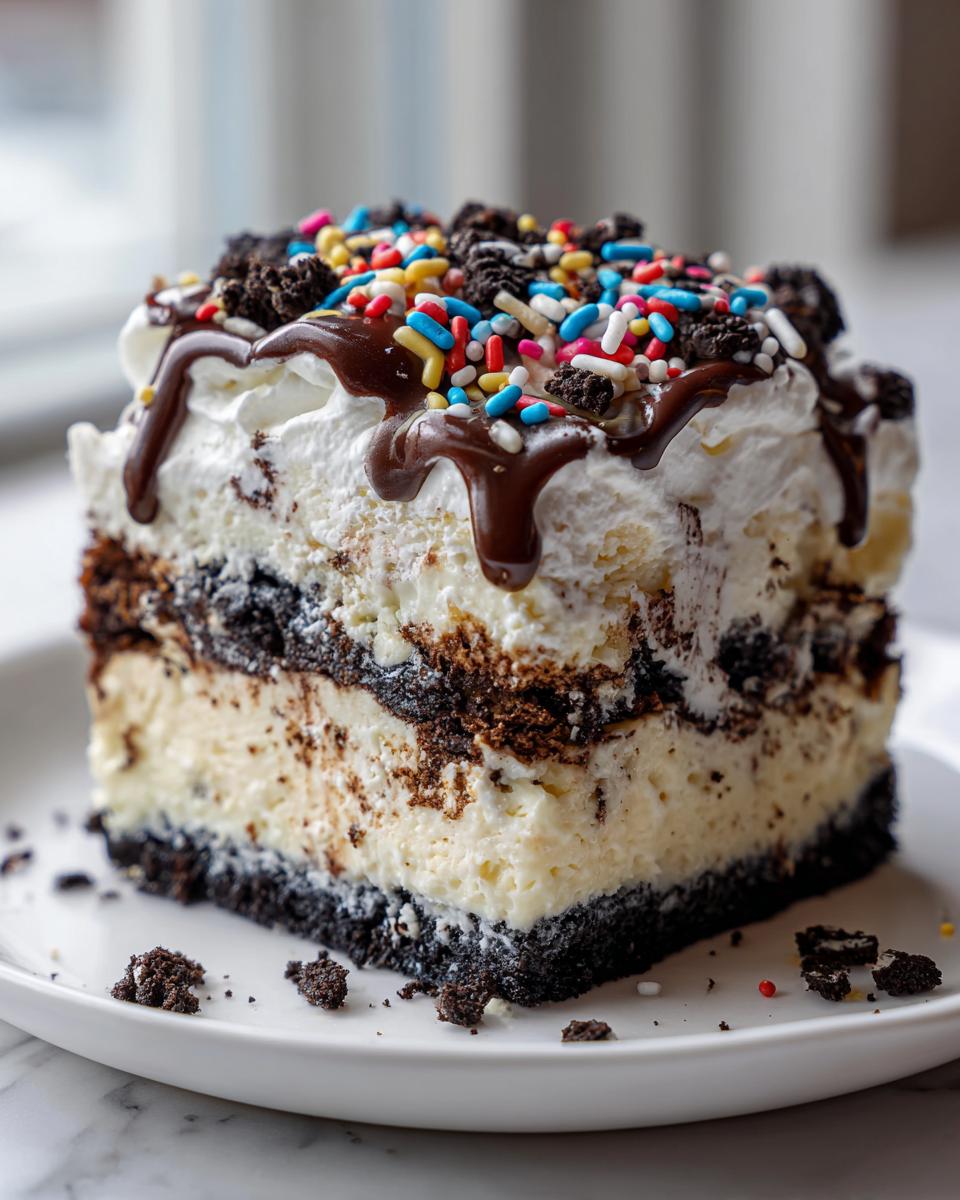
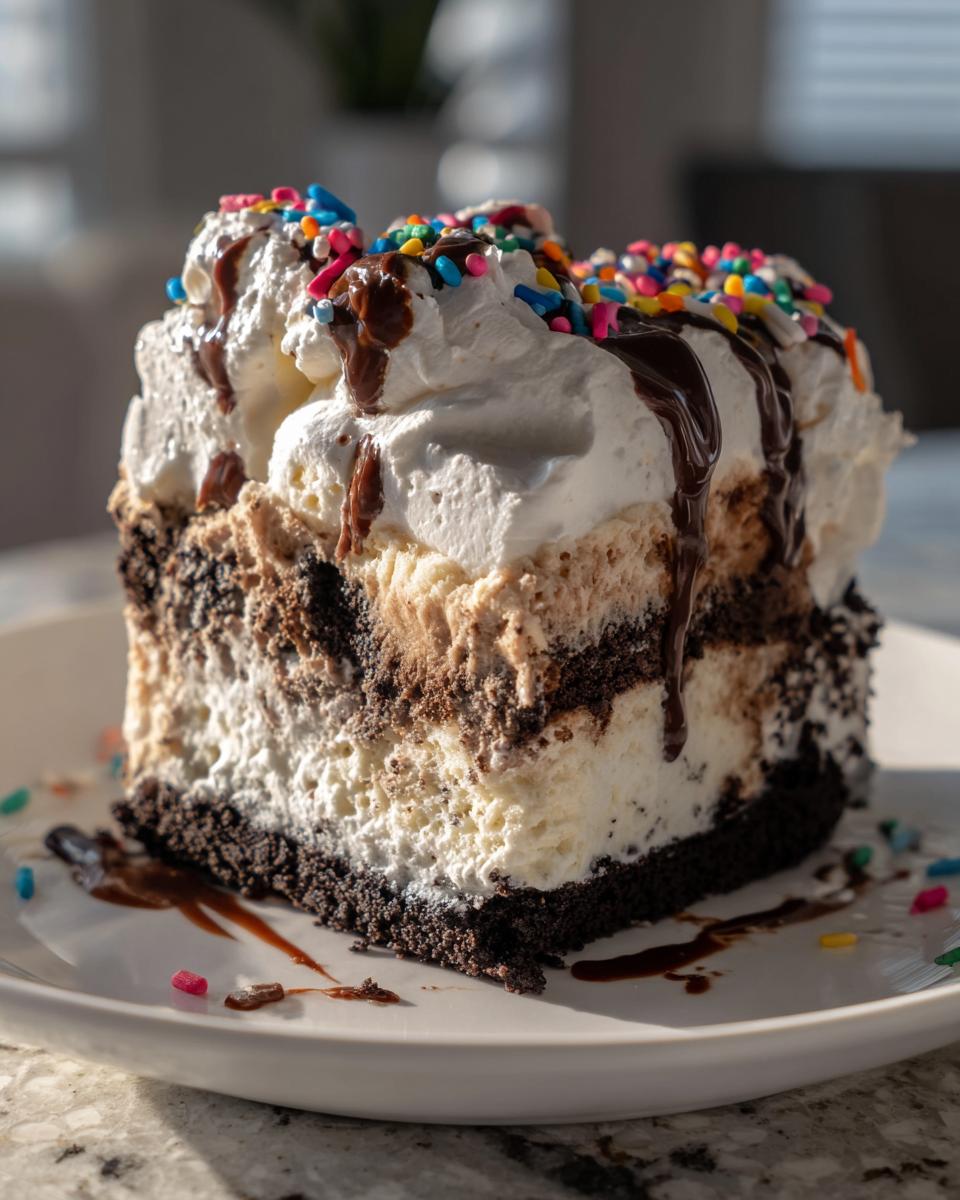
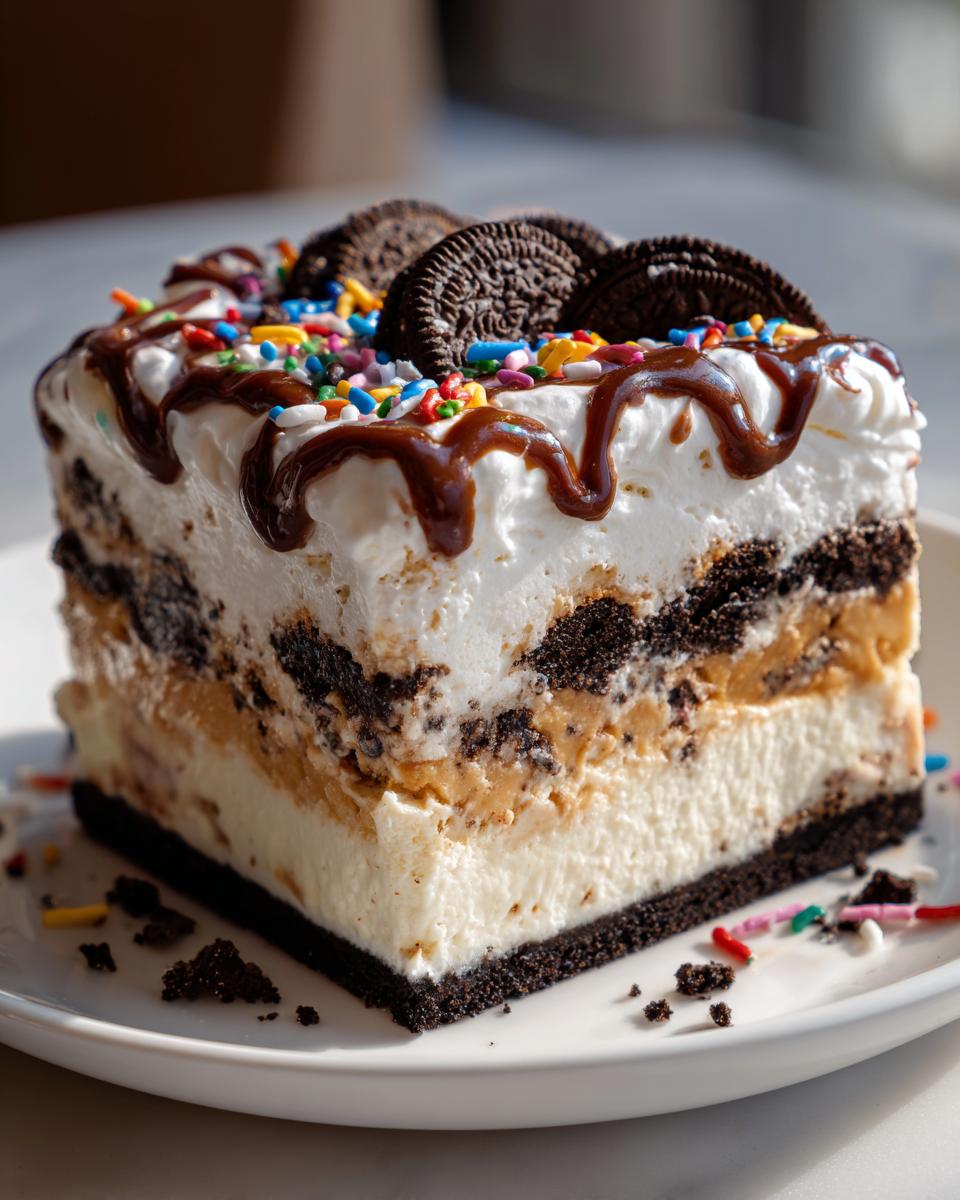
Once the cake is rock solid, you can carefully release the sides of the springform pan. Now for the grand finale! You’ll cover the entire frozen cake with your whipped topping. Here’s my pro tip: keep your offset spatula in the freezer for five minutes before you frost it! A cold spatula glides right over the frozen surface like butter, giving you those clean, smooth sides you see in the fancy bakeries. Finish it with the last of that warm fudge drizzle and a generous shower of sprinkles. Wow, it looks incredible!
Tips for a Perfect Homemade Ice Cream Cake Every Time
You’ve successfully built the layers, and now that gorgeous thing is frozen solid. Fantastic job! Making a stunning presentation with a frozen dessert is half the battle, but serving it nicely is where home cooks often get stumped. I’ve learned a few tricks over the years to ensure your ice cream cake looks professional when it hits the party table. It’s all about timing and having the right tools handy. These aren’t complicated steps; they are just the little secrets that elevate this from a nice dessert to *the* dessert everyone asks for next year. If you love understanding the “why” behind the steps, you’ll find this just as fun as making a classic chocolate meringue pie!
-
Achieving Clean Slices of Ice Cream Cake
This is the secret weapon I always share because slicing through a rock-solid frozen dessert can be a nightmare! Your best friend here is hot water. Seriously! Take a tall glass and fill it with boiling water. Wait just a minute for the glass to heat up, then carefully dip a large, sharp knife into the water. Wipe the knife completely dry before making your first cut. The hot, clean blade glides right through all those layers—crust, ice cream, topping—without tearing or dragging. For every single slice, dip the knife back in the hot water and wipe it dry again. Trust me, this little step makes all the difference in presentation!
-
Planning Ahead: The Make Ahead Cake Advantage
Remember how I mentioned this is the ultimate make ahead cake? This is the key to actually enjoying your party! The recipe is designed to be assembled almost entirely the day before. The initial layering plus the big overnight freeze gets you 90% done. But here’s my advice: don’t add the final whipped topping and fudge drizzle until about an hour before you plan to serve it. Whipped topping can sometimes absorb freezer odors or get a bit stiff if it’s frozen for too long. Assemble the layers, freeze overnight, and then pull it out, frost it, decorate it, and let it sit on the counter for 5-10 minutes to soften ever so slightly before slicing. Perfect timing!
Variations on the Classic Ice Cream Cake
You know, while I absolutely love the Oreo version we just made—it’s just so satisfying—sometimes you need to switch things up, especially if you’re planning a big event and want to offer a few different ice cream dessert ideas. The beauty of this homemade ice cream cake structure is that it’s basically a blank slate for your favorite flavors! It’s meant to be customized, so don’t feel locked into the vanilla and chocolate combo.
Think about your favorite candy bars or cookies. If you want that incredible richness reminiscent of a commercial favorite, we can easily build a fantastic copycat ice cream cake right here at home. The core concept remains sturdy, which is exactly what we want when dealing with frozen treats!
For instance, let’s talk about swapping out that cookie crust. If you have leftover brownies, that is a home run! Forget crushing Oreos; just use a single layer of fudgy brownies pressed into the pan—it makes this an instant brownie ice cream cake dream. Alternatively, if you want something a little lighter, you can easily use graham cracker crumbs mixed with melted butter instead of the Oreos. It gives the whole thing a slightly nutty, sandy texture that’s really nice against the creamy ice cream.
And flavor-wise? Go wild! Instead of vanilla and chocolate, try combining mint chocolate chip with coffee ice cream. Or, lean into strawberry and vanilla for a Neapolitan feel. The only rule—and this is a big one for any frozen treat recipe—is to make sure the ice creams you choose soften at roughly the same rate. If one turns to liquid while the other is still frozen solid, you end up fighting the layers when you try to spread them!
Serving Suggestions for Your Frozen Dessert Recipes
Now that you have this magnificent, massive ice cream cake ready to go, how do we serve this beautiful creamy frozen dessert? Because it’s so rich and filling, you don’t need much on the side, but a few thoughtful additions can really make it special for your guests, especially if you’re hosting summer party desserts!
First thought: sauce! Even though we put some fudge on top, a caramel sauce or even a bright raspberry coulis adds a nice temperature and flavor contrast. Think about pouring a thin ribbon of that caramel right next to the slice on the plate. It just makes it feel more restaurant-worthy, even though it came from your freezer!
If you want a little something fresh, skip heavy desserts and go straight for fruit. A small bowl of fresh, mixed berries—strawberries, raspberries, maybe some blueberries—adds color and cuts through the richness of the chocolate and cream beautifully. They pair wonderfully with the cold temperatures of these frozen treat recipes.

If you happen to have some of that wonderful honey butter I shared a while back—you can check out the recipe here—a tiny, tiny dollop on the side of a vanilla slice adds an unexpected floral note. But honestly? This cake stands on its own. If you’ve done the layers right, it’s the star of the show!
Storage and Reheating Instructions for Ice Cream Cake
This is the beautiful part about making an ice cream cake: it’s already perfectly preserved! Since we’re dealing with frozen goodness, there’s absolutely no awkward reheating situation to worry about—which is just another win for the busy home cook. The goal here isn’t reheating; it’s about keeping the cake pristine until you’re ready to serve the next time. Freezer space is sacred, and we don’t want our amazing creation to pick up any weird freezer smells!
The key to long-term storage, whether you are storing leftovers for a week or assembling this a full day ahead of time as a make ahead cake, is tight protection. If you are using a springform pan, leave the cake in the pan—don’t try to remove the collar yet! Wrap the entire thing—pan and all—very tightly in two layers of plastic wrap. I mean *tight*. Press the plastic right down onto the surface of the whipped topping as best you can so you minimize air contact. Air is the enemy, leading straight to freezer burn, which gives us icy, tasteless patches on our otherwise perfect layers.
Once it’s wrapped in plastic, go ahead and place a layer of heavy-duty aluminum foil over the plastic wrap. This double-whammy wrapping system locks out everything. If you’ve made the cake overnight, keep it wrapped tightly in the fridge for the first few hours after you take it out of the freezer before you plan to garnish it. If you need to store leftovers, keep them wrapped in the freezer, and they should stay fantastic for up to two weeks. Because the layers are so rich, you almost never need to reheat anything; you just need to let it sit on the counter for about 10 to 15 minutes before slicing for that perfect, clean cut every time!
Frequently Asked Questions About Making Ice Cream Cake
I totally get it—when you’re trying a new frozen dessert recipe, questions pop up! It’s my job to make sure you feel totally confident before you even pull the tub of ice cream out of the freezer. Don’t worry if you don’t have the exact 9-inch springform pan; we can make adjustments easily. These little things are what separate a good ice cream cake from a great one!
-
Can I use a different size pan for this easy ice cream cake recipe?
Oh yes, you absolutely can! That’s the charm of a good homemade ice cream cake. If you decide to use a 9×13 inch baking dish—which would turn this into that wonderful ice cream sheet cake style—you’ll have a much larger surface area, meaning your ice cream layers will be thinner. That sounds great, but you MUST reduce the freezing time between layers. Instead of an hour for the first layer, maybe shoot for 30-40 minutes, just until it’s firm to the touch. If you use a deeper, smaller round cake pan, you’ll need a longer overall freeze time, especially for that final layer, because the center takes ages to fully set hard.
-
What is the best way to soften ice cream for layering?
This is the most crucial, make-or-break step for any layered ice cream dessert! You don’t want liquid ice cream. You want the consistency of really thick, stiff frosting. The best way I found for this creamy frozen dessert is to leave the tubs on the counter for about 15 to 20 minutes maximum. If you don’t trust your internal clock, cut the ice cream into several large chunks and put those chunks into your mixing bowl. Use a sturdy spoon or spatula and mash them around for about a minute. That gentle agitation warms them just enough to be spreadable without melting the whole container.
-
Is this recipe kid-friendly to assemble?
Definitely! My nephew helps me every year when we make a big birthday ice cream cake. It’s a fantastic kid friendly dessert project! Kids absolutely love crushing the Oreos (especially if you put them in a large Ziploc bag and let them smash them with a rolling pin—great stress relief!). And they are the best helpers for sprinkling crushed cookies between layers and, of course, the final decoration with the whipped topping and sprinkles. Just keep them away from the electrical mixer when the ice cream starts getting soft; that can get messy fast, but the rest is pure fun!
Share Your Ultimate Ice Cream Cake Creations
I’ve given you my absolute best secrets for creating this fantastic, no-fuss ice cream cake. Now it’s your turn to get in the kitchen and make some memories! Seriously, there’s nothing better than seeing your beautiful creations come to life. When you try this recipe, please come back here and leave me a rating—tell me how many stars you give it! I’m always curious to know which flavors you chose for your layers. If you snapped a picture of your finished dessert, I’d love for you to share it over on social media and tag me so I can see your amazing work. Happy freezing, and I hope this dessert brings a massive smile to whoever you’re sharing it with!
Share Your Ultimate Ice Cream Cake Creations
I’ve given you my absolute best secrets for creating this fantastic, no-fuss ice cream cake. Now it’s your turn to get in the kitchen and make some memories! Seriously, there’s nothing better than seeing your beautiful creations come to life. When you try this recipe, please come back here and leave me a rating—tell me how many stars you give it! I’m always curious to know which flavors you chose for your layers. If you snapped a picture of your finished dessert, I’d love for you to share it over on social media and tag me so I can see your amazing work. Happy freezing, and I hope this dessert brings a massive smile to whoever you’re sharing it with! You can learn more about my mission to elevate everyday cooking over on my About Page.
PrintEasy No-Bake Oreo Ice Cream Cake

Make this easy, no-bake Oreo ice cream cake for your next celebration. This layered frozen dessert uses simple ingredients and is perfect for birthdays or summer parties.
- Prep Time: 25 min
- Cook Time: 0 min
- Total Time: 4 hours 25 min
- Yield: 10 servings 1x
- Category: Dessert
- Method: No-Bake
- Cuisine: American
- Diet: Vegetarian
Ingredients
- 1 (13.2 ounce) package of chocolate sandwich cookies (like Oreos)
- 1/2 cup unsalted butter, melted
- 1.5 quarts vanilla ice cream, softened slightly
- 1.5 quarts chocolate ice cream, softened slightly
- 1 cup crushed chocolate sandwich cookies
- 1 cup fudge topping, warmed
- 2 cups whipped topping (store-bought or homemade)
- 1/4 cup sprinkles for decoration
Instructions
- Prepare a 9-inch springform pan by lining the bottom with parchment paper.
- Crush the first package of chocolate sandwich cookies finely in a food processor or by placing them in a sealed bag and crushing with a rolling pin. Mix the cookie crumbs with the melted butter until combined.
- Press the buttered cookie mixture firmly and evenly into the bottom of the prepared springform pan. Place the pan in the freezer for 15 minutes to set.
- Remove the pan from the freezer. Spread the softened vanilla ice cream evenly over the cookie crust. Return the pan to the freezer for at least 1 hour, or until the layer is firm.
- Once the vanilla layer is firm, sprinkle the 1 cup of crushed cookies over the top. Drizzle half of the warmed fudge topping over the cookie layer. Freeze for another 30 minutes.
- Spread the softened chocolate ice cream evenly over the cookie and fudge layer. Freeze for at least 4 hours, or preferably overnight, until completely firm.
- When ready to serve, carefully remove the cake from the springform pan. Spread the whipped topping over the top and sides of the frozen cake.
- Drizzle the remaining warm fudge topping over the whipped topping in a decorative pattern. Sprinkle with decorative sprinkles.
- Slice and serve this homemade ice cream cake immediately.
Notes
- You can substitute any two ice cream flavors you prefer for a custom layered ice cream dessert.
- For cleaner slices, dip your knife in hot water and wipe it dry between each cut.
- This make ahead cake is best assembled one day before you plan to serve it.
Nutrition
- Serving Size: 1 slice
- Calories: 450
- Sugar: 45g
- Sodium: 250mg
- Fat: 28g
- Saturated Fat: 15g
- Unsaturated Fat: 13g
- Trans Fat: 0.5g
- Carbohydrates: 48g
- Fiber: 2g
- Protein: 6g
- Cholesterol: 55mg