
Oh, fall baking, my favorite time of year! There’s just nothing that says comfort like the smell of warm spices filling up the entire house, right? We all love pumpkin pie, of course, but sometimes you need something that feels just as festive but maybe a tiny bit easier to manage when you’re busy hosting. That’s where the absolute magic of this layered **pumpkin crunch** comes in. Trust me when I say this is the ultimate, no-fuss dessert solution for your Thanksgiving table or any big gathering.
I’ve spent years perfecting what I call my home-cook approach to flavor—taking inspiration from classic recipes but always streamlining them so they actually work for real life. This dessert is the definition of that philosophy. It gives you that rich, creamy pumpkin center we all crave, but it pairs it with this incredible, buttery, almost shortbread-like base and a crunchy pecan streusel topping. It’s the texture contrast that gets everyone talking!
Forget fussy crusts or temperamental fillings. This recipe is built to be reliable, which is what I always aim for when developing something new. It’s a crowd-pleaser through and through, and I promise, once you try this easy layered showstopper, it’ll bump your usual holiday offering right off the menu. We want amazing results without unnecessary stress, and this pecan crunch delivers that every single time. If you’ve ever loved my approach to classic comfort desserts, like my work on things such as the Sweet Potato Pie, you are going to adore this one.
- Why This Easy Pumpkin Dessert is Your New Fall Favorite
- Gathering Ingredients for the Best Pumpkin Crunch Recipe
- Step-by-Step Instructions for Layered Pumpkin Dessert
- Tips for Success with Your Crunchy Pumpkin Dessert
- Serving Suggestions for This Festive Fall Baking Treat
- Storage and Reheating Instructions for Pumpkin Crunch
- Frequently Asked Questions About Pumpkin Crunch Cake Recipe
- Nutritional Estimate for This Crowd Pleasing Holiday Dessert
- Share Your Autumn Dessert Inspiration
Why This Easy Pumpkin Dessert is Your New Fall Favorite
Honestly, if you bring a traditional pie to a potluck these days, people might gently ask if you forgot to bring a second dish! We all need something that travels well and cuts into neat squares. That’s why I’m obsessed with this **Easy Pumpkin Dessert**. It’s just so sturdy, which is exactly what I need when I’m juggling plates and making sure the gravy doesn’t spill.
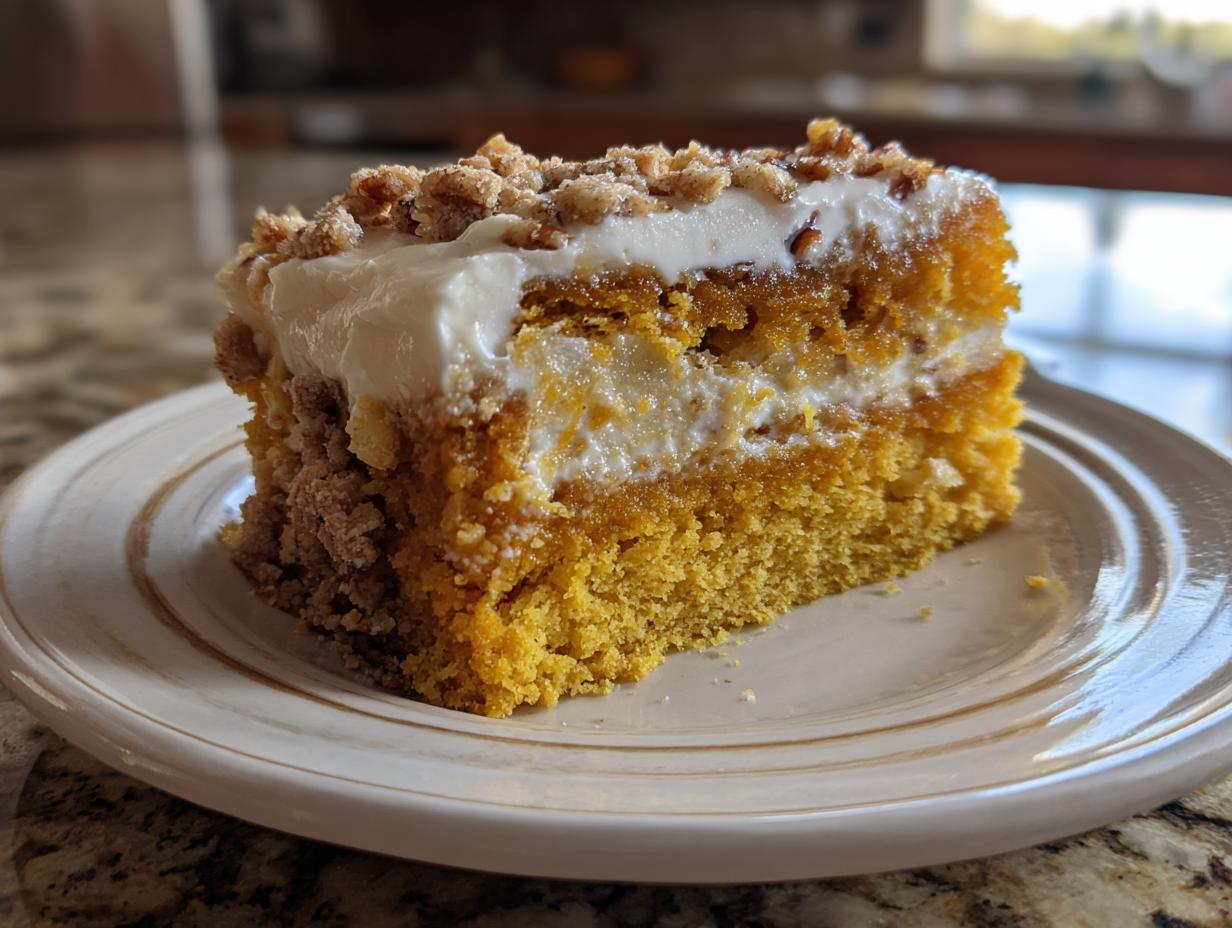
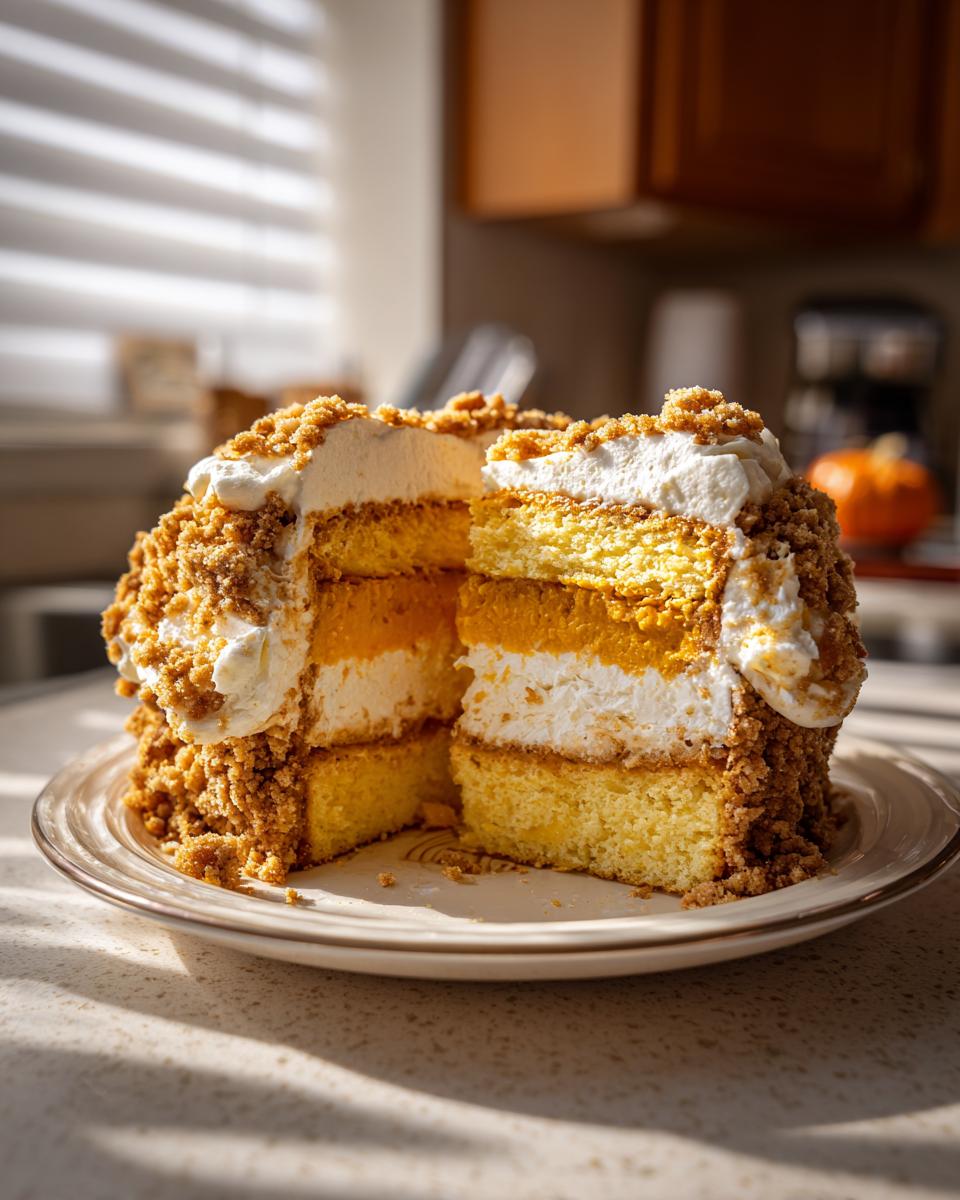
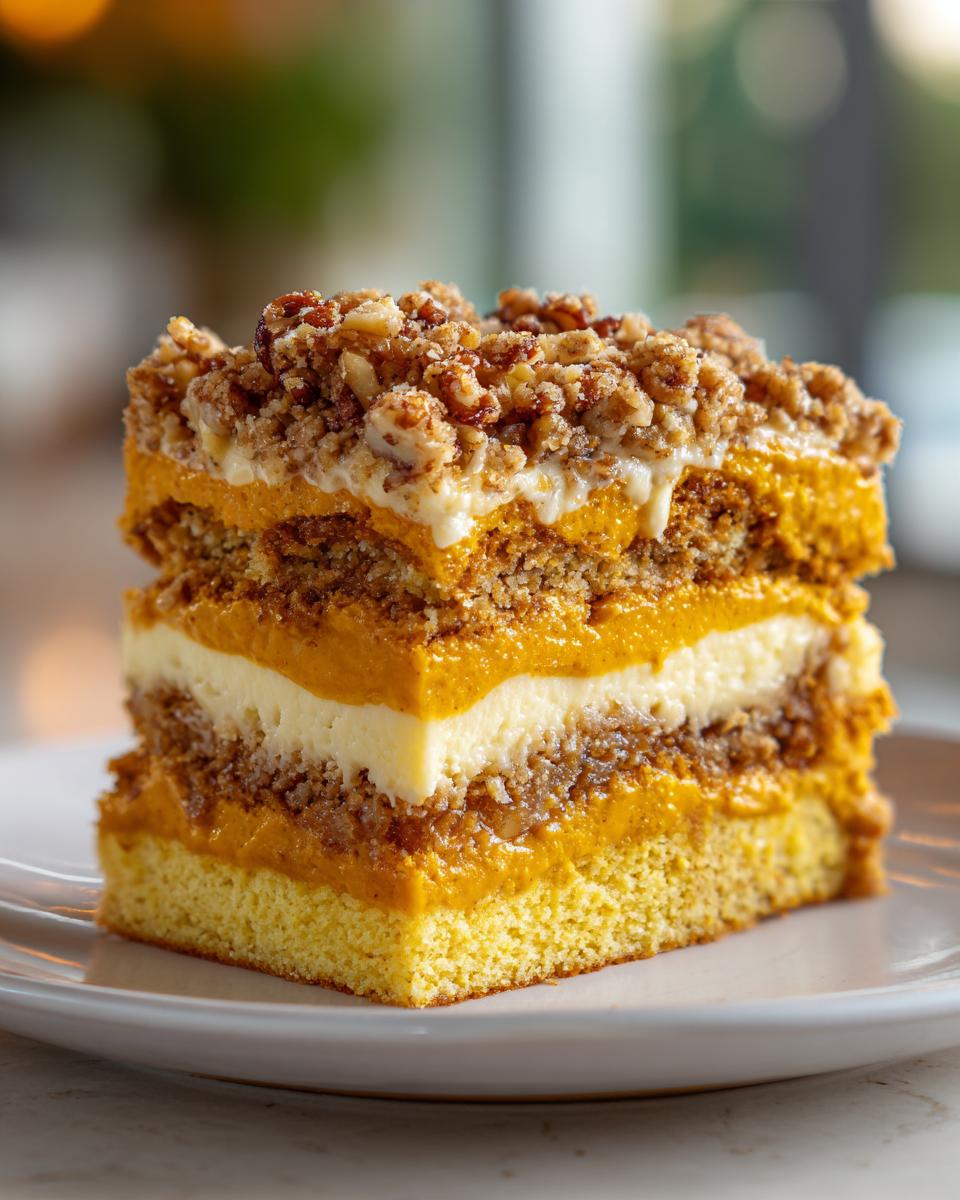
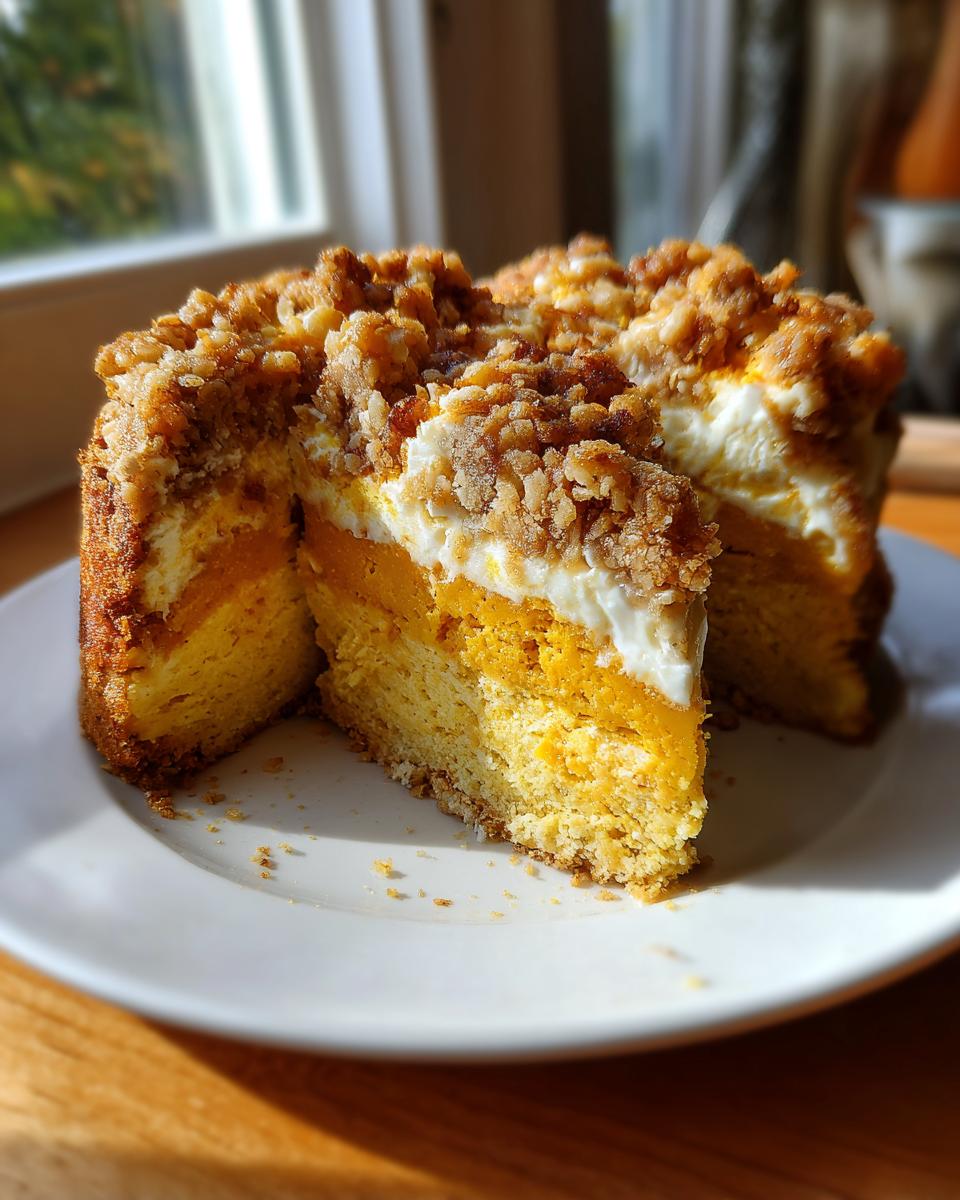
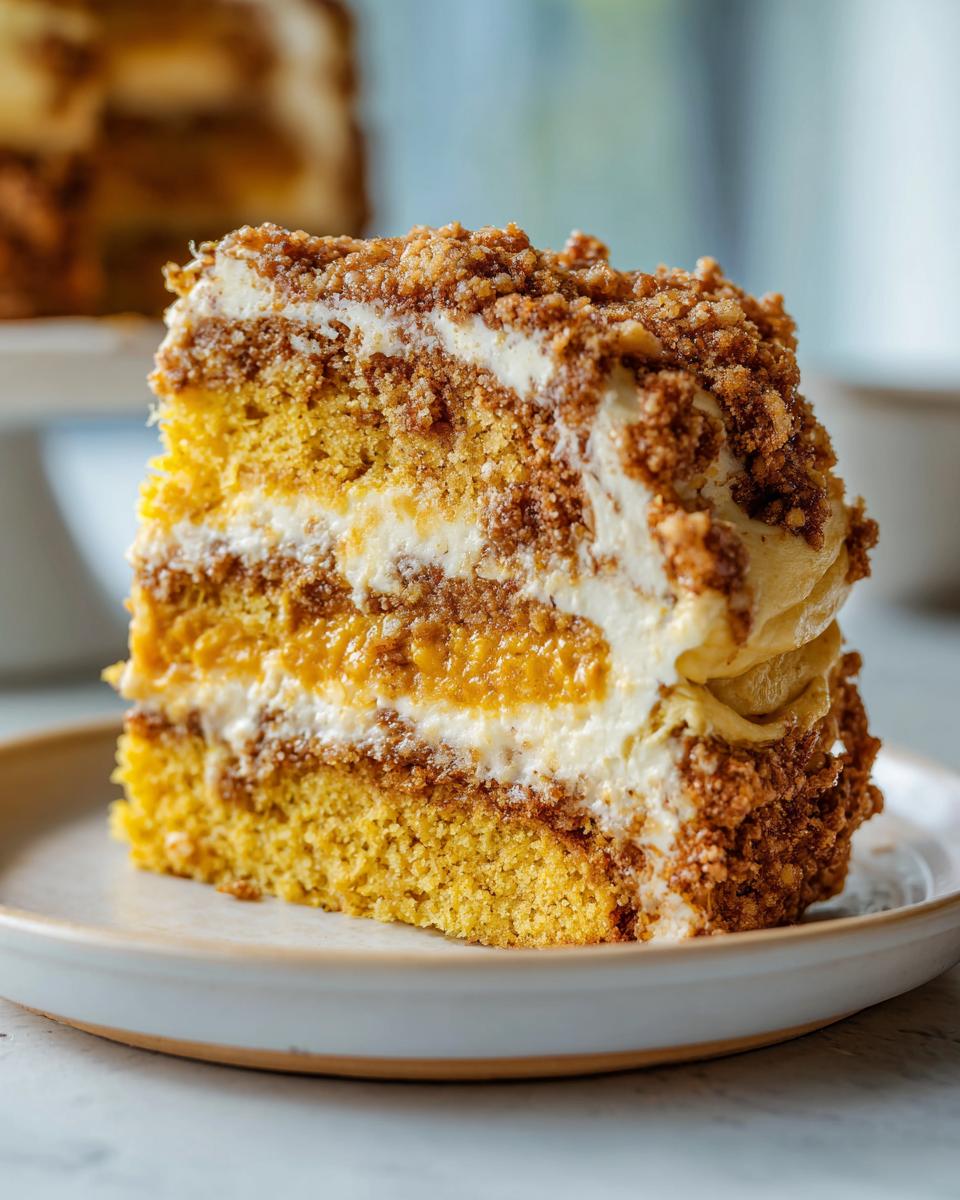
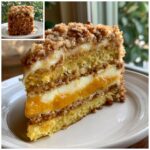
What makes this **Layered Pumpkin Dessert** such a winner? It’s the architecture! You’ve got that buttery, slightly salty baked base—it’s made from cake mix, which is my secret weapon for speed—acting as the foundation. Then comes the silky, spiced custard layer, and finally, that amazing crunch on top. It’s just more interesting than a standard cake, and frankly, it feeds a crowd faster.
When I have family coming over, I skip the pie entirely and make this. Pies can crack, they can slide, they need careful temperature plating. This? This stays put. I love that I can make my Pumpkin Bread earlier in the week, but this layers dessert needs to be served cold, which means one less thing to worry about right before dinner time.
Achieving the Perfect Texture in Your Pumpkin Crunch
The texture is really the whole game here, isn’t it? That satisfying contrast between the creamy pumpkin filling and the crunchy pecan streusel has to be spot on. You get the soft middle because we use instant pudding mix in the filling to help it set up firmly as it chills. As for the crunch? That comes from the combination of the baked cake mix crust and the nuts sprinkled over the top before the final bake. Make sure those nuts toast up nicely—that’s peak satisfaction!
Gathering Ingredients for the Best Pumpkin Crunch Recipe
Okay, let’s get down to brass tacks because knowing exactly what you need makes this whole process feel so much less intimidating. The beauty of this **Pumpkin Crunch Cake Recipe** is that it relies heavily on pantry staples, especially that reliable yellow cake mix that we all keep stocked for emergencies. I’ve broken down everything you need, but pay close attention to the details—those little things are what separate “good” from “absolute winner.”
Here is what you’ll need to make this spectacular dessert:
- 1 box (15.25 ounces) **yellow cake mix** (Don’t grab the spiced one! We are building our own spice profile.)
- 1 cup (2 sticks) unsalted butter, melted (This is key for that buttery base, unlike oil substitutes.)
- 1 cup chopped pecans (If you aren’t a fan, walnuts work beautifully too—more on that in a second.)
- 1 can (15 ounces) pure pumpkin puree (Make sure it’s 100% pure, not pumpkin pie filling!)
- 1 can (14 ounces) sweetened condensed milk
- 1 box (3.4 ounces) **instant vanilla pudding mix** (This helps the filling firm up perfectly when chilled.)
- 1 teaspoon pumpkin pie spice
- 1 teaspoon vanilla extract
- 1 container (8 ounces) frozen whipped topping, thawed (This sits on top after baking and chilling, so make sure it’s completely thawed in the fridge.)
See? Pretty straightforward! When you shop, just make sure you grab the right size cans and boxes. Getting the pudding mix right is especially important because it’s the binder that sets the creaminess!
Ingredient Notes and Simple Substitutions
As your dedicated home-cook guide, I want you to feel empowered to tweak things if you need to. For the nuts, if you are allergic to pecans or just plain don’t have them, I highly recommend using chopped walnuts. They toast up just as nicely and provide that required **Buttery Pecan Topping** crunch.
Now, here’s a fun tip if you want to nod to the legendary versions of this dessert—specifically the ones inspired by Hawaii Pumpkin Crunch. If you want that slightly tropical twist that those island bakers use, grab a little bit of coconut extract—maybe half a teaspoon—and whisk it right into your pumpkin filling mixture. It truly elevates the spice notes!
For the butter, please use real butter for the crust. You might be tempted to save time by using something else, but relying on real, melted dairy butter gives you a richness that really sets this dessert apart from simpler baked goods. I always use real butter, just like I insist on it for my Homemade Honey Butter!
Step-by-Step Instructions for Layered Pumpkin Dessert
Alright, here is where we put it all together! Since this **Layered Pumpkin Dessert** has a few distinct stages—the crust, the filling, and the topping—we need to take it one step at a time. Don’t rush the cooling parts, though; that’s when the magic happens to make sure everything sets up perfectly for slicing.
First things first: turn your oven on to 350 degrees F. Gotta get it good and hot! And make sure you’ve got that 9×13 inch baking dish lightly greased. You don’t want any sticking drama later, trust me, especially with this rich dessert.
Baking the Crust and Filling
This recipe uses the cake mix straight from the box, which is fantastic. In a medium bowl, mix up that dry yellow cake mix with your melted butter. You want to work it together until it starts looking like coarse, buttery sand—not wet dough, just crumbly. Press this mixture firmly and evenly into the bottom of your prepared dish. This layer is going to form the sturdy base for the whole thing, kind of like a giant cookie bar base.
Pop that crust into the preheated oven for about 15 minutes. We aren’t cooking it all the way through, just enough so the edges get a little golden and it sets up a bit. Take it out, but don’t turn the oven off!
While that’s baking (or while it cools for just a minute), whip up the creamy part. In a separate bowl—no need to dirty another—whisk together the pure pumpkin puree, the sweetened condensed milk, that instant vanilla pudding mix, your pumpkin pie spice, and the vanilla extract. You are looking for a super smooth mixture here. If you see lumps of pudding mix, keep whisking! This is what creates that luscious center.
This next step is important for the structure: gently spread that creamy pumpkin filling evenly right over the top of your warm, partially baked crust. Don’t press hard; you don’t want to shatter the crust! Then, scatter those chopped pecans over the top. Back into the oven it goes for another 25 to 30 minutes. You’ll know it’s ready when the pumpkin layer looks set—not jiggly in the middle—and the pecans on top look golden brown and toasted. You can test it with a toothpick near the center, but remember, this isn’t a traditional cake, so the toothpick might come out a little gooey, which is fine because of the pudding mix.
Setting and Chilling the Pumpkin Crunch Cake
Don’t skip this step! When you pull the dish out of the oven, it is going to be hot and tender. You absolutely must let it cool completely on a wire rack. If you try to put the whipped topping on a warm dessert, you’ll end up with pumpkin soup instead of a nice, clean layer. Seriously, go pour yourself a cup of my Homemade Pumpkin Spice Latte while this cools down!
Once it’s fully cooled—and I mean room temperature cool—then you can gently spread that thawed whipped topping all over the top. This is the final layer before chilling, so take your time spreading it evenly edge to edge. This step is what makes it a true **Pumpkin Crunch Cake**. After that, cover it loosely and stick it in the fridge for at least two hours. Those two hours are non-negotiable if you want those clean slices you see in pictures! If you’re prepping for a big event, this chill time is what allows it to become the perfect make-ahead dessert.
Tips for Success with Your Crunchy Pumpkin Dessert
Look, I’ve made this **Crunchy Pumpkin Dessert** dozens of times, and I’ve learned that a few tweaks can turn a great recipe into the absolute best one on the table. Since we rely on the cake mix for our structure, we need to make sure we treat it right, especially that topping.
If you really want that peak crunch factor, I sometimes reserve about a quarter cup of the dry cake mix *before* I mix it with the butter for the crust. Once the pecans are spread on top of the pumpkin layer (before the final 30-minute bake), I sprinkle that reserved dry mix right over the nuts. It helps create an extra veil of crunch that stays crispy because it bakes right into the pumpkin layer. It acts almost like a streusel base, making the final product even more decadent. I use this same technique when I make my Pear Crisp!
Another tip for maximum crunch comes from toasting your nuts separately first. If you have a few extra minutes, toss those pecans in a dry pan over medium heat for about five minutes until you can really smell them. That little bit of extra toasting makes a huge difference later and really enhances that nutty flavor.
Making This a Make Ahead Fall Dessert
Because this is such a fantastic make ahead fall dessert, I almost always bake it the day before Thanksgiving or Christmas. You can bake the crust and pumpkin layer entirely, let it cool completely, and even top it with the whipped topping—but here’s the catch.
If you add the whipped topping, you need to cover it tightly with plastic wrap and keep it chilled. It will stay perfectly good for up to two days, but honestly, I think the texture of the crust is best on day one or two. If you want it *super* fresh, bake the whole thing—crust and filling—and let it cool completely. Then, cover the cooled, un-topped dessert tightly and refrigerate overnight. The next day, mix up your filling, bake it, let it cool, and then add the pecans and the whipped topping right before serving. That ensures maximum freshness if you’re worried about sogginess.
Serving Suggestions for This Festive Fall Baking Treat
This **Festive Fall Baking** delight is pretty rich and satisfying on its own, but if you want to elevate it just a touch for presentation, I have a couple of simple ideas. Since this dessert is served cold, it pairs wonderfully with something slightly warmer or with a little zing.
My absolute favorite way? A tiny dusting of extra pumpkin pie spice right over the top of the whipped cream layer just before presentation. It just brings the aroma right back to the forefront.
If you’re serving it after a big meal, a very small scoop of good quality vanilla bean ice cream on the side is fantastic, especially if you happen to have any leftovers that aren’t quite as cold as they should be. Or, if you want to keep that cozy feeling going, serve a slice alongside a warm cup of coffee. When I’m deep into fall baking mode, I often make myself a batch of my Homemade Pumpkin Spice Latte just to sip on while I enjoy a small piece of this **Pumpkin Crunch**!
Storage and Reheating Instructions for Pumpkin Crunch
Since this recipe is wonderfully layered, storing it correctly is key to preventing any texture issues, especially with that creamy filling and the whipped topping. You don’t want your beautiful crumble getting soggy overnight, right?
Always store leftovers of your **Pumpkin Crunch** in the refrigerator. Because we use real dairy in the whipped topping, it needs to stay cold. Cover the dish tightly with plastic wrap—make sure the wrap isn’t actually touching the whipped topping, or you’ll smear it all off! Better yet, transfer cut slices into an airtight container with a lid if you aren’t eating the whole thing right out of the pan.
It will keep beautifully for about three to four days in the fridge. I know I mentioned chilling it for two hours to set up, but keeping it cold after that just helps maintain that firmness in the pudding layer.
Now, can you reheat it? Well, not really, and I wouldn’t advise it! The delicious, crunchy topping loses its *crunch* when heated, and the whipped topping will just melt into a puddle of creaminess, which defeats the whole purpose of this layered treat. So, plan on serving this chilled or just slightly cooler than room temperature. It’s truly best when served cold!
Frequently Asked Questions About Pumpkin Crunch Cake Recipe
I know when you are dealing with a popular dessert like this, questions always pop up! I’ve gathered some of the ones I hear most often about texture, timing, and where this amazing **Pumpkin Crunch Cake Recipe** comes from. Hopefully, these clear things up so you can get baking!
Can I make the pecan topping crunchier in the pumpkin crunch?
You absolutely can! The secret I shared—sprinkling that reserved dry cake mix over the pecans before the final bake—is the best way to ensure a crackly, almost shortbread-like crunch on top. Also, make sure your pecans are fresh and not stale; stale nuts taste bland and soft after baking. Toasting them first, like I mentioned earlier, makes a huge difference too!
Is this truly a ‘dump cake’ style pumpkin crunch?
That’s a great question! People often call it that because we start with a package of **Yellow Cake Mix Dessert** base and “dump” the filling over it. However, technically, it requires two separate baking stages and careful layering, so it’s more structured than a true one-pan dump cake variation like my Pumpkin Dump Cake recipes. It requires a little more finesse, but the payoff is better texture!
What about that Hawaii-inspired version I keep hearing about?
Yes! If you look online, you’ll see recipes referencing Hawaii or Sam Choy’s Kitchen. That inspiration comes from adding a hint of coconut flavor. I mentioned it under ingredients, but for a true taste of that regional style, add about half a teaspoon of coconut extract to your pumpkin puree mixture. It truly elevates the spice notes! You can read more about the inspiration behind the Hawaii-Style Pumpkin Crunch if you’re curious!
Nutritional Estimate for This Crowd Pleasing Holiday Dessert
Okay, real talk time. We are making dessert here, and dessert involves sugar and fat—there’s no way around it, and frankly, I wouldn’t want one without it! Since this is such a fantastic **Crowd Pleasing Holiday Dessert**, I always like to give you a rough idea of what you are digging into, just so you can plan accordingly.
Please keep in mind, this is just an estimate based on the ingredients listed in the recipe for 12 standard slices. If you cut massive slabs (which I usually do when I’m serving it myself!), the numbers will climb, ha! But here is the breakdown:
- Serving Size: 1 slice
- Calories: 380
- Sugar: 35g
- Sodium: 250mg
- Fat: 22g
- Saturated Fat: 10g
- Carbohydrates: 45g
- Protein: 5g
See those numbers? They are what you’d expect from a rich, layered treat involving cake mix and sweetened condensed milk. But look at that protein—a little something, right? When you bite into this glorious **Pumpkin Crunch**, you aren’t just getting empty calories; you’re getting the satisfaction of a perfectly balanced, spiced treat that truly tastes homemade. Don’t stress over the numbers too much; just enjoy the fact that you made something absolutely incredible!
Share Your Autumn Dessert Inspiration
I truly hope this Easy Layered **Pumpkin Crunch** makes its way onto your table this season. Cooking, for me, has always been about connection—seeing people enjoy something I made with love right in my own kitchen. Baking is all about sharing, tasting, and seeing those happy faces, so I’d love to hear how it turned out for you!
When you make this recipe, please don’t be shy—jump down to the comments section below and give me a rating. Seriously, those star ratings help other home cooks know if this dessert is the winner they’ve been looking for. And always leave comments! Tell me if you tried the coconut extract trick or if you stuck to the classic pecan topping. Your feedback helps me, and it helps others decide if this is the right **Autumn Dessert Inspiration** for their busy schedule.
And listen, if you took a beautiful picture of your perfectly layered slices—especially those clean slices after chilling—I absolutely want to see them! Tag me on social media! Seeing your creations is genuinely the best part of running Cooking Zenith. It proves that everyone can achieve this peak flavor without needing a professional degree. If you’re looking for more ways to utilize that great fall bounty, maybe switch gears after dessert and check out my recipe for a Fall Harvest Salad!
Tips for Success with Your Crunchy Pumpkin Dessert
Look, I’ve made this **Crunchy Pumpkin Dessert** dozens of times, and I’ve learned that a few tweaks can turn a great recipe into the absolute best one on the table. Since we rely on the cake mix for our structure, we need to make sure we treat it right, especially that topping.
If you really want that peak crunch factor, I sometimes reserve about a quarter cup of the dry cake mix *before* I mix it with the butter for the crust. Once the pecans are spread on top of the pumpkin layer (before the final 30-minute bake), I sprinkle that reserved dry mix right over the nuts. It helps create an extra veil of crunch that stays crispy because it bakes right into the pumpkin layer. It acts almost like a streusel base, making the final product even more decadent. I use this same technique when I make my Cinnamon Sugar Pecans!
Another tip for maximum crunch comes from toasting your nuts separately first. If you have a few extra minutes, toss those pecans in a dry pan over medium heat for about five minutes until you can really smell them. That little bit of extra toasting makes a huge difference later and really enhances that nutty flavor.
Making This a Make Ahead Fall Dessert
Because this is such a fantastic make ahead fall dessert, I almost always bake it the day before Thanksgiving or Christmas. You can bake the crust and pumpkin layer entirely, let it cool completely, and even top it with the whipped topping—but here’s the catch.
If you add the whipped topping, you need to cover it tightly with plastic wrap and keep it chilled. It will stay perfectly good for up to two days, but honestly, I think the texture of the crust is best on day one or two. If you want it *super* fresh, bake the whole thing—crust and filling—and let it cool completely. Then, cover the cooled, un-topped dessert tightly and refrigerate overnight. The next day, mix up your filling, bake it, let it cool, and then add the pecans and the whipped topping right before serving. That ensures maximum freshness if you’re worried about sogginess. This strategy lets you enjoy your party, knowing the heavy lifting for the **pumpkin crunch** is already done!
Serving Suggestions for This Festive Fall Baking Treat
This **Festive Fall Baking** delight is pretty rich and satisfying on its own, but if you want to elevate it just a touch for presentation, I have a couple of simple ideas. Since this dessert is served cold, it pairs wonderfully with something slightly warmer or with a little zing.
My absolute favorite way? A tiny dusting of extra pumpkin pie spice right over the top of the whipped cream layer just before presentation. It just brings the aroma right back to the forefront.
If you’re serving it after a big meal, a very small scoop of good quality vanilla bean ice cream on the side is fantastic, especially if you happen to have any leftovers that aren’t quite as cold as they should be. Or, if you want to keep that cozy feeling going, serve a slice alongside a warm cup of coffee. When I’m deep into fall baking mode, I often make myself a batch of my Homemade Pumpkin Spice Latte just to sip on while I enjoy a small piece of this **Pumpkin Crunch**!
Storage and Reheating Instructions for Pumpkin Crunch
Since this recipe is wonderfully layered, storing it correctly is key to preventing any texture issues, especially with that creamy filling and the whipped topping. You don’t want your beautiful crumble getting soggy overnight, right?
Always store leftovers of your **Pumpkin Crunch** in the refrigerator. Because we use real dairy in the whipped topping, it needs to stay cold. Cover the dish tightly with plastic wrap—make sure the wrap isn’t actually touching the whipped topping, or you’ll smear it all off! Better yet, transfer cut slices into an airtight container with a lid if you aren’t eating the whole thing right out of the pan.
It will keep beautifully for about three to four days in the fridge. I know I mentioned chilling it for two hours to set up, but keeping it cold after that just helps maintain that firmness in the pudding layer.
Now, can you reheat it? Well, not really, and I wouldn’t advise it! The delicious, crunchy topping loses its *crunch* when heated, and the whipped topping will just melt into a puddle of creaminess, which defeats the whole purpose of this layered treat. So, plan on serving this chilled or just slightly cooler than room temperature. It’s truly best when served cold!
Frequently Asked Questions About Pumpkin Crunch Cake Recipe
I know when you are dealing with a popular dessert like this, questions always pop up! I’ve gathered some of the ones I hear most often about texture, timing, and where this amazing **Pumpkin Crunch Cake Recipe** comes from. Hopefully, these clear things up so you can get baking!
Can I make the pecan topping crunchier in the pumpkin crunch?
You absolutely can! The secret I shared—sprinkling that reserved dry cake mix over the pecans before the final bake—is the best way to ensure a crackly, almost shortbread-like crunch on top. Also, make sure your pecans are fresh and not stale; stale nuts taste bland and soft after baking. Toasting them first, like I mentioned earlier, makes a huge difference too!
Is this truly a ‘dump cake’ style pumpkin crunch?
That’s a great question! People often call it that because we start with a package of **Yellow Cake Mix Dessert** base and “dump” the filling over it. However, technically, it requires two separate baking stages and careful layering, so it’s more structured than a true one-pan dump cake variation like my Pumpkin Dump Cake recipes. It requires a little more finesse, but the payoff is better texture!
What about that Hawaii-inspired version I keep hearing about?
Yes! If you look online, you’ll see recipes referencing Hawaii or Sam Choy’s Kitchen. That inspiration comes from adding a hint of coconut flavor. I mentioned it under ingredients, but for a true taste of that regional style, add about half a teaspoon of coconut extract to your pumpkin puree mixture. It truly elevates the spice notes! You can read more about the inspiration behind the Hawaii-Style Pumpkin Crunch if you’re curious!
Nutritional Estimate for This Crowd Pleasing Holiday Dessert
Okay, real talk time. We are making dessert here, and dessert involves sugar and fat—there’s no way around it, and frankly, I wouldn’t want one without it! Since this is such a fantastic **Crowd Pleasing Holiday Dessert**, I always like to give you a rough idea of what you are digging into, just so you can plan accordingly.
Please keep in mind, this is just an estimate based on the ingredients listed in the recipe for 12 standard slices. If you cut massive slabs (which I usually do when I’m serving it myself!), the numbers will climb, ha! But here is the breakdown:
- Serving Size: 1 slice
- Calories: 380
- Sugar: 35g
- Sodium: 250mg
- Fat: 22g
- Saturated Fat: 10g
- Carbohydrates: 45g
- Protein: 5g
See those numbers? They are what you’d expect from a rich, layered treat involving cake mix and sweetened condensed milk. But look at that protein—a little something, right? When you bite into this glorious **Pumpkin Crunch**, you aren’t just getting empty calories; you’re getting the satisfaction of a perfectly balanced, spiced treat that truly tastes homemade. Don’t stress over the numbers too much; just enjoy the fact that you made something absolutely incredible!
Share Your Autumn Dessert Inspiration
I truly hope this Easy Layered **Pumpkin Crunch** makes its way onto your table this season. Cooking, for me, has always been about connection—seeing people enjoy something I made with love right in my own kitchen. Baking is all about sharing, tasting, and seeing those happy faces, so I’d love to hear how it turned out for you!
When you make this recipe, please don’t be shy—jump down to the comments section below and give me a rating. Seriously, those star ratings help other home cooks know if this dessert is the winner they’ve been looking for. And always leave comments! Tell me if you tried the coconut extract trick or if you stuck to the classic pecan topping. Your feedback helps me, and it helps others decide if this is the right **Autumn Dessert Inspiration** for their busy schedule.
And listen, if you took a beautiful picture of your perfectly layered slices—especially those clean slices after chilling—I absolutely want to see them! Tag me on social media! Seeing your creations is genuinely the best part of running Cooking Zenith. It proves that everyone can achieve this peak flavor without needing a professional degree. If you’re looking for more ways to utilize that great fall bounty, maybe switch gears after dessert and check out my recipe for a Fall Harvest Salad!
PrintEasy Layered Pumpkin Crunch Cake with Pecan Streusel
You make this simple, crowd-pleasing dessert for fall gatherings. It features a creamy pumpkin layer, a moist cake base, and a buttery pecan streusel topping for satisfying texture contrast.
- Prep Time: 20 min
- Cook Time: 45 min
- Total Time: 65 min
- Yield: 12 servings 1x
- Category: Dessert
- Method: Baking
- Cuisine: American
- Diet: Vegetarian
Ingredients
- 1 box (15.25 ounces) yellow cake mix
- 1 cup (2 sticks) unsalted butter, melted
- 1 cup chopped pecans
- 1 can (15 ounces) pure pumpkin puree
- 1 can (14 ounces) sweetened condensed milk
- 1 box (3.4 ounces) instant vanilla pudding mix
- 1 teaspoon pumpkin pie spice
- 1 teaspoon vanilla extract
- 1 container (8 ounces) frozen whipped topping, thawed
Instructions
- Preheat your oven to 350 degrees F. Lightly grease a 9×13 inch baking dish.
- In a medium bowl, combine the dry yellow cake mix and the melted butter until the mixture resembles coarse crumbs. Press this mixture evenly into the bottom of the prepared baking dish to form the crust.
- Bake the crust for 15 minutes, or until the edges are lightly golden. Remove from the oven and let it cool slightly while you prepare the filling.
- In a separate bowl, whisk together the pumpkin puree, sweetened condensed milk, instant vanilla pudding mix, pumpkin pie spice, and vanilla extract until the mixture is smooth and well combined. This is your creamy pumpkin filling.
- Gently spread the pumpkin filling evenly over the warm, partially baked crust.
- Sprinkle the chopped pecans evenly over the pumpkin layer.
- Bake for 25 to 30 minutes, or until the pumpkin layer is set and the pecan topping is golden brown.
- Remove the dish from the oven and let it cool completely on a wire rack. This cooling step is important for the layers to set properly.
- Once cooled, spread the thawed whipped topping evenly over the top layer.
- Chill the Pumpkin Crunch Cake for at least 2 hours before slicing and serving.
Notes
- For a richer crunch, you can substitute the pecans with walnuts or a combination of both nuts.
- If you want a dessert inspired by Hawaii Pumpkin Crunch, you can add a small amount of coconut extract to the pumpkin filling.
- This dessert tastes best when served cold, so plan to make it ahead of time.
Nutrition
- Serving Size: 1 slice
- Calories: 380
- Sugar: 35
- Sodium: 250
- Fat: 22
- Saturated Fat: 10
- Unsaturated Fat: 12
- Trans Fat: 0.5
- Carbohydrates: 45
- Fiber: 2
- Protein: 5
- Cholesterol: 30