
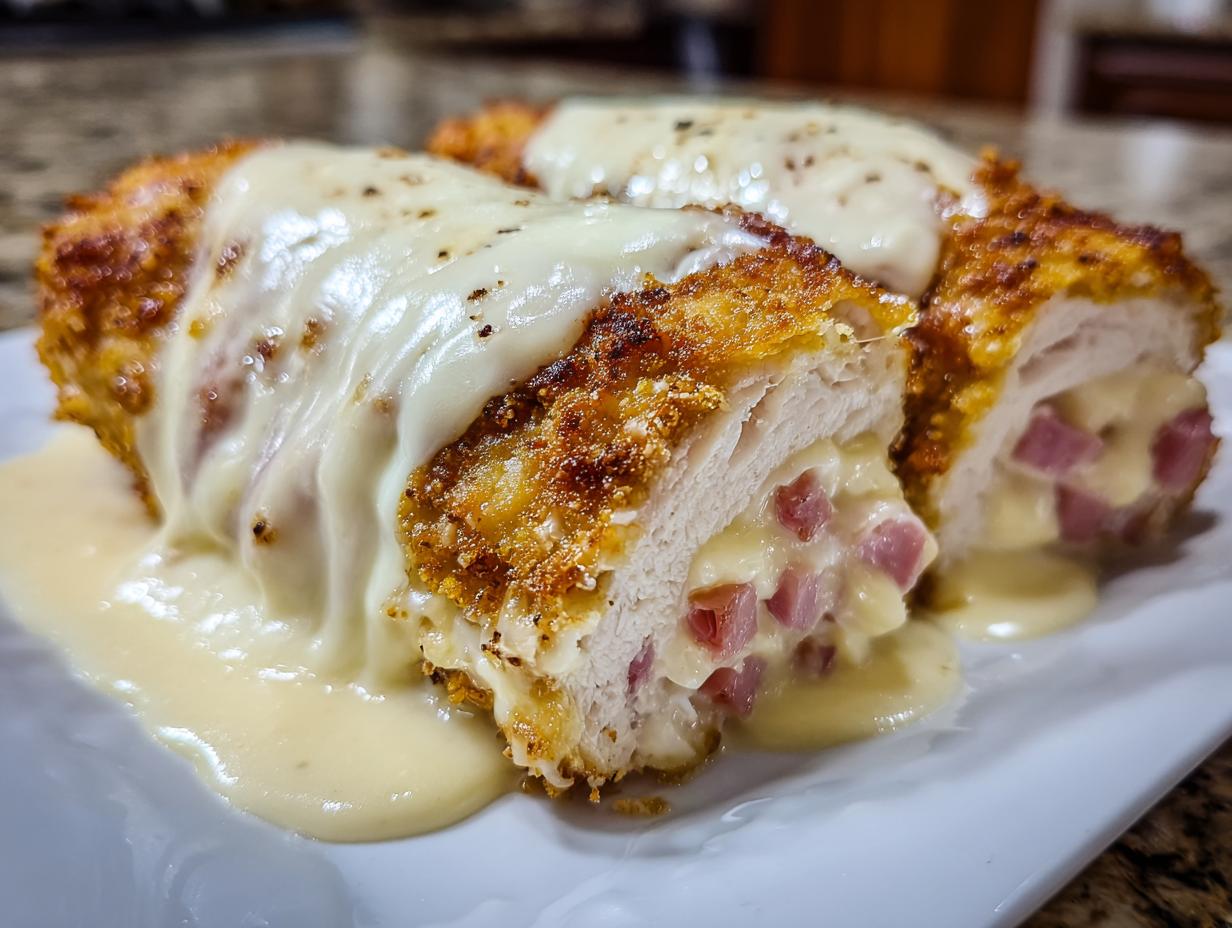
Let’s be honest, sometimes you just crave that decadent, cheesy, crispy perfection that usually means a huge takeout bill or a lot of counter mess. Well, stop right there! I’m Aria, and I promise you, this is the easiest, best chicken cordon bleu recipe you will ever make. We’re skipping the deep fryer today because our goal here at Cooking Zenith is simple: elevate your everyday cooking, not complicate it. This entire **weeknight chicken dinner** comes out of the oven golden brown and tender, complete with a luscious sauce. You absolutely do not need a fancy catering background to serve restaurant quality comfort food at home. Trust me, I learned this simplifying the classics firsthand! Check out all my best quick meals over at my guide on simple weeknight dinners.
- Why This Easy Chicken Cordon Bleu Recipe Works for Your Family
- Ingredients Needed for Crispy Coated Chicken Cordon Bleu
- Step-by-Step Instructions for Baked Chicken Cordon Bleu
- Tips for Achieving Restaurant Quality Chicken at Home
- Make Ahead Chicken Cordon Bleu and Storage
- Serving Suggestions for Your Dinner
- Frequently Asked Questions About This Dish
- Nutritional Estimates for This Comfort Food Chicken
- Share Your Cooking Zenith Creations
Why This Easy Chicken Cordon Bleu Recipe Works for Your Family
I developed this version because I was tired of recipes that felt like they needed a culinary degree just to get the cheese to stay inside! My main focus when creating this Easy Chicken Cordon Bleu was making sure you’re not stuck over a splattering pan after a long day. This dish feels gourmet, but it truly delivers on the weeknight promise. If you’re looking for other quick wins to get dinner on the table, check out some of my suggestions for easy breakfast recipes—sometimes planning ahead helps dinner time run smoother, too!
- No Frying Required: We skip the heavy dredging and pan-frying common in older recipes. This saves you cleanup time and keeps the meal lighter.
- Speedy Prep: You can get these **stuffed chicken breasts** assembled faster than you can decide what side dish to make. It’s perfect for when you need a satisfying meal in under an hour.
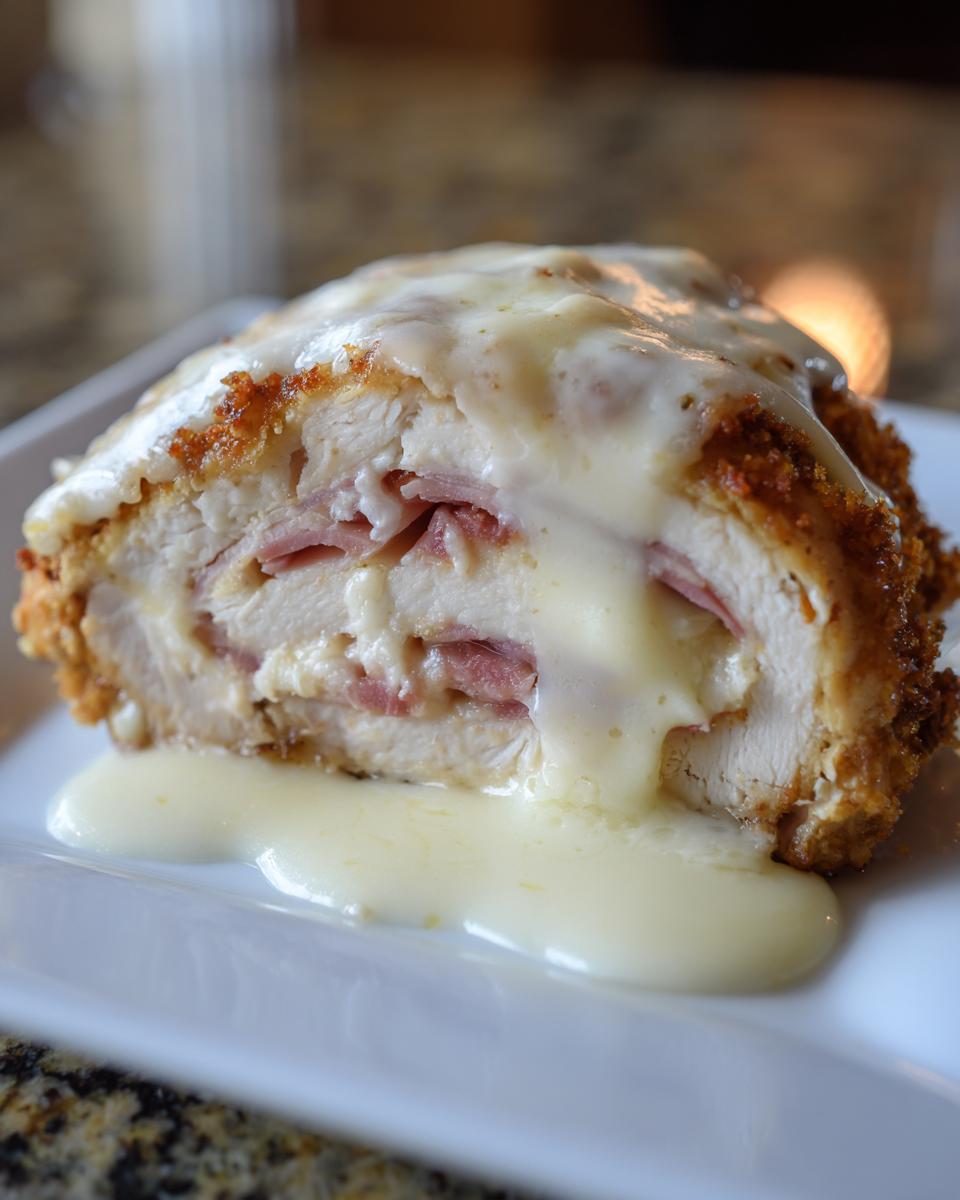
- Family Approved Flavors: Let’s face it, ham, Swiss cheese, and crunchy coating? It’s instant kid-pleaser status. It’s comfort food elevated!
- Foolproof Filling: By pounding the chicken evenly first, we make sure that delicious filling stays exactly where it belongs.
Perfectly Baked Chicken Cordon Bleu Every Time
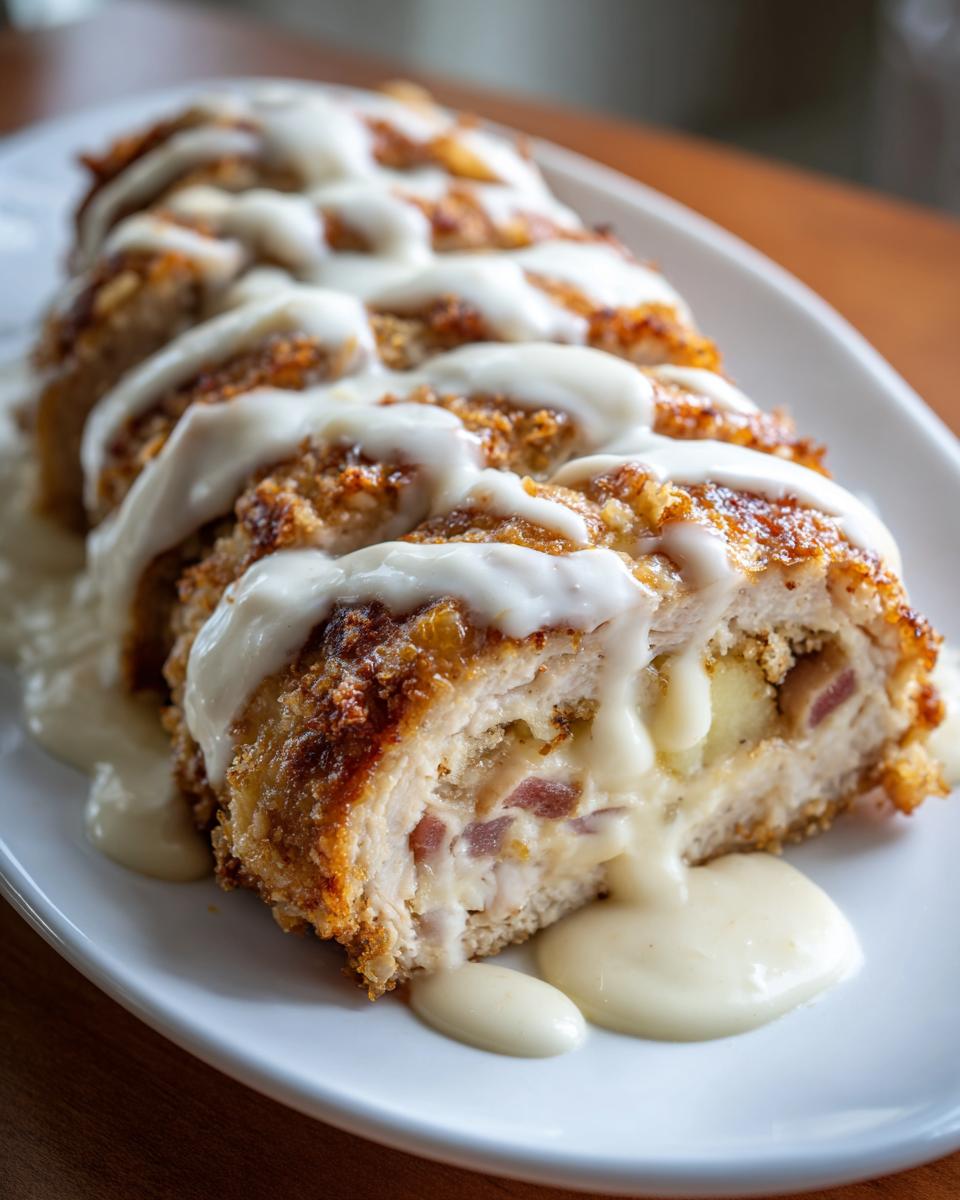
The oven is our best friend here. We coat the rolls in Panko breadcrumbs—and make sure you’re using Panko, it’s essential for that airy crunch!—and then bake them until they hit that perfect temperature. You get a gloriously **crispy coated chicken** texture without the messy oil splatter. Baking eliminates the worry about the cheese melting out prematurely, as the heat surrounds the roll evenly.
Simple Assembly for Stuffed Chicken Breast
This is where you save all the time! You only need to pound your chicken breasts thin enough to wrap around the filling, which takes maybe five minutes total if you’re using a mallet. As soon as they are flat, it’s just layer on the **ham and Swiss chicken** filling, roll it up tight, and you are ready for the breading station. Seriously, this level of **Oven Baked Chicken** prep is what makes it my go-to.
Ingredients Needed for Crispy Coated Chicken Cordon Bleu
Okay, laying out your ingredients before you start is my number one rule for stress-free cooking. It’s the only way to ensure you don’t realize halfway through you’re out of eggs! Because we are making two distinct parts—the stuffed, breaded chicken and the rich sauce—I like to organize everything onto the counter first. Please make sure your Swiss cheese is sliced thin for rolling, and the cheese for the sauce is already shredded so it melts beautifully. If you want to see how I tackle another cheesy favorite, you have to check out my creamy baked mac and cheese recipe right here! creamy baked mac and cheese is another comfort classic!
Here’s exactly what you need:
- Four boneless, skinless chicken breasts—aim for about 7 ounces each. They need to pound down nicely!
- Four thin slices of good deli ham.
- Four slices of quality Swiss cheese.
- 1/2 cup all-purpose flour for the first dip.
- 2 large eggs, beaten until they look pale and frothy.
- 1 cup Panko breadcrumbs. These are vital for the crunch you want!
- 1/2 teaspoon salt and 1/4 teaspoon black pepper (for seasoning the crumbs).
- 2 tablespoons of olive oil—just a drizzle for baking.
For the Creamy Cordon Bleu Sauce
This sauce transforms the dish from good to wow. It’s rich, cheesy, and just sings alongside that crisp coating. Don’t skip the Dijon; it cuts through the richness perfectly!
- 2 tablespoons of unsalted butter.
- 2 tablespoons of all-purpose flour (this makes our roux so the sauce doesn’t break).
- 1 cup of regular milk.
- 1/4 cup heavy cream—this is what makes it luxurious!
- 1/2 cup shredded Swiss cheese. Make sure it’s shredded so it incorporates smoothly!
- 1/4 teaspoon Dijon mustard.
- A tiny pinch of nutmeg. This is a secret weapon in cream sauces, trust me!
Step-by-Step Instructions for Baked Chicken Cordon Bleu
Now for the fun part! This is where your prep work pays off. I like to crank the oven up to 400°F (200°C) right away so it’s ready when we are. Grab that greased baking dish and let’s get these beauties rolled up. If you’re looking for a ridiculously good side to go with this, my crispy roasted potatoes are the perfect match! You can find the tutorial here: oven roasted potatoes crispy tutorial. They bake right alongside the chicken!
Preparing the Tender Chicken Cutlets
You simply can’t rush this part. Take your chicken breasts and slice them horizontally if they are super thick, making four thinner pieces ideally. Then, place each one between plastic wrap or two sheets of parchment paper. Get out that meat mallet—don’t be shy! You need to pound these pieces until they are uniformly about 1/4-inch thick. This evenness is key! If one end is thick and the other thin, the thin part will dry out before the thick part cooks through. Once they’re flat sheets, lay your ham slice and Swiss cheese slice on the wide end. Roll it up tightly, like a little meat burrito, and secure the seam shut. If you’re worried about them unrolling, just pierce them once down the middle with a sturdy toothpick.
Creating the Perfect Crispy Coating
We need a dedicated assembly line here. That’s three shallow dishes: one for flour, one for your beaten eggs, and one for the Panko mixture (remember to mix salt and pepper right into those crumbs!). First, dredge the rolled chicken piece in the flour, making sure every surface is lightly covered, and shake off the extra. You want just a dusting! Next, dip it in the egg, letting the thick excess drip off back into the bowl—we don’t want soggy breading! Finally, this is important: press that chicken firmly into the Panko mixture. Really press it on there! That pressure makes sure the breading really adheres during baking. That’s what gives us that glorious crunch.
Baking and Making the Rich Sauce
Place your coated rolls seam-side down in that prepared baking dish. We just drizzle a little olive oil over the tops; this helps them brown nicely without having to deep fry. Pop them in the 400°F oven for about 25 to 30 minutes. Use a thermometer! We are aiming for 165°F (74°C) inside. While that’s going, get started on that sauce. Melt your butter in a saucepan over medium heat. Whisk in the flour for about a minute—that’s your roux, the thickening base! Now, slowly, slowly whisk in the milk until it’s smooth and no lumps remain. Let it simmer and thicken just a bit, constantly stirring. Take it off the heat, then whisk in that heavy cream, the Swiss cheese, Dijon, and nutmeg until everything is melted and velvety. Don’t let the sauce boil once the cheese is in!
Tips for Achieving Restaurant Quality Chicken at Home
Okay, we’ve got the basics down—this is where we take it from great home cooking to something you’d rave about at a nice bistro. These little tweaks are what my friends always ask me about when they taste mine versus theirs. It’s all about refining the texture and the flavor profile just a touch. If you’re looking for a side dish that really complements this meal, I’ve got an incredible recipe for creamy garlic parmesan mushroom pasta that you could whip up while the chicken is in the oven!
Crispiness Boost: The Hybrid Bake and Fry Method
Remember how I said we skipped deep-frying? That’s true! But if you are feeling extra ambitious or maybe you just *love* that intense, golden-brown crunch that only frying gives you, we can cheat a little bit. The notes mention this: after you’ve coated your **Crispy Coated Chicken** rolls, you can actually give them a very quick pan-fry beforehand. Get about half an inch of neutral oil hot over medium-high heat. Fry each side of the rolled chicken for just about two minutes—that’s only long enough to set that beautiful crust and get it super golden. Then, immediately transfer them to your baking dish to finish cooking in the 400°F oven. This hybrid approach locks in moisture while guaranteeing maximum crispiness. You can see how chefs like the ones over on Fork Luxe often use a combination of techniques to get that perfect finish.
Ingredient Swaps for Swiss Cheese Stuffed Chicken
Swiss cheese is the classic, and it melts beautifully, but sometimes you want to mix things up or maybe your deli is out! If you are looking for an upgrade for your **Swiss Cheese Stuffed Chicken**, my favorite switch is Gruyère. Gruyère melts even creamier than Swiss and has a slightly nutty depth that really complements the salty ham. If you can’t find Gruyère, a good quality Manchego can work in a pinch, although the flavor will be a little sharper. The key, though, is making sure whatever you choose melts well and doesn’t separate into oil too quickly when heated. That’s why we stick to cheese varieties that hold their structure somewhat, even when hot!
Make Ahead Chicken Cordon Bleu and Storage
I know you’re busy, just like me! One of the things I love most about this **Chicken Cordon Bleu Recipe** is that it is fantastic for planning ahead. Seriously, thinking ahead is what separates a stressful dinner from a relaxing one. You can knock out the tricky prep work the day before and just breeze through the oven time when you actually need to eat. This is a huge win for getting a **gourmet chicken dinner** on the table after a crazy afternoon.
If you’re stacking up meals for the week or prepping for a party, you can actually assemble these rolls up to 24 hours in advance. Just stuff the ham and Swiss right into those pounded cutlets, roll them up, and then cover the whole thing tightly with plastic wrap. Keep them refrigerated. It’s important they stay cool right up until they hit the breading station!
Now, here is the key: Do not bread them until you are ready to bake them. The breading won’t stick as well, and the moisture from the fridge can make it gummy. Once they are fully rolled and chilling, get your breading station ready when you are an hour out from dinner. Breading fresh off the fridge seems to stick better anyway!
For leftovers—which you will have, because this tastes amazing the next day too—storage is easy. Once the chicken is fully cooked and cooled, you can store it in an airtight container in the fridge for about three days. Reheating is best done in the oven to maintain that crispiness we worked so hard to achieve. Pop it in a 350°F oven for about 10 to 15 minutes. Don’t microwave it if you can help it, unless you like rubbery chicken! If you need more ideas for planning your weeknight meals around make-ahead components, my guide on easy make-ahead cheesy egg bake has some great tips for batch cooking components.
If you’re making a huge batch, you can freeze the fully breaded (but unbaked) rolls. Flash freeze them on a baking sheet first, then transfer them to a freezer bag. When baking from frozen, just add about 10 to 15 minutes extra to the baking time. It really gives you an instant, impressive **comfort food chicken** option anytime!
Before you bake, take a look over at Tastes Better from Scratch; they have a great breakdown of steps if you like visual reference checks after assembling the rolls: tastesbetterfromscratch.com/chicken-cordon-bleu/.
Serving Suggestions for Your Dinner
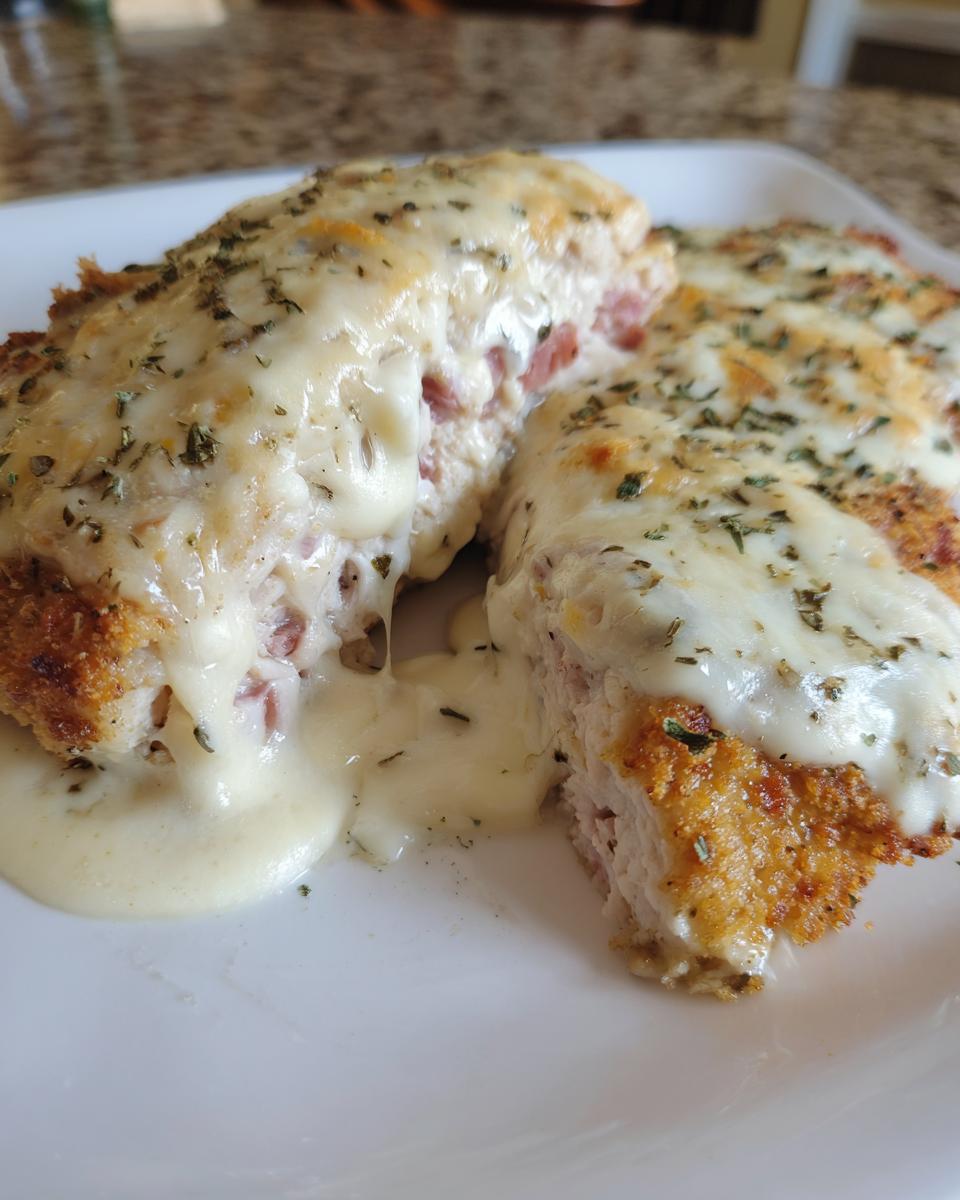
Okay, your beautiful, crispy **Chicken Cordon Bleu** is coming out of the oven, dripping with that amazing creamy sauce, and you think, “What now?” We need sides that can handle the richness of the ham and Swiss but don’t fight the flavor profile, right? Since this is definitely a fantastic **Family Dinner Idea**, I always lean toward things that are simple to make while the chicken is baking. We want something green or starchy to soak up every last drop of that sauce.
Here are the sides that I always keep stocked for when I’m making this classic dinner—they’re foolproof pairings!
- Steamed Green Beans with Lemon: You need a little brightness to cut through the cheese and cream. Steaming them lightly—and I mean *lightly* so they keep their snap—and just tossing them with a squeeze of fresh lemon juice and a tiny slick of butter is all you need. It’s quick, easy, and so refreshing.
- Simple Roasted Asparagus: If you’re already using your oven for the chicken, tossing some asparagus stalks with olive oil, salt, and pepper and roasting them for the last 12 minutes is no extra work. They caramelize a little, which is just heavenly.
- Creamy Mashed Potatoes: If you want the ultimate comfort meal experience, you *have* to have something starchy underneath to catch that sauce. I swear by my recipe for creamy mashed potatoes ultimate recipe. They are fluffy, rich, and the absolute perfect bed for this chicken. Don’t skip the potatoes!
- A Light Garden Salad: Sometimes you just need fresh greens. Don’t overcomplicate the dressing. A simple vinaigrette made with good quality olive oil, red wine vinegar, salt, and a touch of honey will keep things light enough so you can really enjoy that main course.
The goal here is balance. Since the chicken itself has ham and Swiss cheese inside, we don’t need heavy, rich sides competing for attention. Keep it fresh or keep it simple!
Frequently Asked Questions About This Dish
I always get a ton of questions after people try my recipes for the first time, especially when it comes to adapting them! Since this **Chicken Cordon Bleu Recipe** is so adaptable, I pulled together the most common things folks ask me. Don’t worry if you need to tweak it for your family or an event—that’s what cooking is all about! If you have other questions, you can always check my guide on chicken piccata meatballs for more quick-fix ideas, or just send me a note!
Can I turn this into a Cordon Bleu Casserole?
Oh, absolutely! If you need something that can sit in the oven unattended while you manage the kids or set the table, the casserole is your answer. Instead of rolling the chicken breasts whole, you’ll want to cut the pounded, stuffed chicken into thick, bite-sized pieces. Then, you toss those pieces in a light binder—I suggest using a can of cream of chicken soup mixed with maybe half a cup of extra milk and a little more Swiss cheese. Put that whole mixture into your baking dish (top with those Panko crumbs, of course), and bake it a little longer, probably 35 to 40 minutes until bubbly. It shifts from a precise roll to a super comforting **Cordon Bleu Casserole**!
How do I make mini Chicken Cordon Bleu appetizers?
These are so fun for parties! For perfect little bites, you’ll use smaller, thinner chicken cutlets—maybe cut them in half before pounding them, or use tenderloins if you can find them. You want to use just half a slice of ham and cheese, or even cut the fillings into quarters. The trick here is scaling down the breading station accordingly; smaller pieces go through the dredge much faster, so keep your hands moving! You might find great inspiration for party hacks over at Yaya Recipes when thinking about appetizers.
What if the cheese leaks out while baking?
I’ve been there! It’s usually one of two things: either the chicken wasn’t pounded to a consistent thickness, or the roll wasn’t sealed tightly enough. My best advice, after pounding everything exactly the same, is to make sure the seam of the roll is facing down in the baking dish. This pressure keeps everything tucked in tight around the filling while it heats up. If you’re nervous, just use a sturdy toothpick to hold that seam closed before you even bread it. Just remember to pull those toothpicks out before serving!
Nutritional Estimates for This Comfort Food Chicken
I know some of you are counting macros or just curious about what’s in this delicious dish, and that’s totally smart! While I am obsessed with flavor first, it’s good to know what you’re serving up. This **Comfort Food Chicken** recipe is quite hearty because of that rich Swiss cheese and ham filling, plus the creamy sauce we drizzle on top. I calculated the estimates based on the ingredients list, and you can see the breakdown below. Remember, since we are baking and not deep-frying, we are keeping the fat content managed, which I think is a win!
But here is my standard disclaimer—and this is important for E-E-A-T, folks! Because every brand of ham is different, and I use specific types of butter, these numbers are just estimates for guidance. If you switch to Gruyère or use five extra tablespoons of heavy cream in that sauce, the numbers are going to shift! If you’re looking to lighten things up a bit, maybe try swapping some of the standard milk for skim milk, or check out some of my ideas for healthy snack ideas.
Here are the approximate nutritional estimates per serving (one piece of chicken with about 2 tablespoons of sauce):
- Serving Size: 1 piece chicken with 2 tbsp sauce
- Calories: 480
- Protein: 38g
- Fat: 28g (with 14g saturated fat)
- Carbohydrates: 18g
- Sugar: 3g
- Sodium: 750mg (This is a little higher because of the ham, so maybe go light on extra salt in your prep!)
Share Your Cooking Zenith Creations
That’s it! You have officially mastered the **Easy Baked Chicken Cordon Bleu**! I sincerely hope this recipe brings some major comfort food vibes to your kitchen tonight. But honestly, my favorite part of sharing these home-tested recipes is seeing what you all create!
I am totally obsessed with seeing your beautifully golden, crispy rolls sitting on your dinner plates. Did you manage to get the sauce picture-perfect? Don’t be shy! I want to see how you served it up. It really makes my day when I know my simple techniques helped you achieve that restaurant quality feeling right at home.

If you loved this recipe—maybe it’s going straight onto your weekly rotation?—please jump over to the rating stars below and let me know! A quick rating really helps other home cooks trust that this is worth their time. And if you posted a picture on Instagram or Facebook, please tag me! I promise I always look through the tags.
If you have any burning questions that the FAQ didn’t cover, or maybe you tried a side dish that blew your mind, please don’t hesitate to reach out to me directly through the contact page at Cooking Zenith contact. Happy cooking, everyone. I can’t wait to see your glorious Ham and Swiss Chicken creations!
PrintEasy Baked Chicken Cordon Bleu with Creamy Sauce

Make this family-friendly Chicken Cordon Bleu recipe in your oven for a crispy, tender dinner. You stuff chicken breasts with ham and Swiss cheese, coat them, and bake them until golden. Serve with a simple creamy sauce for a restaurant-quality meal at home.
- Prep Time: 20 min
- Cook Time: 30 min
- Total Time: 50 min
- Yield: 4 servings 1x
- Category: Dinner
- Method: Baking
- Cuisine: American
- Diet: Vegetarian
Ingredients
- 4 boneless, skinless chicken breasts (about 7 ounces each)
- 4 thin slices deli ham
- 4 slices Swiss cheese
- 1/2 cup all-purpose flour
- 2 large eggs, beaten
- 1 cup panko breadcrumbs
- 1/2 teaspoon salt
- 1/4 teaspoon black pepper
- 2 tablespoons olive oil
- For the Creamy Sauce:
- 2 tablespoons unsalted butter
- 2 tablespoons all-purpose flour
- 1 cup milk
- 1/4 cup heavy cream
- 1/2 cup shredded Swiss cheese
- 1/4 teaspoon Dijon mustard
- Pinch of nutmeg
Instructions
- Preheat your oven to 400°F (200°C). Lightly grease a baking dish.
- Prepare the chicken: Place each chicken breast between two sheets of plastic wrap. Pound the chicken to an even 1/4-inch thickness using a meat mallet.
- Assemble the rolls: Place one slice of ham and one slice of Swiss cheese on the wide end of each pounded chicken breast. Roll the chicken tightly around the filling, securing the edges if necessary.
- Set up your breading station: Place flour on one shallow plate. Whisk the eggs in a second shallow dish. Mix the panko breadcrumbs, salt, and pepper on a third plate.
- Coat the chicken: Dredge each rolled chicken breast first in the flour, shaking off excess. Dip it into the egg mixture, allowing excess to drip off. Finally, press firmly into the panko mixture to coat completely.
- Bake the chicken: Place the coated chicken rolls seam-side down in the prepared baking dish. Drizzle the tops with olive oil. Bake for 25 to 30 minutes, or until the internal temperature reaches 165°F (74°C) and the crust is golden brown.
- Make the creamy sauce while the chicken bakes: Melt the butter in a small saucepan over medium heat. Whisk in the flour and cook for one minute. Gradually whisk in the milk until smooth.
- Bring the sauce to a simmer, stirring constantly until it thickens slightly. Remove from heat. Stir in the heavy cream, Swiss cheese, Dijon mustard, and nutmeg until the cheese melts and the sauce is smooth.
- Serve the baked chicken immediately with the warm Swiss cheese sauce spooned over the top.
Notes
- For an extra crispy coating, you can pan-fry the coated chicken rolls in a little oil for 2 minutes per side before transferring them to the oven.
- If you prefer a different cheese, Gruyère works well as a substitute for Swiss cheese.
- You can prepare the stuffed chicken rolls up to 24 hours ahead of time and keep them covered in the refrigerator before breading and baking.
Nutrition
- Serving Size: 1 piece chicken with 2 tbsp sauce
- Calories: 480
- Sugar: 3
- Sodium: 750
- Fat: 28
- Saturated Fat: 14
- Unsaturated Fat: 14
- Trans Fat: 0.5
- Carbohydrates: 18
- Fiber: 1
- Protein: 38
- Cholesterol: 120