
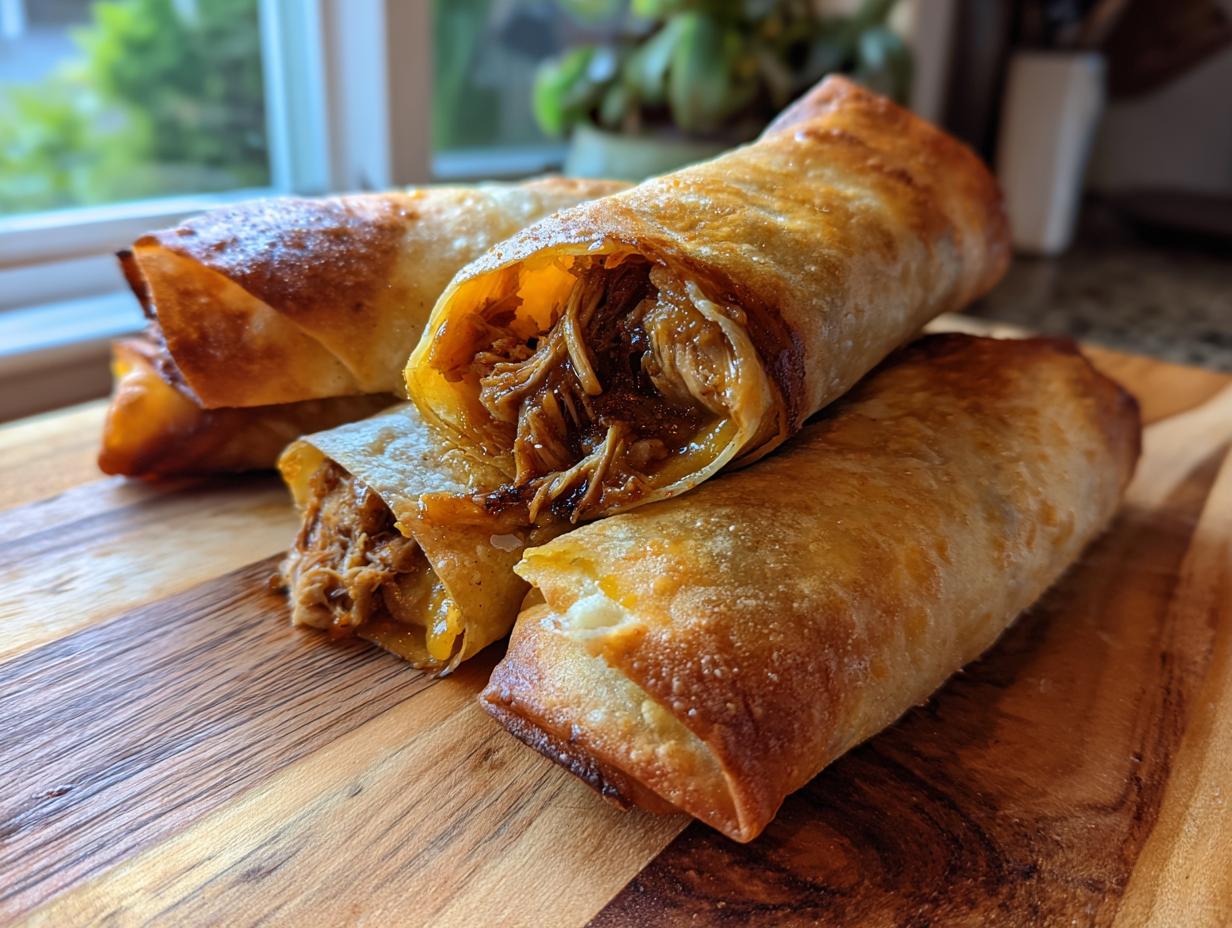
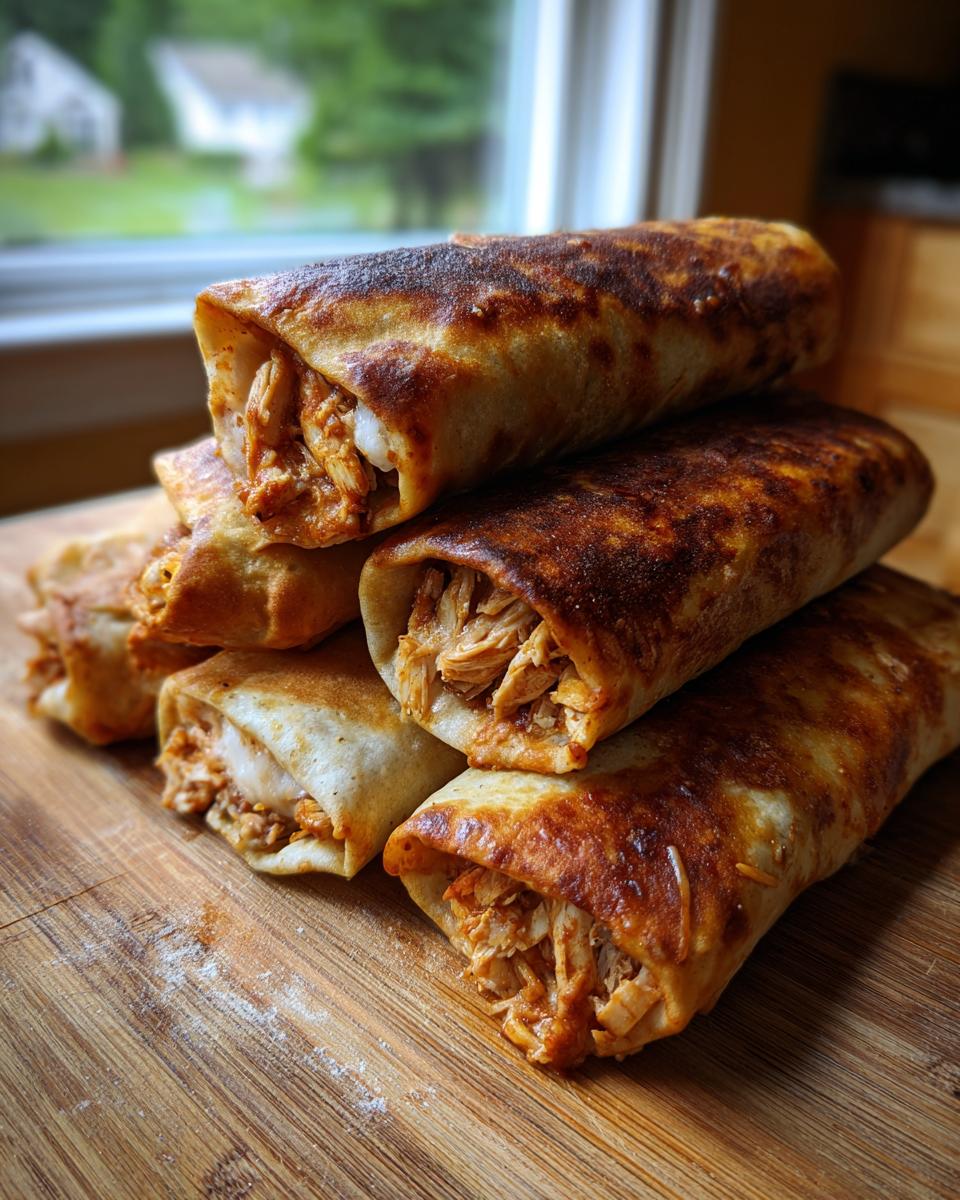
Oh man, do you ever just get that sudden, intense craving for something beautifully crunchy, savory, and dripping with melted cheese? That’s my exact feeling whenever I think about real Tex-Mex comfort food! If you’re picturing deep-fried perfection but dreading the mess and the oil slick it leaves behind, I have the absolute best thing for you today: my **Crispy Baked Chicken Chimichangas** recipe. Trust me on this one—we are cracking the code on making amazing, crunchy Chimichangas in the oven. This recipe is all about maximum crunch without that deep-fry ritual. It truly embodies what we at Cooking Zenith are all about: following Aria Thompson’s philosophy of Elevating Your Everyday Cooking by proving you can get incredible flavor and texture without all the fuss!
- Why This Crispy Baked Chicken Chimichangas Recipe Works
- Ingredients for Your Ultimate Baked Chimichangas
- Step-by-Step Instructions for Easy Homemade Chimichangas
- Tips for Making the Best Chicken Chimichangas
- Serving Suggestions for Your Quick Tex Mex Dinner
- Storage and Reheating Instructions for Leftover Chimichangas
- Frequently Asked Questions About Baked Chimichangas Recipe
- Estimated Nutritional Data for These Chimichangas
- Share Your Crispy Chimichanga Creations
Why This Crispy Baked Chicken Chimichangas Recipe Works
I know what you’re thinking: “Baked? How can it get crunchy?” That’s the secret sauce! This isn’t just a lighter option; it’s a game-changer. We nail that satisfying crispiness you want from great Chimichangas by using two key things: high heat and a very generous coating of cooking spray before it hits the pan. It caramelizes the outside shell while the inside stays steamy and cheesy. You get all the Tex-Mex satisfaction with way less cleanup! If you’re looking for simple weeknight dinners that deliver big flavor, this is it.
- Maximum Crunch, Minimum Mess: The oven crisping method gets you close to deep-fried texture without sinking your health goals.
- Incredibly Flavorful Filling: We load up the chicken with cumin and oregano so every bite is bold and savory.
- Super Quick Assembly: From cooking the filling to wrapping, you’re looking at under 35 minutes total. That’s practically instant gratification!
Achieving the Perfect Crunchy Tortilla Dinner
The trick here is making sure the cooking spray hits every single part of the tortilla wrapper before it goes in. Think of that spray as your shortcut to a Crunchy Tortilla Dinner! It allows the heat to aggressively bake the outside, making it stiff and golden almost immediately. It’s the best Healthy Chimichanga Alternative if you avoid the fryer but still demand that essential shattering crunch!
Ingredients for Your Ultimate Baked Chimichangas
Okay, you can’t make delicious Chimichangas without the right stuff! This list is straightforward, but pay attention to those little details, like making sure your tortillas are big enough. I listed everything you need right here so you can check your pantry before you head to the store. Seriously, checking twice saves you driving back for one missing thing!
For this recipe, we are focusing on shredded chicken, but don’t sweat it if you prefer ground beef—I’ll share a secret swap later on!
- 1 tablespoon olive oil (Just regular cooking olive oil, nothing fancy!)
- 1 medium onion, chopped (I try to dice mine pretty small so they melt into the flavor)
- 2 cloves garlic, minced (If you’re using the jarred stuff, about a teaspoon is perfect)
- 1 teaspoon chili powder (Your basic, reliable powder works great here)
- 1 teaspoon ground cumin (Don’t skip this, it gives it that real Tex-Mex warmth!)
- 1/2 teaspoon dried oregano
- 1/4 teaspoon salt
- 1/4 teaspoon black pepper
- 2 cups cooked, shredded chicken (Make sure it’s already cooked and pulled apart!)
- 1/2 cup chicken broth (Just enough to keep the filling moist while we cook it down)
- 1 cup shredded Monterey Jack cheese (Use good quality, it melts so much better)
- 8 medium flour tortillas (These need to be the burrito size, at least 10 inches, so they wrap up tightly!)
- Cooking spray (This is crucial for that crispy finish, so make sure you have a full can!)
Step-by-Step Instructions for Easy Homemade Chimichangas
Alright, now for the fun part! Making these baked Chimichangas is way easier than you think, even though the result tastes like you spent hours working over a deep fryer—which we definitely didn’t! We need to work in three main stages: making the filling, getting them rolled tight, and then, the secret to the crunch. If you follow these steps, you’ll have a fantastic quick Tex Mex dinner ready in no time. Let’s get rolling!
Preparing the Flavorful Chicken Chimichanga Filling
This is where we build all the flavor. Don’t rush this part; we want all that liquid gone so we don’t end up with soggy rolls!
- First things first, grab a medium skillet and heat up that tablespoon of olive oil over medium heat. Toss in your chopped onion and let it soften up nicely. About five minutes should do it until they look a little see-through and sweeter.
- Now, add your spices: the garlic, chili powder, cumin, oregano, salt, and pepper. Stir constantly for about one minute until you can really smell those spices waking up—that smell alone is going to make your kitchen feel like a little Tex-Mex cafe!
- Next, stir in your two cups of shredded chicken and the half-cup of broth. We need to cook this mixture down until almost all that broth has evaporated. When the mixture thickens slightly and the chicken looks glossy instead of swimming in liquid, pull it right off the heat. This is the secret to a thick, Flavorful Chicken Chimichanga Filling that won’t make your tortilla fall apart! Last step for the filling: stir in that cup of Monterey Jack cheese until it’s all gooey and perfectly blended.
Simple Chimichanga Assembly and Rolling Technique
Once that filling is mixed up, you want to let it cool down for just a minute. If the filling is piping hot, it can tear your tortillas when you try to roll them tight, and we can’t have that! While it cools down, go ahead and preheat your oven to 400°F (200°C). Get that baking sheet ready and give it a good spray with cooking spray.
Tortillas need some help being rolled—they like to crack if they are cold! So, warm up all eight tortillas for maybe 15 seconds each in the microwave or just dry-toasted over a burner for a few seconds. They should be super pliable. Now, for the Simple Chimichanga Assembly: Spoon about a third of a cup of that gorgeous, cheesy filling just off-center on one tortilla. You need to fold the sides in first, just like you’re wrapping a present to keep the filling contained. Then, start rolling it *tightly* away from you, like you’re tucking in a tight burrito. If you’re worried about it coming undone, use a toothpick to hold the seam closed. They need to be snug!
Baking for a Crunchy Chimichanga Recipe Finish
This final step is what transforms our dinner from ‘soft wrap’ to an amazing Crispy Chimichanga Recipe!
- Place all those neatly rolled packages seam-side down onto your prepared, sprayed baking sheet. Make sure they aren’t touching—they need space for the heat to circulate!
- Here’s the most important move for crunch: Spray the tops generously, almost dousing them, with cooking spray. Don’t be shy with this step; this replaces the oil bath!
- Bake them for 15 to 20 minutes total. You need to flip them halfway through—around the 8-minute mark—so both sides get beautifully golden brown and achieve that perfect crunch. Stick to that time, and you’ll have the crispiest baked Chimichangas ever!
Tips for Making the Best Chicken Chimichangas
Okay, now that you know the basic assembly, let me give you a few tricks I’ve learned over the years to make sure these turn out perfectly every single time. Getting that professional-tasting crunch is all about the small details, which is how we stick to the Cooking Zenith promise of elevating your everyday meals!
First, a quick note from my own trial-and-error sessions: Make sure your filling has cooled down enough before you start rolling. Hot filling steams the tortilla from the inside out, making them gummy rather than crispy. Let it sit for at least five minutes after stirring in the cheese—just long enough to handle comfortably.
Also, remember the notes mentioned brushing them with a little melted butter before the cooking spray? That’s my little extra step for even deeper browning. If you have the time, go for it. If not, the spray alone is still amazing, but butter just adds that extra layer of flavor richness you’d expect from a classic chicken dish!
Ingredient Notes and Substitutions for Chimichangas
When making these Chimichangas, the tortilla quality is non-negotiable. You absolutely need medium, sturdy flour tortillas. Don’t try to use taco-sized ones—the filling will burst out! You need the 10-inch burrito size so you have enough surface area to fold in the sides and roll it super tight. If they tear during wrapping, it means they weren’t warmed enough, so that’s almost always the issue.
And if you aren’t feeling the chicken today, no problem! You can totally switch things up. If you want to try making the super popular Flavorful Beef Chimichangas instead, just sauté one pound of ground beef first, drain off all that grease, and then add your spices and onion mixture right into the cooked beef. You might need an extra splash of broth to keep it moist, but the technique stays exactly the same. It’s so satisfying knowing you can flip between chicken and beef dinners using the same foolproof baking method!
Another great tip is to always drain your cheese well if it looks wet. Excess moisture near the outside means a soggy wrapper, and we are trying to avoid sogginess at all costs!
Serving Suggestions for Your Quick Tex Mex Dinner
You’ve made the perfect crunchy rolls—now what? A chimichanga isn’t truly complete until it’s lounging on a plate covered in all the good stuff! Think of the crispy shell as the perfect base for a mountain of flavor. This is what makes it such a fantastic, complete Quick Tex Mex Dinner, because you can assemble the whole meal super fast.
First off, you need the classics: creamy sour cream, bright salsa, and definitely some fresh guacamole. I like to whip up a huge bowl of guacamole because the cool, smooth avocado is the best contrast to that hot, salty crunch from the oven. Don’t hold back on those toppings!
If you want to make this a heartier meal—maybe you’re feeding hungry teenagers or just had a really long day—you really need a side dish, too. We usually just make a simple batch of Spanish rice on the side, or maybe some refried beans if I’m feeling fancy. You can stir a little extra cheese into the beans right before serving, too, just for fun! It really brings the whole Tex-Mex experience home when you serve it up loaded and ready to eat.
Storage and Reheating Instructions for Leftover Chimichangas
Now, if you manage to have leftovers—which is rare in my house, honestly—you want to keep them crisp! Store any leftover Chimichangas in an airtight container. I usually pop them in the fridge for up to three days. The microwave is your worst enemy here; it makes them soft and sad. For reheating, you definitely want dry heat. A quick 5 to 7 minutes in a 350°F oven works wonders, or even better, toss them in your air fryer for about 4 minutes.
Using the air fryer, like we talk about for our air fryer potato chips recipe, brings back that satisfying, crunchy texture perfectly. They come out tasting almost freshly made, ready for seconds!
Frequently Asked Questions About Baked Chimichangas Recipe
I love getting your cooking questions! It shows me you’re getting right into the kitchen, which is exactly what I hope for when I share these recipes. Since we are trying to get the absolute best texture without relying on a deep fryer, folks often have a few specific worries. Here are the most common things I hear about trying this Baked Chimichangas Recipe at home. If you want even more crisping tips for different foods, check out my post on air fryer potato chips recipe for maximum crunch!
Can I use an Air Fryer for this Chimichanga Tutorial?
Oh, absolutely! If you have an air fryer, you should totally use it—it’s an amazing tool, kind of like a tiny convection oven that gets things extra crispy fast. An air fryer really takes our promise of an amazing Air Fryer Chimichanga Tutorial to the next level. For the best results, set your air fryer to about 375°F for 8 to 10 minutes. Make sure you still spray them well with cooking spray, and flip them halfway through just like in the oven directions. They come out unbelievably crunchy!
How do I make Cheesy Chimichanga Filling with Ground Beef?
That’s such a popular substitution! If you want to make Ground Beef Chimichangas instead of chicken, the process is incredibly easy. Just brown about a pound of ground beef until it’s completely cooked through. You *must* drain off every bit of that grease thoroughly—this is crucial so your filling isn’t oily. Once drained, you can proceed exactly as written in steps 2 and 3, adding the spices and seasoning, and then mixing in the cheese. You get the same wonderful Cheesy Chimichanga Filling Ideas, just with savory beef instead!
Are Baked Chimichangas a Healthy Chimichanga Alternative?
In my book, yes, they absolutely are! That’s why I focus so much on this method. When you deep fry, the tortilla soaks up so much oil, which adds a ton of heavy fat and calories. By baking and just using a spray coating, you are drastically cutting down on that added fat. It keeps the inside flavorful and amazing while letting you enjoy that textural payoff you crave. It’s certainly a much lighter, more manageable version, making it a great Healthy Chimichanga Alternative for a weeknight meal!
Estimated Nutritional Data for These Chimichangas
It’s always a good idea to know what you’re eating, even when you’re indulging in comfort food! But before we dive into the numbers for these amazing baked Chimichangas, I have to give you my standard home cook disclaimer. Since we are baking and not using a controlled commercial deep fryer, and since the exact brand of cheese or size of chicken breast can vary, these numbers are just a guide. Think of them as a good ballpark to keep you informed!
When comparing this baked recipe to the traditional deep-fried versions, you’ll see our fat content is significantly lower because we skipped the oil bath. That’s a win in my book!
- Serving Size: You get 2 chimichangas per serving, which is a hearty portion!
- Calories: Estimated at about 450 calories.
- Total Fat: Around 18 grams. (Notice that most of that is unsaturated fat, which is great!)
- Saturated Fat: About 7 grams.
- Carbohydrates: Roughly 45 grams of glorious tortilla goodness.
- Protein: A solid 30 grams per serving, thanks to all that chicken and cheese!
- Fiber: About 4 grams.
- Sugar: Very low, only about 3 grams.
I always try to keep things balanced, and seeing a quick Tex-Mex dinner like this come in with that much protein under 500 calories makes me feel great about serving it up any night of the week. Enjoy them guilt-free!
Share Your Crispy Chimichanga Creations
Wow, we made it! I hope you had as much fun rolling these up as I do every time I make them for dinner. Now the best part: taste-testing and sharing the delicious outcome of your efforts! I genuinely want to know how your **Crispy Chimichanga Recipe** turned out for you. Did you manage to get that incredible crunch in the oven?
Please, please come back and leave a 5-star rating right below this post if you loved this simple approach to making Chimichangas! It helps other home cooks know they can trust this recipe. And if anything felt a little sticky, or maybe your folding technique gave you trouble, throw your questions in the comments below. I read every single one!
If you snap a picture of your beautifully baked, golden-brown masterpieces, tag me on social media—I absolutely love seeing how your food turns out! And if you’re always looking for new ideas for comfort food, maybe check out some other beef options, like the amazing recipe I saw over at Yumsyla, or perhaps you want another take on chicken from Cocinarepublic next time.
For any other questions about kitchen setup or just need to reach out about getting your own everyday cooking elevated, feel free to use my contact page here: Contact Cooking Zenith. Happy cooking, and enjoy that crunch!
PrintCrispy Baked Chicken Chimichangas

Make satisfying, crispy chicken chimichangas at home using your oven. This recipe focuses on achieving a crunchy texture without deep frying, perfect for a quick Tex-Mex dinner.
- Prep Time: 15 min
- Cook Time: 20 min
- Total Time: 35 min
- Yield: 4 servings 1x
- Category: Dinner
- Method: Baking
- Cuisine: Tex-Mex
- Diet: Vegetarian
Ingredients
- 1 tablespoon olive oil
- 1 medium onion, chopped
- 2 cloves garlic, minced
- 1 teaspoon chili powder
- 1 teaspoon ground cumin
- 1/2 teaspoon dried oregano
- 1/4 teaspoon salt
- 1/4 teaspoon black pepper
- 2 cups cooked, shredded chicken
- 1/2 cup chicken broth
- 1 cup shredded Monterey Jack cheese
- 8 medium flour tortillas (burrito size)
- Cooking spray
Instructions
- Heat olive oil in a skillet over medium heat. Add onion and cook until soft, about 5 minutes.
- Add garlic, chili powder, cumin, oregano, salt, and pepper. Cook for 1 minute until fragrant.
- Stir in the shredded chicken and chicken broth. Cook until the liquid evaporates and the mixture thickens slightly. Remove from heat and stir in the shredded cheese until melted. This is your flavorful beef chimichanga filling.
- Preheat your oven to 400°F (200°C). Lightly spray a baking sheet with cooking spray.
- Warm the tortillas briefly in a microwave or dry skillet to make them pliable.
- Place about 1/3 cup of the chicken mixture near one edge of a tortilla. Fold the sides inward, then tightly roll the tortilla away from you, creating a sealed package. Secure with a toothpick if necessary.
- Place the rolled chimichangas seam-side down on the prepared baking sheet.
- Spray the tops of the chimichangas generously with cooking spray for crisping.
- Bake for 15 to 20 minutes, flipping halfway through, until the tortillas are golden brown and crispy.
- Remove toothpicks before serving. Serve immediately with your preferred toppings.
Notes
- For extra crispiness, you can lightly brush the tortillas with melted butter before spraying with cooking spray.
- You can substitute ground beef for the chicken to make beef chimichangas.
- Serve these chimichangas with sour cream, salsa, or guacamole for a complete Tex-Mex meal.
Nutrition
- Serving Size: 2 chimichangas
- Calories: 450
- Sugar: 3
- Sodium: 650
- Fat: 18
- Saturated Fat: 7
- Unsaturated Fat: 11
- Trans Fat: 0.5
- Carbohydrates: 45
- Fiber: 4
- Protein: 30
- Cholesterol: 85