
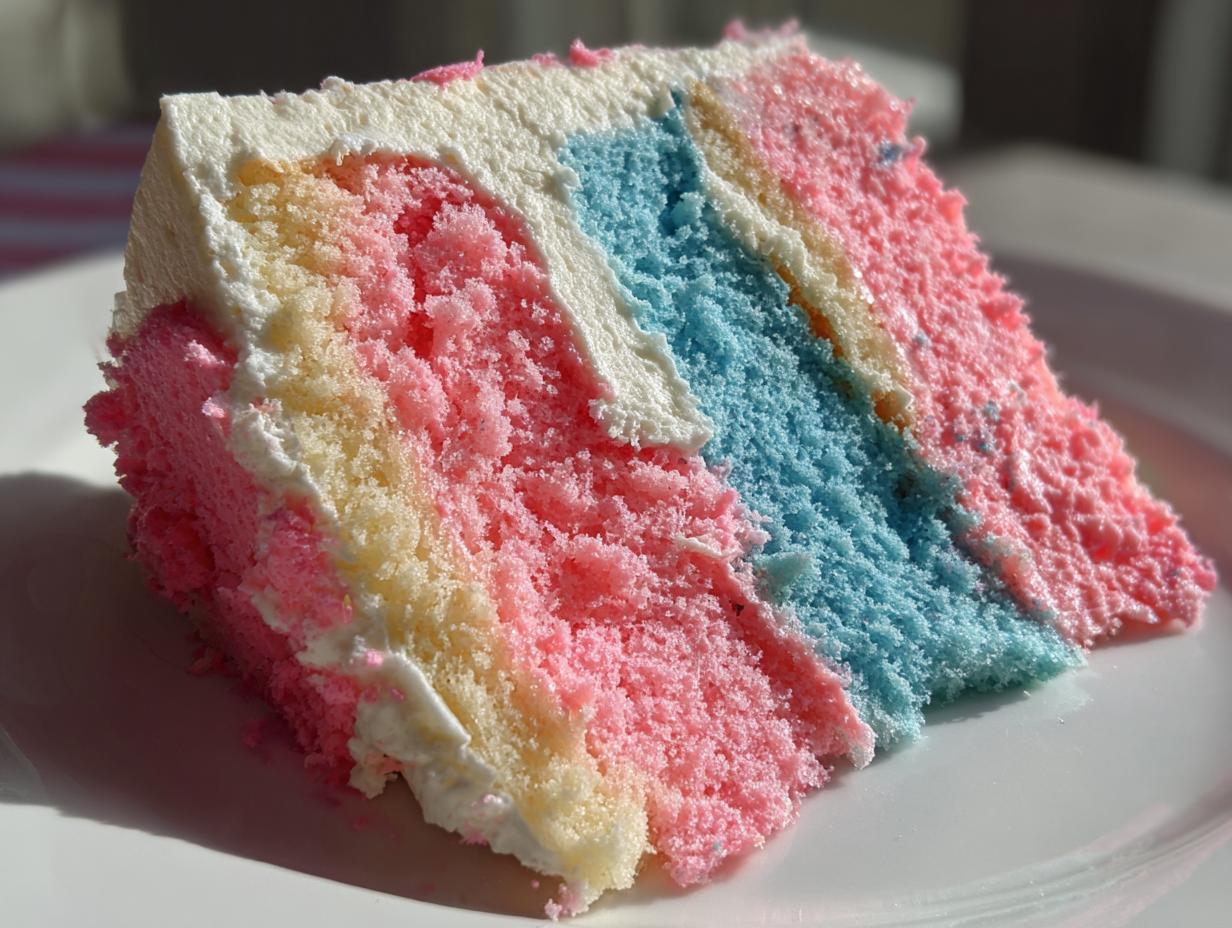
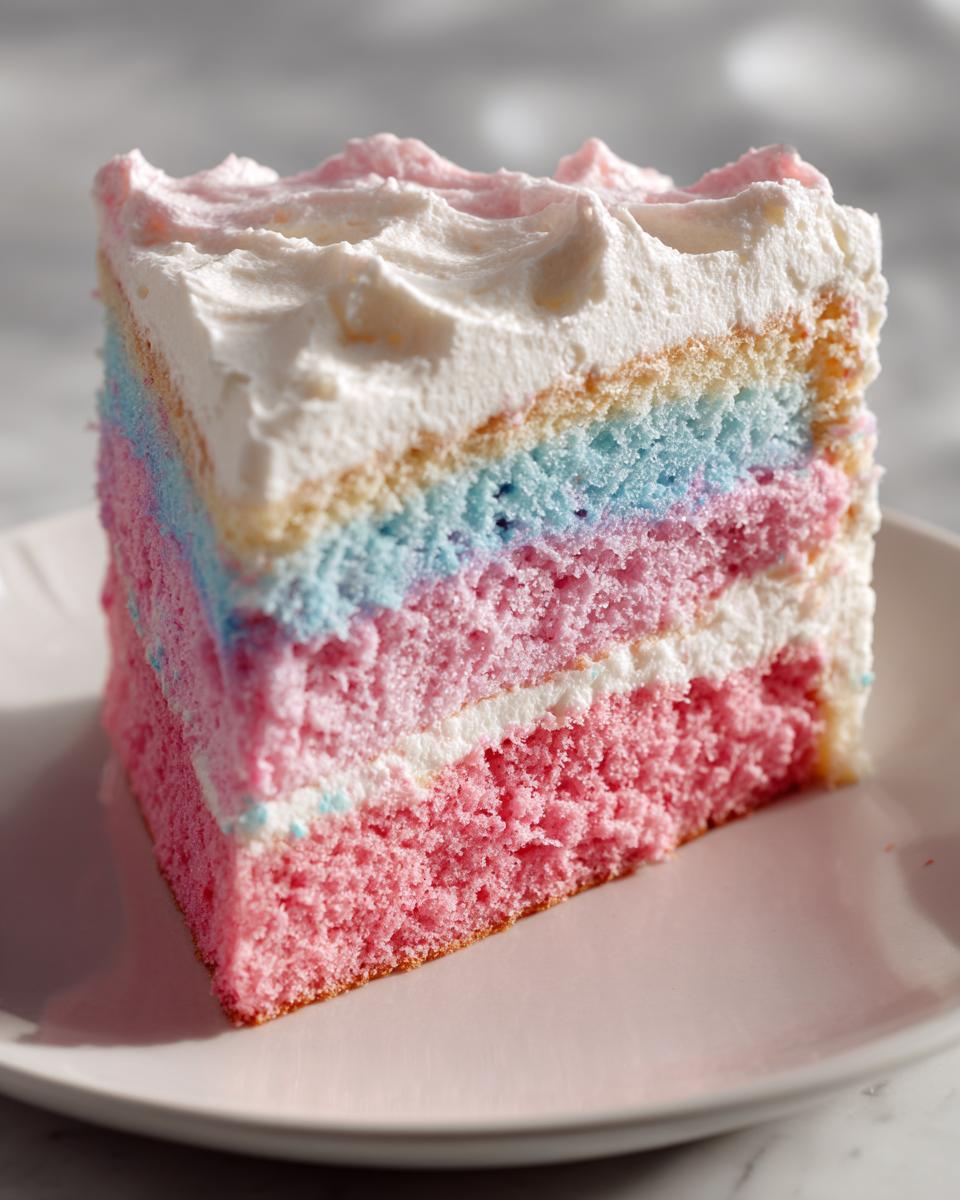
You know those desserts that just make you stop scrolling and say, “Wow, I need that for my next party”? For me, that’s always been the gorgeous, over-the-top, completely whimsical creations you usually see at carnivals or fairgrounds. But listen, you don’t need to be a professional baker to make something that looks that magical! I’m so excited to share my absolute favorite recipe for a truly show-stopping **cotton candy cake**. This is how we bring that dreamy, fluffy, pastel magic right into our ordinary kitchens. Honestly, getting those soft pink and blue swirls just right is pure joy, and trust me, this recipe is far easier than it looks. It’s all about simple steps yielding epic results!
- Why This Easy Cotton Candy Cake Recipe Works for You
- Essential Ingredients for Your Cotton Candy Cake
- Step-by-Step Instructions to Make the Cotton Candy Cake
- Tips for Success: Mastering Your Cotton Candy Cake
- Variations for Your Whimsical Birthday Cake
- Storage and Serving Suggestions for the Cotton Candy Cake
- Frequently Asked Questions About Making a Cotton Candy Cake
- Nutritional Estimates for This Cotton Candy Flavored Dessert
- Share Your Magical Cotton Candy Cake Creation
- Nutritional Estimates for This Cotton Candy Flavored Dessert
- Share Your Magical Cotton Candy Cake Creation
Why This Easy Cotton Candy Cake Recipe Works for You
I completely understand. Sometimes you need that showstopper dessert—the one that gets everyone reaching for their phone because it looks like it took three days of advanced pastry school to complete. That’s why I tweaked this cotton candy cake recipe until it was foolproof. You get all the whimsy without any of the stress.
- It truly is a fluffy layer cake recipe; the crumb is incredibly light, not dense or gummy like some specialty cakes can be.
- The colors are stunning but achieved with just a drop of gel coloring—so you get those gorgeous pastel colored desserts without worrying about bleeding or muddy hues.
- It comes together quickly! You can have this finished cake on the table in just about an hour of active time. If you want a quick win before our easy breakfast recipes day, this is it!
Achieving Fluffy Layers with Pastel Hues
The secret to that airy texture isn’t complicated, I promise! It comes down to how we handle the butter and sugar first, creating those tiny pockets for air. When you divide the batter and add the color, just handle it gently. We fold in the color, we don’t beat it in. This keeps those beautiful air bubbles intact so your cake stays light and almost cloud-like when baked.
Homemade Cotton Candy Frosting: Simple and Sweet
Forget those grainy, overly sweet store-bought tubs! The homemade cotton candy frosting is where we add so much flavor without adding fussy steps. I keep the base a classic American buttercream—butter, sugar, cream—and then we just fold in that amazing extract. It pipes beautifully and tastes exactly like a nostalgic sweet treat, making this cotton candy cake the ultimate party centerpiece.
Essential Ingredients for Your Cotton Candy Cake
Okay, let’s talk about what you need to gather. When we’re making something this fun and whimsical, the quality of the flavor agents really matters! I want you to feel that rush of nostalgia when you taste this cake, so we’re focusing on the core items that carry that sweet, carnival flavor.
Don’t skip the step of sifting that powdered sugar, seriously. If you don’t, you’ll spend half your time wrestling with lumps in your frosting, and we don’t have time for that drama! Also, remember that while we aren’t making a deeply pigmented cake—we want soft pastels—you must use a good quality gel food coloring. Those little drops work wonders!
If you’ve ever had trouble with icing bases before, check out my tips for managing glazes over at my guide on icing stability; that same concept applies here to keep our buttercream swirl looking sharp!
For the Fluffy Pastel Cake Layers
- 1 1/2 cups all-purpose flour
- 1 1/2 teaspoons baking powder
- 1/2 teaspoon salt
- 1 cup granulated sugar
- 1/2 cup unsalted butter, softened
- 2 large eggs
- 1 teaspoon vanilla extract
- 1/2 cup whole milk
- 1 teaspoon cotton candy flavoring extract
- Pink and blue gel food coloring
When you grab your cotton candy flavoring, make sure it’s the *extract* meant for baking, which is usually stronger and more concentrated. For the coloring, focus on the gel kind, not the liquid droppers you use for dyeing Easter eggs, because the gel won’t thin out your batter consistency while giving you vibrant pastel results.
For the Homemade Cotton Candy Frosting
- 1 cup (2 sticks) unsalted butter, softened
- 4 cups powdered sugar, sifted
- 1/4 cup heavy cream
- 1 teaspoon cotton candy flavoring extract
- Pinch of salt
- Extra cotton candy for topping (optional)
The butter for the frosting absolutely has to be softened—I mean perfectly room temperature. If it’s cold, your frosting will shred; if it’s too warm and greasy, it’ll run right off the cake. We want that perfect, creamy foundation so we can whip it up into something light and fluffy that perfectly caps off this fun dessert.
Step-by-Step Instructions to Make the Cotton Candy Cake
Alright, time to get messy! This is where the fun really starts, turning simple batter into a beautiful, whimsical cotton candy cake. Don’t rush the mixing stages; that’s how we lock in the fluffiness. I’ve tested this a million times to make sure the process is straightforward, even when you’re juggling two different colors. It’s all about layering the additions correctly so everything blends without deflating all the air we worked so hard to create!
Preparing the Cake Batter and Swirl Technique for the Cotton Candy Cake
First things first: get that oven preheated to 350°F (175°C) and make absolutely sure those 8-inch cake pans are well-greased and floured—we don’t want any sticking drama later! Start by creaming your sugar and softened butter until it looks like pale, fluffy cloud fluff. Then, add those eggs one by one. Next, we start alternating: dry mixture, then milk mixture, always starting and ending with the dry ingredients. Remember, we’re mixing until *just* combined. Seriously, stop the mixer when you still see a tiny streak of flour; that’s perfect.
Now for the color show! Divide your batter evenly into two bowls. Add just a few drops of pink gel coloring to one bowl and blue to the other. Fold it in super gently until you get soft pastel shades. Don’t mix it hard, or you’ll lose the air! Simply spoon alternating small dollops of pink and blue batter right into your prepared pans. This alternating dump method naturally creates a beautiful, subtle swirl effect when it bakes up.
Baking and Cooling the Fluffy Layer Cake Recipe
Pop those beauties in the oven and set your timer for about 28 minutes. You’re aiming for that toothpick test to come out clean, maybe with a few mopping crumbs attached—that means it’s done but not drying out. The most critical part? Patience during cooling. Let the cakes rest right in those pans for 10 minutes. Once that time is up, carefully invert them onto a wire rack. They must be completely, stone-cold before you even *think* about frosting them. If those layers are even slightly warm, the frosting melts into a sugary puddle, and that’s a sad sight for such a fluffy layer cake recipe!
Assembling Your Showstopper Dessert with Cotton Candy Frosting
While the cakes chill down, whip up that homemade cotton candy frosting. Beat that softened butter until it’s smooth—I mean *really* smooth. Then, add your sifted powdered sugar slowly, alternating with the heavy cream. Once it’s creamy, beat in that vanilla and the cotton candy extract. If you want a marbled look, take about a third of the frosting, add a drop of color, and mix it lightly. Layer one cooled cake down, spread a generous layer of the white frosting, top with the second cake, and then frost the whole thing. For the grand finish, grab some actual, fluffy cotton candy and gently press it right on top just moments before you bring this showstopper dessert to the table. You can see a great example of how to create stunning swirls like this over at Cupcake Recipes! If you’re looking for other baking projects that require that perfect creamed base, you must see my guide on melt-in-your-mouth butter cookies.
Tips for Success: Mastering Your Cotton Candy Cake
Even the easiest recipes need a little finesse sometimes, right? This cotton candy cake is super fun, but there are three quick things I always double-check to make sure it’s absolutely perfect when I serve it. First, when you’re coloring the batter, less is truly more. You want that soft, whimsical pastel look—if you add too much gel coloring, you risk slightly changing the batter’s texture, so use just a few drops!
Next up: the frosting consistency. If your homemade cotton candy frosting looks a little soupy after you mix it, don’t panic! Just pop it in the fridge for about 15 minutes to firm up before you start frosting the layers. That short chill time works wonders for stability. I learned that trick when I was trying to get a smooth finish on my lemon brownies!
Finally, that amazing, floating topping of real cotton candy? It’s humidity’s sworn enemy. Only decorate the very top of your completely assembled cake right before you walk it out to the party table. Seriously, if you put it on an hour early, it’ll start dissolving into sticky strings! For more ideas on keeping things perfect right up until serving, check out the advice on Cook Orchard.
Variations for Your Whimsical Birthday Cake
You know, once you have the base formula down for this light cake, you can take it in so many fun directions! While the classic pink and blue swirl is wonderful, this recipe is truly begging for a little customization to match whatever party theme you’re throwing. It’s such a great base for all sorts of kid friendly birthday cake ideas.
If you’re planning a full carnival themed treat setup, lean into the flavor variations. Instead of the standard cotton candy extract, try swapping in a clear bubblegum flavoring for an even more nostalgic vibe, or maybe even blend the cotton candy with a little bright raspberry extract for a dual flavor layer!
For the look? If you aren’t feeling the two-tone batter swirl, you can simplify everything while keeping the visual impact. Try coloring all of your batter light blue, then filling the center of your cake pans with a separate small batch of plain white cake batter. When you pull it out, you get a perfectly framed, lighter center color! Or, if you want to make it a true pink and blue swirl cake but don’t want to mix two batters again, you can pour the whole batch in, then drizzle about a teaspoon of melted white chocolate colored bright pink and another teaspoon of blue over the top, swirling gently with a knife just once or twice.
I also love playing with the sprinkles. Don’t just stick to standard rainbow jimmies! Try finding specialty sprinkles that include shiny dragees or crunchy sanding sugar in very specific pastel tones—think lavender, mint green, and baby yellow mixed with your pink and blue. They add texture and make the cake look even more special. If you like playing with vintage flavors, you might enjoy my inspiration for a maraschino cherry cake next time!
Storage and Serving Suggestions for the Cotton Candy Cake
Because this cotton candy cake has that sugary, cloud-like topping, timing is everything when serving! If you’re not needing it right away, keep the frosted cake covered tightly at cool room temperature for up to two days. Do *not* try to refrigerate a cake topped with real cotton candy—trust me, it dissolves instantly!
Save that beautiful cloud topping for the very last minute. For drinks, keep things simple so the cake remains the star! A light sparkling water or maybe even some homemade fun pink lemonade pairs perfectly with all that sweet flavor. This cake is best enjoyed the day it’s frosted for maximum fluff factor!
Frequently Asked Questions About Making a Cotton Candy Cake
I always get a ton of questions when I post photos of this cake because people want to know all the insider secrets! That’s totally fair; transforming simple ingredients into a whimsical birthday cake can seem tricky. Here are the top things I hear from fellow bakers when they try this for the first time. I hope these help you feel super confident!
Can I use box cake mix instead of scratch for this cake?
You absolutely can, and I won’t tell anyone! If you’re looking for an ultra no fuss cake recipe, start with a good quality white or vanilla box mix. The main thing you have to change is the liquid. Boxed mixes usually call for water or milk, but you’ll want to use milk and definitely add that teaspoon of cotton candy flavoring extract when you mix in your wet ingredients. Skip the milk and water the box calls for and use a mix of milk and flavoring instead. You should still divide the batter and color it for that lovely swirl effect.
Why is my frosting too thin, even with sifted sugar?
This usually happens when the butter gets too warm while you’re creaming it, or if you added too much cream at the end. If you reach that point, stop what you’re doing and put the entire bowl into the fridge for about 10 to 15 minutes. That chill time is magic! Once the butter re-chills slightly, the frosting will stiffen up beautifully. You can then beat it again at a medium speed. This trick works great for keeping any party centerpiece cake looking sharp!
How can I prevent the pink and blue colors from bleeding into each other?
Great question! Color bleeding happens when the food coloring is too thin or if the batter is overworked. Since we are using gel coloring, that’s mostly avoided, but the real key is how you mix after adding the color. You must fold it in very gently, only until the color is *just* visible—a light pastel. If you mix until it’s uniform and fully saturated, you’re mixing too much, which can encourage the dyes to spread during baking. Also, make sure you don’t let the colored batters sit around for hours before baking. The sooner they go into the oven, the better they hold their distinct color lines.
Is it possible to make this a single-layer sheet cake?
Yes, you can absolutely shift this recipe to an easy celebration cake sheet pan style! You can pour the entire batch of batter—both colors combined, or swirled as directed—into a greased and floured 9×13 inch pan. Because the heat reaches the center faster in a wide pan, the baking time will likely be shorter, so start checking around the 22-minute mark. You’ll still get that lovely sweet flavor, but it will be easier to slice and serve, which is great for big crowds!
If you run into any trouble or have something amazing to share about your experience with this recipe, please don’t hesitate to reach out; you can always find us over at the Contact Page!
Nutritional Estimates for This Cotton Candy Flavored Dessert
I always want you to know what you’re serving up! Keep in mind that these figures are just estimates, since how much frosting you use or exactly which brand of ingredients you choose can make a difference in the final count for this amazing cotton candy flavored dessert. This is based on the yield of 10 average-sized slices.
We know this is a treat, not an everyday staple, but knowing the basics helps when planning out the rest of the menu!
- Serving Size: 1 slice
- Calories: 450
- Sugar: 65g
- Sodium: 250mg
- Fat: 20g
- Saturated Fat: 12g
- Carbohydrates: 68g
- Protein: 4g
Share Your Magical Cotton Candy Cake Creation
Honestly, the best part of sharing these recipes is seeing what you all come up with! I hope this guide has given you the confidence to dive in and create your own magical dessert ideas. When you finish baking this showstopper, please come back and give the recipe a star rating—it helps me know what’s working for you all!
And please, please share photos! Tag me on social media when you serve up your beautiful cotton candy cake. I love seeing those perfect pastel swirls! Happy baking; I know it’s going to be stunning!
Nutritional Estimates for This Cotton Candy Flavored Dessert
I always want you to know what you’re serving up! Keep in mind that these figures are just estimates, since how much frosting you use or exactly which brand of ingredients you choose can make a difference in the final count for this amazing cotton candy flavored dessert. This is based on the yield of 10 average-sized slices.
We know this is a treat, not an everyday staple, but knowing the basics helps when planning out the rest of the menu!
- Serving Size: 1 slice
- Calories: 450
- Sugar: 65g
- Sodium: 250mg
- Fat: 20g
- Saturated Fat: 12g
- Carbohydrates: 68g
- Protein: 4g
Share Your Magical Cotton Candy Cake Creation
Honestly, the best part of sharing these recipes is seeing what you all come up with! I hope this guide has given you the confidence to dive in and create your own magical dessert ideas. When you finish baking this showstopper, please come back and give the recipe a star rating—it helps me know what’s working for you all!
And please, please share photos! Tag me on social media when you serve up your beautiful cotton candy cake. I love seeing those perfect pastel swirls! If you want to read a bit more about my philosophy on cooking and community after you’re done baking, check out my About Page. Happy baking; I know it’s going to be stunning!
PrintEasy, Fluffy, Pastel Cotton Candy Layer Cake with Homemade Cotton Candy Buttercream
Create a whimsical, fluffy cotton candy cake with pastel layers and sweet homemade frosting. This recipe is straightforward to make and perfect for birthdays or fun celebrations.
- Prep Time: 30 min
- Cook Time: 30 min
- Total Time: 60 min
- Yield: 10 servings 1x
- Category: Dessert
- Method: Baking
- Cuisine: American
- Diet: Vegetarian
Ingredients
- 1 1/2 cups all-purpose flour
- 1 1/2 teaspoons baking powder
- 1/2 teaspoon salt
- 1 cup granulated sugar
- 1/2 cup unsalted butter, softened
- 2 large eggs
- 1 teaspoon vanilla extract
- 1/2 cup whole milk
- 1 teaspoon cotton candy flavoring extract
- Pink and blue gel food coloring
- 1 cup (2 sticks) unsalted butter, softened (for frosting)
- 4 cups powdered sugar, sifted (for frosting)
- 1/4 cup heavy cream (for frosting)
- 1 teaspoon cotton candy flavoring extract (for frosting)
- Pinch of salt (for frosting)
- Extra cotton candy for topping (optional)
Instructions
- Preheat your oven to 350°F (175°C). Grease and flour two 8-inch round cake pans.
- In a medium bowl, whisk together the flour, baking powder, and salt. Set this dry mixture aside.
- In a large bowl, cream together the granulated sugar and softened butter until light and fluffy. Beat in the eggs one at a time, mixing well after each addition. Stir in the vanilla extract.
- In a separate small bowl, mix the milk and cotton candy flavoring extract.
- Alternate adding the dry ingredients and the milk mixture to the wet ingredients, beginning and ending with the dry ingredients. Mix until just combined; do not overmix.
- Divide the batter evenly between two bowls. Add a few drops of pink gel coloring to one bowl and blue gel coloring to the other. Gently fold the color into each batter until you have two distinct pastel colors.
- Spoon alternating dollops of pink and blue batter into the prepared cake pans to create a swirled effect.
- Bake for 28 to 32 minutes, or until a toothpick inserted into the center comes out clean. Let the cakes cool in the pans for 10 minutes before inverting them onto a wire rack to cool completely.
- Prepare the cotton candy buttercream: In a large bowl, beat the softened butter until smooth. Gradually add the sifted powdered sugar, alternating with the heavy cream, until the frosting is smooth and creamy. Beat in the cotton candy flavoring extract and a pinch of salt.
- If you want a marbled look, divide the frosting and tint one portion a very light pink or blue.
- Place one cooled cake layer on a serving plate. Spread a layer of frosting over the top. Place the second layer on top.
- Frost the top and sides of the entire cake with the remaining white or marbled frosting.
- If desired, gently press real cotton candy onto the top of the cake just before serving.
Notes
- For the best pastel color, use gel food coloring sparingly. You want a light, whimsical hue, not a deep shade.
- Make the frosting slightly ahead of time, but wait to apply it until the cakes are completely cool to prevent melting.
- This cake tastes best when served the day it is assembled, as the real cotton candy topping will dissolve over time.
Nutrition
- Serving Size: 1 slice
- Calories: 450
- Sugar: 65
- Sodium: 250
- Fat: 20
- Saturated Fat: 12
- Unsaturated Fat: 8
- Trans Fat: 0
- Carbohydrates: 68
- Fiber: 1
- Protein: 4
- Cholesterol: 65