
If you’ve ever walked past a bakery window and stopped dead in your tracks because of that stunning, towering loaf with the deep, dark swirls peering out—I get it. You think, “That’s impossible to make at home,” but I’m here to tell you it absolutely is! My goal, just like Aria’s philosophy here at Cooking Zenith, is to take those intimidating techniques and make them feel totally achievable. Forget complicated steps; this is the ultimate, easy step-by-step guide to making the very best chocolate babka you’ve ever tasted. We’re turning that bakery magic into your weekend baking project. You can read more about our mission to elevate your everyday cooking right here!
- Why This Ultimate Chocolate Babka Recipe Works (Best Chocolate Swirl Bread)
- Ingredients for Your Soft Buttery Babka Dough and Filling
- Step by Step Babka Guide: How to Make Chocolate Babka
- Tips for Success Making Homemade Sweet Bread
- Variations for Your Chocolate Babka Recipe
- Serving Suggestions for Babka for Brunch and Dessert
- Storage and Reheating Instructions for Your Moist Sweet Loaf
- Frequently Asked Questions About How to Make Babka
- Nutritional Estimates for This Decadent Chocolate Pastry
- Share Your Homemade Chocolate Babka Experience
- Nutritional Estimates for This Decadent Chocolate Pastry
- Share Your Homemade Chocolate Babka Experience
Why This Ultimate Chocolate Babka Recipe Works (Best Chocolate Swirl Bread)
So, why am I calling this the ULTIMATE chocolate babka recipe? Because I’ve taken the fuss out of it without sacrificing any of that glorious bakery flavor. Seriously, this is the perfect combination for you home bakers!
- It Starts with the Dough: We’re using a rich, yeasted dough that borders on chocolate brioche territory. It’s soft, slightly sweet, and unbelievably buttery. This soft buttery babka dough is the foundation that keeps your loaf moist long after you bake it.
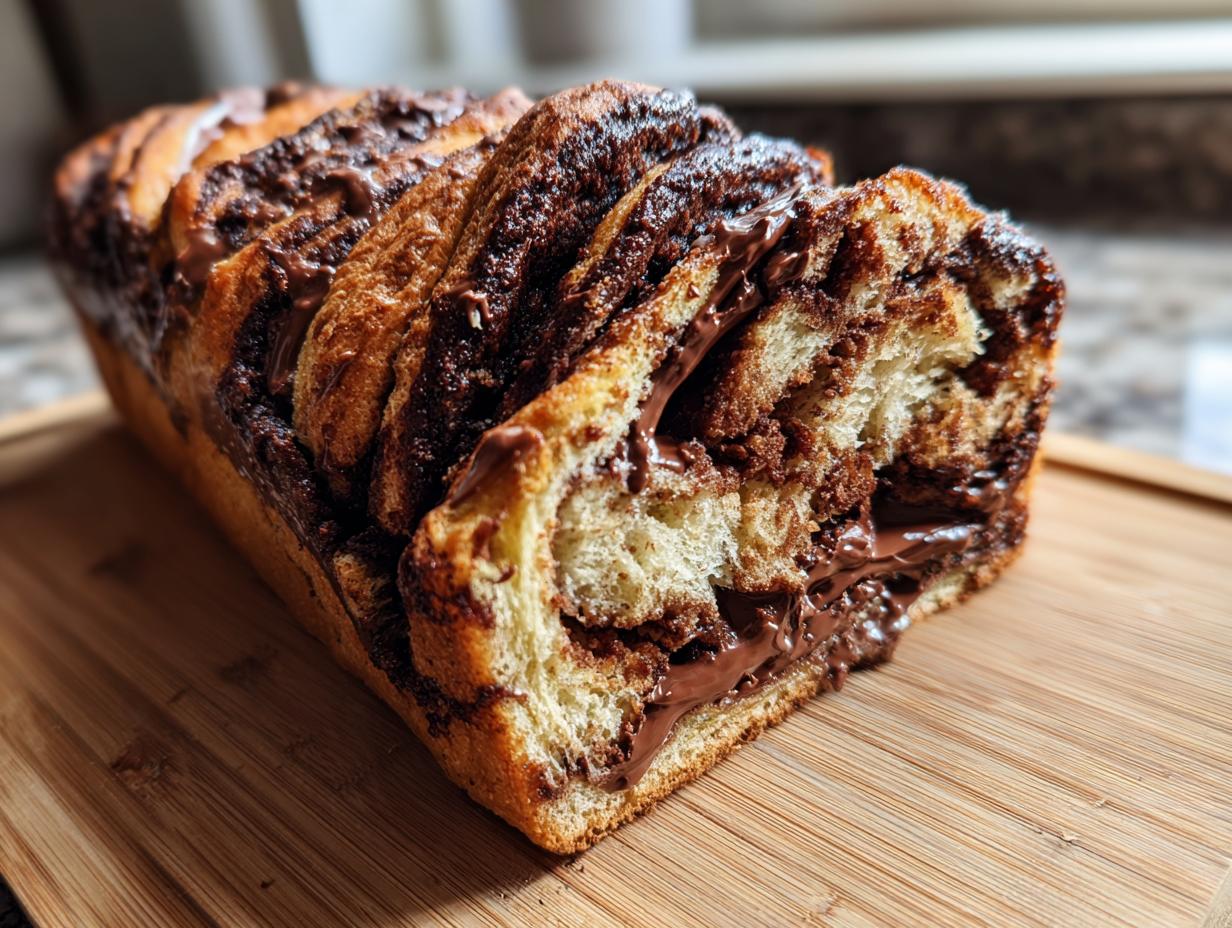
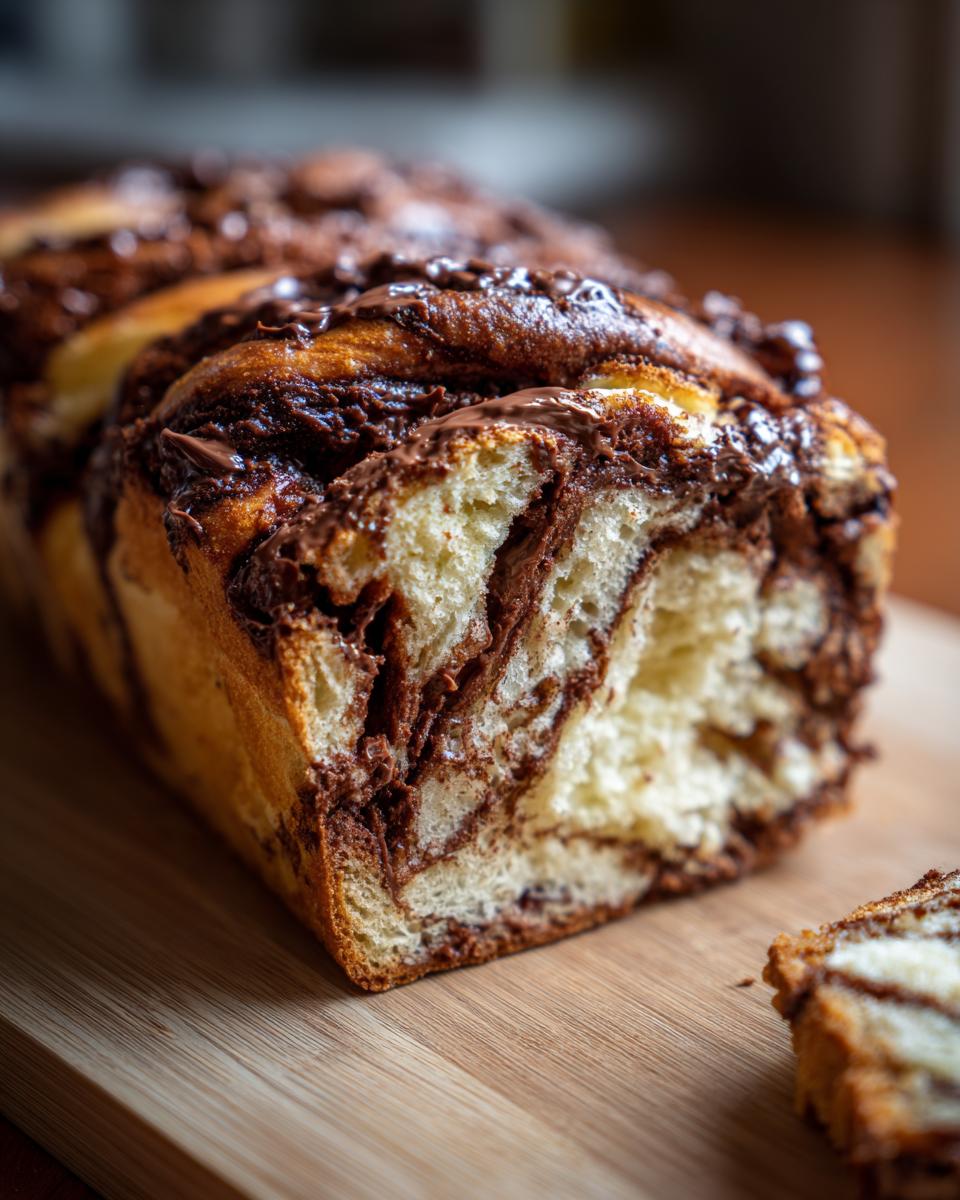
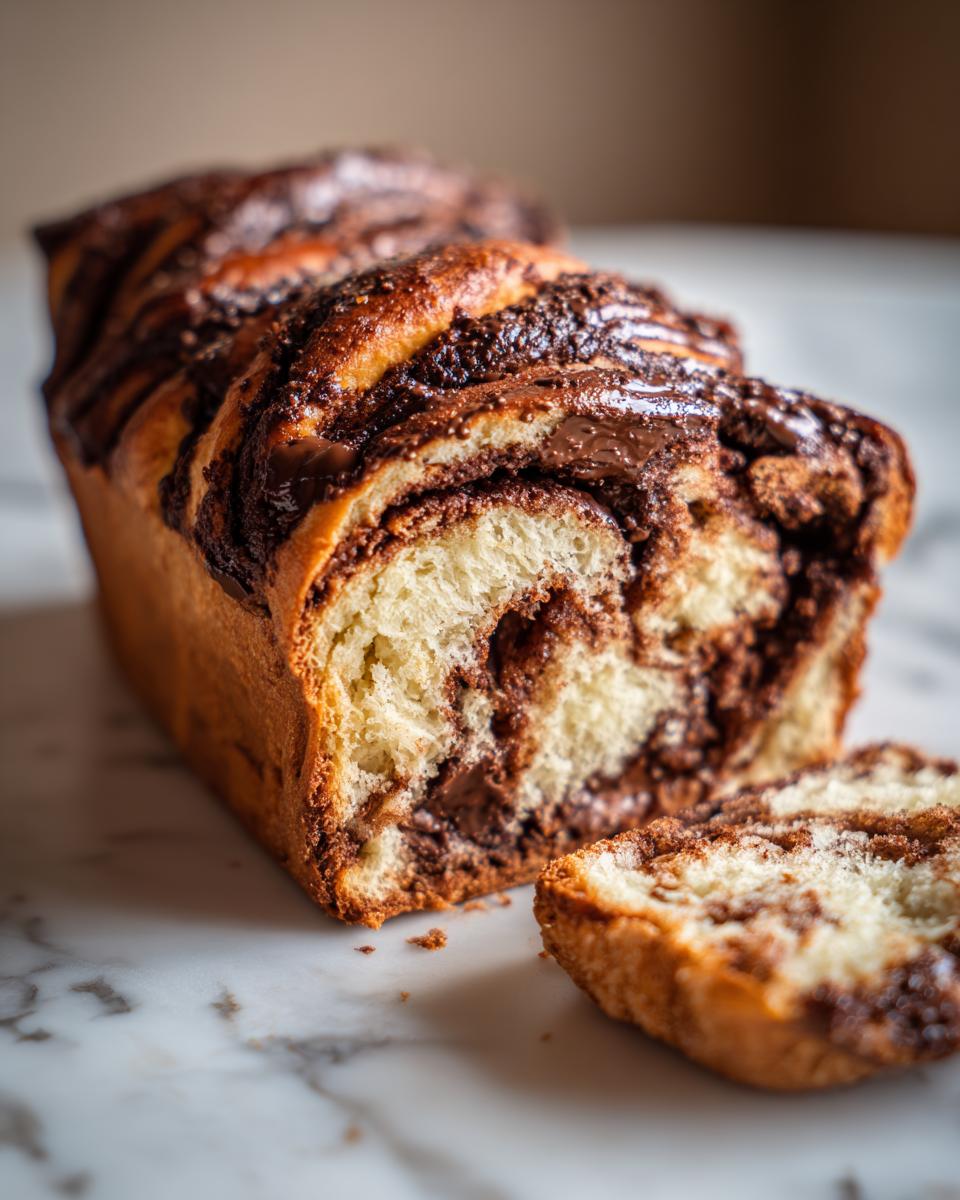
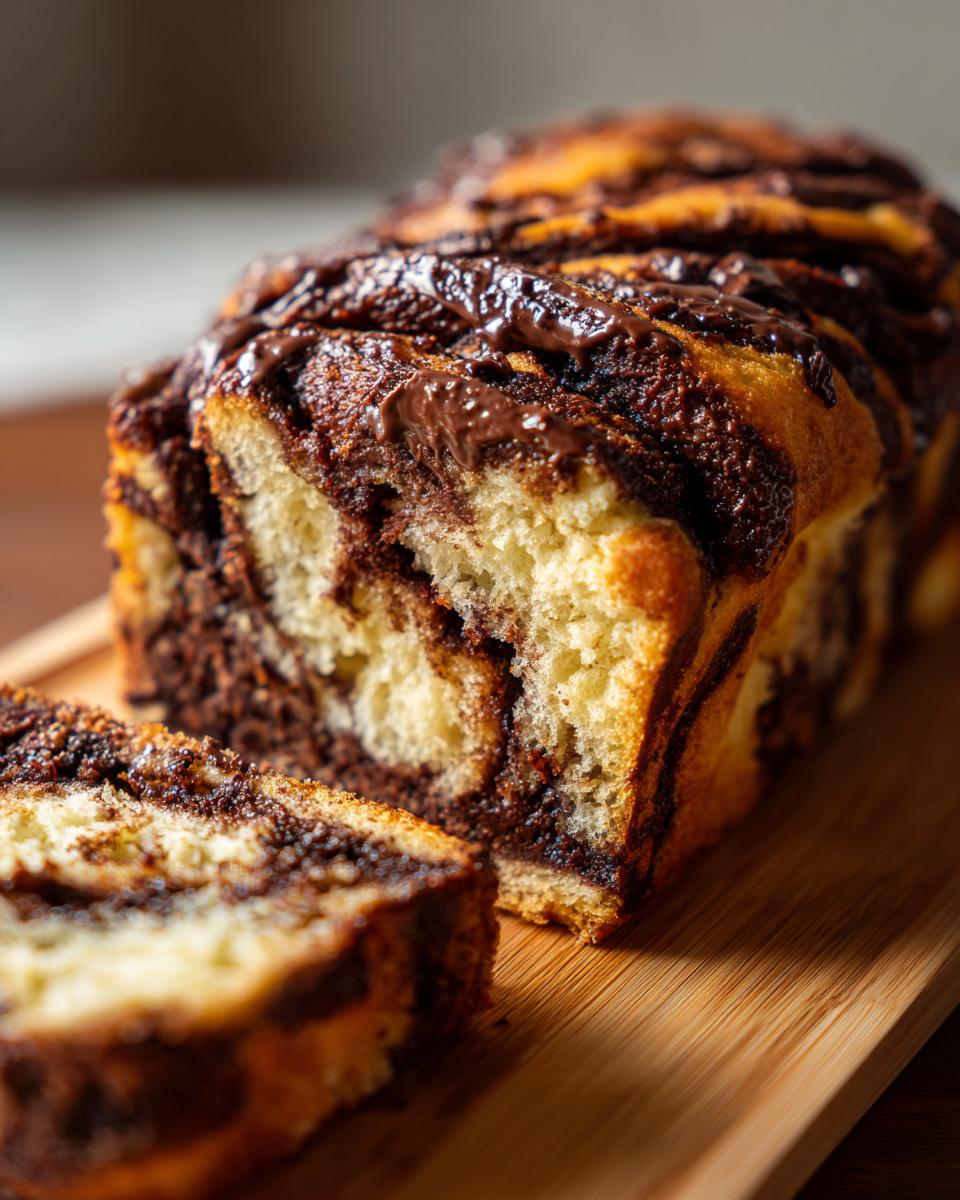
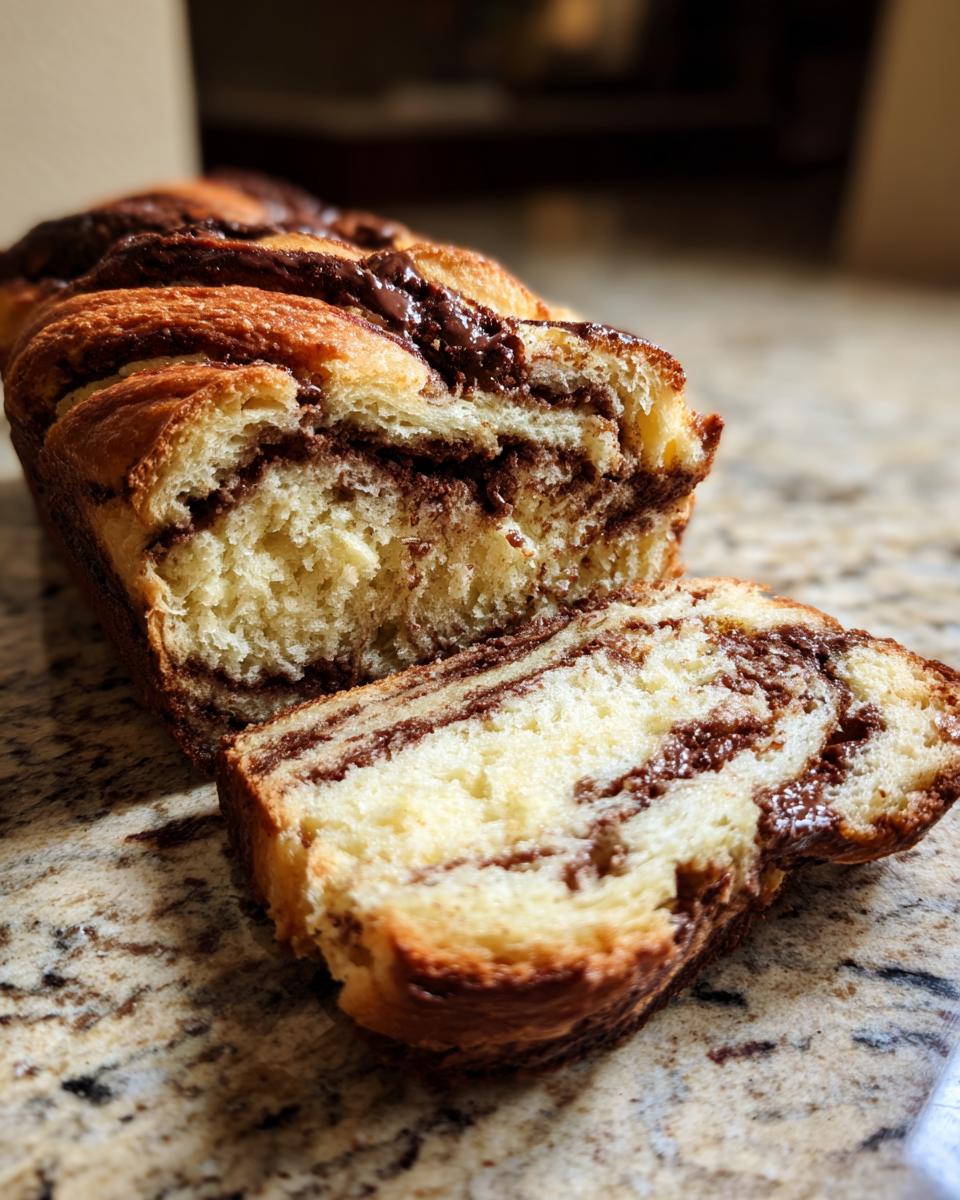
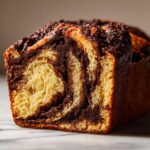
- The Filling Factor: No dry swirls here! Our filling is deeply flavored with cocoa and just enough cream to ensure you get those rich, gooey chocolate swirls. When you slice it, you’ll see the deep contrast between the golden dough and the dark, melted chocolate.
- Simplified Twisting: I know the braiding scares people off, but I’ve simplified the classic cut-and-twist method. Trust me, even if your twists aren’t perfect, the final braided dessert bread looks absolutely stunning! If you want to check out more easy techniques, you can look at my tips for perfecting classic breakfast bakes.
Ingredients for Your Soft Buttery Babka Dough and Filling
Okay, now for the fun (and most important!) part: measuring things out. To get that truly incredible texture we talked about—rich, soft, and buttery—you absolutely must pay attention to the temperature of a few key items for the dough. Room temperature eggs and butter are non-negotiable, trust me on this one; it helps everything emulsify beautifully!
We’re separating these because they have different jobs. The dough needs time and love, while the filling needs to come together quickly so we can move on to the twisting. If you’re looking for other show-stopping bakes, always look at my tips for my incredible cinnamon roll cheesecake—it’s all about layering the flavor!
For the Soft Buttery Babka Dough
- 1 cup whole milk, warm (about 110°F)
- 2 1/4 teaspoons active dry yeast
- 1/2 cup granulated sugar
- 3 large eggs, room temperature
- 1 teaspoon vanilla extract
- 1 teaspoon salt
- 1/2 cup (1 stick) unsalted butter, softened and cut into pieces
- 4 1/2 to 5 cups all-purpose flour, plus more for dusting
For the Rich Chocolate Filling
This is what brings the intense flavor and those amazing gooey chocolate swirls to life!
- 1/2 cup (1 stick) unsalted butter, melted
- 1 cup powdered sugar
- 1/2 cup unsweetened cocoa powder
- 1/4 cup heavy cream
- 1/4 teaspoon ground cinnamon
For the Simple Glaze
This gives your finished loaf that beautiful, shiny bakery look!
- 1/4 cup apricot jam or simple syrup
Step by Step Babka Guide: How to Make Chocolate Babka
Alright, deep breaths! This is where your **chocolate babka** goes from a humble mound of dough to a show-stopping, braided masterpiece. I know this whole process makes it feel like a big weekend baking project, but if you follow these steps, you’ll nail that bakery-quality look. We need to be patient during the rises, but the active work is surprisingly quick once you get the hang of the rolling!
Preparing the Dough and First Rise
First things first: wake up that yeast! Combine your warm milk and yeast and let it giggle and foam for about 10 minutes. That beautiful foam tells you the yeast is happy and ready to work its magic. Mix in the sugar, eggs, vanilla, and salt. Now, slowly add the flour until you get a shaggy mess, but don’t panic—that’s normal!
Kneading is key for that soft buttery babka dough. Once it’s somewhat smooth, we introduce the softened butter, one piece at a time. You have to be patient here; incorporate one piece fully before adding the next. It looks messy, but it’s how we create that rich, brioche-like texture. Knead until it’s silky smooth—this might take 10 to 15 minutes total. Then, put it in an oiled bowl, cover it up, and let it double—we’re talking 1.5 to 2 hours in a warm spot!
Assembling the Rich Chocolate Filling
While the dough is relaxing and rising (use this time wisely!), whisk together everything for your filling. Melted butter is the base, then dump in the cocoa, powdered sugar, cream, and that little dash of cinnamon. Whisk it until it’s a smooth, thick paste. If you’ve made this ahead of time and it’s been chilling, just let it sit on the counter for a bit so it’s soft and spreadable. We want maximum coverage!
Rolling, Filling, and Achieving the Perfect Chocolate Babka Swirl
Gently punch down your gorgeous, puffy dough and turn it out onto a lightly floured area. Roll it out into a big rectangle, about 12 by 18 inches. Take that amazing chocolate filling and spread it everywhere! Cover it right up to the edges, but please, leave a tiny half-inch border along one long side clean. That bare strip is what seals the deal later.
Now, starting from the opposite side, roll that rectangle up super tightly into a log. Pinch the seam closed really well. Here’s the crucial part for that best chocolate swirl bread look: take a sharp knife or a bench scraper and carefully slice that log right down the middle lengthwise. You must expose those layers! Lay the two halves side-by-side with the cut sides facing up. Cross them over each other in an ‘X’ shape, and then twist them together gently, making sure you keep those beautiful layers showing on top. Don’t over-twist, or you’ll mix the chocolate right back into the dough!
Baking and Glazing Your Braided Dessert Bread
Carefully move your twisted log into a greased 9×5 loaf pan. You need to let it do one final proof—cover it loosely and let it sit for about 30 to 45 minutes until it looks puffed up again. Get that oven preheating to 350°F (175°C) while it waits. Baking breads like this is just as satisfying as making a quick soup, I swear! If you want to try something easier while you wait, check out my recipe for easy one-pot ravioli soup.
Bake for 35 to 45 minutes. Keep an eye on it! If the top starts getting too dark brown before the middle is done, just loosely tent it with foil—we want golden brown, not burnt! Right when it comes out, while it’s still scorching hot, warm up your apricot jam or simple syrup until it’s runny and brush it all over the top. That shiny layer is the final touch for your braided dessert bread. Let it chill in the pan for about 15 minutes before moving it to a rack. Honestly, the smell while this bakes is better than anything you can buy! For more scratch-baked goodness, check out how I make my easy homemade French bread.
Tips for Success Making Homemade Sweet Bread
Making a truly stunning bakery style chocolate bread isn’t just about following the steps; it’s about learning the little quirks that take it from *good* to *WOW*. Since I’ve had a few glorious successes and a couple of sticky disasters (oops!), I want to share the few tricks that guarantee you get that beautiful, soft texture every time.
Follow these tips, and you’ll bypass the common pitfalls people run into with this rich dough.
Don’t Be Scared of Room Temperature Ingredients
This is the big one for the dough! If those eggs and butter are straight from the fridge, your dough just won’t mix right. Cold butter cuts into the sugar instead of creaming with it slowly, and cold eggs can shock the yeast mixture. Plan ahead! Taking your eggs out an hour early and leaving your butter on the counter for a bit ensures everything incorporates into that gorgeous, cohesive mass we need for a tender crumb. It’s all about building that perfect structure from the start.
Work Quickly with the Chocolate Filling
The rich chocolate filling is amazing, but because it’s got so much butter and cocoa, it can get really firm if you let it sit on the counter while you’re wrestling with the dough. Always try to roll out the dough and spread the filling right away after the first rise. If you notice it getting too stiff or hard to spread evenly, pop it in the microwave for just 5 or 10 seconds—literally just enough to soften it again. Even coverage is what stops you from ending up with big empty pockets instead of those desirable swirls!
Trust Your Senses, Not Just the Timer, for Baking
While the instructions give you 35 to 45 minutes, every oven is different, right? When you think your babka is done, don’t just pull it out based on time alone. Gently tap the top; it should feel springy. More importantly, if you have a thin skewer or a clean knife, insert it into the center between two swirls. If it comes out clean, or with just a few tiny, moist crumbs clinging to it, you’re golden. If you see wet batter, give it another five minutes and check again. It’s better to bake it slightly longer than to have a gooey center that won’t set.
For some deep dives on dough handling, you should absolutely check out my guide on making Japanese milk bread—it uses similar techniques to achieve maximum softness in a yeast loaf!
Variations for Your Chocolate Babka Recipe
Now that you’ve mastered the basic technique for this chocolate babka recipe, the real fun begins: playing around! I love having a basic, perfect recipe to rely on, but sometimes you just need to mix things up for a different brunch crowd or just because you have an extra bag of pecans staring at you from the pantry!
These small changes are super simple and totally respected by the original structure of the dough. You don’t need to adjust any rising times or temperatures—just mix them into whatever stage applies.
Add Some Crunch with Toasted Nuts
If you want a little texture contrast against that soft, buttery dough, try adding toasted nuts right into your chocolate filling. Pecans are my favorite, but walnuts work just as well! Before you spread the filling onto the rolled-out dough, gently fold in about a half-cup of finely chopped nuts. Just make sure they are toasted first—it really deepens their flavor and prevents them from tasting dusty inside the loaf.
Switch Up the Spice or Extract
The filling already has a tiny whisper of cinnamon, but you can lean into that or swap it out entirely! Instead of the vanilla extract in the dough, try using almond extract for a slightly different, more sophisticated flavor profile. Or, if you love warming spices, experiment with adding a pinch of cardamom to the cocoa powder mixture. Cardamom and chocolate are just heaven together, turning it into a really unique homemade sweet bread experience.
Swap Out the Glaze for Something Richer
The apricot glaze keeps things light and shiny, which is traditional, but if you want a truly decadent finish, skip the jam! When the babka is still warm, you can brush on a simple powdered sugar glaze made with just a tablespoon of butter, a cup of powdered sugar, and a couple of teaspoons of milk or heavy cream instead. If you’re feeling really bold, swirl a tiny bit of instant coffee powder into that glaze for a mocha twist!
Serving Suggestions for Babka for Brunch and Dessert
This decadent chocolate pastry is truly versatile! For a relaxed morning, nothing beats a thick slice of warm babka alongside a strong cup of coffee or espresso. It’s honestly better than any bakery muffin! If you are serving this for brunch, pair it with fresh, slightly tart berries—raspberries or sliced strawberries cut through the richness beautifully.
When it’s time for dessert, it gets even better. This braided dessert bread is amazing served slightly warmed with a scoop of vanilla bean ice cream that melts into those gooey chocolate swirls. If you love cinnamon buns as much as I do, you’ll appreciate how this loaf offers that same comforting satisfaction. You can find tips for other breakfast heroes, like my favorite French toast, or check out my guide to the best homemade cinnamon buns if you need more ideas for your morning spread!
Storage and Reheating Instructions for Your Moist Sweet Loaf
The best part about making a **chocolate babka** is that it actually tastes better the next day, assuming you stored it right! We worked so hard to get that perfect texture, so we absolutely need to protect this moist sweet loaf. Luckily, sweet breads like this hold up really well, but they do get a little dry if left uncovered on the counter. Don’t worry about having leftovers!
For immediate enjoyment over 1 or 2 days, room temperature is best. Just make sure you cover it tightly. Plastic wrap is great, but I actually prefer tucking the cooled loaf snugly into an airtight container. That fat in the dough and filling acts like a natural preservative, keeping it soft.
If you need to keep it longer than two days—say, you made this as a big holiday sweet bread centerpiece—you should definitely freeze it. Slice it first! Yes, I know it’s painful to cut into this beauty, but slicing it *before* you freeze allows you to pull out just one or two pieces whenever a craving hits. Wrap the individual slices tightly in plastic wrap, and then put those slices inside a freezer bag. It keeps beautifully for up to three months!
Waking Up Your Babka Slices
Reheating is key to bringing back that fresh-from-the-oven, buttery feel. If you are just warming up a single slice, I swear, the microwave is your friend here. Pop it on a plate. Heat it for just 10 to 15 seconds. It softens the fat crystals in the butter and makes it taste instantly fresh again. Don’t overdo it, or you’ll end up with a tough slice!
Using the Dough for Make-Ahead Baking
You can absolutely treat this dough like a proper chocolate brioche recipe and refrigerate the bulk dough overnight! After you finish kneading in the butter (Step 3 in the instructions), instead of letting it rise at room temperature for 2 hours, just pop that oiled, covered bowl right into the fridge for 8 to 12 hours. The cold slows the yeast way down.
This long, slow chill develops even deeper flavor, which is fantastic for yeast breads. The next morning, just take it out, let it warm up slightly on the counter for about 30 minutes (just so it’s pliable, not actively rising), and then punch it down and proceed with the rolling and filling steps. It takes a perfectly normal weekend baking project and turns it into a two-day affair, making it much less intimidating!
For tips on keeping other baked goods soft, like my famous apple cake, take a look at my guide on how to make a moist applesauce cake!
Frequently Asked Questions About How to Make Babka
It’s totally normal to have questions when you tackle a beautiful recipe like this **chocolate babka**! Yeast breads can feel a little mysterious, but I promise our steps are designed to make this an example of easy babka baking. If you’re wondering about shortcuts or troubleshooting, I’ve got you covered. You can see tons of my other trusted tips for simple baking in my guide to easy breakfast recipes!
Can I make the chocolate babka dough ahead of time?
Oh, yes, you absolutely can! This is what separates the weekend warrior from the weekday baker. If you finish kneading the dough (after you’ve incorporated all that butter—remember that step!), instead of letting it rise at room temperature for 2 hours, just cover that bowl tightly and stick it in the fridge. Cold fermentation is your best friend here. I let mine chill for 8 to 12 hours, or even overnight. Not only does this save you time on baking day, but that slow, cold rest actually develops a deeper, more complex flavor profile, much like a true **chocolate brioche recipe**!
What is the difference between babka and challah?
They look similar because they both start as enriched, braided yeast breads, but the huge difference is the filling! Challah is traditionally a festive bread served plain (though sometimes enriched with egg yolks) and is typically left unfilled for braiding. Babka, on the other hand, is all about that gorgeous interior texture. We roll it flat, cover it in our rich chocolate filling, and then twist it to create those distinct, glorious layers and swirls. Think of challah as the canvas, and babka as the richly painted masterpiece!
My dough isn’t doubling in size. What went wrong?
Don’t panic! A non-doubling dough usually points to one of two culprits, and both are totally fixable. First, check your water temperature when you activated the yeast. If the milk was too hot (over 125°F), you basically killed your yeast, and it won’t wake up. If it was too cold, it’s just being lazy. Second, check the temperature of your kitchen. Yeast loves warmth! If your kitchen is chilly, the dough will take forever. Try covering the bowl and setting it inside your oven with *just* the light on—that little bit of ambient heat often does the trick. If you’re still struggling, you can read about how Naomi Elberg handles her dough for some other awesome insights.
Nutritional Estimates for This Decadent Chocolate Pastry
I’m a cook, not a nutritionist, so please take these numbers with a big grain of salt—or maybe a pinch of sugar! Because this is such a rich, buttery, chocolate-filled bake, it scores high on flavor and, naturally, in the indulgent categories. These figures are just estimates based on breaking the entire loaf down into 12 slices. They are here to give you a rough idea of what you are enjoying in this stunning **decadent chocolate pastry**!
- Serving Size: 1 slice
- Calories: 450
- Sugar: 35g
- Sodium: 250mg
- Fat: 25g
- Saturated Fat: 15g
- Unsaturated Fat: 10g
- Trans Fat: 0.5g
- Carbohydrates: 50g
- Fiber: 3g
- Protein: 8g
- Cholesterol: 70mg
Share Your Homemade Chocolate Babka Experience
Now you’ve done it! You’ve conquered the kneading, you’ve mastered the twist, and you have this incredible, bakery-quality **chocolate babka** sitting on your counter. I want to hear all about it! Did your swirls look amazing? Did your family freak out when they saw the finished loaf? Please leave a rating for the recipe down below—it helps other home cooks feel confident to try this next. If you have any photos, tag me on social media! I love seeing what you create in your own kitchen. If you need to send kitchen questions my way, hop over to the contact page!
Nutritional Estimates for This Decadent Chocolate Pastry
I’m a cook, not a nutritionist, so please take these numbers with a big grain of salt—or maybe a pinch of sugar! Because this is such a rich, buttery, chocolate-filled bake, it scores high on flavor and, naturally, in the indulgent categories. These figures are just estimates based on breaking the entire loaf down into 12 slices. They are here to give you a rough idea of what you are enjoying in this stunning **decadent chocolate pastry**!
- Serving Size: 1 slice
- Calories: 450
- Sugar: 35g
- Sodium: 250mg
- Fat: 25g
- Saturated Fat: 15g
- Unsaturated Fat: 10g
- Trans Fat: 0.5g
- Carbohydrates: 50g
- Fiber: 3g
- Protein: 8g
- Cholesterol: 70mg
Share Your Homemade Chocolate Babka Experience
Now you’ve done it! You’ve conquered the kneading, you’ve mastered the twist, and you have this incredible, bakery-quality **chocolate babka** sitting on your counter. I want to hear all about it! Did your swirls look amazing? Did your family freak out when they saw the finished loaf? Seriously, I live for these results!
Please take a minute to leave a rating for the recipe down below—it helps other home cooks feel confident to try this next. And if you run into a little issue with your braid or have a little tip I missed (which happens!), drop a comment! Sharing our wins and our sticky messes is what builds a great community in the kitchen.
If you have any photos, tag me on social media! I absolutely love seeing what you create in your own kitchens. And hey, if you have any burning recipe questions that popped up while you were kneading that sweet dough, don’t hesitate to reach out—you can send kitchen queries my way over on the contact page!
PrintUltimate Chocolate Swirl Babka Recipe
Bake a soft, buttery, bakery-style chocolate babka with rich, gooey swirls using this easy step-by-step guide. This braided sweet bread is perfect for brunch or dessert.
- Prep Time: 45 min
- Cook Time: 45 min
- Total Time: 3 hr 30 min
- Yield: 1 loaf 1x
- Category: Dessert
- Method: Baking
- Cuisine: Eastern European
- Diet: Vegetarian
Ingredients
- 1 cup whole milk, warm (about 110°F)
- 2 1/4 teaspoons active dry yeast
- 1/2 cup granulated sugar
- 3 large eggs, room temperature
- 1 teaspoon vanilla extract
- 1 teaspoon salt
- 1/2 cup (1 stick) unsalted butter, softened and cut into pieces
- 4 1/2 to 5 cups all-purpose flour, plus more for dusting
- 1/2 cup (1 stick) unsalted butter, melted (for chocolate filling)
- 1 cup powdered sugar (for chocolate filling)
- 1/2 cup unsweetened cocoa powder (for chocolate filling)
- 1/4 cup heavy cream (for chocolate filling)
- 1/4 teaspoon ground cinnamon (for chocolate filling)
- 1/4 cup apricot jam or simple syrup (for glaze)
Instructions
- Activate the yeast: In a large bowl, combine the warm milk and yeast. Let it sit for 5 to 10 minutes until foamy.
- Make the dough: Add the granulated sugar, eggs, vanilla extract, and salt to the yeast mixture. Mix well. Gradually add the flour, mixing until a shaggy dough forms.
- Knead the dough: Turn the dough onto a lightly floured surface. Knead for 5 minutes. Add the softened butter pieces one at a time, kneading until fully incorporated before adding the next piece. Continue kneading until the dough is smooth and elastic, about 10 to 15 minutes total.
- First rise: Place the dough in a lightly oiled bowl, turning to coat. Cover the bowl and let it rise in a warm place for 1.5 to 2 hours, or until doubled in size.
- Prepare the filling: While the dough rises, whisk together the melted butter, powdered sugar, cocoa powder, heavy cream, and cinnamon in a medium bowl until smooth. This is your rich chocolate filling.
- Shape the dough: Gently punch down the risen dough. Turn it out onto a lightly floured surface. Roll the dough into a large rectangle, about 12 by 18 inches.
- Spread the filling: Spread the chocolate filling evenly over the entire surface of the dough, leaving a small 1/2-inch border along one long edge clean.
- Roll and slice: Starting from the long edge opposite the clean border, tightly roll the dough into a log. Pinch the seam closed. Using a sharp knife or bench scraper, carefully slice the log lengthwise down the center, exposing the layers.
- Braid the babka: Turn the two halves so the cut sides face up. Cross the two halves over each other, keeping the cut sides facing up as much as possible, forming an ‘X’ shape at the top. Twist the two halves together loosely, maintaining the exposed layers.
- Bake: Gently transfer the twisted dough into a greased 9×5 inch loaf pan. Cover loosely and let it proof for 30 to 45 minutes. Preheat your oven to 350°F (175°C). Bake for 35 to 45 minutes, or until golden brown and cooked through. If the top browns too quickly, loosely tent it with foil.
- Glaze: While the babka is still warm, heat the apricot jam or simple syrup until liquid. Brush the warm glaze over the top of the baked babka. Let it cool in the pan for 15 minutes before transferring it to a wire rack to cool completely before slicing.
Notes
- For the softest dough, ensure your milk and eggs are at room temperature before starting.
- You can make the chocolate filling ahead of time and store it in the refrigerator; let it warm slightly before spreading.
- If you prefer a less sweet glaze, use plain simple syrup instead of apricot jam.
Nutrition
- Serving Size: 1 slice
- Calories: 450
- Sugar: 35g
- Sodium: 250mg
- Fat: 25g
- Saturated Fat: 15g
- Unsaturated Fat: 10g
- Trans Fat: 0.5g
- Carbohydrates: 50g
- Fiber: 3g
- Protein: 8g
- Cholesterol: 70mg