
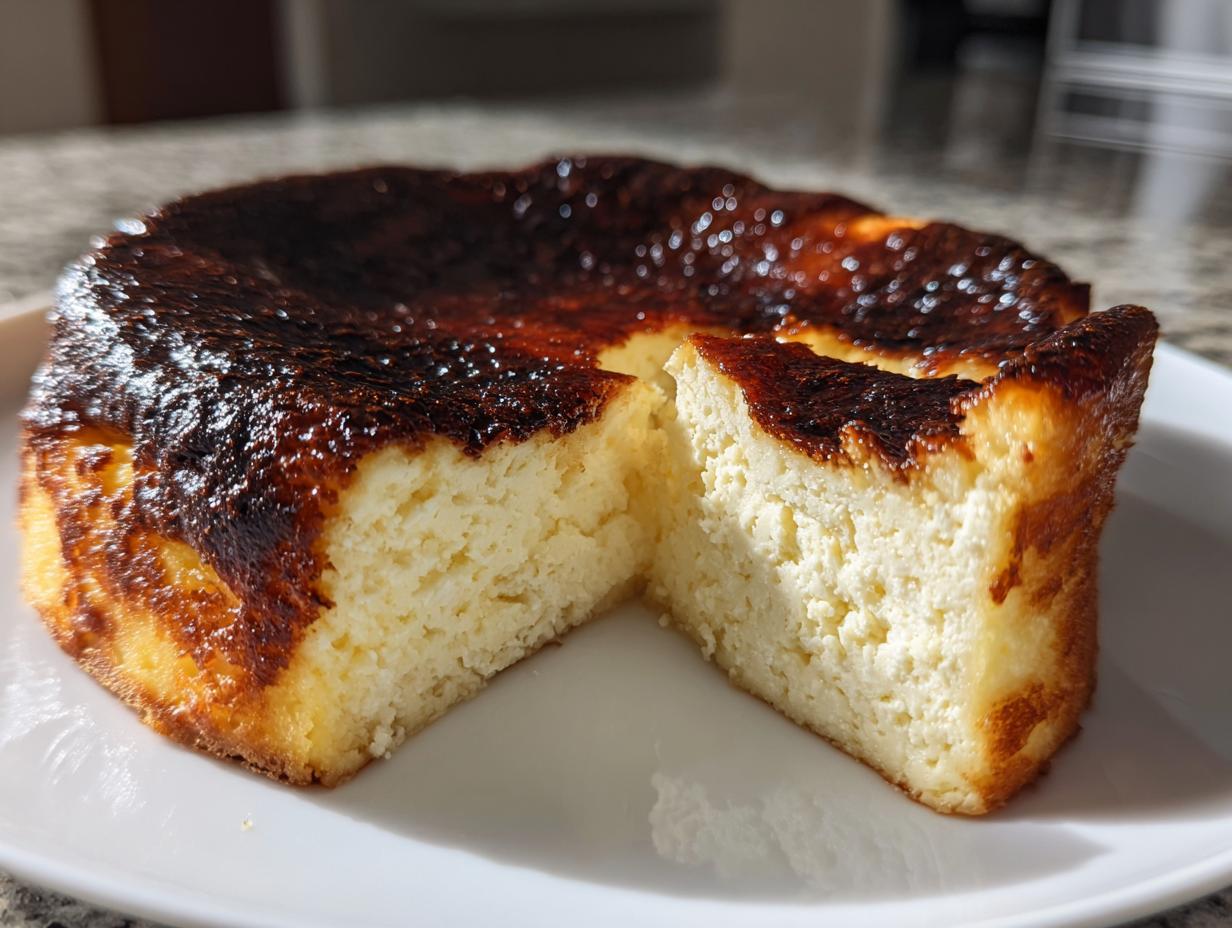
Listen, sometimes you just need a dessert that screams, “I spent hours on this!” but secretly, you know it took almost no effort. That’s exactly what we get with the incredible basque cheesecake. It’s rich, it’s decadent, and honestly, it looks like a masterpiece pulled straight from a high-end San Sebastian bakery. But here’s the magic: it’s one of the easiest showstoppers you’ll ever make in your own kitchen—no fiddly crust, no fussy water bath needed!
We are talking about that signature deeply caramelized, almost burnt exterior that locks in all the flavor, protecting the center that melts in your mouth like velvet. It’s luxurious comfort food disguised as a gourmet treat. I’ve spent way too many early mornings testing this recipe here at home to make sure it’s absolutely foolproof—just like my classic apple crisp! Trust me, if you can soften cream cheese, you can master this dessert on your first try. Get ready to impress everyone!

- Why This Easy Basque Cheesecake Recipe Works for Everyone
- Gathering Your Minimal Ingredient Dessert Supplies
- How to Prepare Your Easy Basque Cheesecake
- Cooling and Chilling the Basque Cheesecake for Decadent Creamy Texture
- Tips for Success with Your Burnt Basque Cheesecake Recipe
- Variations: Making a Loaf Pan Basque Cheesecake
- Storage and Reheating Instructions for Leftover Basque Cheesecake
- Serving Suggestions for This Impressive Dinner Party Sweet
- Frequently Asked Questions About This Creamy Cheesecake Recipe
Why This Easy Basque Cheesecake Recipe Works for Everyone
Honestly, what’s not to love about a dessert that promises maximum impact with minimum fuss? I know baking can feel like a chore sometimes, but this recipe strips away all the annoyances. Seriously, throw away those pie crust worries!
- No crust required—yay for less work!
- We skip the finicky no water bath cheesecake—just straight into a hot oven.
- It all comes together with just a handful of ingredients.
It’s perfect! If you need another simple treat for your rotation, check out my moist pumpkin bread recipe too.
Achieving the Perfect Caramelized Cheesecake Top
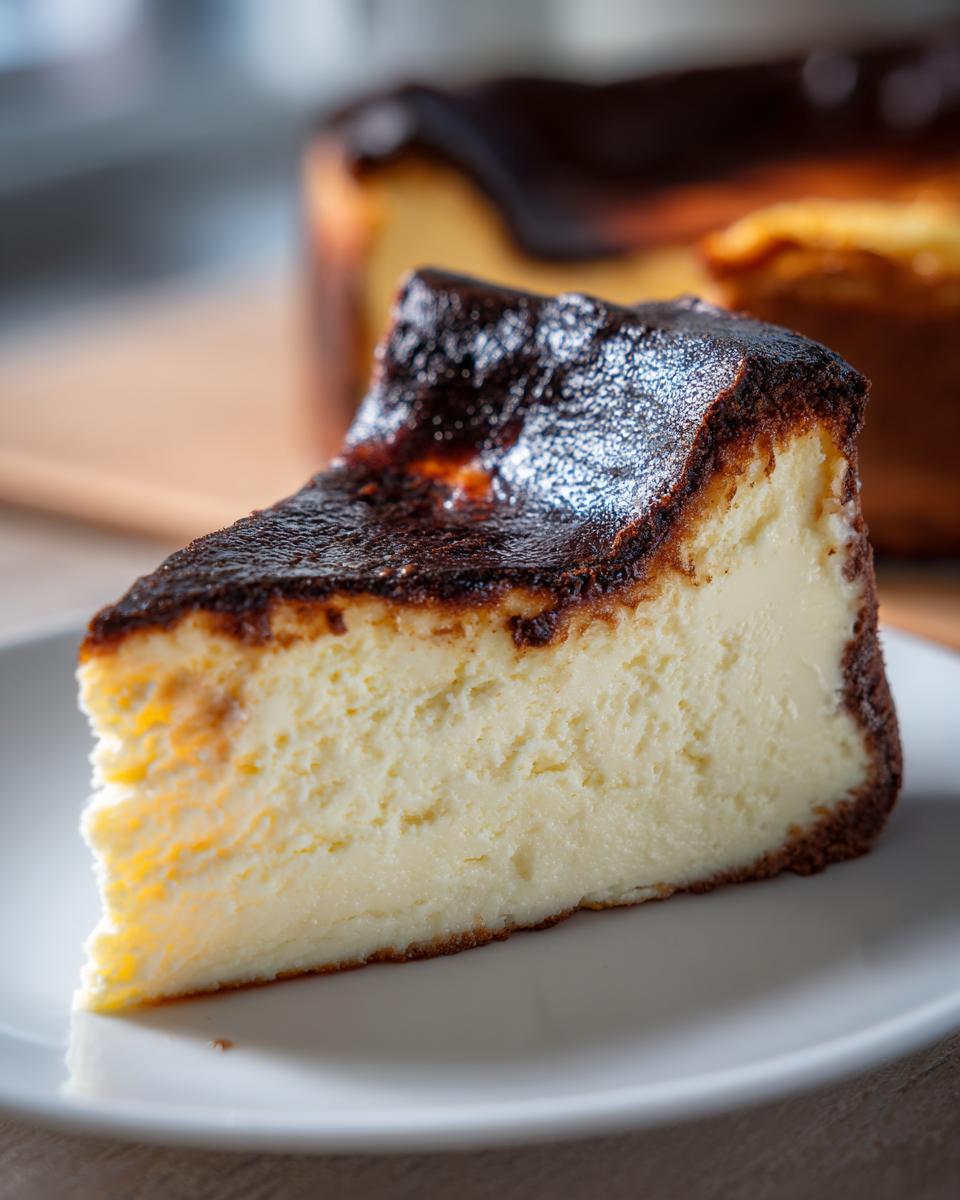
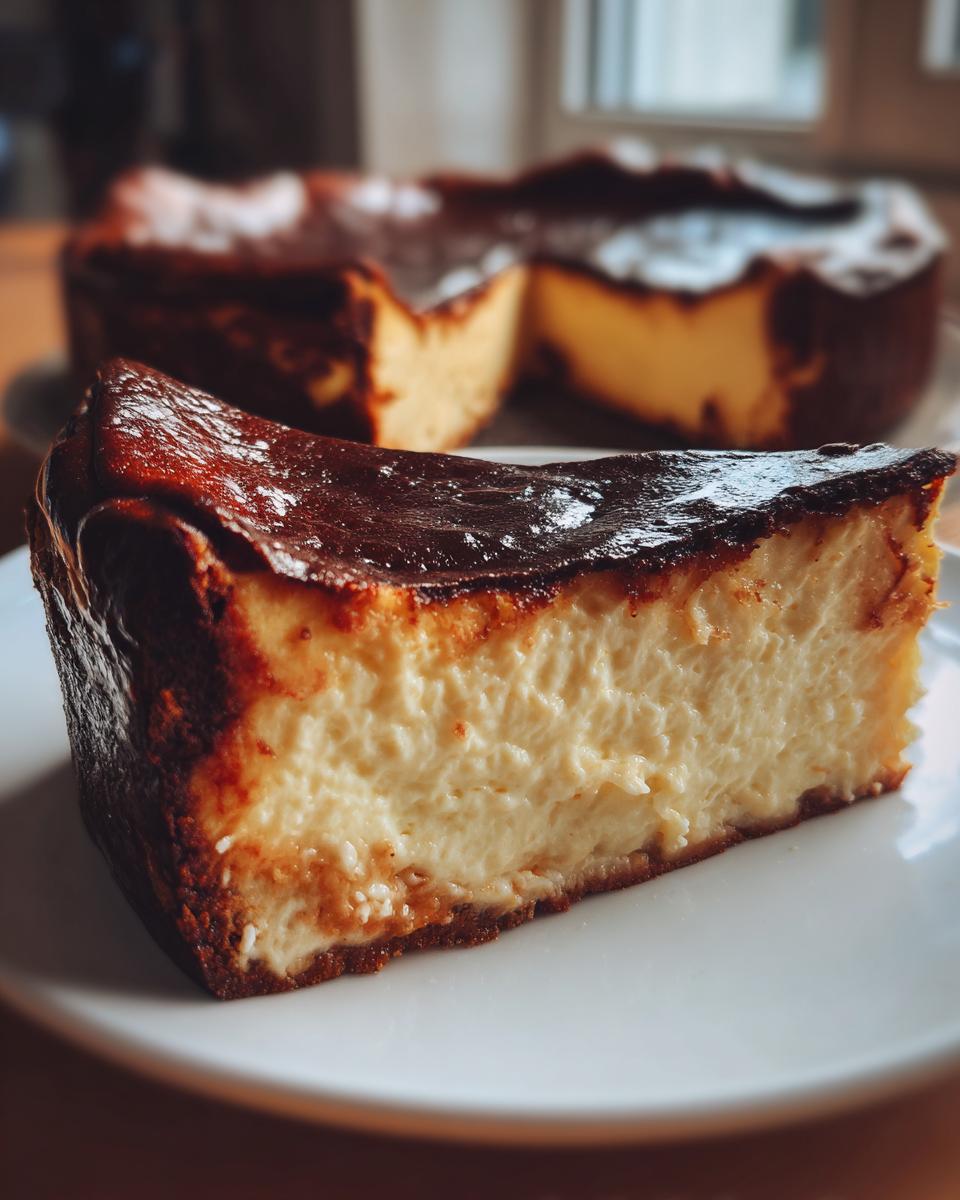
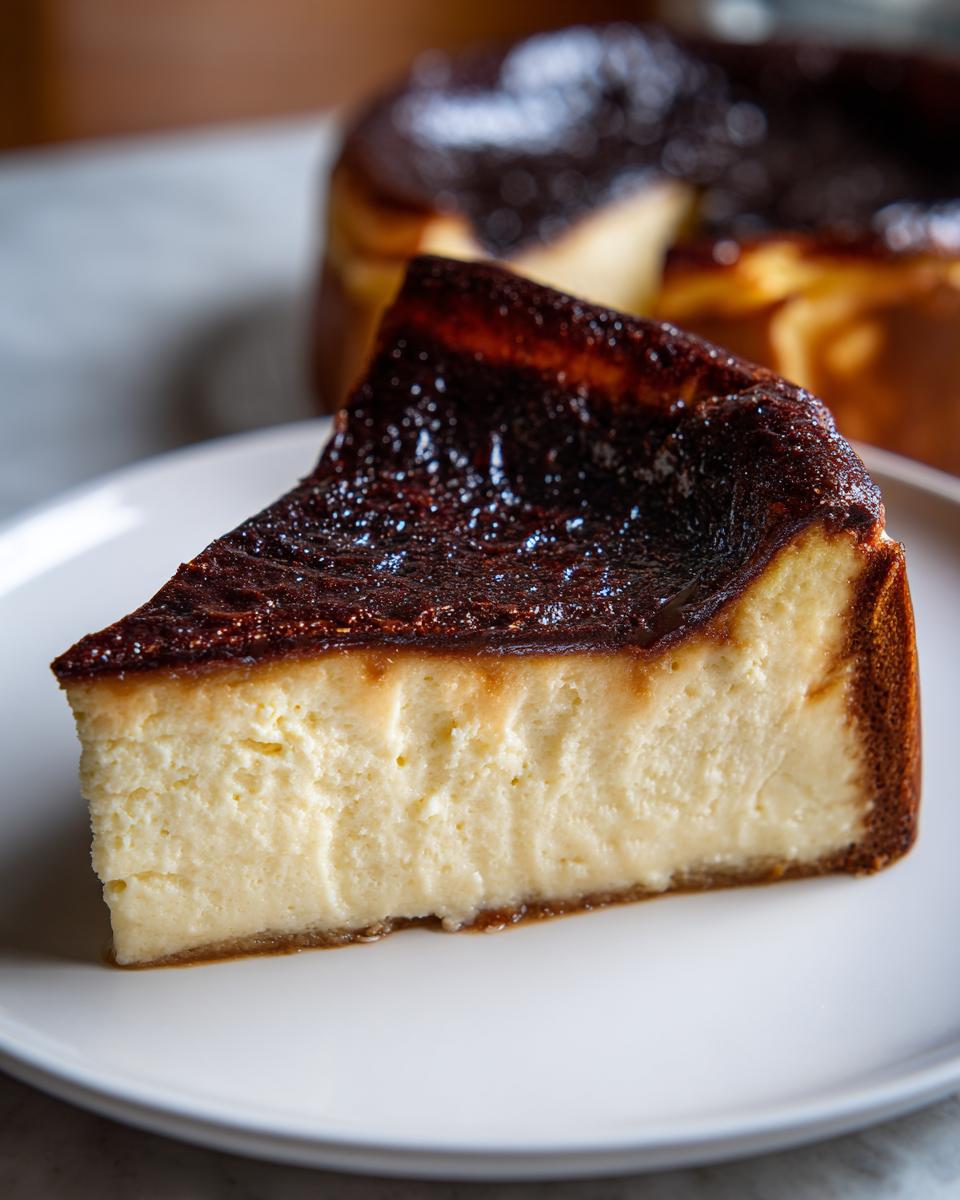
That signature look—the dark, almost scorched surface—is what makes everyone snap a photo! Don’t be scared by the color; it’s intentional. The trick is high heat. We blast this basque cheesecake at 400°F. This caramelizes the sugars fast, giving you that bittersweet, complex flavor without burning the actual custard underneath. It’s totally rustic, which means you don’t even need to worry about it looking perfectly smooth.
The Secret to a Velvety Center Cheesecake Recipe
If you’re aiming for that famous, impossibly smooth, almost soufflé-like center—the signature of a true San Sebastian Cheesecake—it comes down to two things: mixing and temperature. Make sure your cream cheese and eggs are truly at room temperature. When you mix, be gentle once the eggs go in. Overbeating incorporates too much air, which can make it tough. We want that luxurious, barely-set, velvety center cheesecake recipe feel, and gentle handling is how we get it every single time for this basque cheesecake.
Gathering Your Minimal Ingredient Dessert Supplies
Okay, let’s talk supplies! One of the best things about this recipe is that it’s truly simple, which means we aren’t hauling out every gadget we own. For this basque cheesecake, we’re keeping the ingredient list tight because quality really shines through when there aren’t too many players on the field.
As you gather things, make sure you check out my easy parmesan pasta recipe if you need a fantastic savory dish to serve *before* this amazing dessert!
Essential Ingredients for Basque Cheesecake
I put emphasis on the temperature of your dairy and eggs—this is where we build that gorgeous, lump-free texture. Don’t cheat by using low-fat products; this dessert relies on the richness!
- 900g full-fat cream cheese, softened—and I mean *really* softened!
- 1 1/4 cups granulated sugar
- 6 large eggs, make sure they are at room temperature!
- 2 cups heavy cream
- 1 teaspoon vanilla extract
- 1/4 cup all-purpose flour
- A tiny pinch of salt
Equipment Needed for Your Crustless Cheesecake Recipe
Because this is a rustic beauty, we need to set up the pan just right so it releases easily and gives us those dramatic, crumpled parchment edges. That crumpled look is iconic!
- A 9-inch springform pan—this is standard, but if you only have a different size, you’ll need to adjust baking time, which we cover later!
- Two large sheets of parchment paper. I like to use slightly heavier-duty parchment, just because we are wrinkling it up and shoving it into the pan, and you don’t want it tearing mid-bake.
- An electric hand mixer or a stand mixer. You could technically do it by hand, but I’m not going to lie; 900g of cream cheese is a workout!
- A large mixing bowl.
How to Prepare Your Easy Basque Cheesecake
Okay, now we get to the fun part! This is where we take those beautiful supplies and turn them into the most impressive dessert with surprisingly little effort. Before you even grab a mixer, make sure your oven is ready to go. If you’re hungry for something savory first, whip up my creamy lemon pasta; it bakes fast!
Preparing the Pan and Oven for Basque Cheesecake
First thing’s first: get that oven cranked up! We need a really hot environment for that signature burn on top, so preheat your oven to a solid 400°F (200°C). Seriously, make sure it’s at temp before the batter goes in.
Now for the pan—this is critical for that beautifully rustic edge this basque cheesecake is known for. Take a 9-inch springform pan and grab two large sheets of parchment paper. You have to crumple them up like you’re throwing them away, then smooth them out slightly and press them firmly into the pan. Make sure the edges wildly overhang the sides of the pan. I mean, let it look messy! Those high, crinkled edges will support the batter and give you those gorgeous, uneven sides when it bakes up high.
Mixing the Creamy Cheesecake Batter
Remember how I stressed room-temperature ingredients? This step proves why. Start by putting that softened cream cheese into your large bowl. You need to beat this electric mixer until it’s absolutely, totally smooth. Scrape the bowl down constantly—we cannot have any little lumps hiding in there!
Once it’s smooth as silk, *then* you can gradually add your sugar. Mix until it looks light and creamy. Now, here’s the next crucial spot for success: add the eggs one at a time. Let each one fully incorporate before you add the next one. Do not rush this, and please, please, do not overmix once the eggs are in! Overmixing equals tough cake, and we want that soft, luscious center.
Finally, gently stream in the heavy cream, vanilla, flour, and salt. Mix just until everything comes together and you see a uniform batter. It’s going to look very thin, almost like pancake batter. Don’t panic! That thinness is exactly what leads to that stunning, velvety center cheesecake recipe we’re aiming for.
Baking for the Caramelized Cheesecake Top
Pour that thin batter right into your prepared, parchment-lined pan. Now, slide it onto the middle rack and let the high heat do its work for about 50 to 60 minutes. You need to watch for visual cues. The edges should look set, and the entire top needs to be seriously caramelized—I’m talking deep brown, maybe even black in spots. Don’t poke it too much early on!
The absolute best test is the “wobble.” When you gently shake the pan, the center should still have a significant wobble, just like soft gelatin or thick custard. It needs to look underdone in the very middle. That wobble is your guarantee that when it cools, you’ll have perfection. If it looks completely firm, you’ve baked it too long, honey!
Cooling and Chilling the Basque Cheesecake for Decadent Creamy Texture
Alright, you’ve pulled this gorgeous, beautifully burnt masterpiece out of the oven, and I know you want to slice into it right now. Please, resist that urge! This cooling and chilling phase is just as important as the high heat bake itself if you want that perfect, melt-in-your-mouth texture. This is where the magic sets in, transforming that wobbly custard into the best basque cheesecake you’ve ever had.
First, let it relax. Set the entire pan on a wire rack and just let it sit there on your counter until it comes down to room temperature. This takes a couple of hours. You’ll watch it deflate dramatically—don’t worry, that’s supposed to happen! It’s going from a puffy cloud to that dense, rich texture we love. If you want a truly amazing breakfast later, you can read up on my method for fluffy scrambled eggs, but trust me, focus on the cheesecake right now!
Once it’s cool to the touch, cover the pan loosely. It’s time for the deep chill! You absolutely need to refrigerate this crustless wonder for a minimum of six hours. I’m going to tell you honestly, though: overnight is the sweet spot. When you chill it overnight, the texture firms up perfectly, turning that custardy wobble into something incredibly rich and smooth. That long chill is what guarantees you get that signature texture in every slice!
Tips for Success with Your Burnt Basque Cheesecake Recipe
You’ve done the hard part—baking and chilling! Now, let me share a few little tricks I learned from trying to replicate the original Spanish versions. These aren’t step-by-step instructions, but little nuggets of wisdom that really elevate this basque cheesecake from great to absolutely mind-blowing. If you want a little inspiration for other easy treats, check out my recipe for no-bake cheesecake bites!
I remember one time I tried rushing this cooling process, and it was still soft and messy on the plate. Patience pays off huge here. I also found a fantastic deep dive on technique over at Butter Joy Kitchen if you want even more reading!
Serving Temperature and Texture Guide
This is where people often make a crucial mistake with their burnt basque cheesecake, thinking it should be served straight from the fridge like a New York-style cake. Nope! That’s not how San Sebastian does it, and definitely not how I recommend you enjoy this creamy delight.
If you serve it directly from the refrigerator, it will be lovely and dense—almost like a firm fudge. That’s great if you like a denser cake, but honestly, you miss out on the intended experience. For the ultimate, decadent, soufflé-like, melt-in-your-mouth sensation—that truly luxurious texture—you *must* let it sit out of the fridge for at least 30 minutes before slicing. When it comes to room temperature, the center gets incredibly soft and velvety. It’s almost like eating a rich, slightly warm cloud. Trust me on this serving temperature; it completely changes the whole dessert!
Variations: Making a Loaf Pan Basque Cheesecake
Okay, so while the classic 9-inch round pan gives you that famous rustic height, sometimes you just don’t need an entire giant cheesecake sitting around, right? Or maybe you just only have a loaf pan handy! That’s totally fine, because this recipe is amazingly adaptable. Once you master the main basque cheesecake, taking it down a size for a smaller crowd or a smaller oven situation is simple.
If you’re making this in a standard loaf pan—don’t forget to line it exactly the same way, with lots of crinkled, overhanging parchment paper! You want those high sides sticking up like little flags over the top of the batter.
The only real change you need to make for this crustless cheesecake recipe when using a loaf pan is baking time. Since the batter is deeper and denser in a loaf pan shape, the heat takes longer to penetrate the center. For the round recipe, we aimed for 50 to 60 minutes.
For a loaf pan, you should start checking around 40 minutes. Keep baking until you see that deep caramelization and the center still has that jiggly wobble. Trust me, it’s much harder to salvage an overbaked cheesecake than one that needs 5 more minutes! For more ideas on small-batch baking, check out my recipe for chewy cookie cake.
If you want to read a great example of how to nail this exact variation, this article on the Basque Cheesecake Loaf is a fantastic resource!
Storage and Reheating Instructions for Leftover Basque Cheesecake
Don’t you hate it when you have leftovers of something this amazing? Me too! The good news is that this basque cheesecake holds up beautifully in the fridge, though how you serve it later totally changes the texture experience. It’s still delicious, but you need to be prepared for it to firm up significantly overnight.
When it comes to storage, keep it covered tightly in the refrigerator. Because we skipped the crust—making it a true crustless cheesecake recipe—it handles cold temperatures well. You can generally keep it good for about 4 to 5 days in the fridge, but honestly, I doubt it will last that long in my house!
If you’re bringing leftovers out for a second performance, remember the serving temperature guide! If you pull it straight from the fridge, it will be dense, firm, and almost fudge-like. That’s a different kind of delicious, for sure, but if you want that classic, soft, creamy profile we worked so hard for, you have to bring it back to life first.
Set the slice you plan to eat out on the counter, uncovered, about 30 to 45 minutes before you plan to serve it. This allows those fats to soften up just enough so you get that gorgeous, almost creamy-pudding texture right through the center. It feels like such a treat to enjoy leftovers this way!
If you’re planning ahead or need a different type of creamy treat later, maybe look into my no-bake tiramisu cheesecake recipe for variety!
Serving Suggestions for This Impressive Dinner Party Sweet
You’ve nailed the basque cheesecake, so now how do you serve this stunner? Since it’s already so rich and flavorful, you don’t need a ton of fuss! Often, I just dust the top lightly with powdered sugar right before serving for a beautiful contrast against that dark caramel. It looks super gourmet, trust me.
If you want something extra, fresh, tart berries are my favorite pairing—think raspberries or blackberries. Their acidity cuts through the richness perfectly. You could also offer a tiny dollop of unsweetened whipped cream if you wanted something to smooth out the edges, but honestly, this cake stands on its own! It makes a fantastic finale to any meal. If you’re looking for a refreshing drink to follow, you should check out my creamy watermelon smoothie recipe!
Frequently Asked Questions About This Creamy Cheesecake Recipe
I totally get it—when you make something as special as a basque cheesecake, you want zero guesswork. I’ve collected the questions I always get asked after people try this recipe for the first time. Putting these answers together helped me make sure my own instructions were crystal clear, ensuring you get that perfect, rustic look and luxurious middle every time. Hope this helps you feel super confident heading into the kitchen!
If you’re looking for more rich dessert ideas, my turtle cheesecake recipe is another impressive option!
Can I use low-fat cream cheese in this Basque Cheesecake?
Oh, honey, please don’t try it! I know tempting to swap out ingredients for lower fat versions, but for this specific basque cheesecake, the full-fat cream cheese is non-negotiable. The high fat content is what gives the cake its structure, its unbelievably dense crumb when chilled, and that super decadent mouthfeel. Low-fat versions contain more water, and that added water will throw off the balance, likely leading to a texture that’s grainy or just won’t set right. Stick to the full-fat block cream cheese—it’s absolutely key!
Why is my cheesecake batter so thin?
This used to scare me half to death the first few times I made it! You pour in what looks like soup into that parchment-lined pan, and you think, “Well, this is ruined.” Nope! That’s exactly how it should be. This whole dessert relies on being a crustless cheesecake recipe where the center bakes into a luscious custard. If the batter was thick, the final result would be dense and heavy, like a standard New York cheesecake. The thinness ensures that when it bakes and then sets, you get that famous, almost pudding-like, velvety center.
Do I need to use room temperature eggs?
Yes, 100% yes! This is one of those small steps that makes a huge difference, especially when you are dealing with that huge amount of cream cheese required. If your eggs are cold straight from the fridge, they won’t mix smoothly into the cream cheese and sugar mixture. You end up with small streaks of egg white or curdling, which creates lumps throughout your batter.
When the eggs are room temperature, they incorporate seamlessly, mixing in gently and evenly. This results in a much smoother batter overall, which directly translates to that beautiful, uniform texture we see in the finished cake. Remember, smooth mixing means a velvety center cheesecake recipe!
PrintThe Best Creamy, No-Fail Burnt Basque Cheesecake

Make this easy, crustless Basque Cheesecake for a dessert with a signature caramelized top and a rich, velvety center. This recipe requires no water bath and is perfect for impressing guests.
- Prep Time: 15 min
- Cook Time: 60 min
- Total Time: 7 hours 15 min
- Yield: 10 servings 1x
- Category: Dessert
- Method: Baking
- Cuisine: Spanish
- Diet: Vegetarian
Ingredients
- 900 g full-fat cream cheese, softened
- 1 1/4 cups granulated sugar
- 6 large eggs, room temperature
- 2 cups heavy cream
- 1 teaspoon vanilla extract
- 1/4 cup all-purpose flour
- Pinch of salt
Instructions
- Preheat your oven to 400°F (200°C). Line a 9-inch springform pan with two large sheets of parchment paper, pressing them firmly into the corners and allowing the edges to overhang significantly. This rustic look is part of the appeal.
- In a large bowl, beat the softened cream cheese with an electric mixer until completely smooth. Scrape down the sides often to prevent lumps.
- Gradually add the sugar and beat until the mixture is light and creamy.
- Add the eggs one at a time, mixing well after each addition until just combined. Do not overmix once the eggs are in.
- Slowly mix in the heavy cream, vanilla extract, flour, and salt until the batter is uniform. The batter will be thin.
- Pour the batter into the prepared pan.
- Bake for 50 to 60 minutes. The top should be deeply caramelized, almost black in spots, and the edges should be set. The center should still have a significant wobble, like soft gelatin.
- Remove the cheesecake from the oven. It will deflate as it cools. Let it cool completely on a wire rack at room temperature for about 2 hours.
- Once cool, cover the pan loosely and chill in the refrigerator for at least 6 hours, or preferably overnight, for the best creamy texture.
- Before serving, carefully remove the parchment paper sides. Serve at room temperature for the most decadent, custardy center.
Notes
- For the best caramelized top, place the cheesecake on the highest rack in the oven for the last 10 minutes of baking.
- If you prefer a denser texture, chill the cheesecake for 12 hours. For a more soufflé-like, velvety center, serve after chilling for only 6 hours.
- This crustless cheesecake recipe works well in a loaf pan; reduce the baking time slightly, checking for a wobble around 40 minutes.
Nutrition
- Serving Size: 1 slice
- Calories: 450
- Sugar: 35
- Sodium: 250
- Fat: 35
- Saturated Fat: 22
- Unsaturated Fat: 10
- Trans Fat: 0.5
- Carbohydrates: 28
- Fiber: 0
- Protein: 8
- Cholesterol: 180