

Are you ever craving that incredible taste of a juicy cheeseburger, but you just don’t have the time or the energy for the whole grill setup? I know I get those days! That’s why **cheeseburger pockets** are an absolute lifesaver around here. They bring all that savory, cheesy goodness you love, but wrapped up in a flaky, comforting pastry. As a home cook, I’ve spent ages perfecting simple meals that actually taste amazing, and this recipe is my go-to solution when the weeknight dinner dilemma hits hard. Trust me, these handheld burger flavor bombs are fast, require minimal cleanup, and instantly make dinner feel like a treat!
- Why Our Homemade Cheeseburger Pockets Are the Best
- Gathering Ingredients for Your Cheeseburger Pockets
- Step-by-Step Guide to Making Delicious Cheeseburger Pockets
- Tips for Perfect Cheeseburger Pockets (Aria's Expert Advice)
- Make Ahead & Freezer Friendly Meals with Cheeseburger Pockets
- Serving Suggestions for Handheld Burger Meals
- Frequently Asked Questions About Cheeseburger Pockets
- Storage and Reheating Your Leftover Cheeseburger Pockets
- Nutritional Information Estimate for Cheeseburger Pockets
- Share Your Perfect Cheeseburger Pockets Creation
Why Our Homemade Cheeseburger Pockets Are the Best
I know what you’re thinking: another handheld recipe? But these are different, and once you try them, you’ll see why I had to share. These aren’t just quick; they are genuine Comfort Food Handhelds that deliver maximum flavor payoff for minimum evening effort. They are truly a fantastic Family Friendly Dinner Recipe.
- They freeze like a dream, so you always have backup meals ready. Visit my guide for easy homemade pretzel dogs to see more freezer-friendly hacks!
- The filling is deeply seasoned—it tastes like a gourmet burger, not cafeteria beef!
- Cleanup is a breeze; mostly just one skillet, the mixing bowl, and the baking sheet.
Quick Dinner Ideas with Ground Beef Solved
If your weeknight rotation is stuck in a rut, these are your answer. Seriously, we are talking about getting dinner ready, baked, and on the table in just about 33 minutes total. I managed to squeeze this recipe in between soccer practice pickups and homework sessions, so I promise it’s fast! It’s the ultimate hack for when you need something satisfying now.
The Secret to Perfect Cheeseburger Pockets Every Time
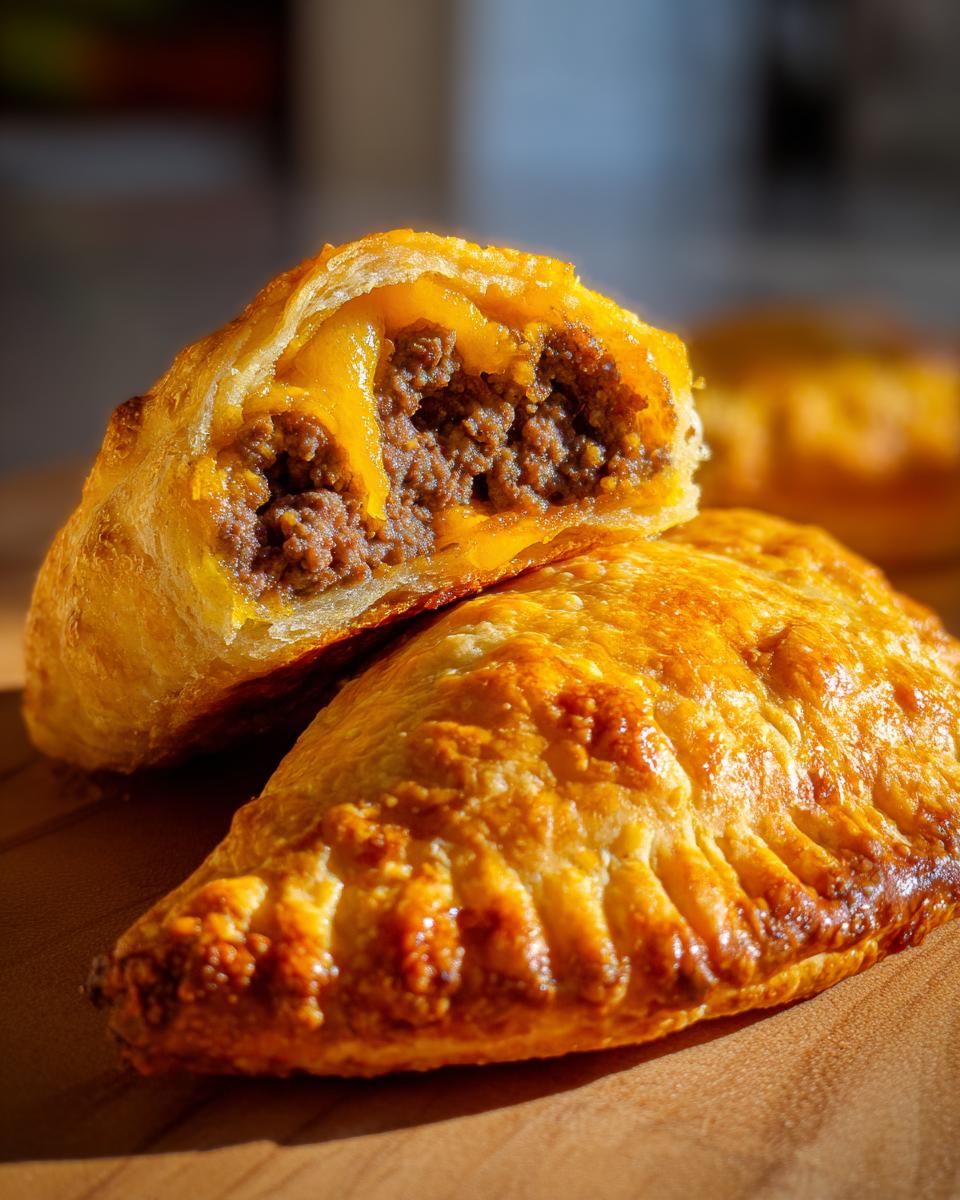
The real magic here is texture. We want flaky pastry outside and a super juicy interior, right? The biggest game-changer for perfect **cheeseburger pockets** is making sure you drain every last drop of grease after cooking the meat. Soggy pastry is the enemy of a good handheld meal, and draining completely ensures that crescent roll dough puffs up beautifully around the cheese and beef filling.
Gathering Ingredients for Your Cheeseburger Pockets
Okay, let’s talk about what you need to grab from the pantry and fridge to make these incredible **cheeseburger pockets**. The beauty of this recipe is that it uses staple ingredients—nothing fancy or hard to track down! We are relying on refrigerated crescent roll dough for that immediate flaky goodness, which makes all the difference when you’re aiming for a simple weeknight dinner. I want to stress that you need to measure that cheese; getting it packed right helps seal everything in later!
If you ever get adventurous and decide to try making bread from scratch later, you can check out my easy condensed milk bread recipe, but for tonight, stick to the store-bought dough. Here is what to gather:
- 1 pound ground beef (I usually go for 85/15)
- 1 small onion, must be finely chopped!
- 1 teaspoon salt
- 1/2 teaspoon black pepper
- 1 teaspoon Worcestershire sauce (don’t skip this; it’s key for that burger depth!)
- 1/2 teaspoon garlic powder
- 1/4 teaspoon dried oregano
- 1 cup shredded cheddar cheese, packed well
- 1 (8 ounce) package refrigerated crescent roll dough
- 1 egg, beaten lightly for the egg wash
Step-by-Step Guide to Making Delicious Cheeseburger Pockets
Alright, this is where the magic happens! We are turning simple ingredients into amazing cheeseburger pockets that rival any takeaway snack. First things first, get your oven warmed up to 375 degrees Fahrenheit and make sure you’ve got a baking sheet lined with parchment paper ready to go. Parchment is my best friend for everything that has cheese, trust me on this one! Once that’s sorted, let’s jump right into making the filling so it has a moment to cool slightly before we seal up those pockets.
Preparing the Savory Beef Filling for Cheeseburger Pockets
Grab your skillet and get the ground beef and that finely chopped onion cooking over medium heat. You want that beef totally browned and the onion nice and soft—no one likes crunchy onion in their cooked filling, right? When it looks done, you have to **drain off every bit of extra grease**. This is honestly the most crucial step for keeping your final **cheeseburger pockets** from getting soggy or oily. Once drained, stir in all your seasonings: salt, pepper, garlic powder, oregano, and that Worcestershire sauce for that classic burger tang. Let that cool down for just a few minutes before moving on.
Assembling the Crescent Roll Cheeseburger Pockets
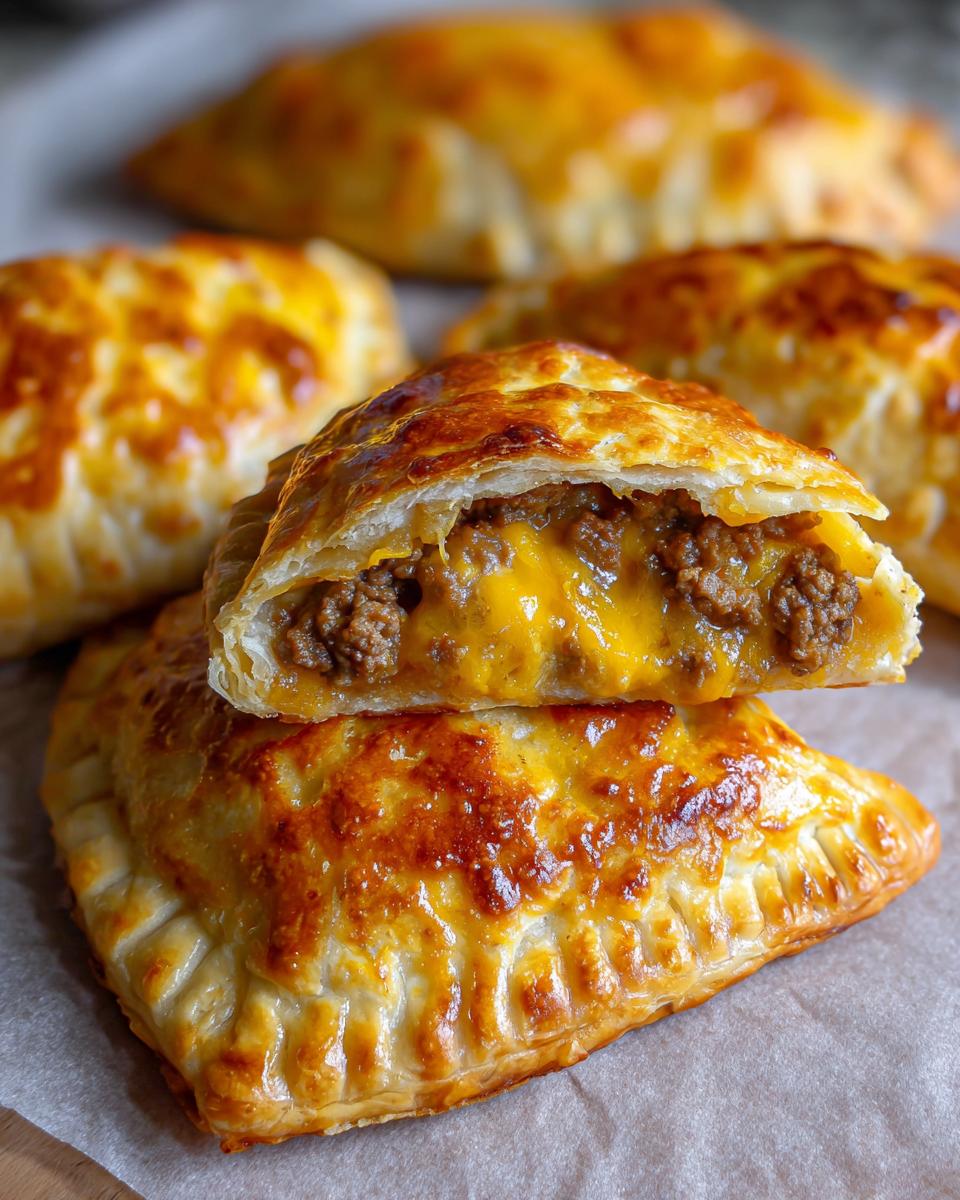
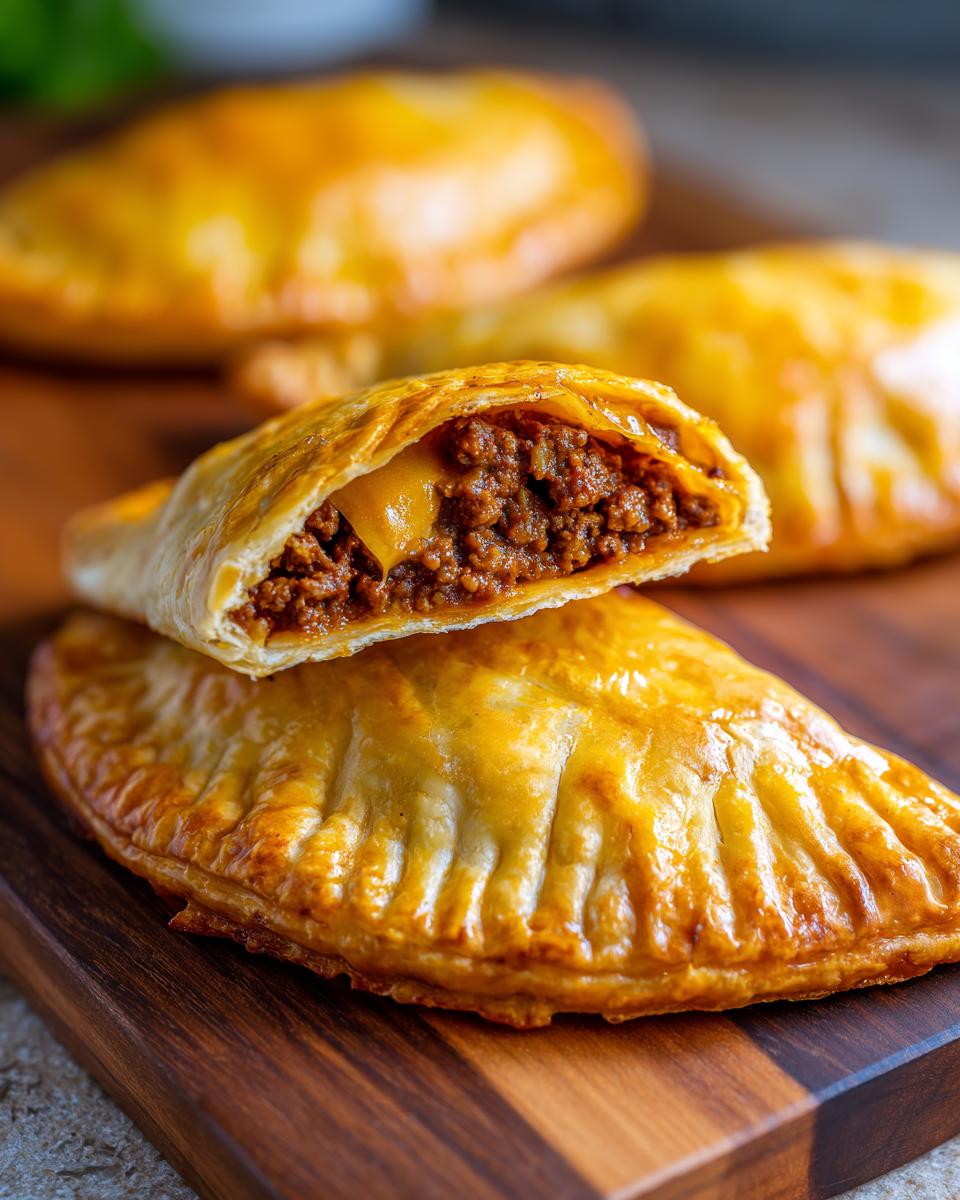
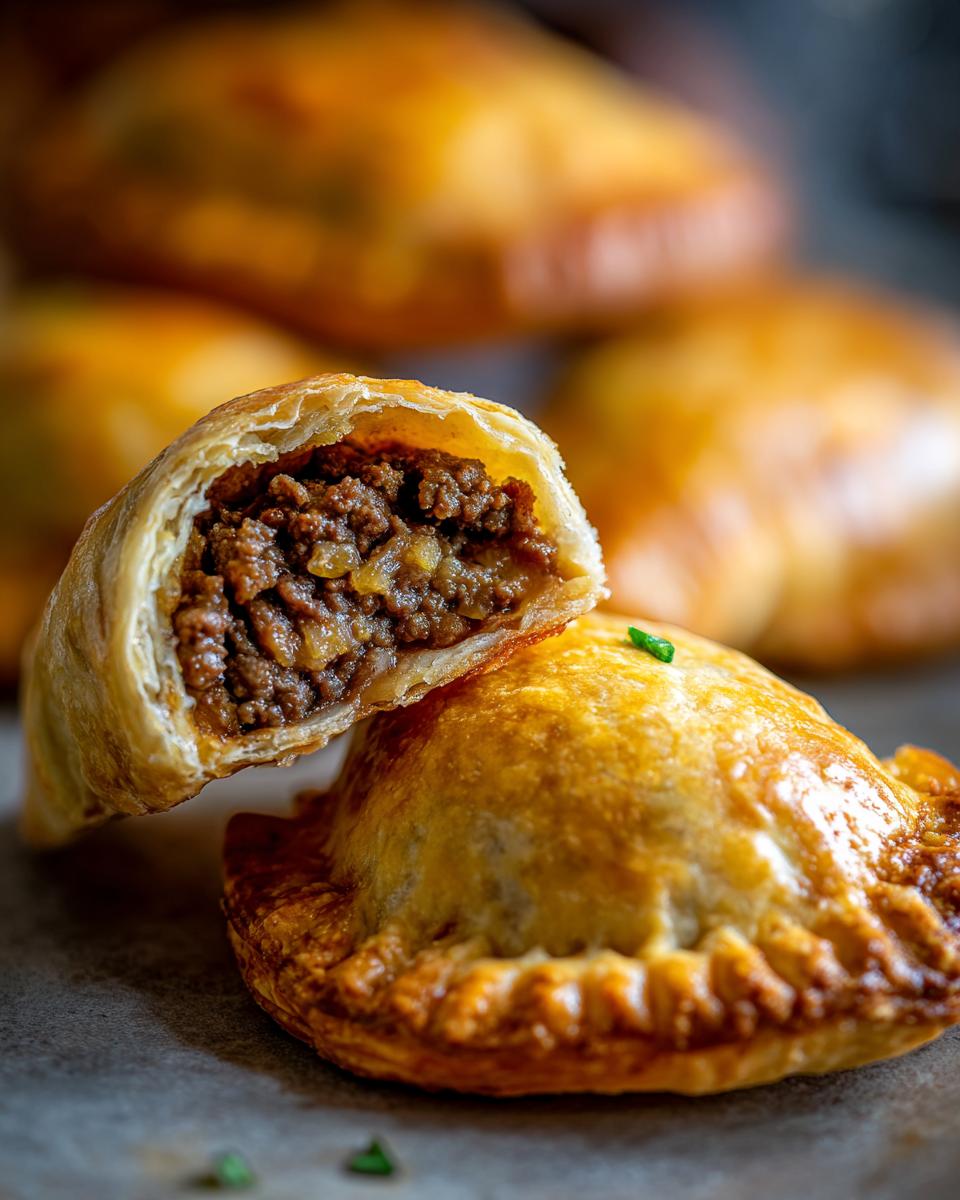
Now we work fast because nobody wants warm meat mixing into cold dough for too long! Unroll your dough and separate it into those 8 little triangles. Spoon about two tablespoons of that cooled beef mixture onto the wide end of each triangle. Next, sprinkle a little cheese right over the top of the beef. Here’s the technique: fold that narrow tip over the filling and start rolling toward the wide end, just like you’re rolling a standard crescent roll. But now, you have to be aggressive with the sealing! Press those edges together really firmly. I always grab a fork and crimp the edges—this extra step ensures you get beautiful Crescent Roll Cheeseburger Pockets that don’t burst open while baking.
Baking Your Baked Beef Pockets to Golden Perfection
Once all your pockets are sealed and sitting seam-side down on that prepared sheet, it’s time for the glow-up! Lightly brush the tops of every pocket with that beaten egg wash we set aside. This is totally optional, but it gives you that irresistible shiny, golden-brown crust that makes these look professional. Pop them into that 375°F oven for about 15 to 18 minutes. Keep an eye on them, especially after 15 minutes, because you are looking for perfectly golden crusts on these Baked Beef Pockets. If you need help timing other baked goods, check out my pretzel dog guide—timing is everything!
Tips for Perfect Cheeseburger Pockets (Aria’s Expert Advice)
Even though this recipe is wonderfully straightforward, leaning into a few tricks I’ve learned over the years can take your **cheeseburger pockets** from good to absolutely legendary. When you understand *why* we do certain things, you gain that cooking confidence I always talk about! It’s all about elevating that everyday simplicity, even when dealing with ground beef and crescent dough. Don’t be afraid to tinker a little bit once you’ve mastered the basic bake!
Substitution Ideas for Your Cheeseburger Pockets
Listen, I love crescent rolls because they are fast, but if you want that incredible, flaky, buttery texture reminiscent of a store-bought, high-end pastry, try using puff pastry instead! It gives you a totally different, airy crust, and it’s amazing. For the cheese, feel free to mix it up! I sometimes use Monterey Jack or even smoked Gouda for a deeper flavor. If you want to lean even harder into that burger vibe—and this is a little secret—try adding a tablespoon of finely diced dill pickles right into your cooled beef filling. It gives you that sharp pop against the rich meat and cheese without making the pastry soggy.
If you’re looking to tackle other wrapped, savory dough recipes, you owe it to yourself to check out my guide on sourdough pretzel dogs. Understanding how different doughs handle moisture is key to mastering all sorts of handhelds!
Make Ahead & Freezer Friendly Meals with Cheeseburger Pockets
One of the biggest reasons I developed this recipe besides the weeknight speed is how fantastic these turn out for future meals! These **cheeseburger pockets** are truly designed to be among your go-to Freezer Friendly Meals. If you decide to make a double batch, the preparation process barely changes!
If you plan to bake them later the next day, assemble them completely, place them seam-side down on a baking sheet, give them a light covering (plastic wrap works well), and pop them in the fridge for up to 24 hours. Just remember, you’ll need to add about 5 extra minutes to your baking time since they dough is starting cold.
For long-term storage, follow the freezing instructions precisely. Assemble them all, place them on a baking sheet to freeze individually until solid—I love this tray-freezing step! Then, transfer all those lovely, frozen pockets into a heavy-duty freezer bag. When you are ready to bake them straight from frozen, add about 5 to 10 minutes to your bake time at 375°F. It’s so satisfying to pull perfectly formed **cheeseburger pockets** out of the freezer on a busy afternoon! Need more slow-cooker help for busy days? You might like my easy crockpot ravioli lasagna.
Serving Suggestions for Handheld Burger Meals
Honestly, these little savory pastry pockets are delicious all by themselves, especially when they are hot and fresh out of the oven with that cheese still molten inside. But why stop there when we have the chance to build an experience? Just like you wouldn’t eat a burger without fries or a certain kind of topping, these handhelds beg for some terrific sides and dips. Since these are so quick, we can focus on making the accompaniments equally simple—no need for complicated side dishes after all that pocket folding!
They work perfectly when you treat them like a fun appetizer spread for game day, or as the main component of a quick lunch spread. If you’re looking for something creamy and green on the side, perhaps check out my thoughts on creamy garlic parmesan mushroom pasta—though maybe keep it light next to these hearty bites!
Best Dipping Sauces for Your Pockets
A good dipping sauce elevates anything, and when you’ve got meaty, cheesy pockets, you need something tangy and rich to cut through that richness. You definitely don’t need to run to the store for fancy jars, either!
For the absolute quickest flavor, just mix up equal parts ketchup and yellow mustard. That’s classic, right? But if you want something a little more special—a real homemade touch—try making a quick burger sauce imitation:
- Start with half a cup of mayonnaise.
- Add two tablespoons of ketchup.
- Stir in one tablespoon of sweet pickle relish (or finely minced dill pickle bits).
- A tiny splash of white vinegar or pickle juice brightens it up.
- Season with just a little garlic powder and a dash of paprika for color.
Seriously, swirl that together, and suddenly your simple baked beef pocket feels like a full-on burger experience. That sauce is unbelievably good paired with the savory pastry; give it a try!
Frequently Asked Questions About Cheeseburger Pockets
I always get so many questions after people try this recipe for the first time because they are just so satisfying! It’s one thing to make a great dinner, but making a great Quick Lunch Idea that you can depend on later is even better. If you were wondering about common issues or tweaks, I bet one of these answers will clear things up for you. Feel free to check out my guide on easy homemade pretzel dogs for other tips on handheld comfort food!
Can I use ground turkey instead of ground beef in these cheeseburger pockets?
You absolutely can! Ground turkey works great here, especially if you are looking for a slightly leaner option. Because turkey can sometimes be drier than beef, I highly, highly recommend adding about a teaspoon of extra Worcestershire sauce or even a splash of beef broth when you are simmering the meat mixture. This just ensures you don’t end up with dry filling in your finished pockets.
How do I prevent the cheese from leaking out of my homemade hot pockets recipe?
Oh, the dreaded cheese leak! It happens to the best of us, but it’s usually preventable. First, make sure your meat mixture has cooled down significantly before you try to seal the dough—if the filling is hot, it melts the cheese too fast, causing it to run out before the dough seals. Second, the key is pressure! When you fold the dough over, press every single seam firmly with your fingers. Then, definitely use that fork to crimp the edges. That extra layer of secure folding is what keeps the melty goodness right where it belongs: inside your amazing **cheeseburger pockets**.
Storage and Reheating Your Leftover Cheeseburger Pockets
I always double this recipe just so I know I have something tasty waiting in the fridge the next day. Leftovers are the unsung hero of the home cook’s week, aren’t they? If you’ve got any leftover, perfectly baked **cheeseburger pockets**, storing them is super easy. Once they’ve cooled down completely—and I mean totally cooled, otherwise you’ll trap steam and make them soggy—pop them into an airtight container. They last great in the refrigerator for about three to four days.
Now, when it comes to reheating? We are focused on bringing back that flaky crust we worked so hard for! Microwaving is fast, sure, but it makes pastry chewy and sad. To truly revive your leftover **cheeseburger pockets**, you’ve got two much better options. The air fryer works like magic here; just a few minutes at 350 degrees Fahrenheit and they taste almost freshly baked again. If you don’t have an air fryer, the oven is your next best bet. Think of it as re-baking them gently: wrap them loosely in foil or skip the foil if you like them extra crispy, and heat them at about 325 degrees Fahrenheit until warmed through. It takes a little longer, maybe 10-12 minutes, but the reward is a beautifully crisp pastry hugging that cheesy filling once more. If you need help with other fast microwave-free reheating, take a peek at my guide for air frying frozen shrimp!
Nutritional Information Estimate for Cheeseburger Pockets
Now, I have to be totally honest with you here. Because I’m Aria, a passionate home cook and not a registered dietitian working in a lab, these numbers are a close approximation based on the core ingredients we used in my kitchen. We are relying on standard measurements for ground beef, cheddar, and the crescent roll dough included in the recipe. If you swap out the fat content of the beef, use a different type of cheese, or use puff pastry, the values will definitely change!
Think of this information as a good ballpark estimate for planning your weeknights, but for precise daily needs, you’d need to calculate using the exact brands you choose. Here is what we calculated for one of these delicious, handheld treats:
- Serving Size: 1 pocket
- Calories: 320
- Fat: 18g
- Saturated Fat: 8g
- Carbohydrates: 22g
- Protein: 17g
- Sugar: 2g
- Sodium: 450mg
See? Not too bad at all for such a satisfying meal! It’s easy to make this a balanced plate by adding a big side salad or some fresh veggie sticks. It’s all about balance, which is what my whole philosophy here at Cooking Zenith is about—elevating the everyday!
Share Your Perfect Cheeseburger Pockets Creation
Wow, we made it! I truly hope you enjoyed making these super satisfying **cheeseburger pockets**. Nothing makes me happier than hearing that one of my recipes powered a busy weeknight or surprised guests at a game day gathering. Now that they are baked up golden brown and smelling fantastic, I really want to hear how they turned out for you!
Please take a moment and leave a quick rating down in the comments section—did you get that flaky crunch? Was your cheese perfectly molten? If you took a picture before everyone devoured them (which I usually fail to do!), tag me on social media! I absolutely love seeing your beautiful kitchen work. Seriously, showing off how you’ve mastered these handhelds is the best compliment I could ever receive. You can always get in touch with me directly if you have any specific feedback or questions about this recipe by visiting the contact page!
PrintEasy Homemade Cheeseburger Pockets

Make comforting, handheld cheeseburger pockets using ground beef and cheese wrapped in flaky pastry. This recipe is simple for a quick weeknight dinner or a freezer-friendly meal.
- Prep Time: 15 min
- Cook Time: 18 min
- Total Time: 33 min
- Yield: 8 servings 1x
- Category: Dinner
- Method: Baking
- Cuisine: American
- Diet: Vegetarian
Ingredients
- 1 pound ground beef
- 1 small onion, finely chopped
- 1 teaspoon salt
- 1/2 teaspoon black pepper
- 1 teaspoon Worcestershire sauce
- 1/2 teaspoon garlic powder
- 1/4 teaspoon dried oregano
- 1 cup shredded cheddar cheese
- 1 (8 ounce) package refrigerated crescent roll dough
- 1 egg, beaten (for egg wash)
Instructions
- Preheat your oven to 375 degrees Fahrenheit. Line a baking sheet with parchment paper.
- In a skillet over medium heat, cook the ground beef and chopped onion until the beef is fully browned and the onion is soft. Drain off any excess grease.
- Stir the salt, pepper, Worcestershire sauce, garlic powder, and oregano into the beef mixture. Cook for one minute. Remove from heat and let the mixture cool slightly.
- Unroll the crescent roll dough onto a clean surface. Separate the dough into 8 triangles. Do not separate the perforations.
- Spoon about 2 tablespoons of the cooled beef mixture onto the wider end of each dough triangle. Sprinkle a small amount of cheddar cheese over the beef.
- Fold the narrow point of the dough over the filling and roll up toward the wide end to seal, creating a pocket shape. Press the edges firmly together to seal the seams. Crimp the edges with a fork for extra security.
- Place the sealed pockets seam-side down on the prepared baking sheet.
- Brush the tops of the pockets lightly with the beaten egg wash. This helps them brown nicely.
- Bake for 15 to 18 minutes, or until the pastry is golden brown and cooked through.
- Let the cheeseburger pockets cool on the baking sheet for a few minutes before serving.
Notes
- For a copycat Hot Pockets recipe feel, use puff pastry instead of crescent rolls for a flakier crust.
- You can prepare these pockets ahead of time, place them on a baking sheet, cover, and refrigerate for up to 24 hours before baking. Add a few extra minutes to the bake time if baking directly from the refrigerator.
- These are great for freezer friendly meals; freeze unbaked pockets on a tray, then transfer to a freezer bag. Bake from frozen at 375 degrees Fahrenheit for about 25-30 minutes.
Nutrition
- Serving Size: 1 pocket
- Calories: 320
- Sugar: 2
- Sodium: 450
- Fat: 18
- Saturated Fat: 8
- Unsaturated Fat: 10
- Trans Fat: 0.5
- Carbohydrates: 22
- Fiber: 1
- Protein: 17
- Cholesterol: 55