
Oh, the holidays! They fill the air with the best smells, but let’s be real—they also bring baking anxiety. If you’ve ever spent hours crafting perfect gingerbread walls only to watch your structure melt into a spiced puddle by morning, I see you. Trust me, I’ve been there. That’s why I’m sharing my absolute, 100% foolproof gingerbread house recipe. This isn’t a soft cookie recipe; this is construction-grade gingerbread that guarantees your holiday centerpiece stays standing strong!
Here at Cooking Zenith, my goal, even when tackling ambitious Christmas baking projects like this, is to make it achievable for you. I, Aria Thompson, dedicate hours to ensuring these guides work perfectly in your home kitchen. We break down the techniques so you can skip the stress and jump straight to the festive fun. This recipe locks in the flavor and the strength, making your edible holiday craft incredibly rewarding.
- Why This Gingerbread House Recipe Stands Tall: The Sturdy Dough Secret
- Step-by-Step Guide to the Perfect Gingerbread House Recipe Dough
- Baking Your Gingerbread House Recipe Pieces for Maximum Strength
- The Essential Royal Icing Recipe for Gingerbread House Construction Guide
- Gingerbread House Construction Guide: Assembly and Stability
- Making This Gingerbread House Recipe a Fun Winter Holiday Activity for Families
- Decoration Ideas for Your Festive Gingerbread Desserts
- Storage and Longevity for Your Gingerbread House Recipe Creation
- Frequently Asked Questions About Making a Sturdy Gingerbread House
- Estimated Nutritional Data for This Gingerbread House Recipe Dough
Why This Gingerbread House Recipe Stands Tall: The Sturdy Dough Secret
Okay, let’s talk about why your last gingerbread attempt might have flopped. Most recipes aim for a soft, chewy cookie, right? Not here! This flavorful spiced cookie recipe is specifically engineered for architecture. We are making Sturdy Gingerbread, which means the dough needs to be much stiffer than your average cookie dough. If you want that gorgeous, load-bearing wall, you embrace the stiffness!
The biggest game-changer that gives us that coveted no spread gingerbread dough? Chilling time. Seriously, don’t rush it. Those two hours (minimum!) in the fridge are doing the heavy structural lifting before the oven even gets involved. It firms everything up so when it hits the heat, it holds its shape like a champion.
Gathering Ingredients for Your Gingerbread House Recipe
When gathering supplies for your holiday centerpiece recipe, remember that molasses isn’t just for flavor; it brings density and that deep, classic color. You’ll need three cups of all-purpose flour balanced with those wonderful spices: ginger, cinnamon, and cloves. Make sure your butter is softened, but not melted. These exact ratios are what keep those walls perfectly straight!
Step-by-Step Guide to the Perfect Gingerbread House Recipe Dough
Now that we have our structural ingredients ready, let’s get mixing! Making the dough for your gingerbread house recipe is where you start building that trust between you and your holiday centerpiece. We’re moving in stages, so take your time and you won’t have any spreading disasters later on.
First up, handle your dry stuff. In a nice big bowl—I use my favorite sturdy glass one—whisk together the flour, all the ginger, cinnamon, cloves, and salt. Whisking really helps distribute those spices evenly, so every bit of the dough tastes perfectly warm, not just one section.
Next, switch to the wet ingredients. Cream your softened butter and sugar together until it looks light and fluffy, like pale whipped cream. It needs to be well-combined before you beat in the egg, the molasses—glorious, dark molasses—and that splash of vanilla. Mix until it’s all beautifully uniform.
The critical moment is adding the dry to the wet. Do it slowly! Mix on low speed just until you see a stiff dough forming. And here’s my golden rule: stop mixing the second the last streak of flour disappears! Overmixing makes tough walls for your house.
Once it comes together, divide that stiff dough into two equal disks, wrap them up tight in plastic wrap, and get them into the fridge. At least two hours, friends. I usually make this the day before I plan to bake. Chilling is the secret weapon for keeping every piece of your gingerbread house recipe exactly where you cut it!
Baking Your Gingerbread House Recipe Pieces for Maximum Strength
Okay, the dough is chilled, and your blueprints are probably scattered across the counter—it’s showtime! Preheat your oven to 350°F (175°C). You want to line those baking sheets with parchment paper; trust me, after all this work, you do not want your walls sticking. While you’re preparing, take a peek at my guide for pizzelle cookies recipe if you want another fun, thin cookie project for later!
Working with one disk at a time, roll out that chilled dough to a solid 1/4 inch thickness. This is non-negotiable for a sturdy gingerbread house! If it’s too thin, it cracks. If it’s too thick, it bends. Use your templates to cut out all your walls and roof sections right there on the floured surface. Cut quickly and carefully!
Pop those pieces onto the sheets and bake them for about 12 to 15 minutes. I actually lean toward the longer end of that suggestion. We aren’t aiming for chewy here; we want them deep golden brown and firm. That extra few minutes ensures they dry out just enough to handle the stress of assembly. The second they come out, if a roof tile warped even a little, gently press it back into shape while it’s still radiating heat. They harden fast!
Let them cool completely on a rack before you attempt to move them. Patience one last time before you move on to mixing up that crucial icing mortar!
The Essential Royal Icing Recipe for Gingerbread House Construction Guide
The gingerbread dough is only half the battle, honey! If you want your masterpiece to last past Christmas Eve, you need mortar that sets like concrete, not marshmallow fluff. Forget thin, sugary glaze; we are making the true best royal icing recipe for gluing this structure together. Since I haven’t given you the exact numbers here—because honestly, icing recipes are their own whole saga—I rely on meringue powder when I want something absolutely rock solid for my vanilla buttercream-loving friends, or fresh egg whites if I’m whipping up a big batch.
This icing must be thick. It needs to hold a wall up instantly! You’ll be looking for stiff peaks that barely droop when you lift the whisk. When cutting the pieces for my gingerbread house recipe, I found that baking them longer gave me strength, but the icing gives you the grip!
Tips for Mixing and Storing Your Gingerbread House Icing
Mixing this icing takes a little patience—it needs to be mixed well past the point where you think it’s ready. You actually want two consistencies later on, but for the initial build, you need it super thick for the seams. If you’re piping your eaves and details, you can thin a small portion with just a few drops of water until it flows nicely, but keep the main batch thick!
The biggest survival tip for your icing? Cover it! Seriously, royal icing dries faster than anything I’ve ever worked with. If you stop mixing for five minutes, cover the bowl with a damp cloth or plastic wrap pressed directly onto the surface. If it starts to crust over while you’re taking a coffee break, just beat it back into submission. This glue needs to stay usable until every piece of your festive gingerbread desserts creation is locked into place.
Gingerbread House Construction Guide: Assembly and Stability
This is the moment of truth! You’ve baked strong walls and mixed up the concrete (I mean, royal icing). Now we move into the actual gingerbread house construction guide. Don’t try to build everything at once; you’ll end up with a mess, I promise! Start with the four walls first. Load up a piping bag fitted with a large round tip—or just cut a hefty corner off the bag—and pipe a thick line of icing along the bottom edges and the vertical seams where the walls meet.
Stand the walls up! This is where having a helper is amazing, but if you’re solo, brace the walls with cans of chickpeas or small spice jars until the icing grabs hold. Hold each joint firmly for about 30 seconds. Get the four walls upright and stable, then step away. Seriously, walk away! You need that initial bond to set before you even think about putting the heavy roof pieces on.
Once the walls feel solid, you can carefully start adding the roof panels. Use generous amounts of icing on the peak and the top edges of the walls. For the best results with your gingerbread house recipe, let the whole structure dry completely—ideally overnight—before you start decorating. That drying time is what turns your temporary pieces into a permanent, or at least very stable, holiday decoration!
If you want to see another cool tutorial on construction approaches, check out the steps over at The Flavor Bender, they have some neat ideas for bracing your structure!
Remember, every piece of your gingerbread house recipe is stronger because you took the time to chill the dough and bake it thoroughly. Now, go build something magical!
Making This Gingerbread House Recipe a Fun Winter Holiday Activity for Families
Listen, I know we just spent time talking about structural integrity and baking times, but please, let’s dial that anxiety back down! The absolute best part of this whole gingerbread house recipe tradition isn’t whether the roof is perfectly level; it’s the pure, messy fun of it all. This is meant to be a wonderful winter holiday activity for families, not a high-stakes engineering exam!
I remember being small, helping my dad brace the walls with milk cartons while my mom frantically piped icing around the base. We always laughed more than we succeeded structurally back then! That memory, that feeling of us all leaning over the table, is why I want this to work for you. Don’t worry if little Susie drops a candy cane into the icing reservoir or if the door ends up upside down. That’s what makes it *your* house.
The goal here is connection. So, once you have your baked pieces (check out how my friends at Cooking With Emy do their baking, too!), put on some holiday tunes, maybe pour yourself a little of my Christmas Sangria, and just enjoy creating something sweet together. Perfection is boring; joy is what lasts!
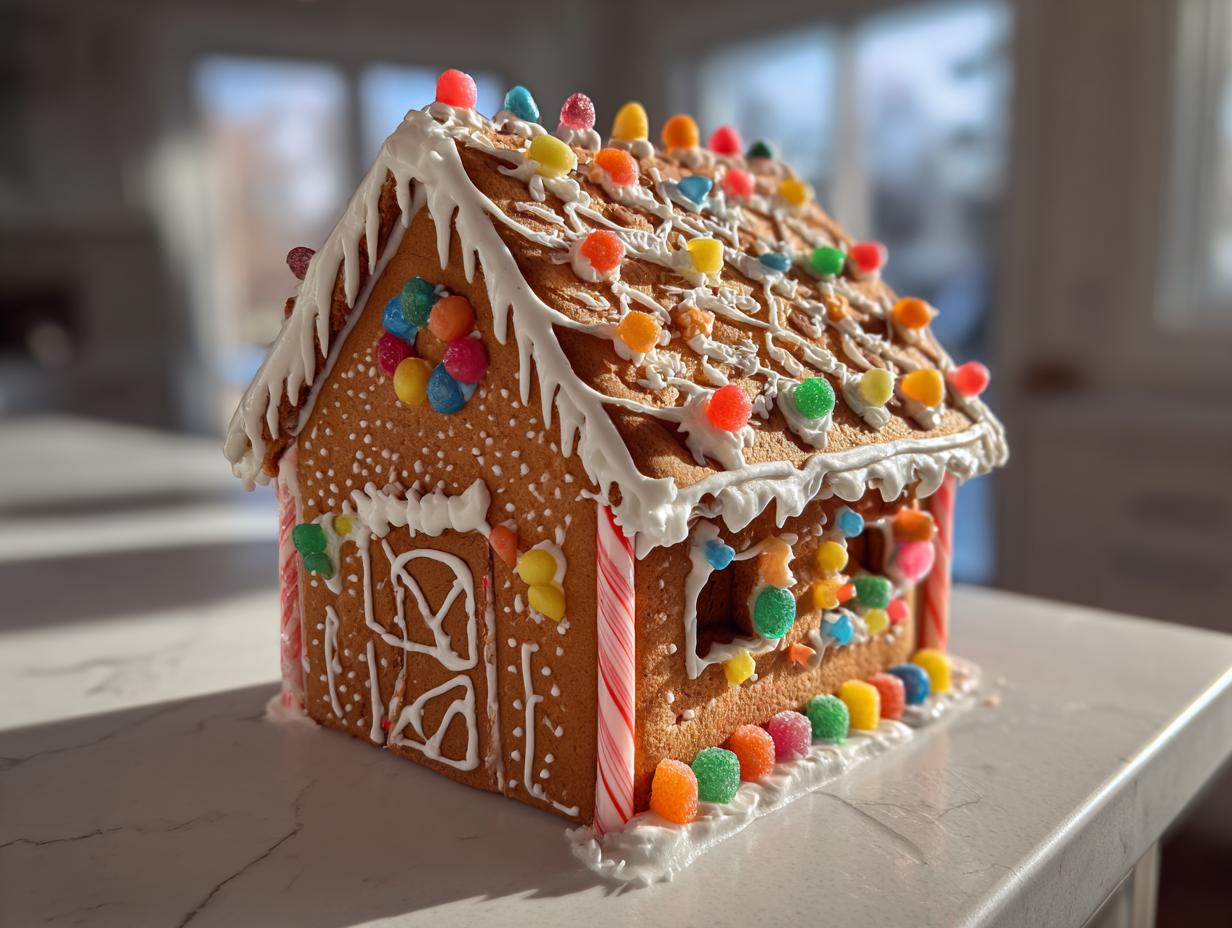
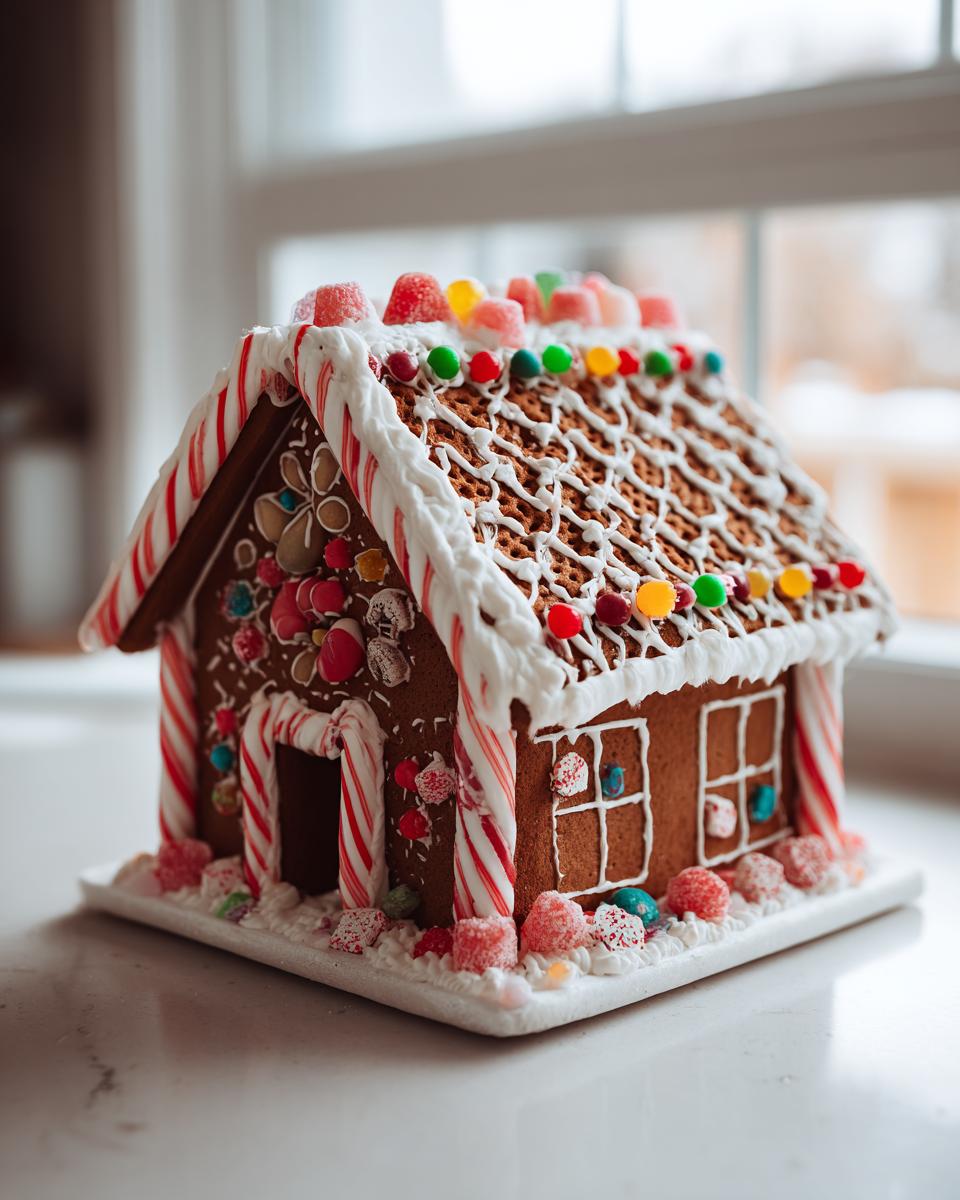
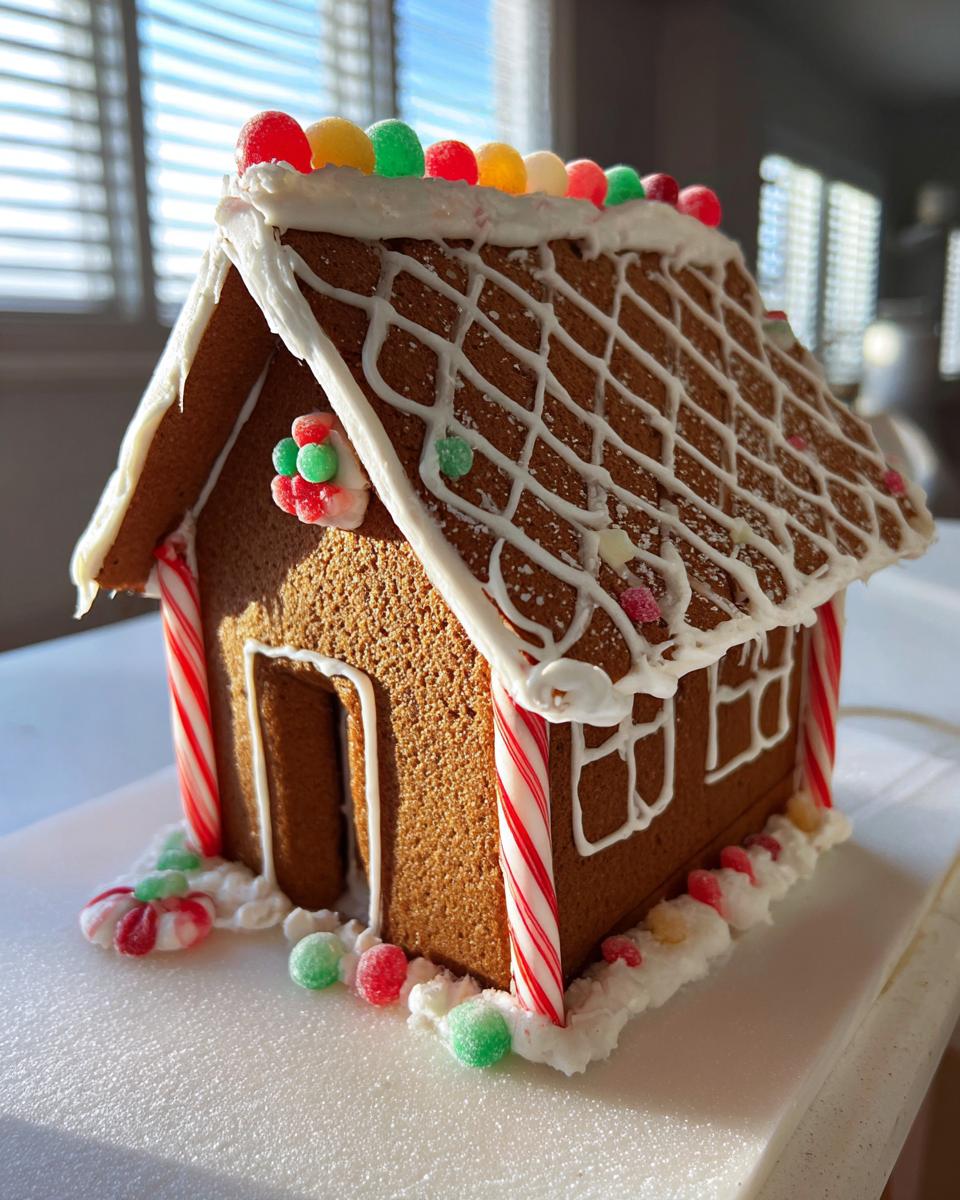
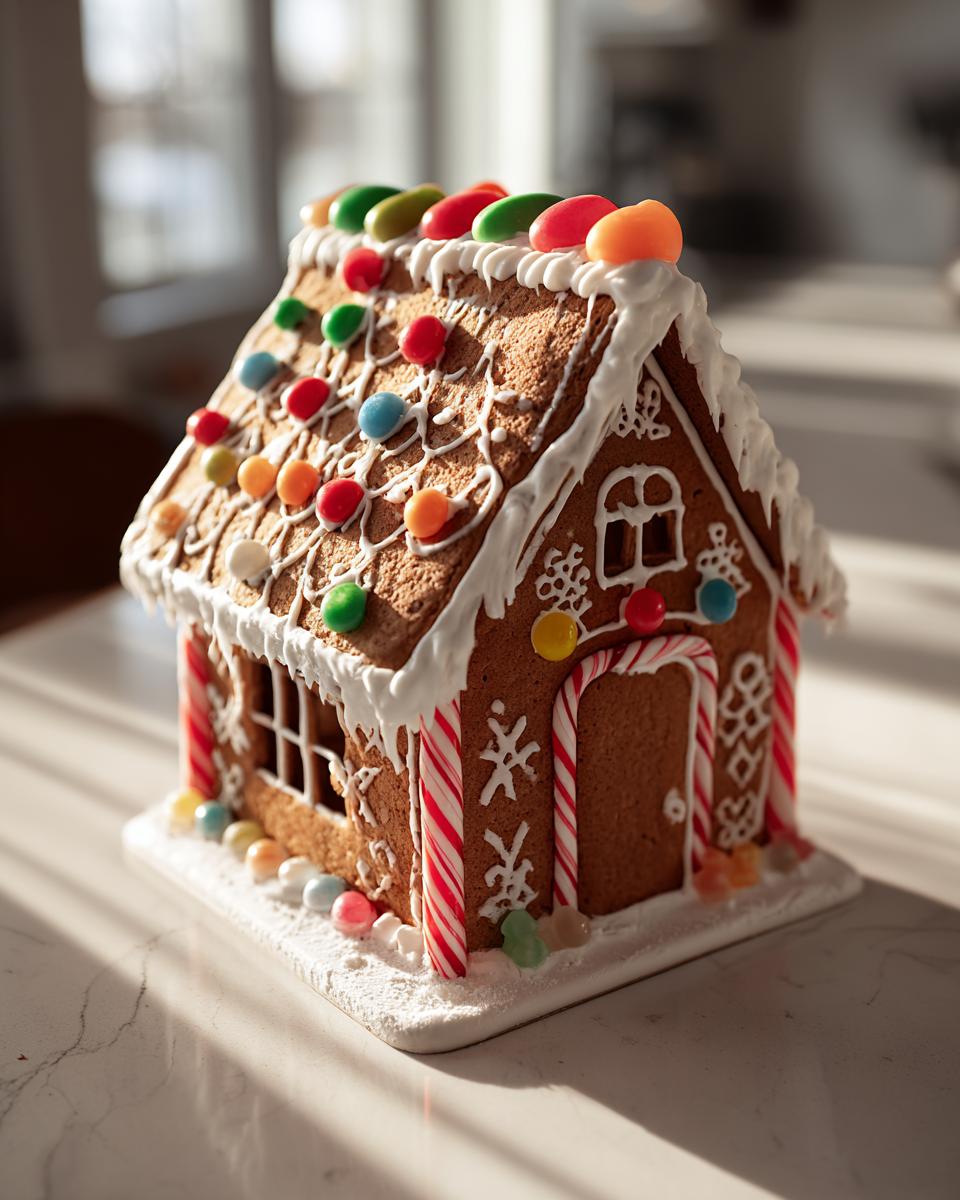
Decoration Ideas for Your Festive Gingerbread Desserts
Okay, the glue has set, your edible holiday craft is standing proud, and now comes the fun part: making it dazzling! Because we used a sturdy gingerbread house recipe, these walls can handle some weight, so don’t be shy with the candy.

I love using different sized gumdrops for roofing shingles, and those little colorful nonpareils look incredible sprinkled over a wet coat of icing on the windows. For the ground around your gingerbread house recipe, mix up a thinner batch of royal icing—almost like frosting—and spread it out. Then, cover that in coconut flakes for a perfect, snowy look. It really makes your finished centerpiece pop!
Remember to keep those heavy things, like pretzel log fences, closer to the base where the structure is strongest. Have fun with your Christmas cookie bars inspiration and get creative!
Storage and Longevity for Your Gingerbread House Recipe Creation
You worked hard on this amazing construction, and you want it to look fantastic right through New Year’s, right? The secret to how to make gingerbread last is controlling the atmosphere! Gingerbread dough, once baked hard, hates humidity. Humidity is its arch-nemesis because it softens the pieces and makes your amazing icing joints crumble.
After you’ve finished decorating your centerpiece, find it a stable, cool, dry spot away from the radiator or any steamy kitchen activity. I always display mine in the formal dining room where no one touches it! If you need to store it for a season, wrap the entire thing loosely in plastic wrap, making sure the icing doesn’t get squished. It’s amazing how well this gingerbread house recipe holds up when kept dry! If you want other sturdy, shelf-stable holiday treats, you have to try my penuche fudge recipe!
Frequently Asked Questions About Making a Sturdy Gingerbread House
Why did my gingerbread dough spread so much during baking?
Oh, that frustrating spread! Usually, it means one of two things happened. First, your dough wasn’t chilled long enough—it really needs that solid chill time we talked about. Second, it might have been a temperature issue. If your butter was too soft when creaming, or if you added the spiced dough to a non-preheated oven, the structure melts before it sets. This specific gingerbread house recipe is designed to resist that, but patience with the chilling step is key!
Do I really need to use templates, or can I freehand my pieces?
I know freehanding feels artistic, but for a sturdy build, templates are your best friend, especially when trying to master an easy to build gingerbread house. Templates ensure your roof pieces match your walls perfectly, which means better seams and a stronger structure. If you are doing this as a winter holiday activity for families, having pre-cut templates printed out really keeps the kids engaged in decorating instead of waiting for pieces to bake and cool!
Can I make the gingerbread pieces months ahead of time? How do I store them?
Yes, absolutely! This is one of the perks of our construction-grade dough. Once the pieces cool completely, how you store them is everything. Keep them in an airtight container at cool room temperature. I usually place a small square of parchment between any pieces that stack. Keep them away from any dampness or strong smells. Stored correctly, they’ll definitely last until Christmas morning, easily satisfying the How to make gingerbread last goal.
Can the gingerbread house be eaten after the holidays?
That’s the million-dollar question! Technically, yes, it’s cookie dough, but honestly? Once this structure has been sitting out coated in icing, it becomes rock hard and is mostly for display. I treat it like an edible holiday craft, not a snack! If you want something guaranteed to be chewy and delicious after the holidays, you should definitely make a separate batch of soft cookies, like my peanut butter ones, for eating.
Estimated Nutritional Data for This Gingerbread House Recipe Dough
I always feel a little funny sharing nutrition facts for something that’s obviously meant to be an incredible, show-stopping holiday decoration, but hey, full transparency is part of my philosophy here at Cooking Zenith!
Keep in mind that this data is only for the unbaked dough portion of the gingerbread house recipe itself, before we start adding gallons of sugary icing and hard little candies. Since we’re working with molasses and a good amount of butter for that sturdy structure, the numbers reflect that richness.
- Serving Size: 1 piece of dough (approx 1/12th of recipe)
- Calories: 280
- Sugar: 25g
- Sodium: 210mg
- Fat: 14g
- Saturated Fat: 8g
- Unsaturated Fat: 6g
- Trans Fat: 0g
- Carbohydrates: 36g
- Fiber: 1g
- Protein: 4g
- Cholesterol: 45mg
Please remember that these figures are estimates based on the ingredients listed, and they don’t factor in the royal icing or the mountain of sprinkles you’ll definitely be piling on for your final festive creation. This is, after all, a centerpiece built on spice and joy!
PrintSturdy Gingerbread House Recipe: A Foolproof Guide for Holiday Construction

Follow this guide to make a sturdy gingerbread house dough that resists spreading, ensuring your festive centerpiece stands tall. We include steps for construction and a strong royal icing recipe to act as reliable mortar for your edible holiday craft.
- Prep Time: 45 min
- Cook Time: 30 min
- Total Time: 2 hr 30 min (includes chilling time)
- Yield: One standard-sized gingerbread house
- Category: Dessert
- Method: Baking and Assembly
- Cuisine: American Holiday
- Diet: Vegetarian
Ingredients
- 3 cups all-purpose flour
- 1 teaspoon ground ginger
- 1 teaspoon ground cinnamon
- 1/2 teaspoon ground cloves
- 1/2 teaspoon salt
- 1/2 cup granulated sugar
- 1/2 cup unsalted butter, softened
- 1 large egg
- 1/2 cup molasses
- 1 teaspoon vanilla extract
Instructions
- In a large bowl, whisk together the flour, ginger, cinnamon, cloves, and salt. Set aside the dry ingredients.
- In a separate bowl, cream together the softened butter and sugar until light and fluffy. This step is key for texture.
- Beat in the egg, molasses, and vanilla extract until fully combined.
- Gradually add the dry ingredients to the wet ingredients, mixing on low speed until a stiff dough forms. Do not overmix.
- Divide the dough in half, flatten each half into a disk, wrap tightly in plastic wrap, and chill for at least 2 hours. Chilling prevents spreading during baking.
- Preheat your oven to 350°F (175°C). Line baking sheets with parchment paper.
- Roll out one dough disk to about 1/4 inch thickness on a lightly floured surface. Cut out your desired house pieces (walls, roof, etc.) using templates.
- Carefully transfer the pieces to the prepared baking sheets.
- Bake for 12 to 15 minutes, or until the edges are firm and the pieces are deep golden brown. Baking longer helps create stronger pieces for construction.
- Immediately after removing from the oven, place the pieces back over your templates or molds to reshape them if necessary while they are hot. Let the pieces cool completely on a wire rack.
- Prepare your royal icing (mortar) while the gingerbread cools.
- Assemble the house using the thick royal icing as glue. Pipe icing along the edges where pieces meet and hold them in place until the icing sets slightly. Allow the structure to dry completely, often overnight, before decorating.
- Decorate your finished gingerbread house with candies and more icing.
Notes
- For the best structural integrity, use a recipe specifically designed for construction, not soft eating cookies. This dough is intentionally less pliable.
- If you plan to store the house for a long time, use a strong royal icing recipe that dries rock hard.
- Bake pieces slightly longer than you would for standard cookies to ensure they are completely dry and sturdy for building.
Nutrition
- Serving Size: 1 piece of dough (approx 1/12th of recipe)
- Calories: 280
- Sugar: 25g
- Sodium: 210mg
- Fat: 14g
- Saturated Fat: 8g
- Unsaturated Fat: 6g
- Trans Fat: 0g
- Carbohydrates: 36g
- Fiber: 1g
- Protein: 4g
- Cholesterol: 45mg