

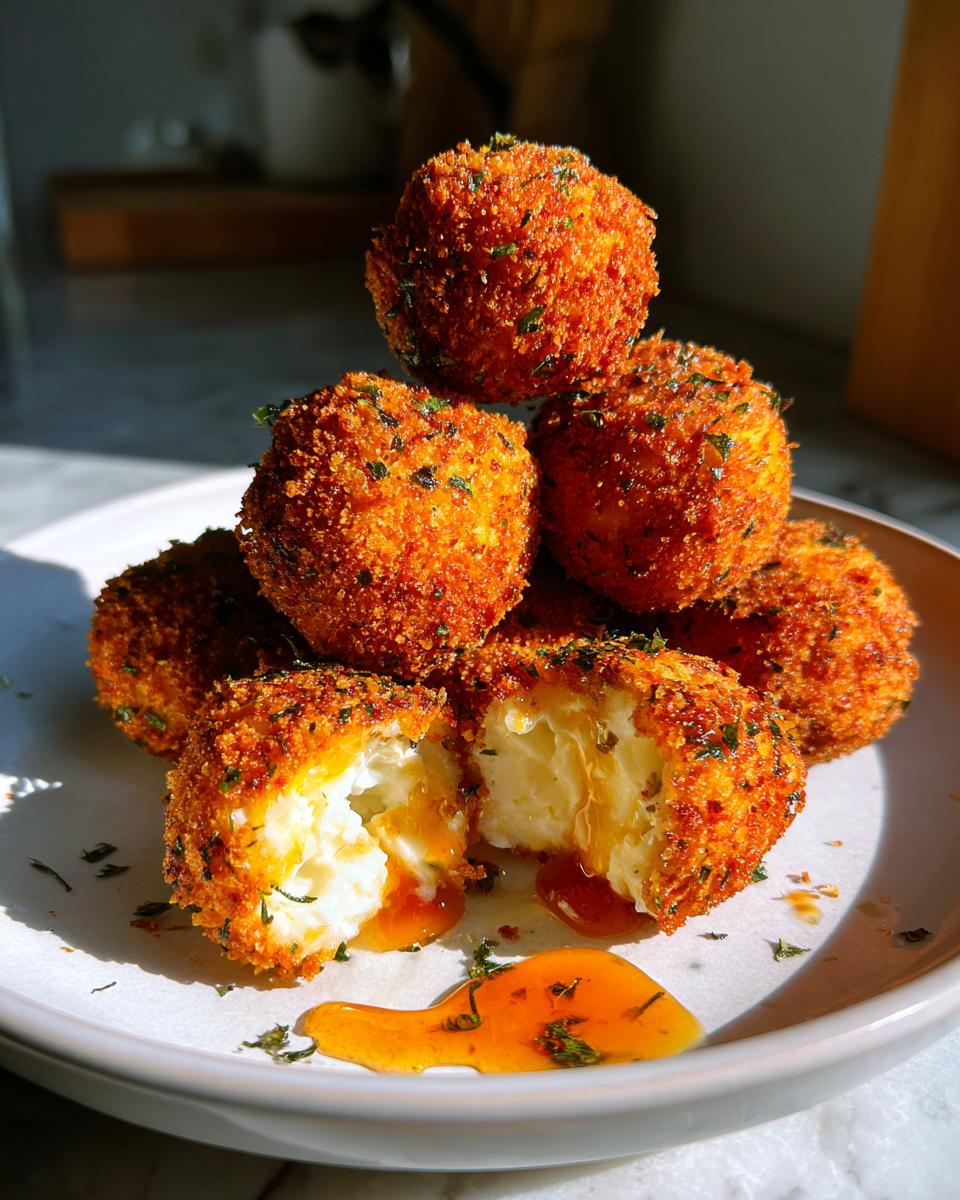
Okay, friends, let’s talk about appetizers because, honestly, that’s where the real party starts, right? Forget the complicated spreads; sometimes you just need that perfect, irresistible bite that makes everyone stop talking and just reach for more. That’s why I’m so thrilled to share my recipe for Crispy Fried Goat Cheese Balls with a Spicy Honey Dip. As a home cook—not a chef in some fancy restaurant—I focus on making things that look gourmet but are totally doable at home. These little spheres are crispy, they have that amazing, tangy, creamy center from the goat cheese, and they are the absolute showstopper for any gathering. If you love things like my whipped feta dip but want something you can pop in your mouth, this is it. Trust me, these aren’t just dips; these goat cheese balls are total crowd pleasers.

- Why You Will Love These Crispy Fried Goat Cheese Balls
- Essential Ingredients for Perfect Goat Cheese Balls
- Step-by-Step Instructions for Making Fried Goat Cheese Balls
- Tips for Success When Making Goat Cheese Balls
- Creative Variations for Your Goat Cheese Balls
- Serving Suggestions for These Elegant Goat Cheese Balls
- Storage and Make Ahead Tips for Goat Cheese Balls
- Frequently Asked Questions About Making Goat Cheese Balls
- Nutritional Estimates for Fried Goat Cheese Balls
- Share Your Experience Making These Goat Cheese Bites
Why You Will Love These Crispy Fried Goat Cheese Balls
I’ve made mountains of appetizers over the years, and these fried goat cheese balls always disappear first. They just hit all the right notes! You need them on your rotation for that next time you have friends over. Here’s why I know you’ll love making this recipe:
- The Texture Contrast is Everything: Seriously, you get that impossibly crispy, golden shell that shatters just a little, followed by the soft, warm, slightly tangy interior of the goat cheese. It’s addictive!
- They are Quick Gourmet Appetizers: Even though they are fried, they come together fast, especially if you use my make-ahead tip. They look sophisticated—total showstoppers—but they are actually super simple, which is my favorite kind of recipe.
- Perfect for Any Party Food Recipes Setting: Whether it’s a casual game day get-together or a more elegant holiday spread, these work. They are much more fun than a standard cheese ball, don’t you think?
- The Spicy Honey Dip is a Game Changer: That sweet and spicy kick cuts through the richness of the cheese perfectly. You’ll want to dip everything in it, not just these marinated cheese appetizers!
- Amazingly Versatile for Entertaining Snacks: You can prep all the little balls ahead of time, which is a lifesaver when hosting. Just chill them, and then fry them right before your guests arrive.
- Herbaceous Pop of Flavor: The fresh parsley and chives mixed right into the panko coating mean you get a fresh, bright herbal note with every single bite. They aren’t just plain fried cheese, oh no!
Essential Ingredients for Perfect Goat Cheese Balls
When it comes to making truly outstanding goat cheese balls, the ingredients are non-negotiable, especially the cheese itself! As a home cook, I know that skimping here ruins the magic. You need everything chilled and ready to go because we want those balls to hold their shape beautifully when they hit the hot oil. This recipe uses staple pantry items alongside that gorgeous goat cheese.
For the Creamy Goat Cheese Balls
We need structure, flavor, and that satisfying crunch for our coating. Here’s the breakdown:
- 8 oz soft goat cheese, but listen, it MUST be chilled solid before we start rolling!
- 1/4 cup all-purpose flour for the initial dredge.
- 1 large egg, thoroughly beaten—this is our glue!
- 1/2 cup panko breadcrumbs. Please use Panko; the regular crumbs won’t give you that great crunch.
- 2 tablespoons finely chopped fresh parsley for brightness.
- 1 tablespoon finely chopped fresh chives—they add a subtle onion note nobody sees coming.
- 1/4 teaspoon garlic powder and just a dash of salt and pepper to season the breading.
For the Spicy Honey Dip
This dip is super easy, but it’s essential for balancing the tang of the cheese. Feel free to make it exactly how you like it!
- 1/2 cup actual honey—nothing fake here, please!
- 1 teaspoon of Sriracha or your favorite hot sauce. If you like it fiery, add another half teaspoon, but be warned, spice travels fast!
Once you’ve got these components ready, you can check out my recipe for easy 4-ingredient homemade cheese crackers for another simple cheese fix!
Step-by-Step Instructions for Making Fried Goat Cheese Balls
Listen up, because how you handle these steps determines whether you get perfect, crispy goat cheese balls or a cheesy mess floating where your coating should be! We need precision, which is why chilling is our best friend here. I always set up my station before I even touch the cheese.
Preparing the Herbed Coating and Shaping the Goat Cheese Balls
First, let’s mix our crunch. In a wide, shallow dish, take that panko and mix in your chopped fresh parsley, chives, garlic powder, salt, and pepper until it looks beautifully speckled. That’s our outer armor! Now, back to that chilled goat cheese—you want it firm. Scoop out small, uniform amounts and quickly roll them between your palms into balls, about an inch across. Don’t work them too long, or they warm up! Pop these formed balls onto a parchment-lined plate and stick them in the fridge for at least 30 minutes. Seriously, don’t skip the chill time; it locks everything in.
The Breading Process and Setting Up for Frying
Once chilled, it’s breading assembly time! Set up three dishes close together: the flour, the beaten egg, and your herbed panko mixture. Take a cold cheese ball and give it a light dust in the flour—shake off the extra! Next, dip it into the egg and let the excess drip back. Finally, roll it aggressively in the panko mix. You have to press the coating onto the cheese ball firmly with your fingers to make sure every bit sticks. This tight seal is key to keeping the cheese inside when frying.
Frying the Goat Cheese Balls to Golden Perfection
Time for the glorious sizzle! You need about two inches of vegetable oil heated up to exactly 350°F (175°C). A thermometer is a must here because if it’s too cool, the balls get greasy; too hot, and the outside burns before the inside softens. Working in small batches—and I mean small, maybe 3 or 4 at a time—carefully drop them into the oil. They only need about 1 to 2 minutes total, just until they’re beautifully golden brown. Scoop them out quickly onto paper towels draped over a wire rack. Don’t forget to mix your spicy honey dip while these drain so they are ready for dunking! If you’re skipping the fry step today, you can check out my easy breakfast recipes while your oven preheats.
Tips for Success When Making Goat Cheese Balls
Even the best recipes can go a little sideways if you don’t know the secret handshake, right? Since we are dealing with warm, gooey cheese encased in a delicate crust, these goat cheese balls need a little patience. If your last attempt at fried cheese ended in disaster, don’t worry! These tips elevate this even from just easy cheese ball recipes to something truly reliable.
The biggest fear people have is the cheese melting out into the hot oil, making a huge watery mess. That’s why chilling is your superpower here. Don’t just chill the balls for 30 minutes; if your kitchen is hot, or if you’re tackling a huge batch, put them in the freezer for 15 minutes right after the final breading. That cold shock helps that herbed panko lock down tight!
Also, resist the urge to overcrowd your pot. I know it’s tempting when you’re trying to get these party food recipes ready for guests, but shoving too many in at once drops the oil temperature fast. And low oil temperature equals soggy, greasy cheese balls. We want crispness! Work in small, quick batches, and pull them out as soon as they hit that perfect golden color.
But hey, if deep frying just isn’t your thing—and I totally get it, the cleanup can be a pain sometimes—you have fantastic alternatives! You can absolutely shift this to baking or air frying, which is what I often recommend for folks looking for lighter fare. If you choose baking, crank your oven up to 400°F (200°C) and lay those breaded balls on a baking sheet lined with parchment paper. They take about 10 to 12 minutes until they look golden. If you have one, the air fryer works wonders too! If you’re interested in another fantastic quick-cook appliance recipe, check out my guide for this easy air fryer shrimp recipe while you wait for your oil to heat up.
Creative Variations for Your Goat Cheese Balls
Now that you’ve mastered the classic herbed fried goat cheese balls, we have to talk about shaking things up! This recipe is seriously flexible, which is great because you can tailor these delicious bites for any holiday, season, or even just based on what you have leftover in the pantry. People often ask me about the best cheese ball variations, especially around the holidays, and this little fried package format is just perfect for experimenting.
Everyone loves those festive, coated cheese balls—you know the ones, usually covered in cranberries and nuts that you serve with crackers. Well, we can adapt that flavor profile right into our crispy coating! For a holiday twist, try swapping out half of those panko breadcrumbs for finely crushed pecans or walnuts. It adds a fantastic earthy crunch that pairs beautifully with the creamy goat cheese inside. Just make sure those nuts are finely chopped so they stick well during the breading process.
If you’re aiming for that sweet-meets-savory feel, consider tossing some dried cranberries (or finely chopped dried apricots!) into the panko mix along with the nuts. It gives you that beautiful visual appeal and a burst of tartness. Or, for an elegant, savory version, try adding a teaspoon of smoked paprika and some dried rosemary to your coating instead of the fresh herbs. That smoky flavor pairs amazingly well with my cranberry orange bread if you happen to be baking something else!
Quick Flavor Swaps for Your Coating
- Festive Crunch: Use 1/4 cup panko + 1/4 cup crushed pecans.
- Savory Herb Swap: Replace chives with dried rosemary and thyme.
- Heat Kick: Add a tiny pinch of cayenne pepper to the flour dredge.
Remember, if you want to see another take on the fried concept, check out this recipe for fried goat cheese balls—it’s always good to see how others tackle the frying process!
Serving Suggestions for These Elegant Goat Cheese Balls
The best part about making these gorgeous goat cheese balls is getting them to the table looking picture-perfect! They really shine when they are served immediately, piping hot right off the rack after draining. That’s when the contrast between the crispy exterior and the melty interior is at its absolute peak. Trust me, if you have to wait even five minutes, they start losing that initial magic!
Presentation-wise, I love arranging them on a simple white platter or a rustic wooden board. You can scatter a few extra fresh chopped chives or a sprinkle of flaky sea salt over the top right before serving. It makes them look instantly elevated—totally hitting that gourmet appetizer vibe without any extra work from you.
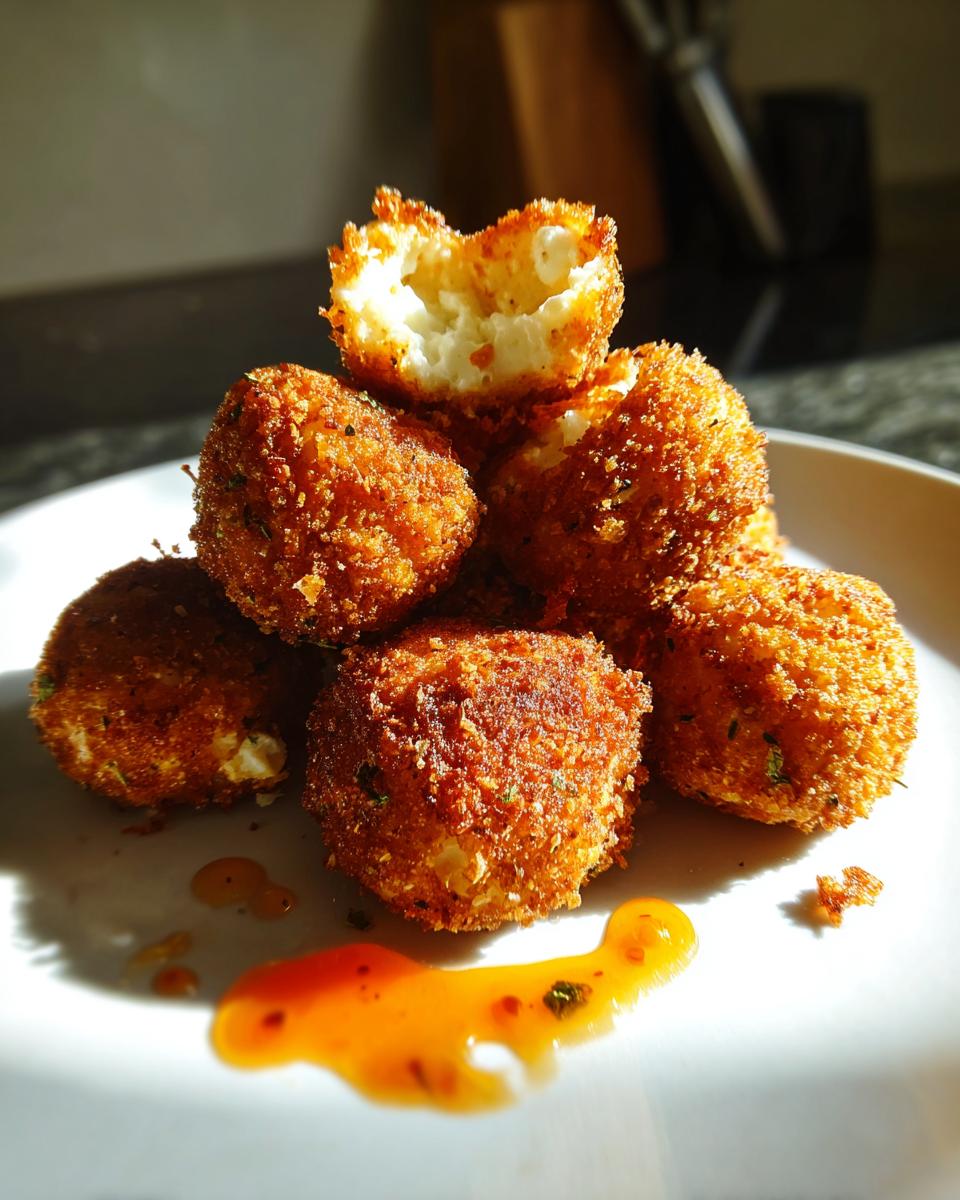
Now, about that Spicy Honey Dip—that stuff is gold. While it was formulated specifically for these creamy bites, don’t be afraid to use the extra dip for other entertaining snacks! It is seriously amazing drizzled over a platter of sturdy crackers, or even as a dip for crispy vegetable sticks if you need a cooling element nearby. If you’ve ever made my Cowboy Caviar, you know how important a killer dip is to tie everything together. Make a double batch of that honey mix; it won’t go to waste!
If you’re setting up a larger spread, try pairing these warm bites alongside something room temperature, like a chilled shrimp cocktail or some marinated olives. The difference in temperature keeps everyone’s palate interested. They are just so delightful, and they’re guaranteed finger food success!
Storage and Make Ahead Tips for Goat Cheese Balls
One of the absolute best qualities about these goat cheese balls is that you can cheat a little bit when hosting! Seriously, anything that lets me spend less time hovering over a hot pot of oil when guests arrive gets a gold star from me. These are fantastic make ahead cheese balls because the chilling process is actually crucial for making them work in the first place, so we can use that to our advantage!
You can prepare the fully breaded goat cheese balls—flour, egg, and that herbed panko coating all applied—and store them in the refrigerator for up to 24 hours before you plan to fry them. Just make sure they are tightly packed onto a plate or baking sheet lined with parchment paper, and cover them closely with plastic wrap. The cold definitely helps that coating adhere, so you’re actually improving them by prepping them a little ahead of time!
If you’re preparing them more than a day out, freezing is the way to go. You can freeze the coated balls for up to a month. The key here is flash freezing: set the breaded balls on a parchment-lined sheet, freeze them until solid (maybe 2 hours), and then transfer them to a sealed freezer bag. When you’re ready to cook, you don’t even need to thaw them! Just add an extra minute or two to your frying time, and keep that oil temp steady at 350°F.
Now, what if you have leftovers? Because that rarely happens, but hypothetically speaking! The problem with reheating fried food is that it loses that amazing crispness. I do not recommend trying to reheat these in the microwave; you’ll end up with hot, greasy sadness. Your best bet? Pop them on a baking sheet and heat them in a toaster oven or regular oven set to about 325°F for just 5–7 minutes. That helps warm the cheese center without completely turning the outside mushy. If you’ve ever tried to revive leftovers from my leftover turkey pot pie, you know quick, low heat is the secret!
When you’re planning your party menu, remember that these are best when cooked fresh, but prepping the shaping and breading a day ahead makes frying them the easiest part of your whole spread. You can focus on making sure your Spicy Honey Dip is ready to go!
Frequently Asked Questions About Making Goat Cheese Balls
It happens! Even when you follow the steps perfectly, questions pop up when you’re dealing with cheese and hot oil. I get so many messages asking how to fix common issues or tweak these goat cheese appetizer recipes for different situations. Let’s clear up a few things so that your next batch of creamy goat cheese bites is an absolute success.
Can I substitute the frying method for baked goat cheese?
Oh yes, you absolutely can! Baking is a fantastic, less messy option if you’re not keen on dealing with hot oil for your party food recipes. I mentioned this in the notes, but I always want to stress how easy it is. If you bake them, you need a hot oven—set it to 400°F (200°C). Place the breaded balls on parchment paper—never directly on the tray—and bake them for about 10 to 12 minutes. They won’t be quite as aggressively crisp as the fried ones, but they are still delicious. If you prefer that route entirely, there are some great guides out there on baking, like the one featured for baked goat cheese balls.
What is the best way to keep these goat cheese appetizer recipes warm?
This is the million-dollar question for anyone entertaining! My honest answer? They are, without a doubt, best served immediately after frying. As soon as they hit the draining rack, they need to go straight to the platter. However, if you are cooking multiple batches and need a holding spot, here’s my trick for keeping these simple appetizer bites warm briefly:
- Set your oven to the absolute lowest setting it will go—think 170°F or 180°F (around 75°C). It needs to be just warm enough to take the chill off, not hot enough to cook them more.
- Place a wire rack inside a baking sheet.
- Set the freshly fried goat cheese balls on the rack. The rack keeps air circulating underneath so they don’t steam and get soggy on the bottom.

Don’t let them sit there for more than 15 minutes, though! After that, they start to lose their texture. If you’re looking for recipes that are better served at ambient temperature, you might want to look into my oatmeal cookies for later instead!
If you have too many to serve right away, remember that storing and reheating them later is always an option!
Nutritional Estimates for Fried Goat Cheese Balls
Now, I know a big part of cooking well is knowing what you’re putting into your body, even when we are indulging in delicious party food recipes like these crispy treats! But please, take these numbers with a big grain of salt—and maybe a drizzle of that spicy honey! Since these are fried and we are using full-fat goat cheese, the numbers tend to lean toward the decadent side. That’s okay, because these are meant to be special occasion snacks, not an everyday thing, right?
The estimates below are calculated based on the recipe yielding about 15 balls total, meaning one serving is roughly 3 of our yummy creamy goat cheese bites. Keep in mind that every batch is unique based on the fat content of your specific goat cheese and exactly how much oil is absorbed during frying. If you decide to go the baked route, you can shave off some of the fat content, which is a great option if you’re looking for quick, healthy lunch ideas later in the week!
Here are the approximate figures per serving (3 balls):
- Calories: 220 per serving
- Total Fat: 18g (And yes, about 10g of that is saturated fat; it’s cheese, after all!)
- Cholesterol: 35mg
- Sodium: 150mg
- Total Carbohydrates: 9g (Most of this is coming from the honey in the dip and the breading)
- Protein: 7g
If you find yourself making these often and tracking macros, you might want to adjust the honey in the dip down a little bit, or use low-fat goat cheese if necessary, but honestly, I think the full-fat version is worth every calorie for that amazing texture!
Share Your Experience Making These Goat Cheese Bites
Alright, my friends, we have created pure appetizer magic here! We turned simple goat cheese into crunchy, decadent little bites perfect for a party. Now that you’ve tried making these creamy goat cheese bites, I truly want to hear all about it! This is the best part of being a home cook—we share what worked and what didn’t, and we all get better together.
Did you stick exactly to the recipe, or did you try one of the flavor tweaks we discussed? Did you go heavy on the sriracha in the dip, or did one of the holiday coating variations make an appearance? I want to know it all!
Please take a second right now to rate this recipe out of 5 stars below—it really helps other home cooks know they can trust this method. And definitely drop a comment telling me what you thought of the crisped-up texture and how quickly they disappeared!
If your experience was amazing and you snapped a photo, please share it! Tag me when you post on social media—seeing your beautiful creations is the highlight of my week. It shows me that Cooking Zenith is helping you elevate the everyday, one delicious snack at a time. If you ever need to get in touch with questions or just want to chat recipes, you can always reach out via my contact page!
Happy entertaining!
PrintCrispy Fried Goat Cheese Balls with Herbed Coating and Spicy Honey Dip

Make these impressive fried goat cheese balls for your next gathering. They feature a creamy interior, a crispy herbed coating, and pair perfectly with a simple spicy honey dip.
- Prep Time: 20 min
- Cook Time: 10 min
- Total Time: 30 min
- Yield: 15 servings 1x
- Category: Appetizer
- Method: Frying
- Cuisine: American
- Diet: Vegetarian
Ingredients
- 8 oz soft goat cheese, chilled
- 1/4 cup all-purpose flour
- 1 large egg, beaten
- 1/2 cup panko breadcrumbs
- 2 tablespoons finely chopped fresh parsley
- 1 tablespoon finely chopped fresh chives
- 1/4 teaspoon garlic powder
- Salt and black pepper to taste
- Vegetable oil, for frying
- For the Spicy Honey Dip: 1/2 cup honey
- 1 teaspoon sriracha or hot sauce (adjust to taste)
Instructions
- Combine the chopped parsley, chives, and garlic powder with the panko breadcrumbs in a shallow dish. Season the breadcrumb mixture with salt and pepper.
- Place the flour in a second shallow dish and the beaten egg in a third dish.
- Scoop the chilled goat cheese and roll it into small, uniform balls, about 1 inch in diameter. You should get about 12 to 15 balls.
- Set up a standard breading station: flour, then egg, then the herbed breadcrumb mixture.
- Dredge each goat cheese ball lightly in the flour, shaking off excess. Dip into the egg, allowing excess to drip off. Finally, roll thoroughly in the herbed panko mixture, pressing gently so the coating adheres well.
- Place the coated goat cheese balls on a plate lined with parchment paper and chill in the refrigerator for at least 30 minutes. This helps the coating set.
- Prepare the spicy honey dip by whisking together the honey and sriracha in a small bowl. Set aside.
- Pour vegetable oil into a deep, heavy-bottomed pot or deep fryer to a depth of about 2 inches. Heat the oil to 350°F (175°C). Use a thermometer to monitor the temperature.
- Working in small batches to avoid overcrowding the pot, carefully lower the chilled goat cheese balls into the hot oil using a slotted spoon.
- Fry for 1 to 2 minutes, turning occasionally, until the coating is golden brown and crispy. The cheese inside will soften but should not fully melt out.
- Remove the fried goat cheese balls with a slotted spoon and place them on a wire rack lined with paper towels to drain excess oil.
- Serve the crispy fried goat cheese balls immediately while warm, alongside the spicy honey dip for dipping.
Notes
- If you prefer a less messy method, you can bake these goat cheese balls at 400°F (200°C) for 10-12 minutes, or use an air fryer until golden.
- For a festive variation, substitute half the panko with crushed pecans for added texture.
- These make excellent party food recipes and can be assembled ahead of time; just wait to fry until serving.
Nutrition
- Serving Size: 3 balls
- Calories: 220
- Sugar: 8
- Sodium: 150
- Fat: 18
- Saturated Fat: 10
- Unsaturated Fat: 8
- Trans Fat: 0
- Carbohydrates: 9
- Fiber: 0
- Protein: 7
- Cholesterol: 35