
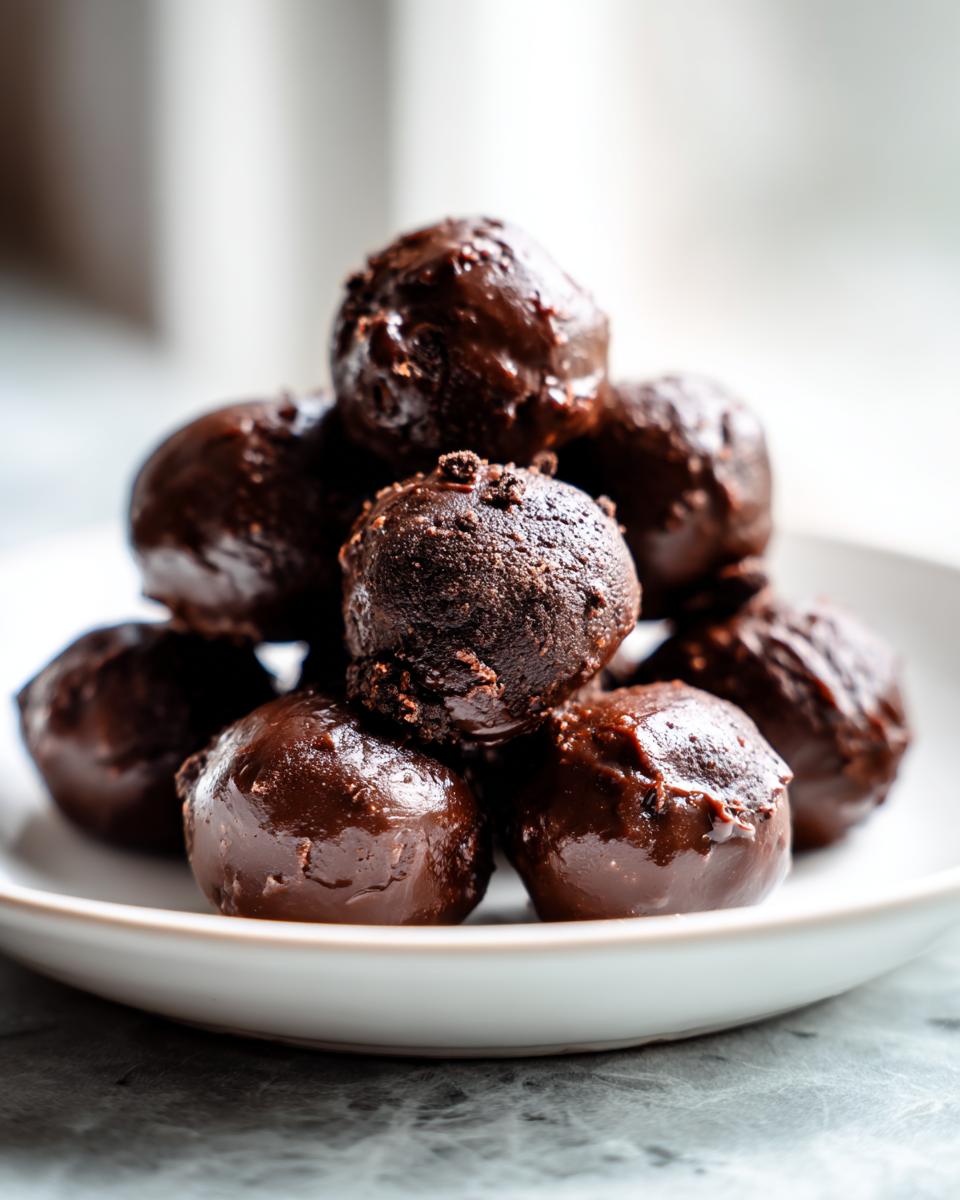
If you’ve ever looked into your pantry and thought, I need something incredibly decadent right now, but the thought of turning on the oven makes you sigh, then I have found your new obsession. Forget complicated baking projects! We are diving straight into the world of effortless indulgence with the ultimate, no-bake answer: oreo balls. Seriously, these chocolatey little gems are pure magic disguised as simplicity. My goal for you, always, is to build culinary confidence, and these treats prove that you don’t need fancy techniques to achieve perfection.
I’m sharing my absolute favorite version today—the iconic, rich, and fudgy 3-ingredient Oreo Balls recipe. You heard that right, just three things stand between you and a platter of these melt-in-your-mouth treasures. They’re perfect for a Tuesday night emergency or when you need to whip up a stunning dessert for a potluck with zero fuss. Trust me when I say, once you try these, they’ll become your go-to party snack chocolate staple! If you’re looking for other quick recipes that deliver big satisfaction without the oven time, check out my guide to making easy one-pot ravioli soup—sometimes fast comfort is the best comfort.
- Why This 3-Ingredient Oreo Balls Recipe Works Every Time
- Gathering Ingredients for Classic Oreo Balls
- Step-by-Step Instructions for No Bake Oreo Truffles
- Tips for Perfect Holiday Oreo Balls
- Storage and Making Ahead for Easy Oreo Balls
- Troubleshooting Common Oreo Balls Issues
- Frequently Asked Questions About Oreo Balls
- Estimated Nutrition Facts for Oreo Balls
- Share Your Experience Making These Oreo Balls
- Estimated Nutrition Facts for Oreo Balls
- Share Your Experience Making These Oreo Balls
Why This 3-Ingredient Oreo Balls Recipe Works Every Time
It seems almost too easy, doesn’t it? Just three simple ingredients transforming into pure, decadent bliss. But the reason these No Bake Oreo Truffles are famous is because those three things work in perfect harmony. We aren’t baking anything, so every element has to pull its weight to create that signature texture.
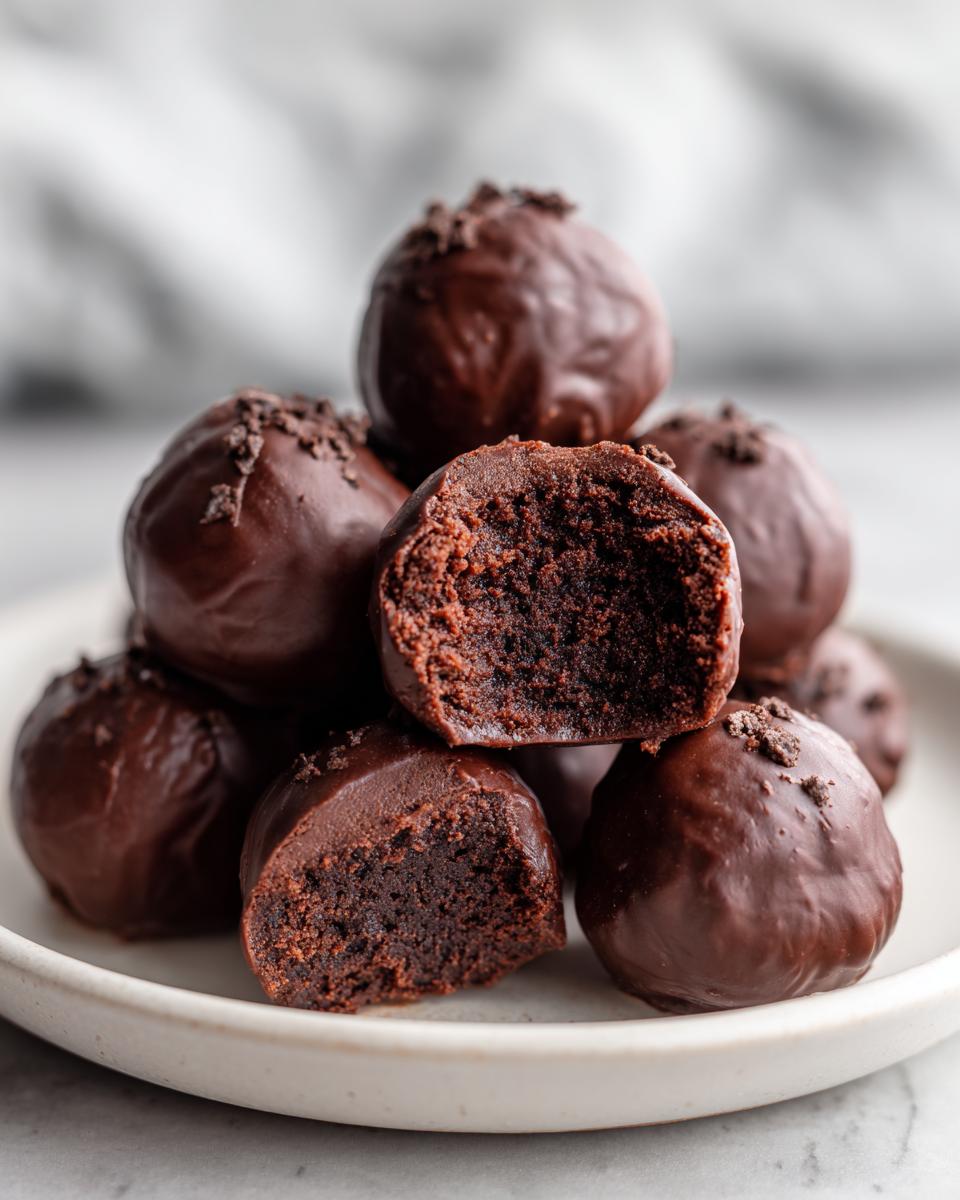
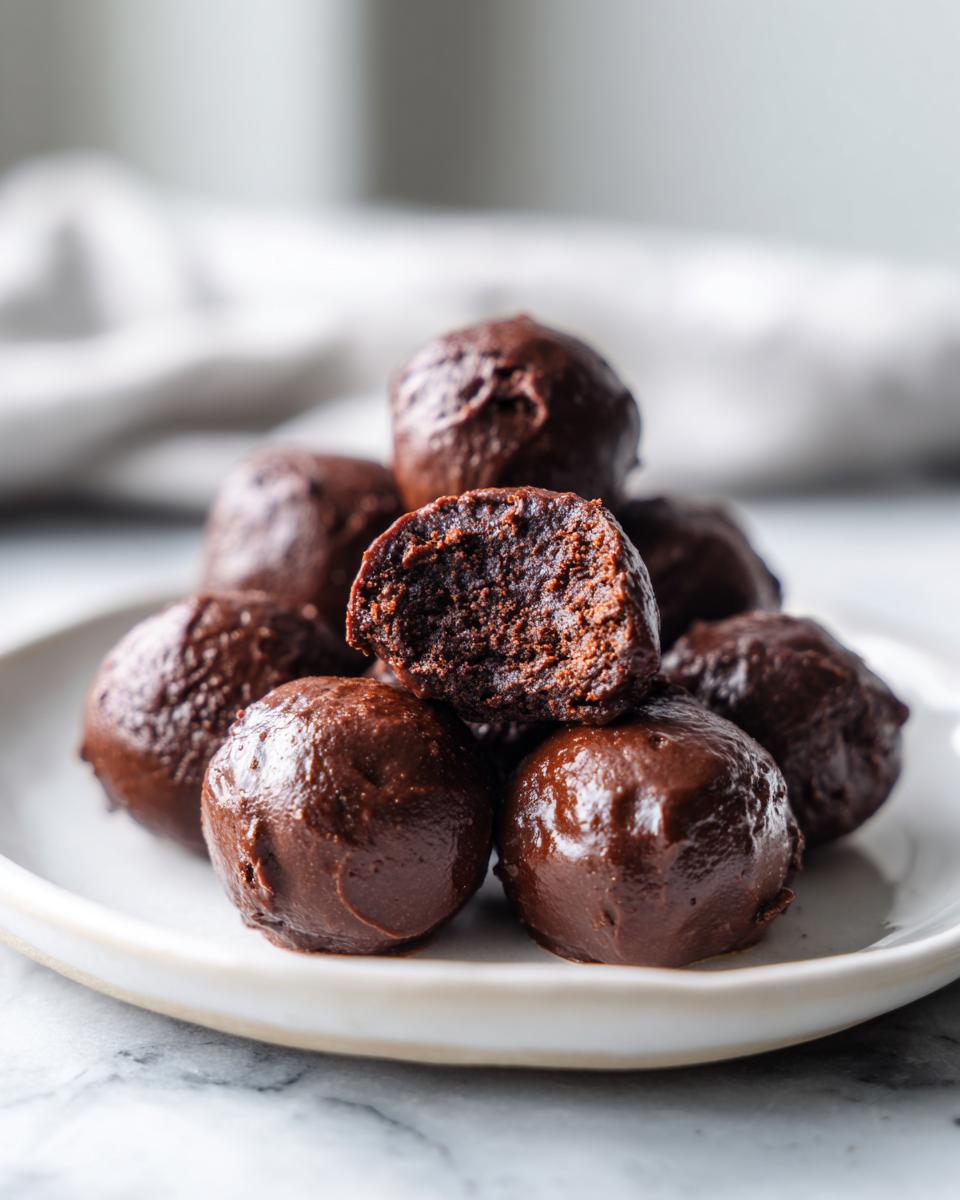
The result is wonderfully Fudgy Oreo Balls that are firm enough to handle but soft enough to melt in your mouth. It’s an effortless combination that screams homemade quality without any of the actual effort!
The Secret to Creamy Oreo Truffles
The magic really hinges on the cream cheese. When you mix the crumbled cookies with softened cream cheese, it acts like the binder that flour usually does in a baked good—but better! It introduces necessary fat and moisture, which keeps these truffles incredibly rich and stops them from drying out. That cream cheese transforms the dry crumbs into a smooth, dough-like consistency. That’s what gives you those perfect Creamy Oreo Truffles.
Making Oreo Balls for Parties and Gifts
One thing I love about this recipe is how well they travel and how long they last in the fridge. Because there’s no perishable filling like actual cake batter, these little treats hold their shape beautifully, making them fantastic for dropping off to neighbors or taking to a big gathering. They are truly the top-tier Party Snacks Chocolate when you need something impressive fast. If you’re planning ahead for the holidays, you should definitely bookmark this one alongside my Christmas Sprinkle Sugar Cookies—they look amazing together on a platter!
Gathering Ingredients for Classic Oreo Balls
Okay, let’s talk what you need! The beauty of these oreo balls is the ridiculously small shopping list. You only need three core things to make this happen, which makes it one of the easiest recipes I’ve ever shared here. We are keeping it super classic today, so stick to these core items for the best result.
Remember, if you want fudgy, perfect truffles, the state of your ingredients matters just as much as the ingredients themselves. Please don’t try to skip the chilling step later, either—that’s critical for handling!
Ingredient Notes and Simple Oreo Dessert Substitutions
First up: the cookies. Please use a whole package of standard Oreo cookies, filling and all! That white filling is crucial; it helps with the binding process so we don’t need four or five ingredients. Don’t waste time scraping the filling out, unless you absolutely must, which I don’t recommend for this Simple Oreo Dessert.
Second, the cream cheese has to be fully softened. If it’s cold, your dough will be lumpy instead of smooth. Just leave it on the counter for at least an hour beforehand. For the coating, I used semi-sweet chocolate, but you can absolutely swap that out for milk chocolate or even white chocolate if you prefer a sweeter treat. If you’re ever curious about boosting flavor in other easy recipes, I share a lot of great tips in my post about Peanut Butter Rice Krispie Treats!
Step-by-Step Instructions for No Bake Oreo Truffles
Alright, let’s get down to business because this is the part where we turn simple pantry items into those divine, oreo balls! Don’t panic about the steps; since nothing is baking, it’s all about technique and temperature control. We move fast, we chill often, and we end up with a perfect, melt-in-your-mouth dessert.
We need to process those cookies first, then mix them into that gorgeous, fudgy dough. Because this is a no-bake recipe, the chilling times are your most important ‘cooking’ steps. You can check out my tips for making other great no-bake cookies if you want more practice with these easy methods!
Preparing the Oreo Ball Dough Base
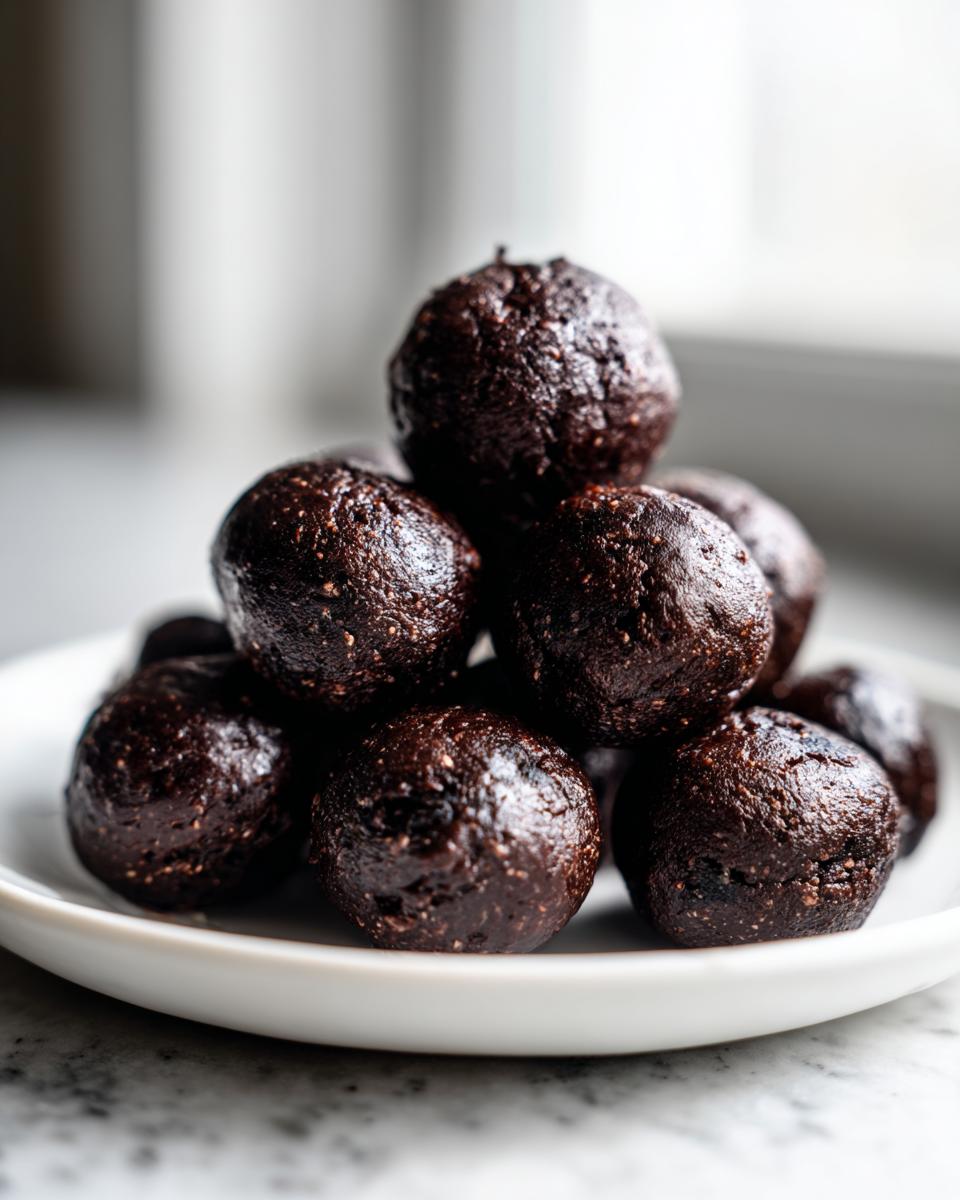
First thing’s first: crush those cookies! I use my food processor because it pulverizes everything—wafers and cream filling—into those fine crumbs we need for a smooth dough. If you’re using my secret weapon, the rolling pin, put the Oreos in a heavy-duty zip-top bag and just go to town until they’re fine dust. Honestly, work out any stress on those cookies!
Once the crumbs are ready, toss in that softened cream cheese. Mix it up. You’re looking for a thick, dark chocolate dough that sticks together beautifully when you squeeze a bit between your fingers. If it feels greasy or too crumbly, you might need to chill it for an extra 10 minutes before rolling.
Rolling and Chilling Your Oreo Balls
Now for the fun part: rolling! I find that using a small cookie scoop helps keep all my Quick Oreo Treats uniform in size, which is great for even dipping later. Roll the dough gently between your palms into about one-inch balls. Try not to overwork them, though; the warmth from your hands can soften them too much.
Once they are all rolled out onto parchment paper, they absolutely must chill. Pop that tray in the refrigerator for at least 30 minutes. This step is non-negotiable, or they will crumble or melt right off your fork when you try to dip them in the hot chocolate coating.
Mastering the Chocolate Coating for Fudgy Oreo Balls
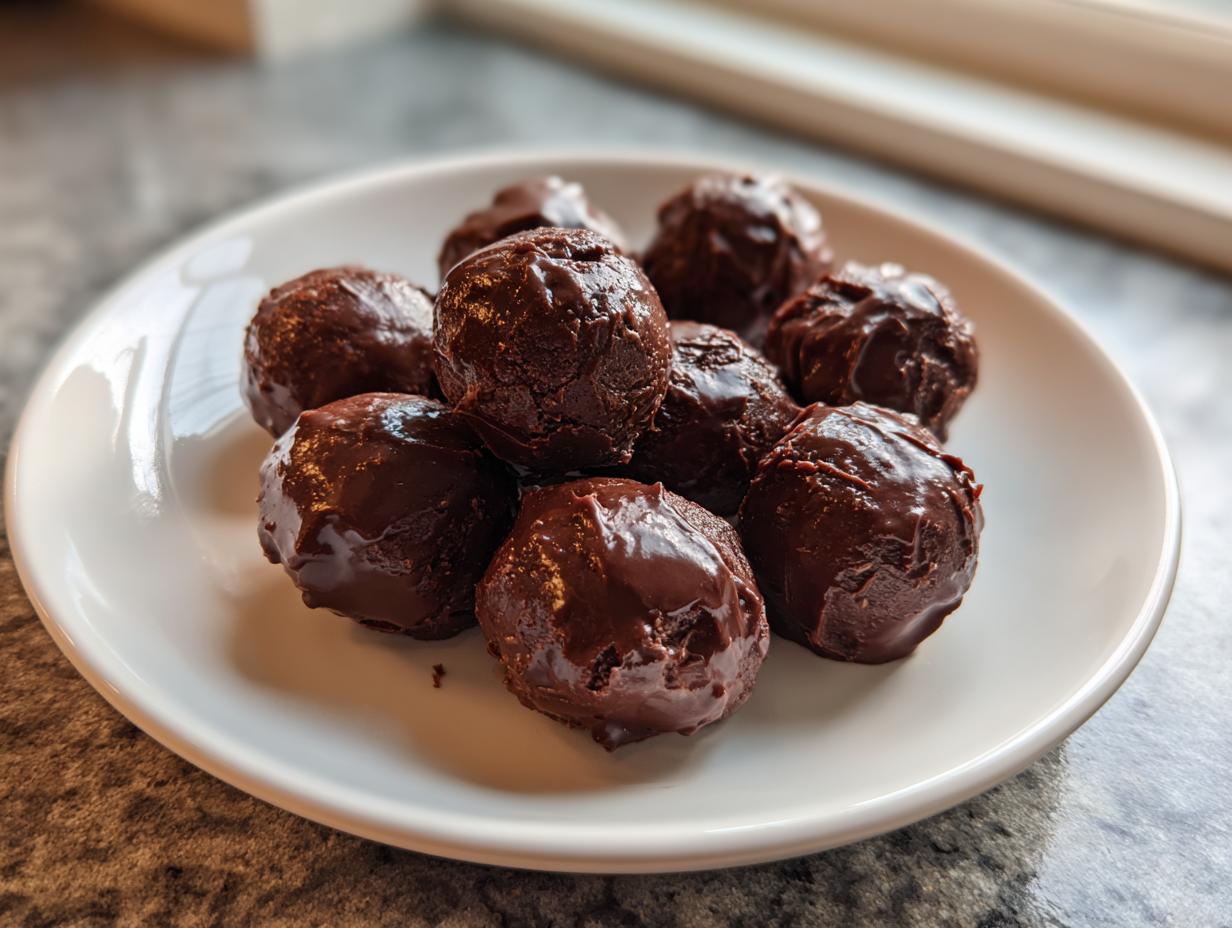
While they chill, melt your semi-sweet chocolate. I always do this slowly in the microwave, using 30-second bursts and stirring *thoroughly* in between each burst. Melting chocolate is tricky, and if you rush it, it seizes up and gets grainy. We want perfectly smooth, glorious liquid chocolate for these Fudgy Oreo Balls.
When the chilling time is up, use a fork to dip each ball. Let the excess chocolate drip back into the bowl—give it a gentle shake off the fork. Put the dipped balls back onto your parchment paper. They set up fast, but they need another hour in the fridge, minimum, for that coating to turn hard and glossy!
Tips for Perfect Holiday Oreo Balls
Now that you have mastered the core, three-ingredient oreo balls, the real fun begins: making them festive! This easy recipe is just begging to be dressed up for any holiday, whether it’s Christmas or even just a fun weekend party. Presentation is half the fun when it comes to bite-sized treats like these, and honestly, you can change the coating and toppings to match any season!
Whether you are making these for a cookie exchange or just want something extra special for dessert, these small presentation tweaks make a huge difference. If you are diving deep into festive baking, you should absolutely check out my tips for making one-bowl peppermint brownies—talk about holiday flavor!
Variations on Classic Oreo Balls
Don’t feel chained to semi-sweet chocolate and plain Oreos! That’s the beauty of a simple recipe; it’s a fantastic canvas. For a really luxurious take, try using peanut butter chips instead of semi-sweet chocolate for the coating. That little hint of saltiness with the sweet, fudgy center is divine.
You can also jazz up the interior dough base before you chill it. A teaspoon of peppermint extract mixed into the cream cheese before combining it with the crumbs works wonders for winter. For a richer experience, try adding a splash of vanilla extract or even some almond extract if you are feeling adventurous. Remember that little instruction about adding sprinkles immediately after dipping? Do that right away, while the wet chocolate is still tacky, and those sprinkles will stick perfectly while the coating sets up in the fridge!
Storage and Making Ahead for Easy Oreo Balls
One of the best things about these oreo balls, besides how ridiculously easy they are to make, is how well they store. This is fantastic news for anyone who gets stressed trying to bake everything fresh right before a big event or during the holidays. You do not have to make these the day of your party!
Since they are already coated in chocolate and don’t contain any fresh fruit or whipped cream fillings, they are incredibly stable. When I’m prepping early for Christmas, these are usually the very first things I make because they just get better with a little chill time. Seriously, sometimes the texture seems even fudgier on day two.
For refrigeration, just pop them into an airtight container. I usually put a layer of wax paper between the layers just to make sure that chocolate coating doesn’t stick to the one below it, although usually, they are firm enough not to worry about it too much. They keep wonderfully in the fridge for at least two full weeks. If you need to keep them longer, or if you made a massive batch, I highly recommend freezing them.
When freezing your oreo balls, cover the tray with plastic wrap first, making sure everything is sealed up tight so they don’t pick up any fridge odors. Then transfer them to a zip-top freezer bag. They freeze beautifully for up to three months! When you want to serve them, just pull out the amount you need and let them thaw on the counter for about 20 minutes. They come back to perfect form every single time, which saves so much stress when planning a massive dessert table. If you get a head start on these beauties, you save time for making other showstoppers, like my gooey Texas Chocolate Pecan Pie!
Troubleshooting Common Oreo Balls Issues
Even the simplest recipes can hit a snag now and then, right? Making oreo balls is usually foolproof, but if you run into a snag, don’t toss the batch! I’ve been there, staring down a bowl of runny crumbs or chocolate that decided to turn solid halfway through dipping. Knowing a quick fix is key to keeping your confidence high in the kitchen. We want perfect, fudgy results, so let’s troubleshoot those common hiccups right now.
It’s usually just a matter of temperature or technique. If your dough seems a little floppy, or if your chocolate coating suddenly looks grainy, I have the quick kitchen tricks to save the day. Don’t let a small issue turn into a big setback!
My Dough Isn’t Firming Up Right
This is the most common issue, especially if your kitchen is warm or your cream cheese wasn’t quite as cold as it should have been before mixing. If your mixture feels too soft or sticky to roll cleanly into balls—almost like thick cookie batter instead of dough—it desperately needs chill time. Don’t try to roll it out! Just cover the bowl tightly with plastic wrap and pop it back into the refrigerator for at least an hour, maybe even two.
If it’s *still* too soft after chilling, you can sometimes save it by stirring in an extra tablespoon or two of finely crushed Oreo crumbs until the texture firms up enough to handle. Resist the temptation to add more cream cheese, of course, because that’s what made it soft in the first place!
The Chocolate Coating Has Seized Up
Oh, the panic when melted chocolate turns thick and clay-like! This usually happens for one of two reasons: either a tiny drop of water got into your bowl while melting, or you overheated the chocolate. If it’s just slightly stiff, try stirring in about half a teaspoon of vegetable oil or a neutral cooking oil. This little bit of extra fat often smooths everything out beautifully.
You want that coating to be smooth and pourable—thin enough to coat the ball but thick enough that it doesn’t run right off. If it seized up badly, you might need to start over with fresh chocolate chips, but the oil trick works about 90% of the time for minor seizing.
My Chocolate Coating Is Cracking When It Sets
When you pull your finished oreo balls out of the fridge and the chocolate coating looks flaky or brittle, it usually means one thing: temperature shock. You dipped a very cold ball into chocolate that was too hot, speeding up the setting process too quickly, or the balls weren’t chilled enough when you dipped them.
The fix? Try to bring your chilled dough balls closer to room temperature while they wait on the sheet (maybe 10-15 minutes out of the fridge). Then, when you dip them, try to work quickly so they don’t sit in the warm melted chocolate for too long. A super rapid return to the fridge once coated helps ensure a smooth, snappy shell!
Frequently Asked Questions About Oreo Balls
I know you might have a few lingering questions when diving into any new recipe, especially when you’re trying to create the best Easy Oreo Balls Recipe possible! Since these delicious treats are so straightforward, people often wonder about making slight shifts. I’ve gathered the most common questions I get about these Oreo Cake Balls Recipe classics to make sure your first batch (or your hundredth!) comes out absolutely perfect.
It’s all about learning the ‘why’ behind the ‘what,’ which is my whole philosophy here at Cooking Zenith! If you’re looking for other common questions I get answered, I actually compiled a big list of tips over on my guide for easy breakfast recipes, too—it covers general kitchen confidence.
Can I skip the cream cheese in this Oreo Balls recipe?
Wow, that’s a bold question! And I have to be honest: no, I really wouldn’t recommend it for this specific *classic* version. That cream cheese isn’t just for flavor; it provides the moisture and the fat needed to bind the crushed Oreos into a sculptable dough. If you skip it, you’ll just have dry cookie dust that won’t roll. If you absolutely must skip the dairy, you’d need an equal weight of another binder, like softened butter combined with a little condensed milk, but honestly, you’ll lose that signature creamy truffle texture.
Can I use different cookies instead of Oreos?
Yes, you totally can! If you look at the recipe structure, it’s really a simple cookie-and-binder ratio. You can use other sandwich cookies like vanilla wafers or chocolate wafers instead of Oreos for quick Oreo treats. Just remember that Oreos have a specific fat and sugar content that works perfectly with the cream cheese. If you swap them out, you might notice the dough is slightly drier or softer, so you’ll need to adjust the chill time accordingly before rolling!
How quickly can I make these batch for a party?
When I say these are fast, I mean it! You have about 20 minutes of active prep work: crushing the cookies, mixing the dough, and rolling the balls. Then they need that minimum 30-minute chill, and finally, the dipping and setting time. If you are efficient with your dipping, you can have a beautiful platter of finished oreo balls ready to serve in under 90 minutes total. They are the ultimate stress-free dessert!
Do I have to use semi-sweet chocolate?
Not at all! While I use semi-sweet chocolate because I like the rich, slightly bitter counterpoint to the super-sweet filling, this is totally up to your taste. If you prefer a sweeter bite, go for milk chocolate. If you want something bright and tangy, melting down high-quality white chocolate chips is amazing. Just be sure whatever you choose, you melt it slowly and carefully so it stays smooth enough to coat those beautiful, chilled little dough balls!
Estimated Nutrition Facts for Oreo Balls
Since we used a very specific set of ingredients—Oreos, branded cream cheese, and semi-sweet coating—we can pull a pretty accurate estimate for our nutrition facts. Keep in mind that topping choice (like sprinkles!) or brand variations can change these numbers even slightly. I want you to feel informed about what you’re serving up, even in a simple recipe like this!
This calculation is based purely on the core recipe proportions listed above. When serving these to guests, it’s always helpful to know what kind of delicious indulgence they are about to enjoy!
What are the approximate nutritional details per ball?
Here’s a quick look at the estimated breakdown. Remember, this is based on approximately 30 small, one-inch bites:
- Serving Size: 1 ball
- Calories: 180
- Fat: 11g (with about 6g being saturated fat)
- Carbohydrates: 19g
- Protein: 2g
- Sugar: 18g
These are certainly a decadent treat, not a health food, but that’s why we love them so much, right? When you make them at home, you know exactly what went into them!
Share Your Experience Making These Oreo Balls
I genuinely hope this recipe brings you as much joy and effortless satisfaction as it brings me and my family. These oreo balls are the perfect example of how just a few quality ingredients—handled with care—can result in something truly special. I always love hearing how these recipes work out in *your* kitchen, whether you stuck perfectly to the plan or went wild with a fun variation!
If you whipped up a batch for a holiday party or just crushed some cravings on a quiet evening, please tell me! Let me know in the comments below how that chocolate coating set up, or if you tried a white chocolate option. Your feedback helps other cooks feel confident trying the recipe next!
Don’t forget to rate the recipe if you loved it! It really helps me know which simple, no-bake favorites you want to see more of on Cooking Zenith. Feel free to reach out directly through my contact page if you have super specific questions that I didn’t manage to cover here. Happy rolling!
PrintUltimate 3-Ingredient No-Bake Oreo Balls (Classic Chocolate Truffles)

Make rich, fudgy Oreo Balls using just three simple ingredients. This no-bake recipe creates decadent chocolate truffles perfect for parties or quick holiday treats.
- Prep Time: 20 min
- Cook Time: 0 min
- Total Time: 1 hr 20 min
- Yield: About 30 servings 1x
- Category: Dessert
- Method: No-Bake
- Cuisine: American
- Diet: Vegetarian
Ingredients
- 1 package (14.3 oz) Oreo cookies
- 8 oz cream cheese, softened
- 16 oz semi-sweet chocolate, melted for coating
Instructions
- Place all Oreo cookies, filling included, into a food processor. Pulse until you have fine crumbs.
- Transfer the crumbs to a medium bowl. Add the softened cream cheese.
- Mix the crumbs and cream cheese together using a hand mixer or sturdy spoon until fully combined and a dough forms.
- Roll the mixture into 1-inch balls. Place the balls on a baking sheet lined with parchment paper.
- Chill the Oreo balls in the refrigerator for at least 30 minutes to firm up.
- Melt the semi-sweet chocolate according to package directions, usually in a microwave-safe bowl in 30-second intervals, stirring until smooth.
- Dip each chilled Oreo ball into the melted chocolate, ensuring it is fully coated. Use a fork to lift the ball out, letting excess chocolate drip back into the bowl.
- Place the coated balls back onto the parchment-lined sheet.
- Refrigerate the finished Oreo balls for at least 1 hour, or until the chocolate coating is set.
Notes
- For a festive look, add holiday sprinkles immediately after dipping the balls in chocolate, before the coating sets.
- If you prefer a different flavor, substitute the semi-sweet chocolate coating with white chocolate or milk chocolate.
- If you do not have a food processor, place cookies in a large zip-top bag and crush them thoroughly with a rolling pin.
Nutrition
- Serving Size: 1 ball
- Calories: 180
- Sugar: 18g
- Sodium: 75mg
- Fat: 11g
- Saturated Fat: 6g
- Unsaturated Fat: 5g
- Trans Fat: 0g
- Carbohydrates: 19g
- Fiber: 0g
- Protein: 2g
- Cholesterol: 10mg