
Oh, friends, let’s talk about the food that fixes everything: the ultimate comfort food. When the world feels a bit too much, there is nothing—and I mean nothing—that compares to digging into a bubbling hot pan of truly sensational baked mac and cheese. We’re not making the dry stuff that sits sadly in the corner of the buffet table, no siree.
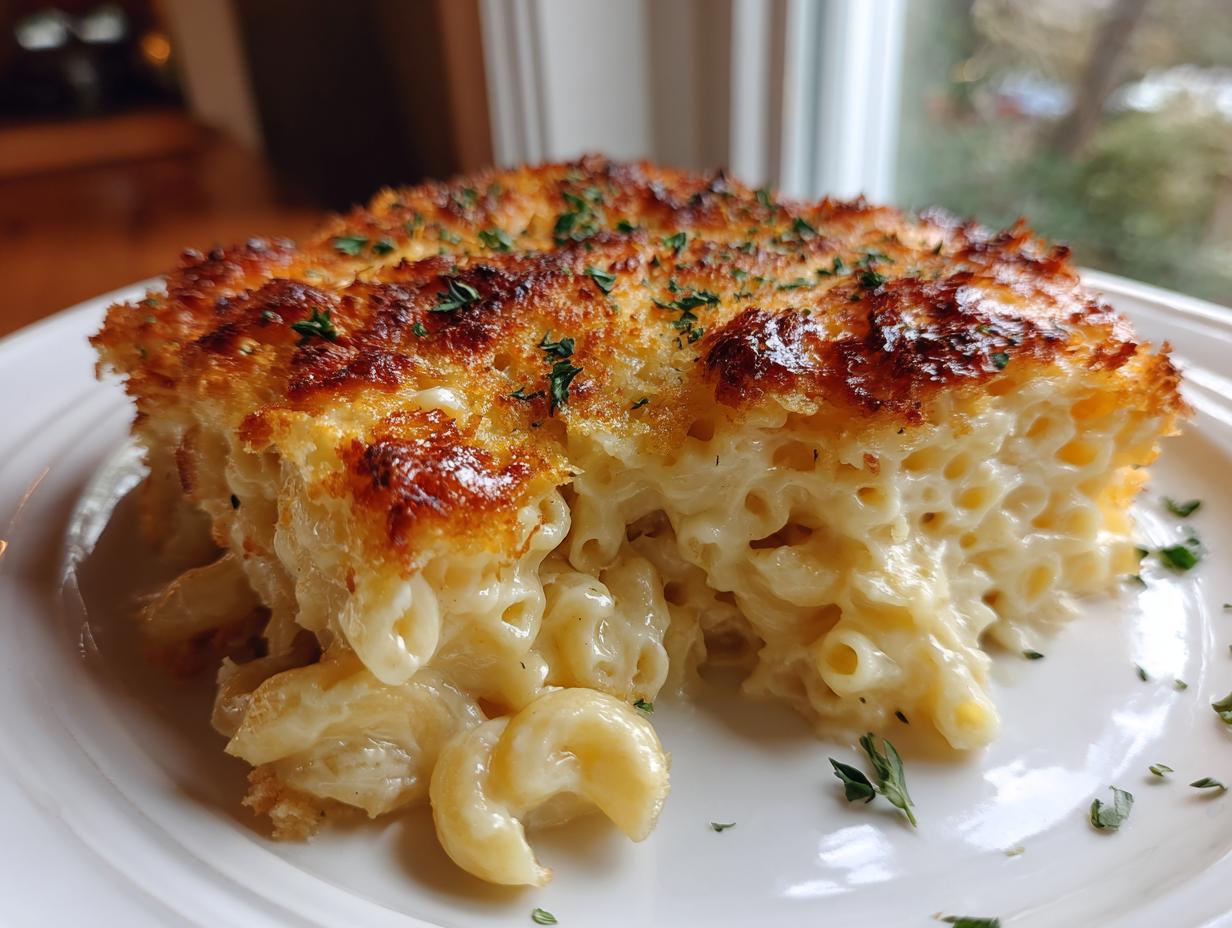
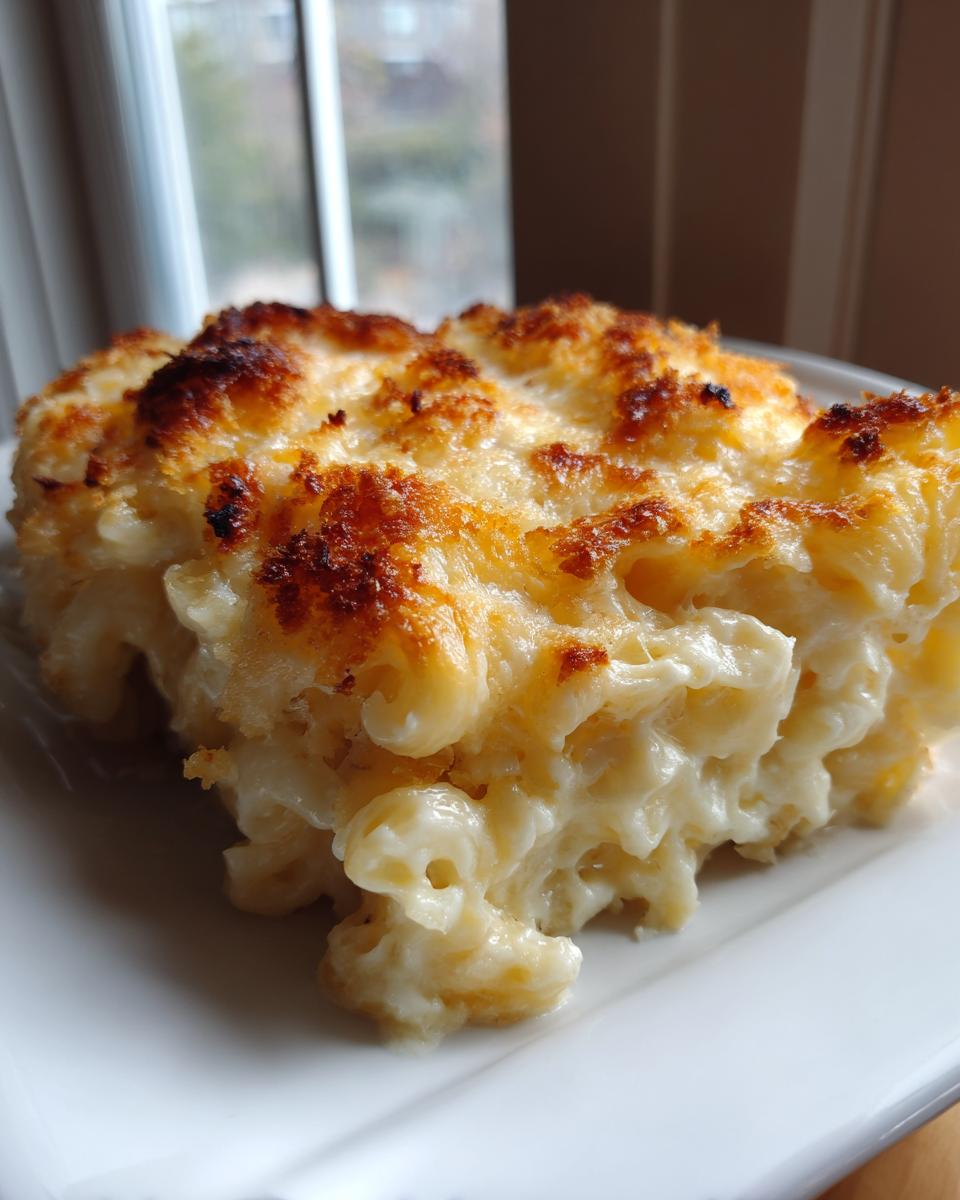
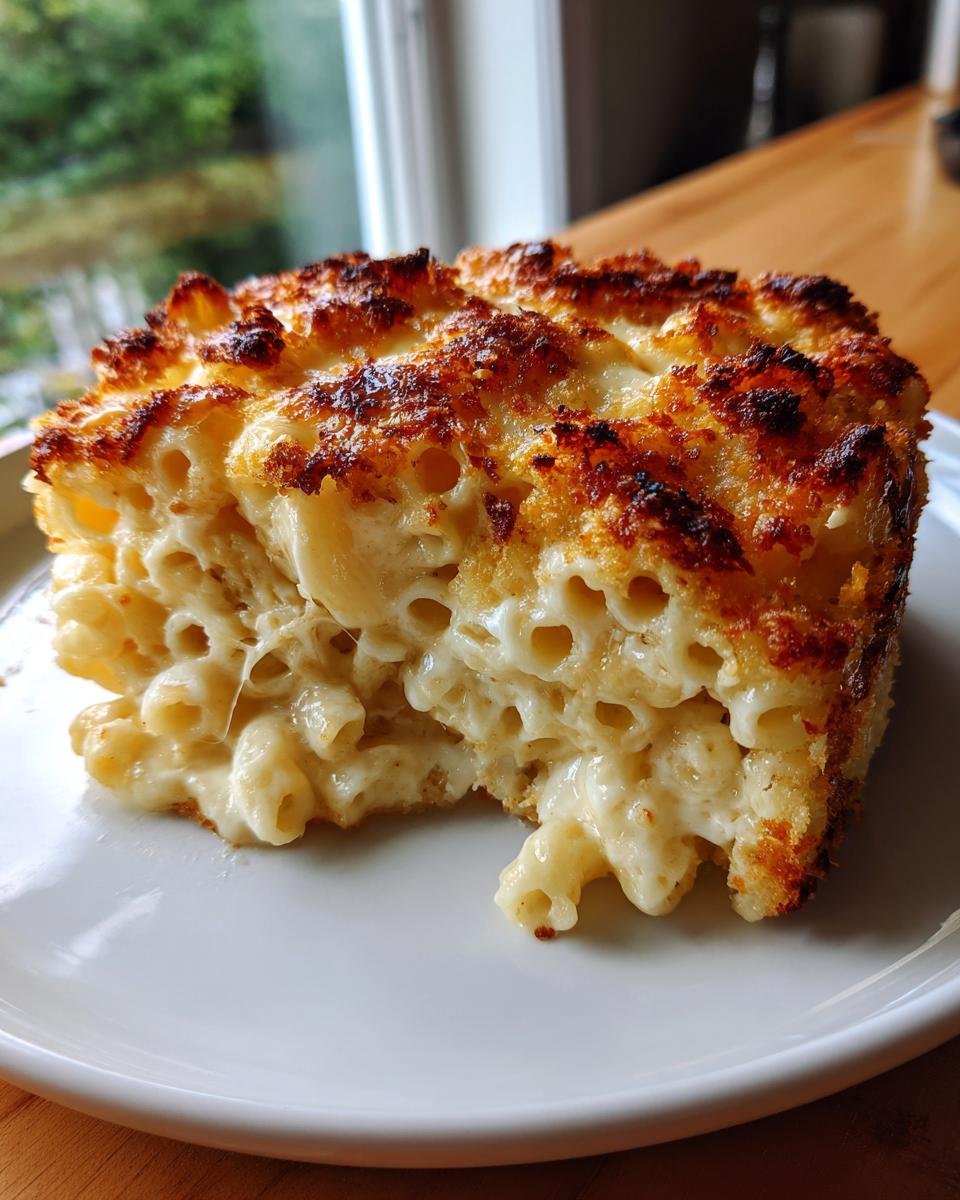
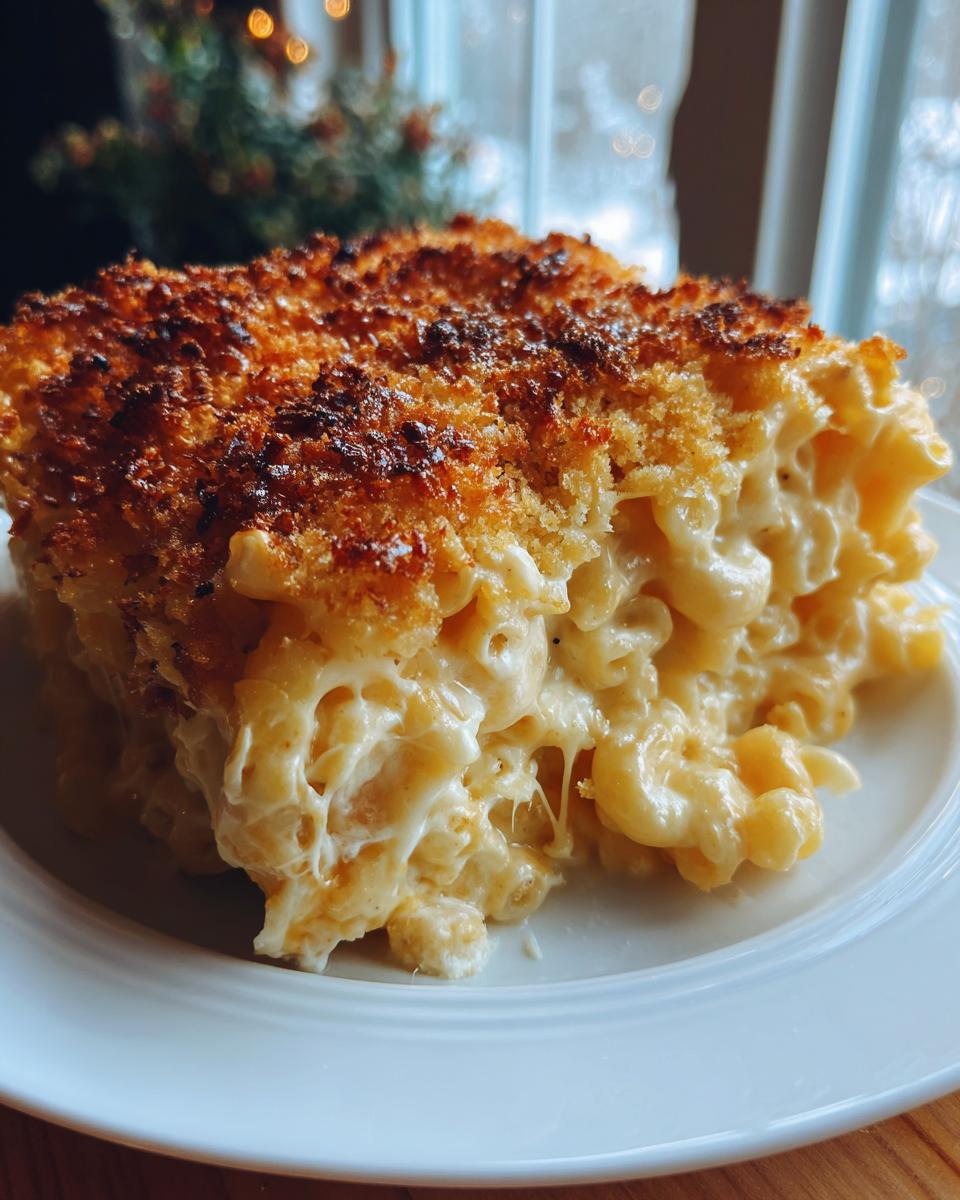
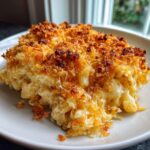
I’m sharing what I honestly believe is the best baked mac and cheese recipe out there: The Ultimate Creamy Baked Mac and Cheese with a Crunchy Gruyère and Panko Topping. My goal here at Cooking Zenith, and trust me on this, is to make sure you walk away with a dish that is ridiculously creamy on the inside, never, ever dry, and crowned with a topping so golden and crunchy it sings when you cut into it. I spent ages perfecting the cheese sauce so that even if you’re nervous about making a roux, this one is foolproof. It’s classic American comfort food, made perfectly accessible for your home kitchen!
When you nail the sauce base and get the cheese blend just right, you realize why this is deservedly the king of all casseroles. It’s meant to be indulgent, and I wouldn’t have it any other way. If you love the idea of creamy mashed potatoes, you are already halfway to loving this rich pasta dish!
- Why This is the Best Baked Mac and Cheese Recipe
- Gathering Ingredients for Your Baked Mac and Cheese
- Step-by-Step Instructions for Perfect Baked Mac and Cheese
- Tips for Southern Style Baked Mac and Cheese Variations
- Storage and Reheating Secrets for Baked Mac and Cheese
- Frequently Asked Questions About Baked Mac and Cheese
- Equipment Needed for This Gourmet Mac and Cheese Recipe
- Serving Suggestions for Your Indulgent Cheese Dishes
- Nutritional Estimates for Classic Baked Mac and Cheese
Why This is the Best Baked Mac and Cheese Recipe
I know what I’m saying when I call this the best baked mac and cheese recipe you’ll ever try. It checks every single box for what makes that ultimate comfort food pasta irresistible. First, we nailed the creaminess. I sneak in cream cheese along with the other cheeses, and trust me, that little addition eliminates any chance of dryness or graininess down the line. Seriously, that’s how we guarantee your creamy baked macaroni and cheese dreams come true.
Second? The flavor depth. We aren’t messing around with just one cheese here! I insist on a blend of sharp cheddar for the punch, Fontina for smoothness, and that nutty Gruyère which just takes everything up a notch into true gourmet mac and cheese recipe territory. It’s my signature blend for any baked pasta casserole recipe, and it shines here.
Achieving Foolproof Creamy Baked Mac and Cheese Texture
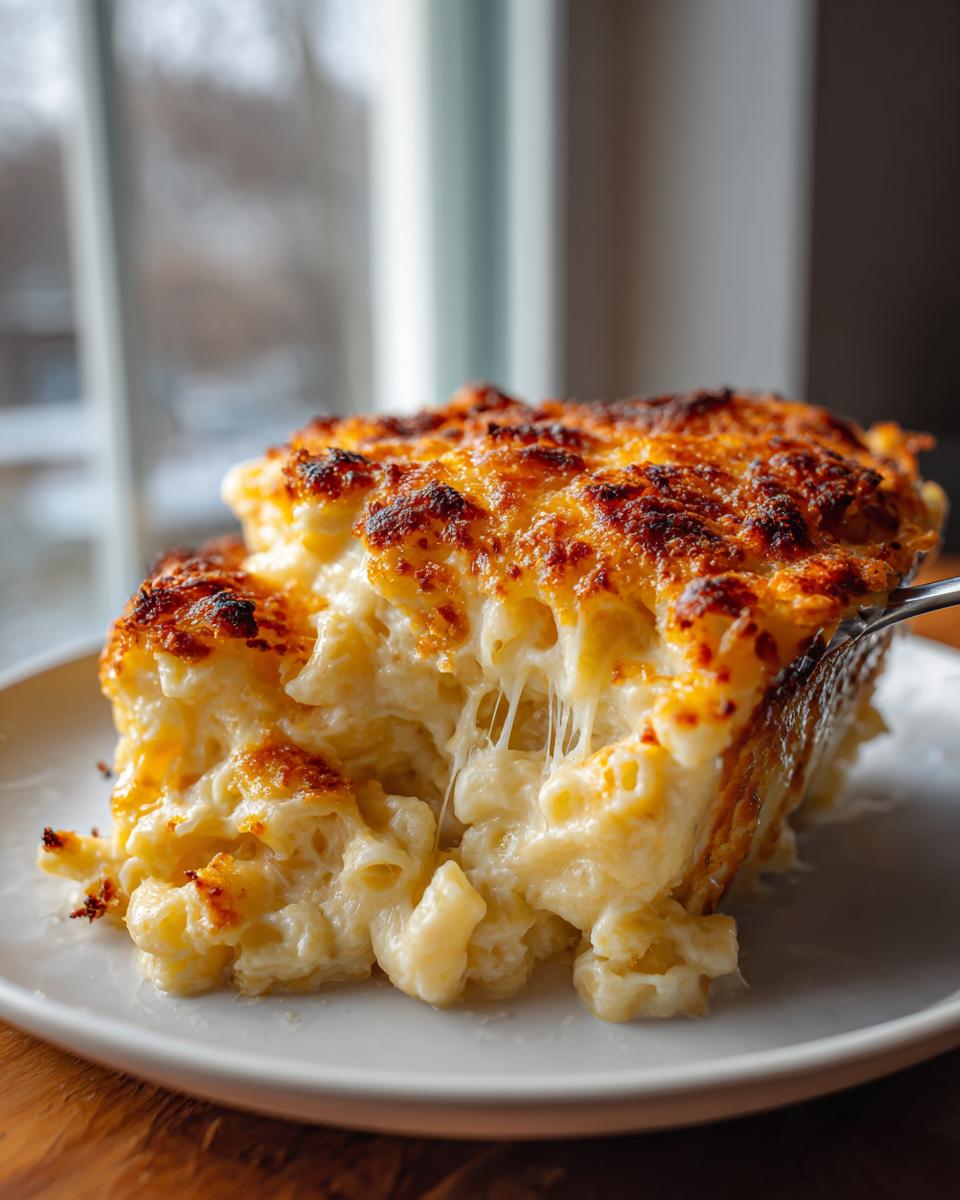
Listen up, because this is where most homemade baked cheesy pasta recipes fall apart! The secret to a foolproof creamy cheese sauce is twofold. You absolutely must cook out that flour in the butter to create the roux—that cooking step removes any raw flour taste. Once you whisk in the milk and it thickens, you have to take the pot *off* the heat before you add your beautiful shredded cheeses. If you don’t, you shock the proteins, and boom—grainy, oily mess. That tiny step is the difference between a mediocre bake and the silkiest sauce you’ve ever poured over pasta. We are achieving silky, not stiff, every time!
When it comes out of the oven, make sure you let it rest! That 10 minutes lets the sauce settle down so you get those perfect, decadent scoops without everything running everywhere. It’s worth the wait, I promise!
If you’re looking for similar cheesy comfort, you absolutely have to check out my guide on the ultimate creamy baked scalloped potatoes. It uses the same logic for building a rich sauce!
Gathering Ingredients for Your Baked Mac and Cheese
Alright, let’s talk components! Making the best baked mac and cheese recipe starts right here, at the grocery list. I’ve broken down exactly what you need below. And can I be Aria for just a second? Please, please, please get blocks of cheese and shred them yourself. Pre-shredded cheese has stuff mixed in to keep it from clumping in the bag, and that “stuff” stops your sauce from melting into that beautiful, smooth texture we are gunning for. It’s a non-negotiable step if you want that rich, gooey payoff!
We need four cups of whole milk, and here’s a pro tip: warm it up slightly on the stove before you add it to the roux. Cold milk hitting hot butter and flour can make your sauce lumpy, and we already talked about avoiding graininess! Don’t skip that little warm-up step.
You’ll also need Panko breadcrumbs for that incredible crunch. They are just lighter and crispier than regular breadcrumbs. A little bit of fresh seasoning goes a long way, so have your salt, pepper, nutmeg, and that tiny kick of cayenne ready to go. The nutmeg honestly wakes up the cheddar flavor an amazing amount; it’s my secret little addition for that restaurant quality experience!
If you are planning on making my Easy Honey Butter later this week, you’ll already have butter ready to go, but just double-check you have 6 tablespoons for the sauce and 2 for the topping!
Here is the full rundown you’ll need:
- 1 pound elbow macaroni
- 6 tablespoons unsalted butter (plus 2 tablespoons melted for the topping)
- 1/2 cup all-purpose flour
- 4 cups whole milk, warmed!
- 1 teaspoon salt
- 1/2 teaspoon black pepper
- 1/4 teaspoon nutmeg
- 1/4 teaspoon cayenne pepper
- 8 ounces sharp cheddar cheese, shredded from a block!
- 4 ounces Fontina cheese, shredded from a block
- 4 ounces Gruyère cheese, shredded from a block
- 4 ounces cream cheese, cut into cubes (this is key for extra richness!)
- 1 cup Panko breadcrumbs
Step-by-Step Instructions for Perfect Baked Mac and Cheese
Okay, now that we have our beautiful ingredients assembled—and I hope you remembered to shred that cheese!—it’s time to bring this magic together. Making truly exceptional baked mac and cheese is about rhythm, not rushing. Follow these steps exactly, and you’ll get that luxurious, heavy, rich cheesy baked pasta that just screams Sunday dinner.
First things first: preheat your oven to 375°F (190°C). While that little guy is warming up, lightly grease your 9×13 baking dish. We want easy cleanup later! Next, get that macaroni going. Cook it just until it’s *al dente*—meaning slightly firm to the bite. Don’t overcook it! Remember, it’s going to bake for another 20-25 minutes, and mushy pre-cooked pasta turns into sad pasta after the oven.
Once that’s cooked, drain it well. Don’t rinse it! We want some starch lingering. Let it hang out while we focus on the star of the show: the sauce.
Creating the Rich, Creamy Cheese Sauce
This is where we build the body of our creamy baked macaroni and cheese. Grab your large saucepan over medium heat. Melt those 6 tablespoons of butter—don’t skimp! Once it’s shimmering, whisk in your flour instantly. You need to cook this mixture, which we call a roux, for just about one solid minute while stirring constantly. This whisks out any raw flour taste, which is vital for a smooth result. Now, slowly, gradually, pour in your slightly warm milk while whisking like you mean it! Keep stirring until the sauce is thick enough to coat the back of a spoon—that usually takes five to eight minutes. Pay attention here!
Crucially, once it coats the spoon nicely, take the pot *OFF* the heat. I cannot stress this enough if you want that foolproof creamy cheese sauce; high direct heat makes cheese scramble. Stir in your salt, pepper, a tiny pinch of nutmeg (it deepens the cheese flavor, truly!), and that hint of cayenne. Now, add your shredded cheddar, Fontina, and Gruyère cheeses, stirring until they are 100% melted and glossy. Finally, drop in those cubes of cream cheese and whisk until they disappear, lending incredible richness. Once it’s liquid velvet, gently fold in your cooked pasta until every single noodle is coated in cheesy goodness.
Building the Crunchy Mac and Cheese with Crunchy Topping
Time to assemble! Pour that gorgeous, saucy mixture right into your prepped baking dish. It should spread out evenly, looking like the happiest casserole in the world. Now for the crunchy payoff! In a small bowl, toss your cup of Panko breadcrumbs with the remaining 2 tablespoons of melted butter. This step transforms them from plain crumbs into a golden, savory crust that delivers that satisfying mac and cheese with crunchy topping contrast.
Sprinkle that buttery Panko evenly all over the top. Don’t press it down; keep it fluffy so it crisps up beautifully. Pop it into the 375°F oven for about 20 to 25 minutes. You are looking for the edges to be bubbly hot and the top to be deeply golden brown.
And here’s a final secret to that perfect scoop? Let it rest! Pull that beautiful dish out and let it sit on the counter for a full 10 minutes before you even think about serving it. If you cut right into it, the sauce will just run everywhere. That rest lets the sauce tighten up just enough so every serving holds its shape. If you follow these instructions—especially the off-heat melting and the resting—you’ll have success every single time. If you enjoyed learning how to make a killer baked dish, you might enjoy my guide for Easy Baked Salmon or perhaps some Easy Chicken Enchiladas next!
Tips for Southern Style Baked Mac and Cheese Variations
Okay, so while my main recipe leans toward that ultra-creamy, almost French-inspired smoothness thanks to the Gruyère, I know so many of you grew up with a totally different texture for your comfort food. If you are looking for that classic, more set, slightly firmer slice of goodness—you want Southern style baked mac and cheese, my friends!
This is where we can really take this already amazing recipe and give it a regional twist. The key difference in that classic Southern style? It’s almost always down to adding an egg or two to the sauce mixture. You might have noticed I mentioned it under my notes! Incorporating one lightly beaten egg into the warm cheese sauce before you mix it with the pasta does something wonderful: it acts as a binder.
When baked, that egg helps the sauce set up much more firmly around the noodles. It creates that beautiful casserole slice that holds its shape perfectly when you scoop it out. It’s less gooey and more structured, which is exactly what so many Southern tables call for. Just make sure your sauce is slightly cooled down—you don’t want to scramble that egg when you stir it in!
Another thing I love adding for maximum comfort flavor if I’m going full Southern? A tiny splash of prepared Creole mustard right into the cheese sauce, along with the traditional seasonings. It just adds a background warmth that pairs unbelievably well with sharp cheddar.
If you adore exploring those rich, traditional flavors, you will absolutely want to check out my recipe for Ultra-Flaky Southern Buttermilk Biscuits. They are the perfect dance partner for this mac and cheese, or you might want to look at how I handle sweets with my Best Classic Southern Sweet Potato Pie!
It’s fun seeing how different regions treat the same core ingredients, isn’t it? If you look around at some other amazing takes on this dish, you’ll notice every cook has their own little touch; you can see another great version over at Headlines Diner, too. It just proves that food is always personal!
Storage and Reheating Secrets for Baked Mac and Cheese
Making the best baked mac and cheese is such an accomplishment that the thought of leftovers going bad just pains me! The good news is that this recipe holds up beautifully, but you do need to treat those leftovers kindly to uphold that creamy quality we worked so hard to achieve. You want to avoid those no dry mac and cheese secrets from creeping into your fridge storage!
First off, how long can you keep it? Once baked and cooled, this casserole should be stored in an airtight container in the refrigerator for up to three or four days. Don’t leave it sitting out for more than two hours—cheese and dairy gotta stay safe!
Now for the reheating part, which is crucial. If you try to blast it in the microwave for too long, that beautiful sauce will tighten up and the pasta will seize. It’ll get rubbery really fast. My advice? Reheat it slow and steady.
The very best method is in the oven. Cover your serving dish tightly with foil—I mean really tight—and bake it at a low temperature, maybe 300°F (150°C), until it’s heated through. Before you cover it, add just a tiny splash of milk or even some chicken broth right over the top. Trust me on this: that added liquid gets absorbed as it heats, bringing that creaminess right back to life!
If you are in a real rush, the microwave is fine, but you have to doctor it up. Take out the portion you want, place it in a microwave-safe dish, cover it loosely with a damp paper towel (this creates steam!), and heat it in short 30-second bursts, stirring gently between each burst. See? It’s about managing the moisture content so you get that silky texture back, not just hot, stiff pasta.
If you are worried about leftovers from a big meal, you could always try making my recipe for Classic Creamy Chicken Divan next time; it holds its moisture even better when frozen!
Frequently Asked Questions About Baked Mac and Cheese
I know you’ve got questions! When you’re aiming for the ultimate comfort food pasta that everyone raves about, you need crystal-clear answers. I’ve gathered the things I get asked most often about achieving that perfect, rich cheesy baked pasta experience. Don’t worry if you’ve messed up a casserole before; we are making sure this next attempt is your best one yet!
Here are the things I want you to always keep in mind when preparing this easy baked mac and cheese!
How to Make Perfect Baked Mac and Cheese Every Time
If you want to guarantee you are making the perfect baked mac and cheese, you need to focus on three non-negotiable steps. Don’t stress about making a giant culinary leap; just focus on these execution points, and you win!
First, you must warm your milk before adding it to the roux. Cold milk equals lumpy sauce, and we need a smooth, creamy baked macaroni and cheese sauce, not a curdled mess. Second, always, always shred your own cheese from the block, specifically for the cheddar, Fontina, and Gruyère blend. Those anti-caking agents in the pre-shredded bags are killers for achieving that silky melt.
And finally, the resting period! Do not skip the 10 minutes on the counter after it comes out of the oven. This short pause allows the sauce to set up so your results are wonderfully creamy but still thick enough to be sturdy—the hallmark of a great baked pasta casserole recipe.
Can I make this ahead of time?
You absolutely can! This is such a fantastic option for feeding a crowd or having that perfect holiday side dish macaroni ready to go. Assemble the entire thing—sauce mixed with pasta, topping applied—cover it tightly with plastic wrap and foil, and refrigerate it for up to two days. When it’s time to bake, pull it out of the fridge about 30 minutes before you want to put it in the oven to take the chill off, and then just add 5 to 10 extra minutes to the baking time.
What is the best pasta shape besides elbow macaroni?
Elbows are iconic, but if you want to mix it up, look for shapes that cup or hold the sauce well. Medium shells (conchiglie) are amazing because the sauce nests right inside. Cavatappi, which is like a curly tube, is another excellent choice for capturing that rich sauce. Just make sure whatever you choose, you cook it slightly less than package directions since it’s finishing in the oven!
How do I prevent the topping from burning before the middle is hot?
This is a super common question when dealing with things that need a short bake time like our baked mac and cheese! If you find your Panko topping is browning too fast, the easiest fix is foil tents. After about 15 minutes of baking, if the top looks deeply golden but you know the center needs more time to bubble, just loosely drape a piece of aluminum foil over the top of the dish for the last 5 to 10 minutes. It shields the crust while letting the heat penetrate through. Since this recipe doesn’t bake for too long, this usually isn’t an issue, but it’s a great trick to have up your sleeve!
If you enjoy simple, satisfying casseroles, you’ll want to try my recipe for an Easy Burrito Bake next week!
Nutritional Estimates for Classic Baked Mac and Cheese
I always include rough nutritional estimates just so you know what you are signing up for when you make an indulgent cheese dish like this. Remember, because we are using high-quality cheeses and real butter, this is definitely a treat! These numbers are based on a serving size of 1/6th of the recipe, and they are estimates—your exact figures will vary based on the specific brands of cheese and milk you use. We aren’t counting calories when we make comfort food, but it’s nice to have the ballpark figure!
- Serving Size: 1 serving
- Calories: 650
- Fat: 38g
- Protein: 28g
Just a quick reminder: these values are calculated based on the ingredients listed in the recipe, so please treat them as a guideline, not a certainty!
Equipment Needed for This Gourmet Mac and Cheese Recipe
When you’re making something as truly special as this gourmet mac and cheese recipe, having the right gear ready makes the whole process feel less like work and more like fun. I always tell people that setting up your station before you start cooking is half the battle won. You don’t need a commercial kitchen for this, just a few reliable tools that I bet you already have sitting in your drawers.
For building that silky cheese sauce, a large, heavy-bottomed saucepan is your best friend. The heavier the bottom, the more evenly the heat distributes, which is really important when you’re melting butter and cooking that flour, preventing any hot spots that might scorch your roux. Trust me, a cheap, thin pan will make your life miserable here.
You definitely need a good whisk—not a wooden spoon right now, a wire whisk! This helps you incorporate that warm milk smoothly and avoid those dreaded lumps that cause grainy texture later on. Also, grab that box grater! Seriously, if you want the ultimate creaminess, you must grate your cheddar, Fontina, and Gruyère fresh.
And finally, let’s talk about the container. Since this recipe yields a nice big batch perfect for sharing, you’ll want a standard 9×13 inch baking dish ready to go. Lightly grease it right at the beginning so you aren’t scrambling when the sauce is hot. Having these items clean and ready means you can focus entirely on the technique, which is what turns a good dish into spectacular comfort food.
If you’ve got your tools ready, you’re halfway to making those fantastic Easy Fried Potato Tacos next week!
Serving Suggestions for Your Indulgent Cheese Dishes
Okay, you’ve pulled this beautiful, bubbling pan of cheesy perfection out of the oven, and you’ve finally let it rest those crucial ten minutes. Now, what about the rest of the meal? Because let’s be honest, this rich cheesy baked pasta is so decadent, it basically demands sides that balance out all that glorious fat and creaminess.
When I’m serving this as a holiday side dish or for a special weekend meal, I always lean hard into incorporating something fresh, acidic, or crisp. You need that palate contrast to cut through the buttery richness of the mac and cheese. It makes every bite feel lighter and more exciting!
For a classic American spread, you absolutely cannot go wrong pairing this with a slow-cooked protein. Think about that tangy, slightly smoky flavor of good BBQ pork shoulder or maybe some slow-cooked pulled chicken. The vinegar-based sauces common with BBQ play wonderfully against the creamy cheddar and Gruyère blend we used.
If you are serving this as the main event, which you totally should on a chilly night, keep the veggies simple and green. We want acidity! A simple vinaigrette-dressed salad is perfect—maybe some bright lemon juice, Dijon mustard, and good olive oil tossed with bitter greens like arugula. It’s the ultimate fresh foil to your heavy indulgent cheese dishes.
Or, if you want another crunch factor because apparently, I can’t get enough crunch in my life, you have to check out my Best Creamy Broccoli Salad recipe! It’s loaded with bacon and sunflower seeds and brings a whole different texture profile that works shockingly well alongside this baked pasta casserole.
Roasted green beans are another favorite of mine. A quick toss in olive oil, salt, pepper, and maybe a quick squeeze of fresh orange or lemon juice right before serving helps wake up those simple vegetables and makes your entire plate feel complete. See? Elevated everyday cooking!
Nutritional Estimates for Classic Baked Mac and Cheese
I always include rough nutritional estimates just so you know what you are signing up for when you make an indulgent cheese dish like this. Remember, because we are using high-quality cheeses and real butter, this is definitely a treat! These numbers are based on a serving size of 1/6th of the recipe, and they are estimates—your exact figures will vary based on the specific brands of cheese and milk you use. We aren’t counting calories when we make comfort food, but it’s nice to have the ballpark figure!
- Serving Size: 1 serving
- Calories: 650
- Fat: 38g
- Protein: 28g
Just a quick reminder: these values are calculated based on the ingredients listed in the recipe, so please treat them as a guideline, not a certainty!
PrintThe Ultimate Creamy Baked Mac and Cheese with a Crunchy Gruyère and Panko Topping
Make the best baked mac and cheese that stays creamy, never dry, and features a satisfyingly crunchy, golden topping. This recipe delivers rich, indulgent comfort food perfection.
- Prep Time: 15 min
- Cook Time: 30 min
- Total Time: 45 min
- Yield: 6 servings 1x
- Category: Dinner
- Method: Baking
- Cuisine: American
- Diet: Vegetarian
Ingredients
- 1 pound elbow macaroni
- 6 tablespoons unsalted butter
- 1/2 cup all-purpose flour
- 4 cups whole milk, warmed
- 1 teaspoon salt
- 1/2 teaspoon black pepper
- 1/4 teaspoon nutmeg
- 1/4 teaspoon cayenne pepper
- 8 ounces sharp cheddar cheese, shredded
- 4 ounces Fontina cheese, shredded
- 4 ounces Gruyère cheese, shredded
- 4 ounces cream cheese, cut into cubes
- 1 cup Panko breadcrumbs
- 2 tablespoons melted butter (for topping)
Instructions
- Preheat your oven to 375°F (190°C). Lightly grease a 9×13 inch baking dish.
- Cook the macaroni according to package directions until al dente. Drain well and set aside. Do not overcook the pasta.
- While the pasta cooks, prepare the cheese sauce. In a large saucepan over medium heat, melt the 6 tablespoons of butter. Whisk in the flour and cook for 1 minute, stirring constantly to create a roux.
- Gradually whisk in the warm milk until the mixture is smooth. Continue cooking, stirring often, until the sauce thickens enough to coat the back of a spoon, about 5 to 8 minutes. Do not let it boil rapidly.
- Remove the saucepan from the heat. Stir in the salt, pepper, nutmeg, and cayenne pepper.
- Add the shredded cheddar, Fontina, and Gruyère cheeses, stirring until completely melted and smooth. This is your foolproof creamy cheese sauce.
- Add the cream cheese cubes and stir until they are fully incorporated, adding extra richness.
- Add the cooked, drained pasta to the cheese sauce and stir gently until every piece is coated.
- Pour the mixture into the prepared baking dish.
- In a small bowl, toss the Panko breadcrumbs with the 2 tablespoons of melted butter. Sprinkle this mixture evenly over the top of the macaroni and cheese for a crunchy, golden crust.
- Bake for 20 to 25 minutes, or until the sauce is bubbly and the topping is golden brown.
- Let the baked mac and cheese rest for 10 minutes before serving. This helps the sauce set and prevents it from being too runny.
Notes
- For the creamiest texture, warm your milk slightly before adding it to the roux. Cold milk can cause lumps.
- Shred your own cheese from blocks; pre-shredded cheese contains anti-caking agents that prevent smooth melting.
- If you prefer a Southern style baked mac and cheese, you can add one egg, lightly beaten, to the cheese sauce mixture before combining it with the pasta.
Nutrition
- Serving Size: 1 serving
- Calories: 650
- Sugar: 8
- Sodium: 650
- Fat: 38
- Saturated Fat: 22
- Unsaturated Fat: 16
- Trans Fat: 1
- Carbohydrates: 55
- Fiber: 3
- Protein: 28
- Cholesterol: 110