
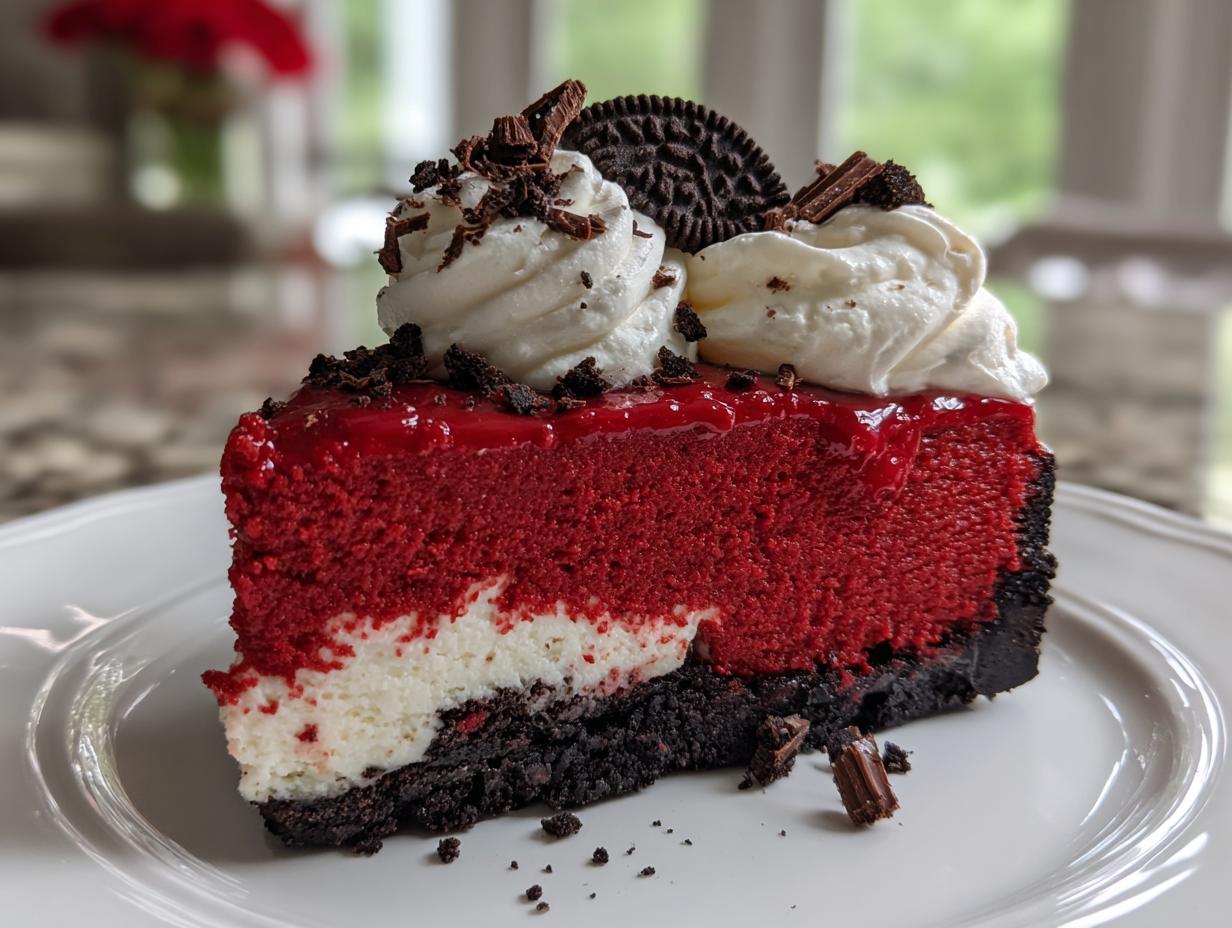
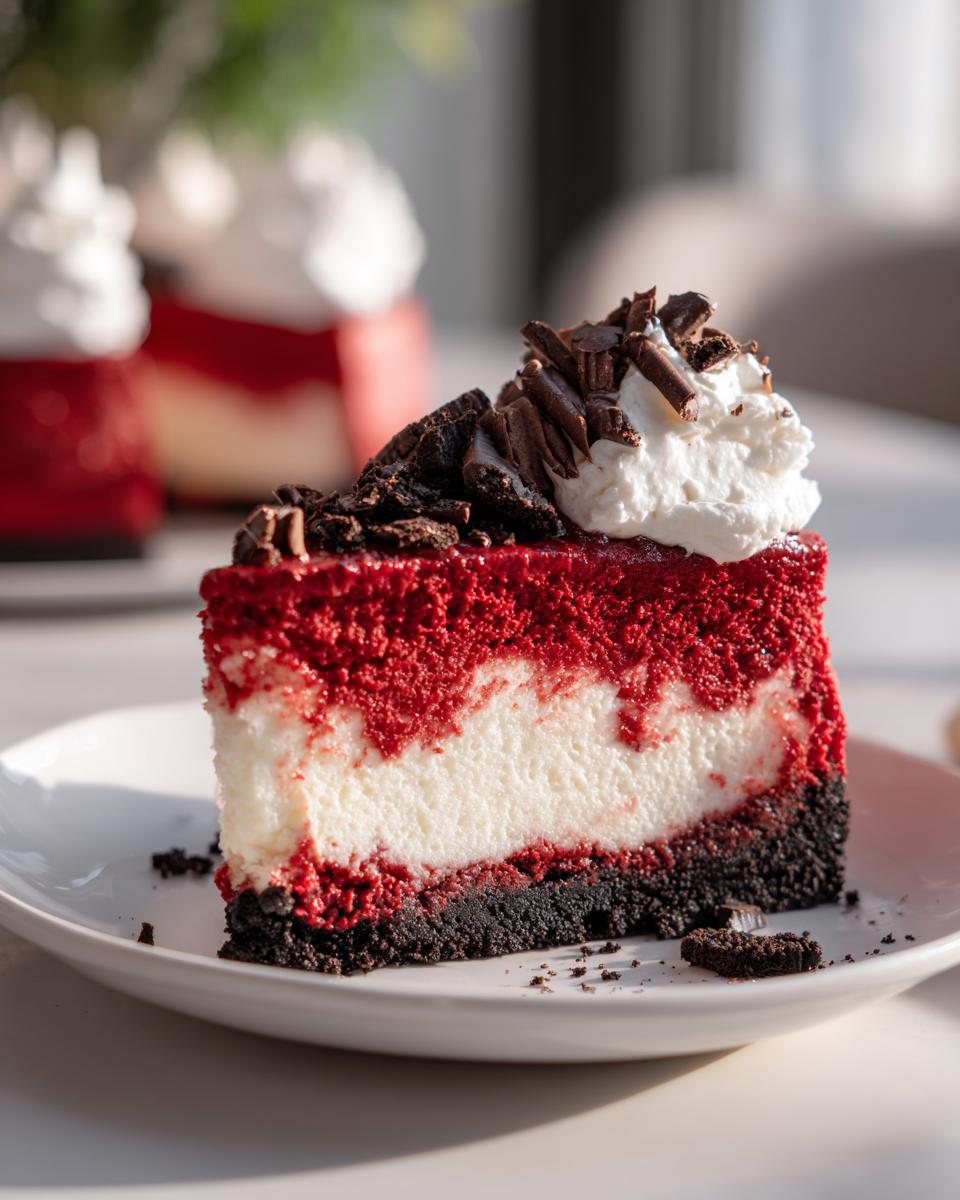
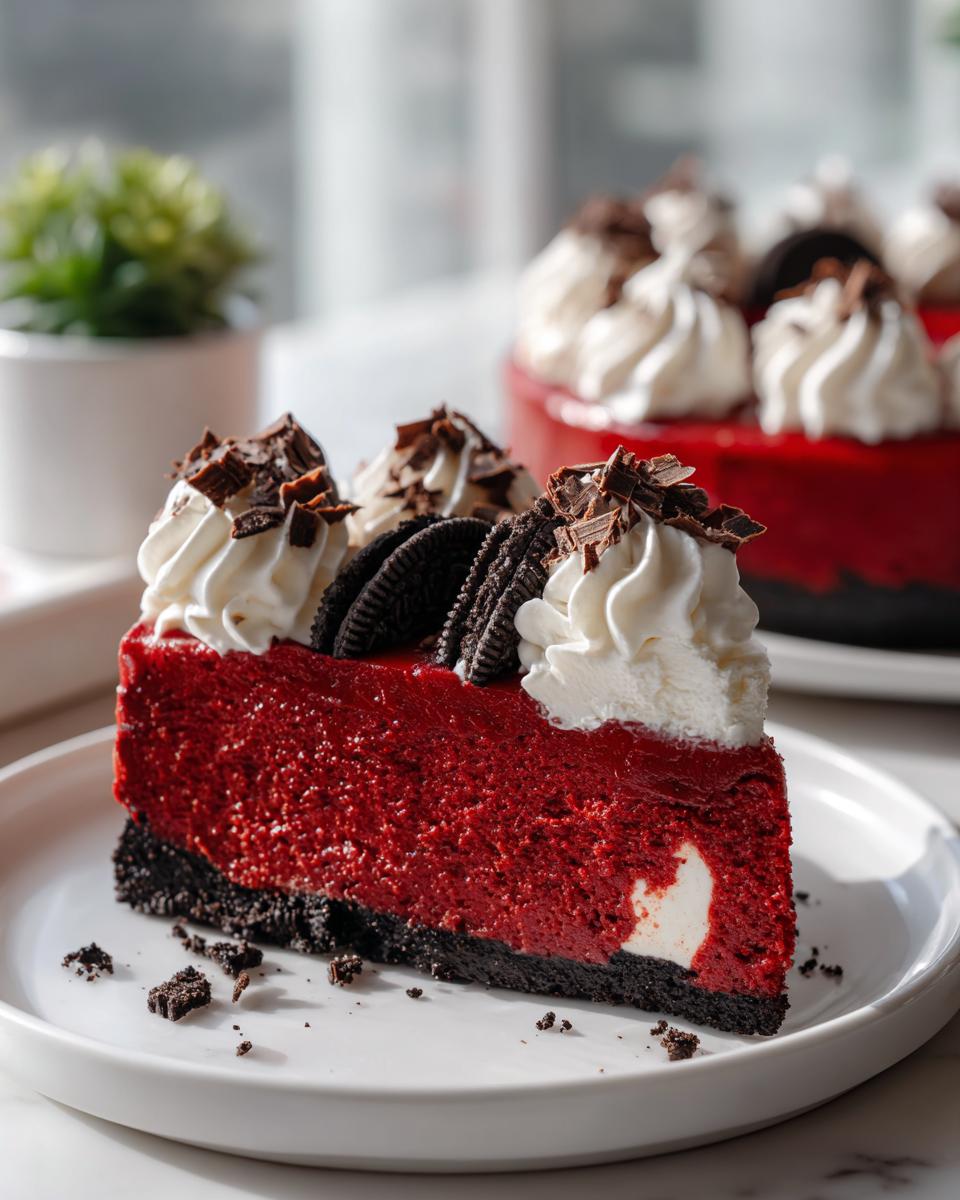
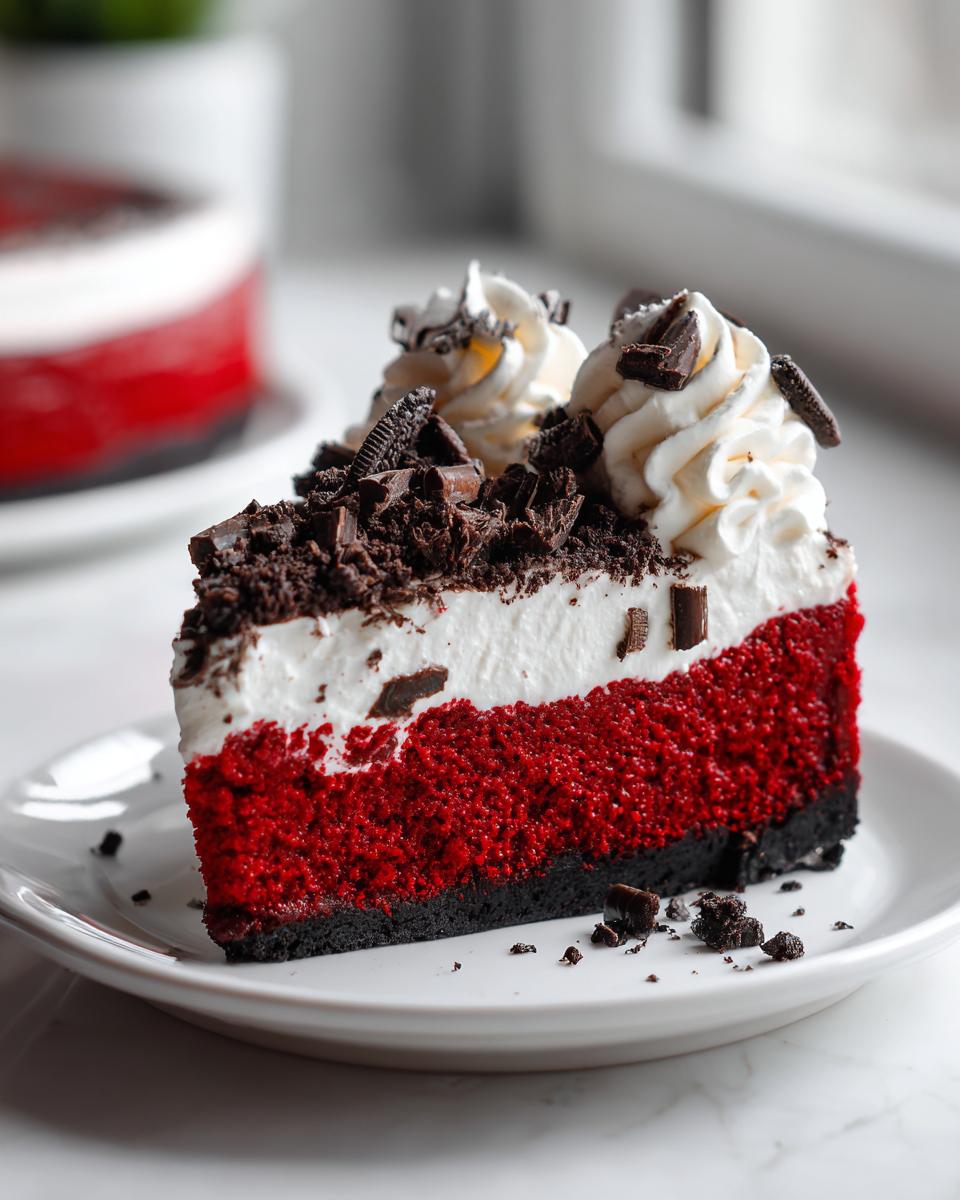
If you are looking for a dessert that simply screams ‘special occasion,’ forget simple cookies and grab your springform pan, because we are diving headfirst into pure decadence! This red velvet cheesecake is not just another sweet; it’s a showstopper. I’ve spent ages perfecting this recipe—the Ultimate Decadent Red Velvet Cheesecake with Oreo Crust—to be rich, memorable, and, most importantly, achievable for you.
When I started Cooking Zenith, it was because I wanted everyone to feel that surge of confidence when they pull something truly gorgeous out of their oven. This cheesecake represents that perfectly. It combines that iconic, slightly tangy red velvet flavor with a unbelievably creamy cheesecake layer resting on a crisp, crunchy Oreo base. Trust me, this is the recipe you save for Valentine’s Day, Christmas, or when you just need a major win in the kitchen!
- Why This red velvet cheesecake Recipe is the Best Cheesecake Ever
- Gathering Ingredients for Your red velvet cheesecake with Oreo Crust
- Step-by-Step Instructions for Your Decadent Cheesecake Recipe
- Tips for Success with Homemade red velvet cheesecake
- Variations: Beyond the Classic red velvet cheesecake
- Serving Suggestions for Your Showstopper Desserts
- Storage and Reheating Instructions for Creamy Red Velvet Dessert
- Frequently Asked Questions About red velvet cheesecake
- Nutritional Estimates for this Gourmet Cheesecake
- Share Your Experience Making This red velvet cheesecake
Why This red velvet cheesecake Recipe is the Best Cheesecake Ever
I know there are a million red velvet cheesecake recipes out there, but this one is hands-down my favorite for a reason: it’s designed to wow! If you need a truly showstopper dessert for your next big gathering, whether it’s Christmas or a birthday bash, this is it.
- It’s visually stunning—that deep red just pops against the dark crust!
- The texture is ridiculously rich; we’re talking velvety smooth cheesecake perfection.
- That crunchy, buttery cheesecake with Oreo crust changes everything. It offers the perfect textural contrast.
- It’s exactly the kind of decadent centerpiece you want on your table for the holidays.
Achieving Velvety Smooth Cheesecake Texture
The secret to that signature smooth, decadent feel is all about temperature control and patience when mixing. Your cream cheese absolutely *must* be perfectly softened—I mean room temperature soft, not microwave weirdly warm! When you add the eggs, beat only until they’re incorporated. Overmixing the final batter introduces air bubbles, and nobody wants a pockmarked, uneven cheesecake. Keep mixing minimal right at the end, and you’ll get that gorgeous, velvety smooth cheesecake consistency that melts in your mouth.
Gathering Ingredients for Your red velvet cheesecake with Oreo Crust
Okay, let’s talk about what you need to make this fantastic red velvet cheesecake! Because we are aiming for decadent here, using the right things matters a ton. We start with that amazing, crunchy cheesecake with Oreo crust, followed by the creamy filling components. Seriously, don’t even think about using cold cream cheese; it will just turn into a lumpy mess, and we don’t have time for that drama!
We need good quality cocoa powder for depth and that vibrant red tone. Making sure your butter is melted for the crust and everything else is measured precisely ensures this whole giant dessert comes together perfectly!
Ingredient Notes and Substitutions for red velvet cheesecake
Let’s chat about that color, because a pale red velvet is just sad, right? If you can swing it, please go for gel food coloring. A little bit goes a long way toward getting that deep, rich red that makes this dessert a true showstopper. Liquid stuff takes way too much product, and sometimes it can introduce extra water, which we don’t want in a gourmet cheesecake.
The cocoa powder plays a crucial role, too; it’s not just for color—it balances the sweetness and really brings out that subtle chocolate note inherent in red velvet. Again, make sure that cream cheese is absolutely, 100% softened. If it’s hard, you’ll end up whipping air into clumps instead of creating that smooth texture we’re aiming for.
Step-by-Step Instructions for Your Decadent Cheesecake Recipe
Alright, let’s get baking! Making this red velvet cheesecake is totally straightforward if we take it one step at a time. Remember, we preheated the oven to 325°F, so make sure that’s ready to go before you start mixing anything wet. Getting the timing right, especially with the cooling stage, is how we guarantee this becomes one of your favorite showstopper desserts.
Preparing the Oreo Crust and Pre-Baking
First up is the base! Grab your crushed Oreos, that little bit of sugar, and the melted butter. Mix those up until they look like wet sand—you want it damp enough to stick together when you squeeze it. Press that firmly into the bottom of your springform pan; really pack it down tight! Pop it into the oven for just 10 minutes. Once it comes out, let it chill slightly while you whip up that gorgeous red batter.
Mastering the Water Bath for a Perfect red velvet cheesecake
This part right here is my absolute, non-negotiable trick for avoiding cracks—it’s the water bath! Cheesecake loves gentle, steamy heat, not harsh, dry oven heat. To set up, wrap the outside of your springform pan really well with heavy-duty foil; I usually do three layers just to be safe so no water leaks in. Place that wrapped pan inside a larger roasting pan. When you pour the batter in, carefully add hot water to the outer roasting pan until it’s about halfway up the side of the cheesecake pan. That steam keeps everything beautifully even and creamy!
Tips for Success with Homemade red velvet cheesecake
Making a spectacular dessert like this red velvet cheesecake is all about timing! Seriously, don’t bring this out of the fridge five minutes before you want to eat it; it won’t slice right. You need that minimum six hours—honestly, overnight is always better—so the texture sets up firm enough to give you those clean, beautiful slices you see in all those pictures. Patience is critical here!
When it comes out of the oven, remember that slight jiggle in the center is perfectly fine—that’s how you know it’s not dry! We turn the oven off and let it hang out in that steamy environment for an hour before moving it out. If you are baking for a party, plan this whole thing for the day before. A holiday cheesecake like this tastes even better the next day, and it saves you so much stress on celebration day!
Variations: Beyond the Classic red velvet cheesecake
Now that you’ve mastered the ultimate showstopper, you might be wondering, “What else can I do with all that amazing flavor?” Because this is truly the best cheesecake ever, we have to talk about playing around with it! If you want something great for a summer gathering, a no bake red velvet cheesecake alternative is easy to manage, often swapping the baked base for a simple, press-in crust.
If you want less fuss, you can totally turn this into satisfying red velvet cake cheesecake bars! Just pour the batter into a greased 9×13 pan instead of a springform and bake for less time. Another great swap for summer is ditching the whipped cream topping and making a simple, tangy cream cheese frosting to spread over the top once it’s chilled. It makes it even richer!
Serving Suggestions for Your Showstopper Desserts
When you’ve put this much beautiful effort into making a red velvet cheesecake, you want the presentation to match, right? Because this dessert is so rich and decadent—definitely a highlight for baking for parties—we need to serve it with things that let the flavor shine, not compete with it.
Think contrast! I love serving a slice of this stunning holiday cheesecake alongside a small handful of fresh raspberries or a few tart blackberries. That little bit of fruit cleanses the palate between those incredibly rich bites! And honestly? A strong, warm cup of black coffee is the perfect drink pairing. It cuts right through the sweetness. It’s simple, elegant, and lets your gorgeous dessert be the star!

Storage and Reheating Instructions for Creamy Red Velvet Dessert
This decadent beauty needs a good, long chill, and storing it properly is key to keeping that creamy red velvet dessert texture perfect! Always keep your cheesecake in the fridge, covered loosely with plastic wrap—especially if you haven’t added the whipped cream topping yet. It stays fantastic for almost a week tucked away in there!
If you are topping it before you serve it, remember that whipped cream doesn’t freeze well at all. If you think you’ll have leftovers, just cover the plain, chilled cheesecake. If you want to serve a slice that isn’t ice cold, just let an individual slice sit on the counter for about 20 minutes before cutting. That little bit of warmth wakes up the flavor beautifully!
Frequently Asked Questions About red velvet cheesecake
I always get a few questions whenever I post this recipe because making a giant, two-part dessert like this can look intimidating! Don’t worry, I’ve got the answers to common sticking points so you can feel confident baking this treat for your next party.
Can I use cake mix for the red velvet portion?
That’s a great question for anyone looking for an easy cheesecake recipe! While this particular recipe is developed to be made completely from scratch for the best flavor, I totally get needing a shortcut sometimes. You absolutely *can* use a quality red velvet cake mix for the red velvet elements if you were adapting this into a layered cheesecake cake. However, since we are using cocoa powder and vinegar right in the cheesecake batter here, this recipe doesn’t rely on a cake mix base, so I recommend sticking to the written steps for the ultimate flavor!
How do I get the best, most vibrant red color?
If you want that deep, true color that makes this a serious showstopper dessert—especially for Valentine’s Day—you need to use gel food coloring. Liquid coloring just won’t cut it; you’d have to use so much you risk messing up the batter texture. A small, concentrated bit of gel coloring gives you that intense, beautiful color saturation every time!
Is it possible to make this a no bake red velvet cheesecake?
My heart belongs to the baked version because that water bath creates the most incredible creamy red velvet dessert texture! But, if you are making this in the summer or just don’t want to turn on the oven, yes, you can adapt it! For a no bake red velvet cheesecake, you skip the baking steps entirely and use much more stabilizers like stabilized whipped cream or maybe even some melted white chocolate in your filling to help it set up firm in the fridge.
How long do I really need to chill this dessert?
Oh, you have to be patient here! If you cut into this beautiful holiday cheesecake too early, it will be soup! I always say a minimum of 6 hours, but honestly, if you want to serve the best cheesecake ever, let it chill overnight. That extended time allows the fats to firm up beautifully, giving you those sharp, clean, perfect slices every single time. Don’t rush the chill!
Nutritional Estimates for this Gourmet Cheesecake
Because this is such a rich and decadent treat, I like to be upfront about what’s in every gorgeous slice of this gourmet cheesecake. Keep in mind these are just estimates based on the recipe ingredients listed above. You are looking at about 450 calories, 30 grams of fat, 40 grams of carbohydrates, and 7 grams of protein per slice. It’s indulgent, friend, and perfectly normal when you are enjoying flavors this rich!
Share Your Experience Making This red velvet cheesecake
Now that you’ve created this stunning red velvet cheesecake, I absolutely need to hear about it! Did you make it for Christmas or maybe Valentine’s Day?
Please take a moment to rate the recipe right here—five stars if it earned my praise! And leave a comment below telling me how it went and if you managed those clean slices. Sharing your success helps me know I’m fulfilling my promise here at Cooking Zenith: to help you feel totally confident in the kitchen. Don’t forget to tag us when you share photos on social media; I love seeing my readers create magic! If you have questions later, feel free to reach out via my contact page!
PrintUltimate Decadent Red Velvet Cheesecake with Oreo Crust

Make a showstopping Red Velvet Cheesecake featuring a rich, creamy filling and a crunchy Oreo crust. This recipe delivers decadent flavor perfect for holidays or special celebrations.
- Prep Time: 25 min
- Cook Time: 75 min
- Total Time: 90 min + chilling
- Yield: 12 servings 1x
- Category: Dessert
- Method: Baking
- Cuisine: American
- Diet: Vegetarian
Ingredients
- 1 1/2 cups crushed Oreo cookies
- 1/4 cup granulated sugar
- 6 tablespoons unsalted butter, melted
- 3 (8 ounce) packages cream cheese, softened
- 1 1/2 cups granulated sugar
- 1/4 cup all-purpose flour
- 1 teaspoon vanilla extract
- 1/2 teaspoon salt
- 4 large eggs
- 1 tablespoon white vinegar
- 1 teaspoon red food coloring (liquid or gel)
- 1 tablespoon unsweetened cocoa powder
- 1/2 cup sour cream
- 1/2 cup heavy whipping cream, whipped (for topping)
- Chocolate shavings (for garnish)
Instructions
- Preheat your oven to 325 degrees Fahrenheit. Wrap the outside bottom of a 9-inch springform pan tightly with heavy-duty aluminum foil.
- Prepare the crust: Combine the crushed Oreos, 1/4 cup sugar, and melted butter in a bowl. Press the mixture firmly into the bottom of the prepared springform pan. Bake for 10 minutes. Remove from the oven and let it cool slightly.
- Prepare the cheesecake filling: In a large bowl, beat the softened cream cheese, 1 1/2 cups sugar, and flour with an electric mixer until smooth. Mix in the vanilla extract and salt.
- Add the eggs one at a time, beating well after each addition. Do not overmix.
- In a small bowl, combine the vinegar, red food coloring, cocoa powder, and sour cream. Mix until the color is uniform.
- Gently fold the red mixture into the cream cheese batter until just combined. Do not overmix to keep the texture smooth.
- Pour the batter over the cooled Oreo crust in the springform pan.
- Bake using a water bath: Place the foil-wrapped springform pan inside a larger roasting pan. Carefully pour hot water into the roasting pan until it reaches halfway up the sides of the springform pan.
- Bake for 60 to 75 minutes, or until the edges are set but the center still jiggles slightly when nudged.
- Turn off the oven, crack the oven door open slightly, and let the cheesecake cool inside the oven for 1 hour. This prevents cracking.
- Remove the cheesecake from the water bath and let it cool completely on a wire rack.
- Once cool, cover the pan loosely with plastic wrap and refrigerate for at least 6 hours, or preferably overnight, before serving.
- Before serving, remove the sides of the springform pan. Top with whipped heavy cream and chocolate shavings.
Notes
- For the best color saturation, use gel food coloring instead of liquid.
- If you skip the water bath, reduce the baking time slightly and watch carefully to prevent cracking.
- Chill time is essential for the best creamy texture and clean slices.
Nutrition
- Serving Size: 1 slice
- Calories: 450
- Sugar: 35g
- Sodium: 300mg
- Fat: 30g
- Saturated Fat: 18g
- Unsaturated Fat: 12g
- Trans Fat: 0.5g
- Carbohydrates: 40g
- Fiber: 1g
- Protein: 7g
- Cholesterol: 110mg