
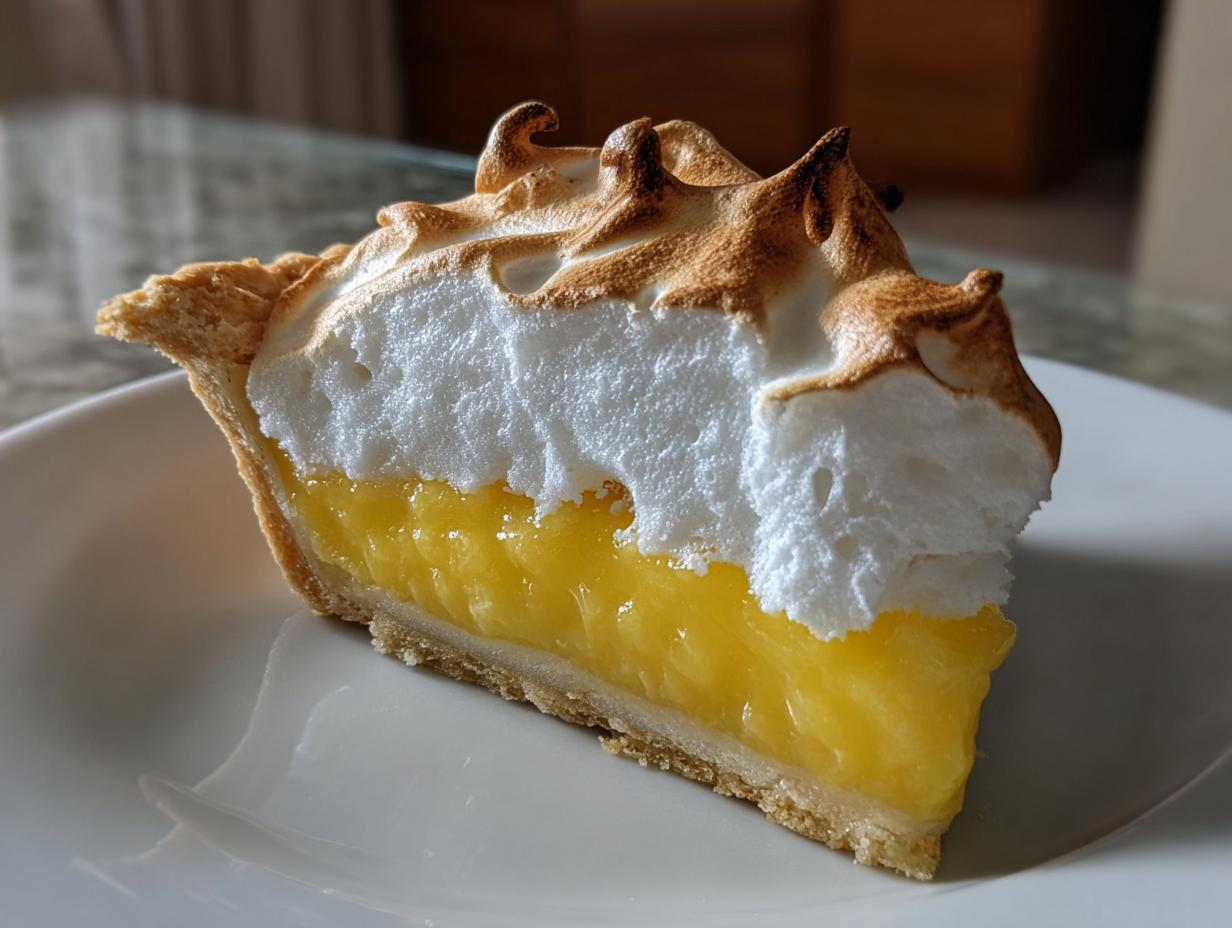
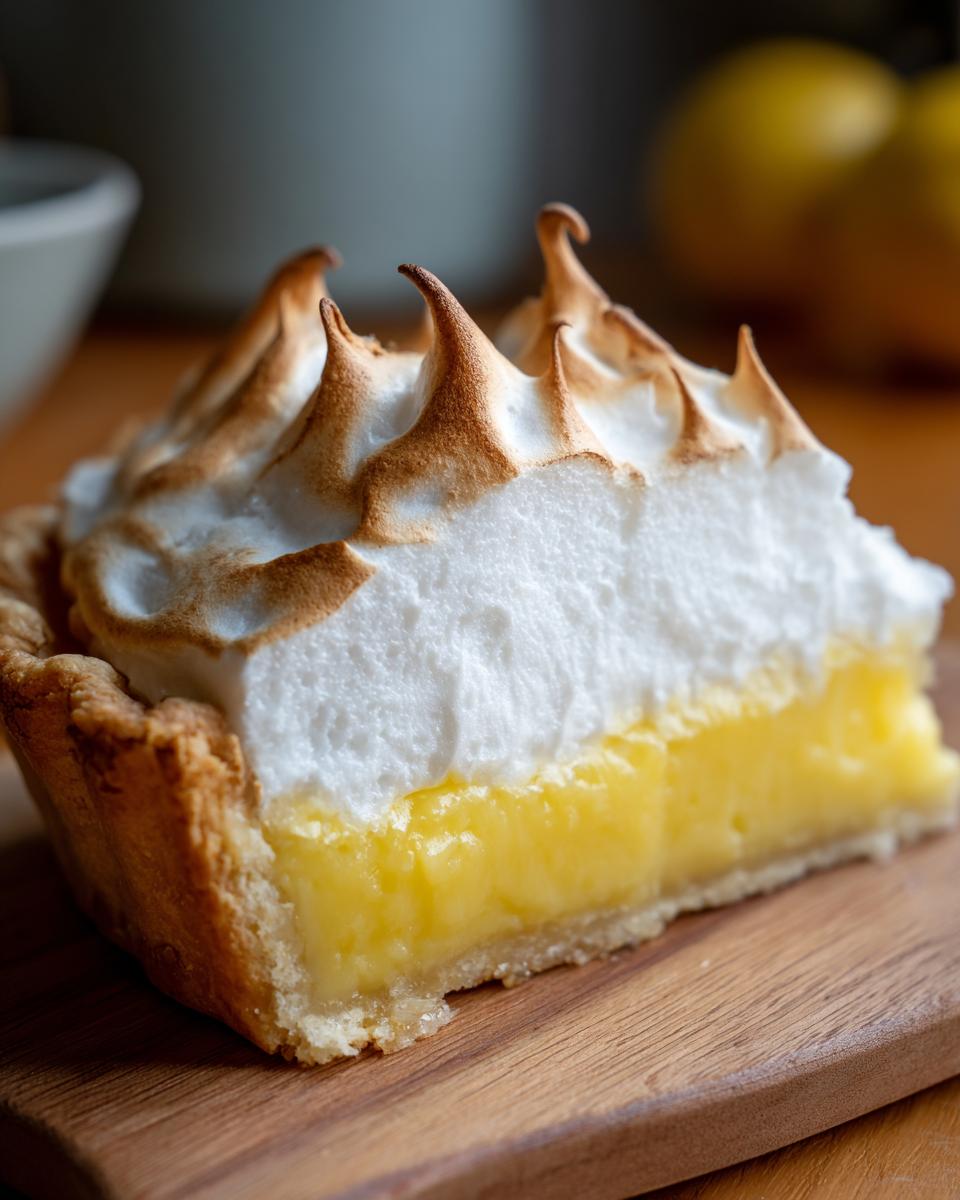
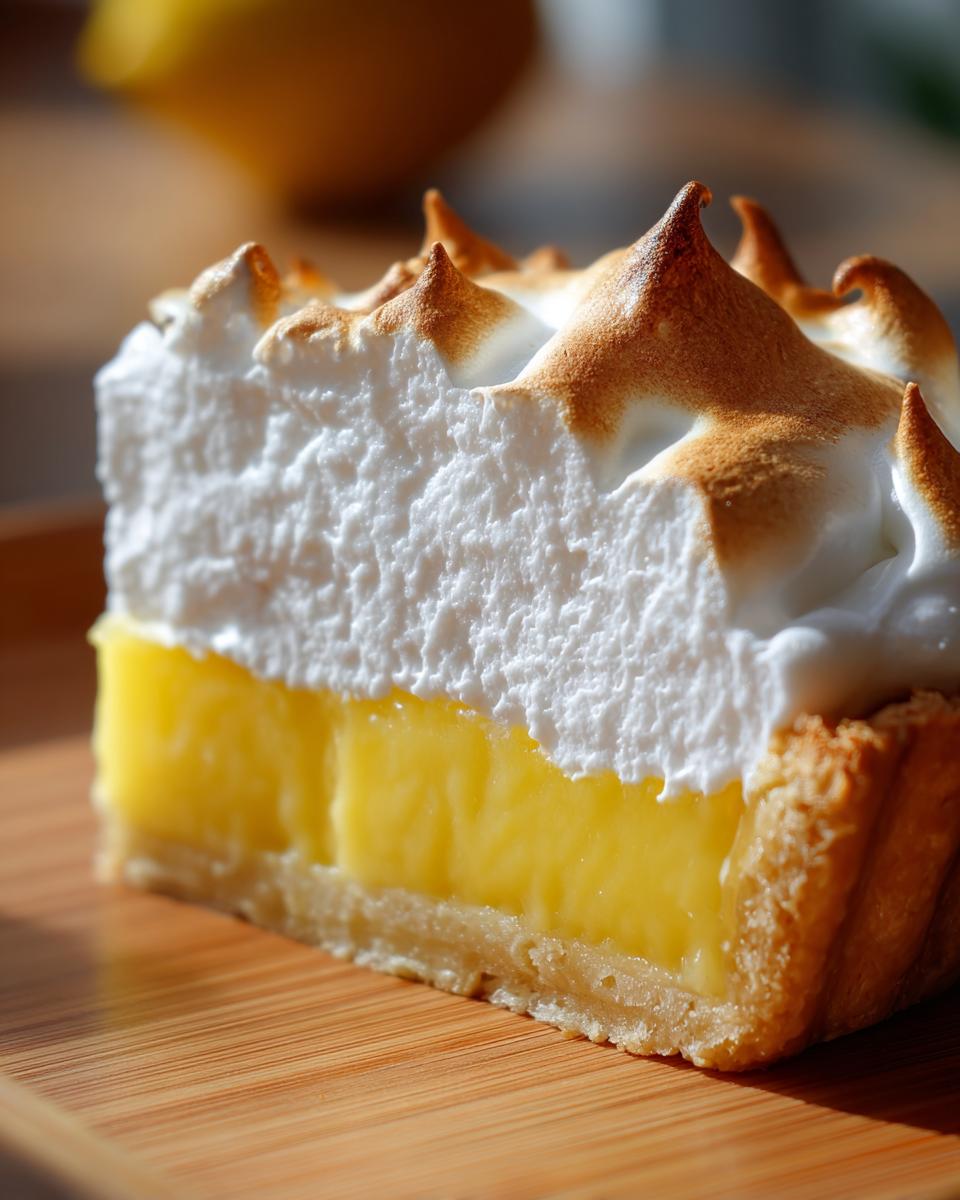
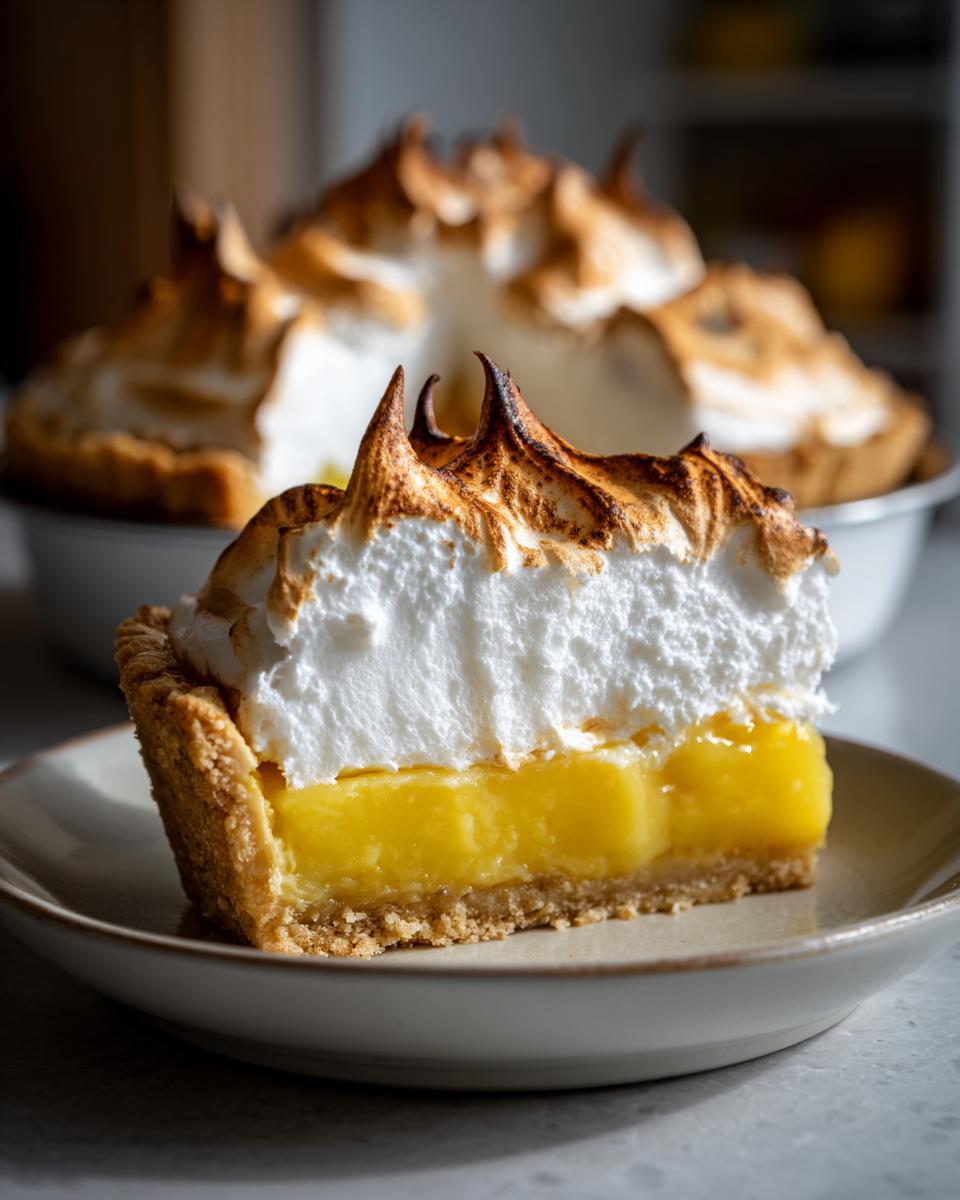
Oh my goodness, are you ready for a showstopper? Seriously, nothing makes people stop in their tracks like a slice of perfect lemon meringue. That towering cloud of toasted foam over that sunny, bright yellow filling? It’s pure drama on a plate! I know everyone chases the perfect lemon meringue pie, and I’m here to tell you why this recipe works every single time. This isn’t some flimsy imitation; this is the best classic homemade lemon pie from scratch you will ever make, and the filling actually *stays* put. Because Aria Thompson isn’t a professional pastry chef—she’s just a very passionate home cook—she focuses on foolproof structure. That means no runny messes, just that perfect, tart slice you dream about!
- Why This Classic Lemon Meringue Recipe Works (The Secret to Success)
- Gathering Ingredients for Your Homemade Lemon Pie From Scratch
- Step-by-Step Instructions for the Lemon Curd Recipe Filling
- How to Make Perfect Meringue Topping for Lemon Meringue
- Final Bake and Cooling for the Ultimate Lemon Meringue
- Serving Suggestions for This Zesty Lemon Dessert
- Storage & Reheating Instructions for Leftover Lemon Meringue Pie
- Frequently Asked Questions About Making Lemon Meringue
- Estimated Nutritional Information for Lemon Meringue
- Share Your Showstopper Dessert Experience
Why This Classic Lemon Meringue Recipe Works (The Secret to Success)
You might look at this recipe and think, ‘Oh great, another one that’s going to weep all over my counter.’ But hang on! This recipe is different because Aria tested it dozens of times until those goofy problems disappeared. When you make your best lemon meringue pie from scratch, you need a solid foundation, and that’s what we built here. It skips the tricky box mixes and gives you absolute control.
- We use cornstarch as the primary thickener—it gives that beautiful, jiggly set that never collapses.
- The ratios are locked down—you get the brightness without needing tons of sugar to mask tartness.
- Every step is designed to produce a stable filling before the meringue even touches it.
Achieving the Perfect Tart and Sweet Pie Balance
This is where the magic happens! The secret to a phenomenal tart and sweet pie isn’t just dumping in tons of lemon; it’s balancing that heavy hit of fresh acid with the sugar needed to carry the flavor. We use both the juice and the zest because the zest holds all those fragrant oils. It should make your eyes squint just a little when you taste the filling warm—that’s how you know it’s zesty enough!
Tips for a Buttery Pie Crust Tutorial Foundation
Look, you can have the best filling and meringue in the world, but if your crust is soggy, the whole thing falls apart. That’s why we insist on a fully pre-baked shell. Remember, you’re putting hot filling into a cool crust, so you need that crust to be done, flaky, and completely cool before that lemon custard touches it! If you need a refresher on getting that golden, flaky base, check out my notes on the buttery pie crust tutorial; keep it blind-baked until it looks like light gold!
Gathering Ingredients for Your Homemade Lemon Pie From Scratch
Okay, let’s talk about what we need to pull off this amazing homemade lemon pie from scratch. Since we are avoiding any funny powders or mixes, everything here is real food and it makes all the difference. I’ve broken the ingredients down into three parts: the crust (which you should have ready to go and totally cool!), the lemon filling, and that glorious meringue topping. Don’t panic seeing egg whites and egg yolks separated—that’s intentional!
For the filling, you absolutely need that combination of sugar, cornstarch, water, and of course, lots of real lemon. And please, make sure you use the whole eggs for the yolks because they are essential for that creamy, thick texture. The meringue just needs the remaining egg whites, a little sugar, and the secret weapon, cream of tartar, which keeps those whites stable for us.
Ingredient Notes and Substitutions for Lemon Meringue
Here’s where I get picky, because I want you to succeed with your lemon meringue! First, please, please, please use fresh lemons. Bottled juice just doesn’t have the bright, zesty punch we need; it tastes flat after baking. That zest we use? It carries the real lemon perfume, so squeeze those babies! Also, that little bit of cream of tartar you see listed for the meringue? Don’t skip it! If you absolutely, positively cannot find it, a teaspoon of lemon juice will work in a pinch, but the cream of tartar is what keeps the egg whites from weeping later on. It’s like insurance for your fluff!
Step-by-Step Instructions for the Lemon Curd Recipe Filling
Now we get to make the heart of the pie—that vibrant, intense lemon curd recipe! Since your pie crust is already wonderfully cool and waiting patiently, we can focus entirely on the custard. First things first: grab a saucepan and whisk together your required sugar amount, the cornstarch, and salt until they’re totally combined. This dry mix prevents lumps later, trust me!
Next, slowly whisk in the cold water until it’s smooth as silk. Put this mixture over medium heat and stir constantly. You have to stir until it thickens up and starts to boil—and this is crucial—you need to let it boil for a whole minute after it thickens! That minute cooks out the raw starch flavor and stabilizes the filling for that perfect set.
Once you pull that off the heat, quickly whisk your 4 egg yolks in a separate bowl. This next part is where people panic, but don’t! We have to temper them. Pour just a little bit of that hot sugar mixture into the yolks while whisking like crazy. This slowly brings the temperature up so the yolks don’t scramble when they hit the main pot. Once you’ve added a ladle full, pour that tempered yolk mixture right back into the saucepan.
Return the whole thing to low heat, stirring slowly until it thickens again. You don’t want a rolling boil here, just nice gentle bubbles showing up. Pull it off the heat for the final time and stir in your lemon juice, zest, and that lovely butter until everything melts into a glistening, gorgeous, zesty pool. That’s it for the filling stage!

How to Make Perfect Meringue Topping for Lemon Meringue
Alright, deep breaths! This is often the scariest part, but I promise, if you treat this step with respect, you’ll have the most gorgeous, cloud-like topping. We’re aiming for that beautiful how to make perfect meringue look, and it all starts with the eggs. You absolutely must use room temperature egg whites for maximum volume. Cold whites just won’t whip up into the structure we need for this lemon meringue!
Take those 6 egg whites and plop them into a mixing bowl that you’ve cleaned obsessively—I mean *zero* grease or yolk allowed! Start beating them until you get soft peaks. They will look foamy and hold a little shape, but then flop over. This is when you start adding the second measure of sugar. Do it slowly, like you’re sprinkling glitter—a little bit at a time while the mixer is running. Keep going until you hit stiff, glossy peaks. When you lift the whisk attachment, the peaks should stand straight up without falling over, and they should look shiny, not dull.
One of my favorite little tricks? Before you even start whipping, add that half teaspoon of cream of tartar. It acts like a tiny stabilizer for the protein, helping those peaks set up beautifully and stay exactly where you put them for the final bake.
No Weep Lemon Meringue Tips: Sealing the Pie
We are now going to tackle the dreaded meringue weep! Weeping is when tiny beads of clear liquid form between the filling and the meringue, and shrinking happens when the meringue pulls away from the crust creating gaps. To stop both of these things from happening, we need to seal the deal!
This is super important: the lemon filling must still be hot when the meringue goes on. Not scalding, but definitely warm enough that it’s steaming a little. That heat creates steam that interacts with the meringue as it bakes, setting the structure against the filling and preventing gaps. So, as soon as your filling is done, go straight to the meringue.
Next, place that fluffy topping over the hot filling. When you spread it, you need to be dramatic! Make sure the very edge of the meringue actually touches the crust all the way around the perimeter. If there is a gap, the meringue will shrink away toward the center as it bakes. Use the back of a spoon or a spatula to make those gorgeous decorative swirls—those high points are what get toasted to that perfect golden brown. That’s all there is to those no weep lemon meringue tips!
Final Bake and Cooling for the Ultimate Lemon Meringue
Okay, we sealed the deal by touching the meringue all the way to the crust edge, so now we bake it! We want that gorgeous golden brown on the peaks, but we don’t want to cook the filling underneath any further. Set your oven for 350°F (175°C). You only need about 12 to 15 minutes on the upper-middle rack. Watch it closely! You’ll know it’s done when those snowy peaks turn into soft, toasted gold. If you notice the very bottom of the crust is browning too fast, maybe just slide a sheet pan underneath it for the last few minutes.
Now comes the hardest part, honestly, because the temptation is huge: you HAVE to let your lemon meringue pie cool down slowly. My instructions say to cool it completely on a wire rack at room temperature for a solid four hours. Why the wait? If you rush this beautiful thing into the fridge while it’s still warm or hot, the temperature shock makes the moisture condense inside the pie. That condensation is what causes the weeping! It’s science, but it’s frustrating science!
If you followed the hot-filling-over-cool-crust rule, and you sealed that meringue edge perimeter, and you let it cool down slowly, you’ve done everything right to get the best lemon meringue pie. Patience pays off here, and by the time those four hours are up, your filling will be perfectly set, and you can cover it loosely and move it to the fridge if you need to chill it longer before serving. Don’t forget to check out the original recipe link for extra pointers if you want to see how others bake this beauty! This recipe always gets rave reviews!
Serving Suggestions for This Zesty Lemon Dessert
Now that you’ve created this magnificent slice of sunshine, how should you serve it? Honestly, this whole lemon meringue pie stands up perfectly on its own because it’s already that perfect balance of tart and sweet. But if you want to elevate it just a smidge, keep the sides simple!
I love serving a slice slightly cool—not ice-cold, remember—with a tiny dollop of unsweetened whipped cream right next to the meringue mound. The extra coolness of the cream is a nice contrast. For beverages, skip the heavy drinks; go for a crisp iced tea or maybe even a sparkling water with a thin cucumber slice floating in it. It just lets that bright citrus flavor really shine through! Enjoy every gorgeous, stable bite!
Storage & Reheating Instructions for Leftover Lemon Meringue Pie
We all know that slicing this lemon meringue pie is hard, but saving leftovers? That can feel even trickier! Because we spent so much time focusing on that beautiful meringue staying put, we have to be a little careful with storage.
Here’s the deal: You want to get this pie into the refrigerator, but you can’t rush it! Remember how we stressed that slow cooling on the counter for four hours? Keep that mentality! Once the pie is completely cooled to room temperature, cover it loosely with plastic wrap. I mean loose—don’t let the wrap stick to the meringue peaks, or you’ll peel the top right off when you uncover it!
Pop it into the fridge. Because of the high moisture content needed for that luscious filling, your lemon meringue pie really only lasts about two to three days maximum before the crust starts getting soggy. That beautiful filling tends to firm up quite a bit in the cold, so here’s a tip: If you can, take your slice out about 30 minutes before you plan to eat it. Letting it sit on the counter just a little allows that filling to soften up, making it creamy again, and takes the chill off so you can appreciate that amazing tart flavor.
Now, reheating? Nope. Just don’t. Trying to microwave this just melts the meringue into a sad lemon soup, and it definitely causes massive weeping. We worked too hard for the best lemon meringue to ruin it with heat! Just enjoy it cool or slightly tempered, and try to eat it all before day three rolls around!
Frequently Asked Questions About Making Lemon Meringue
I know when you tackle something this beautiful, you’re probably going to have a few stray thoughts pop up halfway through. Don’t worry, this is completely normal! I get the same questions every single time I make this lemon meringue, so here are the most common things folks ask when they aren’t sure if they followed my super-secret methods perfectly. And hey, if you need to check out our policies on data use while you’re here, our Privacy Policy is available!
Can I use this recipe for mini lemon meringue tarts?
Oh, I absolutely love the idea of mini lemon meringue tarts! They are so cute for parties. If you want to make them, you can definitely use this recipe! The main thing you have to adjust is your timing, because those little tart shells bake much faster than a full 9-inch pie. You’ll still pre-bake the shells, but the filling will set up quicker when you cook it on the stovetop, and a short burst under the broiler (instead of a full 15-minute bake) is usually enough to kiss the meringue tips golden!
What makes this a classic lemon pie compared to others?
That’s a great question, especially because you see so many variations out there now, like those lemon meringue bars! What makes this one the classic lemon pie, the real deal, is that we use a cooked custard filling made entirely from scratch. We aren’t relying on instant pudding or gelatin! We use fresh lemon juice and zest, and the backbone of the filling relies on cornstarch being cooked properly. It’s that careful cooking of the cornstarch base with the egg yolks that gives you that thick, luxurious texture unique to a truly homemade lemon pie from scratch. No substitutes allowed!
Estimated Nutritional Information for Lemon Meringue
I always feel a little silly putting numbers next to something this joyful, but I know some of you are tracking things, so here is a general idea of what’s tucked into a slice of our beautiful lemon meringue pie. Remember, since we are making everything totally from scratch, including that buttery crust, these numbers can wiggle around a bit based on the exact brand of butter or sugar you use.
This information uses standard measurements based on dividing the entire pie into 8 generous slices. Consider this your starting point, not a doctor’s order! If you’re checking our terms of use while you’re waiting for the pie to set, you can find those details over at the Terms of Use page.
For one slice of this amazing dessert, you are looking at approximately:
- Calories: 380
- Sugar: 45g (Yes, that’s a bit high, but it’s vacation food!)
- Sodium: 150mg
- Total Fat: 18g (Hello, butter!)
- Carbohydrates: 52g
- Protein: 6g
Share Your Showstopper Dessert Experience
And there you have it! You’ve conquered the lemon meringue pie, and I’ll bet yours looks absolutely stunning. Seriously, I want to see it! Did those meringue peaks get perfectly golden? Did the filling stay firm and creamy? I get so much joy out of hearing about your successes!
Please, when you get a chance, come back and leave a rating for this recipe. Your feedback helps other home cooks feel brave enough to try making their own homemade lemon pie from scratch. And if you managed to get that perfect, non-weeping topping, tell us your secret in the comments below! Pop over to the Contact page if you have any lingering questions, but mostly, I hope you enjoy slicing into that beautiful, zesty lemon dessert. Happy baking!
PrintClassic Homemade Lemon Meringue Pie

Make a showstopping dessert with this classic recipe for Lemon Meringue Pie. You get the perfect balance of tart lemon filling, a buttery crust, and a tall, fluffy meringue topping.
- Prep Time: 30 min
- Cook Time: 45 min
- Total Time: 75 min
- Yield: 8 servings 1x
- Category: Dessert
- Method: Baking
- Cuisine: American
- Diet: Vegetarian
Ingredients
- 1 recipe for Buttery Pie Crust (9-inch)
- 1 1/2 cups granulated sugar
- 1/4 cup cornstarch
- 1/4 teaspoon salt
- 1 1/2 cups cold water
- 4 large egg yolks, lightly beaten
- 1/2 cup fresh lemon juice
- 1 tablespoon lemon zest
- 2 tablespoons unsalted butter
- 6 large egg whites, at room temperature
- 1/2 teaspoon cream of tartar
- 1/2 cup granulated sugar (for meringue)
Instructions
- Prepare and partially bake your 9-inch pie crust according to your preferred recipe. Cool the crust completely.
- For the lemon filling, whisk together 1 1/2 cups sugar, cornstarch, and salt in a medium saucepan. Gradually whisk in the cold water until smooth.
- Cook the mixture over medium heat, stirring constantly, until it thickens and boils. Boil for one minute, then remove from heat.
- In a separate bowl, whisk the egg yolks lightly. Slowly temper the hot sugar mixture into the yolks, whisking constantly to prevent scrambling.
- Return the entire mixture to the saucepan. Cook over medium-low heat, stirring constantly, until the filling thickens again and just begins to bubble. Do not boil vigorously.
- Remove from heat. Stir in the lemon juice, lemon zest, and butter until the butter melts completely.
- Pour the hot lemon filling into the cooled, pre-baked pie crust.
- For the meringue, place the room temperature egg whites in a clean, grease-free mixing bowl. Beat on medium speed until soft peaks form.
- Add the cream of tartar and continue beating. Gradually add the 1/2 cup sugar, one tablespoon at a time, beating until stiff, glossy peaks form.
- Spread the meringue evenly over the hot lemon filling, making sure the meringue touches the crust edge all around to prevent shrinking. Create decorative swirls with the back of a spoon.
- Bake at 350°F (175°C) for 12 to 15 minutes, or until the meringue peaks are golden brown.
- Cool the pie completely on a wire rack at room temperature for at least 4 hours before slicing. Do not refrigerate immediately, as this can cause the meringue to weep.
Notes
- To prevent weeping meringue, make sure your mixing bowl for the egg whites is completely free of grease or yolk residue.
- For a stable filling, ensure you boil the cornstarch mixture for a full minute after it thickens.
- Bake the pie on the upper-middle rack for even browning of the meringue.
- To achieve a tall, fluffy meringue topping, use room temperature egg whites.
Nutrition
- Serving Size: 1 slice
- Calories: 380
- Sugar: 45g
- Sodium: 150mg
- Fat: 18g
- Saturated Fat: 5g
- Unsaturated Fat: 13g
- Trans Fat: 0g
- Carbohydrates: 52g
- Fiber: 1g
- Protein: 6g
- Cholesterol: 110mg