
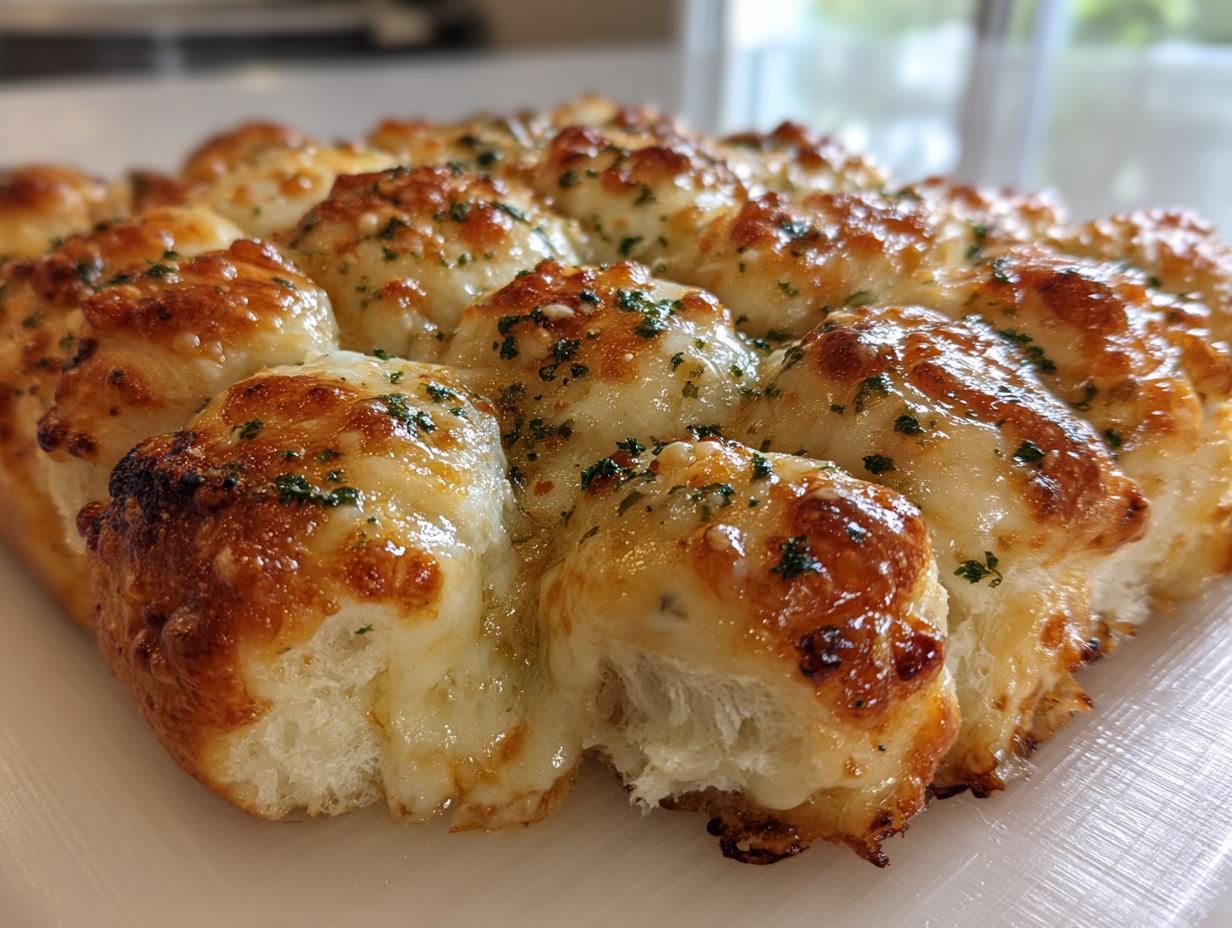
Okay, stop what you are doing. Seriously, pause that microwave popcorn and listen up! We all know Hawaiian sweet rolls are fluffy little pillows of joy, right? But what happens when you take that amazing sweetness and dunk it headfirst into rich, potent garlic butter? Magic happens, folks. That’s how we get this insane **hawaiian roll garlic bread**!
I promise you, this isn’t some fussy, complicated recipe designed to make you feel bad about dinner. This is the fastest, cheesiest, pull-apart version I have ever tested—and trust me, I have tested *many* versions for weeknight success. We’re turning a basic package of rolls into the ultimate crowd-pleaser, guaranteed to satisfy those sweet and savory cravings every single time. It’s the easiest upgrade your side dish game will ever see. You absolutely need to try this cheesy delight, which you can find the full guide for right here: ultimate garlic pull-apart bread.
- Why This Hawaiian Roll Garlic Bread is a Family Favorite Side Recipe (EEAT Focus)
- Ingredients for Your Cheesy Hawaiian Roll Garlic Bread
- How to Prepare the Ultimate Pull Apart Garlic Rolls
- Serving Suggestions for Your Sweet and Savory Bread
- Storage and Reheating Instructions for Leftover Garlic Butter Baked Rolls
- Frequently Asked Questions About Hawaiian Roll Garlic Bread
- Nutritional Estimate for One Serving of Hawaiian Roll Garlic Bread
- Share Your Easy Garlic Bread Recipe Experience
- Nutritional Estimate for One Serving of Hawaiian Roll Garlic Bread
- Share Your Easy Garlic Bread Recipe Experience
Why This Hawaiian Roll Garlic Bread is a Family Favorite Side Recipe (EEAT Focus)
The reason this recipe became legendary in my house is simple: it delivers huge flavor with almost zero actual effort. Forget waiting an hour for yeast dough to rise! This entire showstopper is on your table in under 30 minutes total. That speed is why it’s my go-to when I need a last-minute comfort food dinner side.
The texture contrast is what really seals the deal for me. You get that signature pillowy, slightly sweet interior from the rolls, but the top layer bakes into this incredible, savory, golden-brown crust loaded with melted cheese. It proves that the best flavors often come from unexpected sweet and savory combinations. It’s just pure, cheesy, buttery perfection.
Quick Party Bread Snack: Ready in Minutes
If you are scrambling for a last-minute appetizer idea, look no further. Prep time is genuinely only about 10 minutes—seriously, 10 minutes! We pop it in the oven, and another 17 minutes later, we have the most incredible **Quick Party Bread Snack** imaginable. Think about how fast that is compared to traditional bread! These turn into 15 Minute Dinner Rolls that taste like they took way more planning. Pair them with your favorite pasta dish or soup, and everyone will be asking for the recipe hack.
If you need another incredibly fast appetizer recipe, you have to check out my easy cheesy taco pinwheels next. They use similar speed principles!
Ingredients for Your Cheesy Hawaiian Roll Garlic Bread
Okay, measuring is important here, but honestly, this recipe is so forgiving! Even if you sprinkle a little extra parsley, nobody is going to send it back. The key is getting that rich garlic butter soaking into those sweet pockets. Here is exactly what you need to gather up before we start mixing everything together. You’ll be amazed at how simple the shopping list is for something that tastes this spectacular!
- 1 package (12 count) Hawaiian sweet rolls (Keep them connected in the tray—that’s our secret weapon!)
- 1/2 cup unsalted butter, melted (Don’t skip melting it first!)
- 4 cloves garlic, finely minced (Use four, but I always lean toward five if I’m feeling bold!)
- 2 tablespoons fresh parsley, chopped (For that pop of color and freshness)
- 1/2 teaspoon dried oregano
- 1/4 teaspoon salt (We’ll adjust this based on our butter choice)
- 1/4 teaspoon black pepper
- 1 cup shredded mozzarella cheese (For that epic cheese pull)
- 1/4 cup grated Parmesan cheese (This adds the necessary salty kick)
Once you have your bits ready, you can see the full, amazing recipe process over here: garlic parmesan chicken and potatoes.
Ingredient Notes and Substitutions for Your Buttery Roll Recipe
I always get questions about substitutions, so let me weigh in from my home kitchen experiences! First and foremost: the garlic. Please, please use fresh garlic if you can. That jarred stuff just doesn’t have the same punch once it bakes, and for this specific recipe, we need that bright, sharp flavor to cut through the sweetness of the rolls. Fresh tips are a non-negotiable for me.
Now, about the butter. I almost always use unsalted butter because I like to control the salt level myself, which is why I have that 1/4 teaspoon listed. If you only have salted butter on hand, that’s totally fine! Just skip adding the extra 1/4 teaspoon of salt, taste your melted butter mixture first, and see if it needs a tiny pinch. Don’t over-salt the mixture.
If you run out of Parmesan cheese—oops!—you can increase the mozzarella by about 1/4 cup. It won’t have that sharp, nutty finish that Parmesan gives, but it will still be wonderfully gooey and delicious. It’s not the perfect swap, but it works in a pinch!
How to Prepare the Ultimate Pull Apart Garlic Rolls
Folks, getting these gooey rolls ready is almost as fun as eating them. The beauty here is that we are working with the rolls already connected, which means structure is built right in. First things first: get your oven warmed up to 350°F (175°C). We need that steady heat welcoming our buttery, garlicky creation!
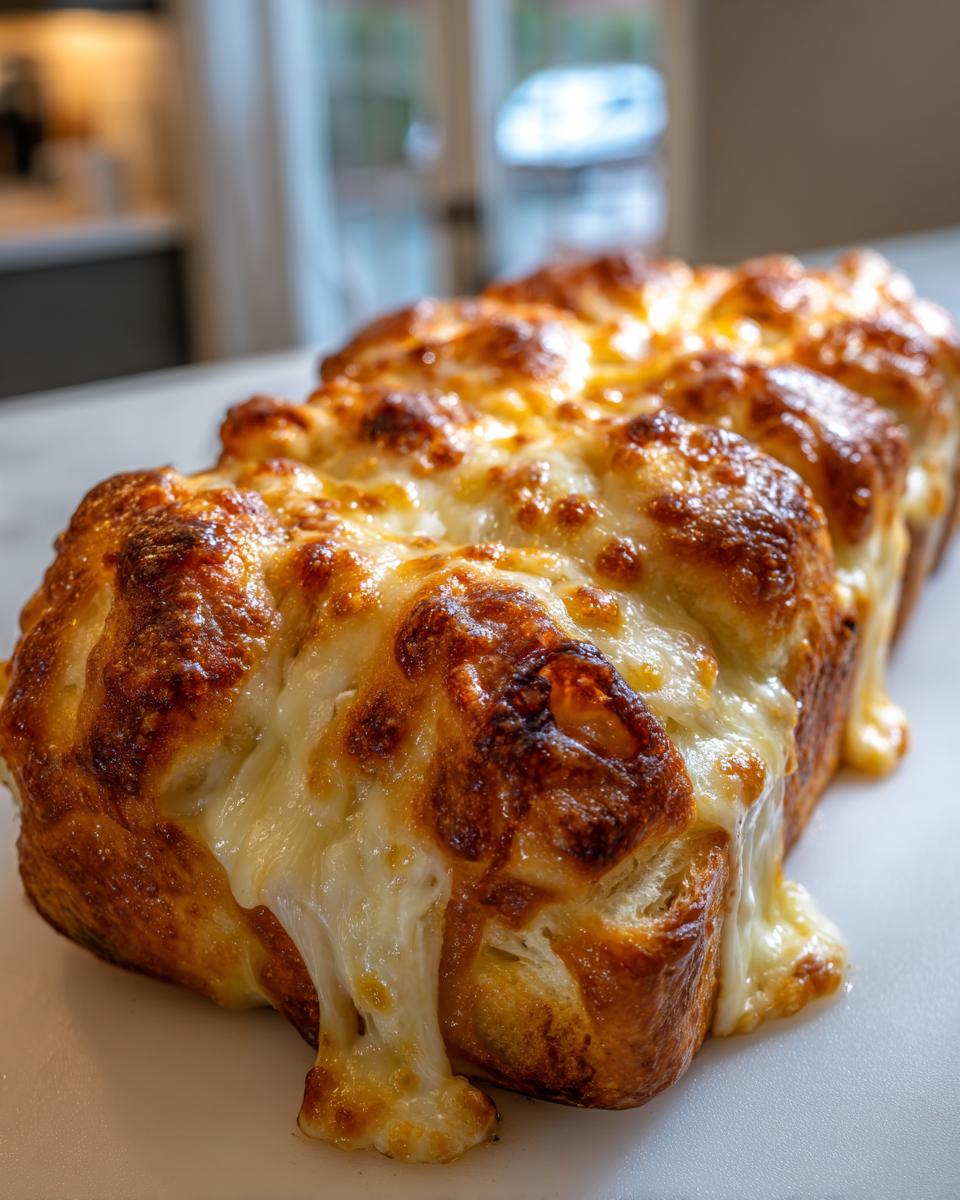
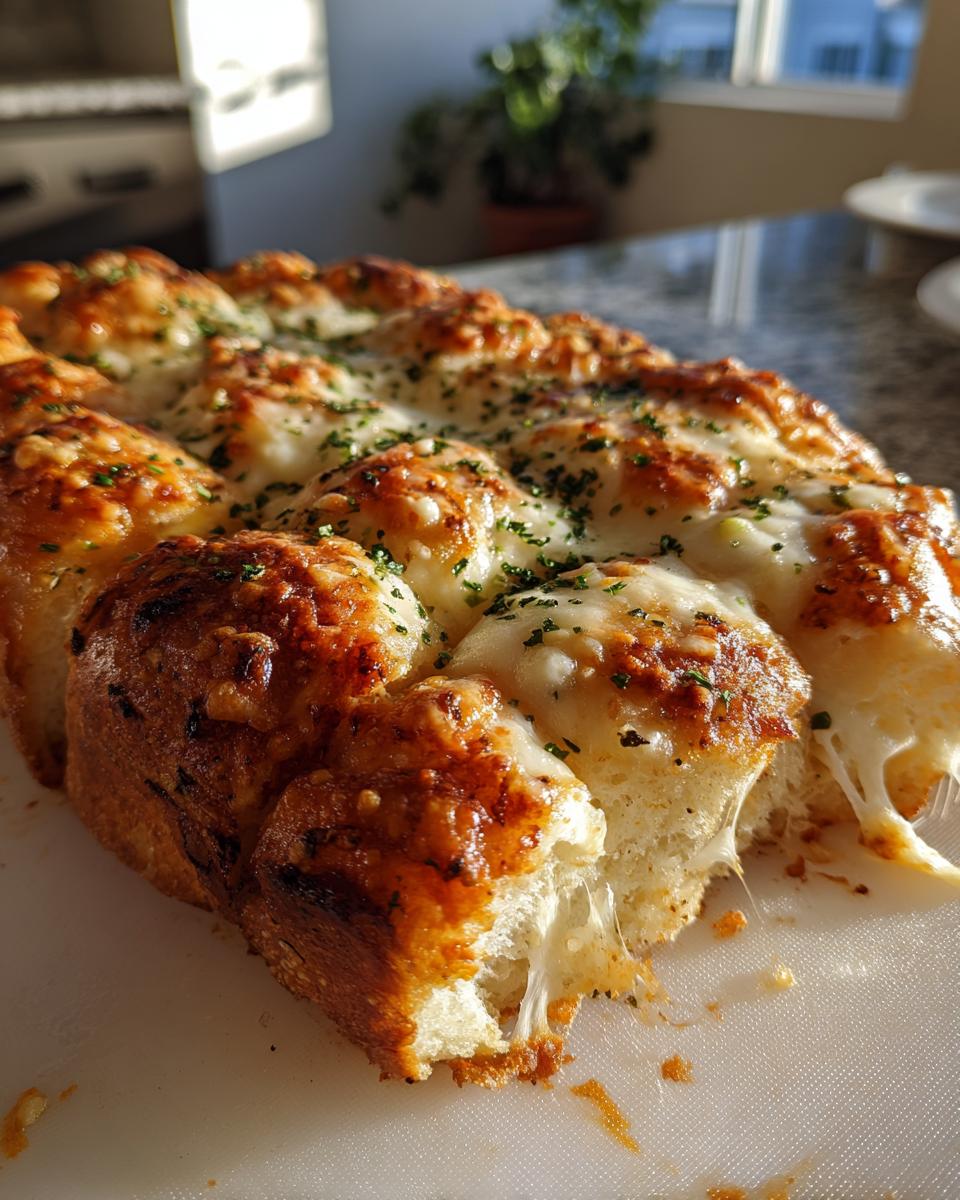
Now, let’s mix up our flavor bomb! Combine that melted butter, minced garlic, parsley, oregano, salt, and pepper in a bowl. Mix it until it really smells like summer Italian dinner. Next, and this is important: take your sharp knife and slice the entire block of rolls horizontally. You are cutting them in half, but *stop* before you slice all the way through the bottom layer. We want them to stay connected. Think of it like a savory loaf you can pull apart later.
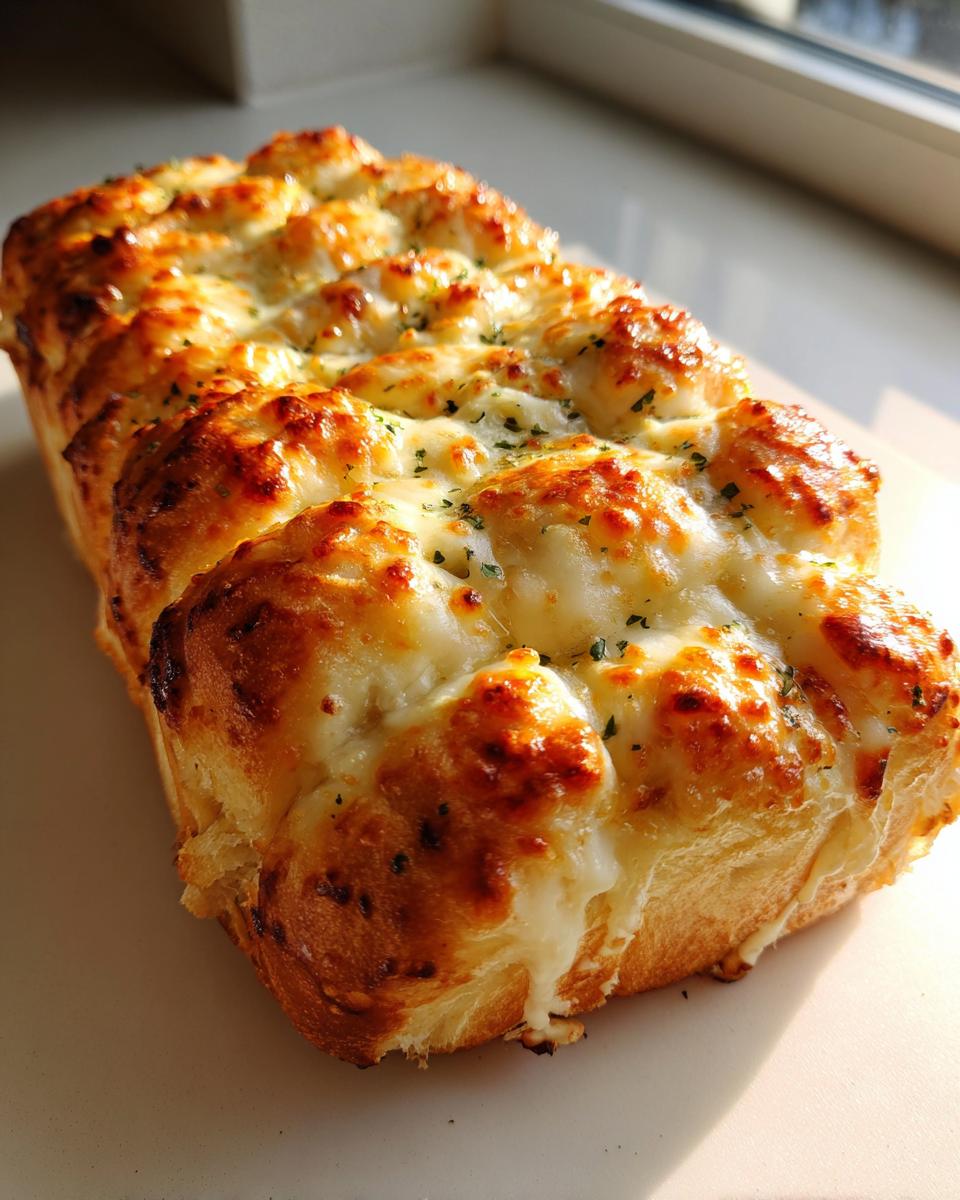
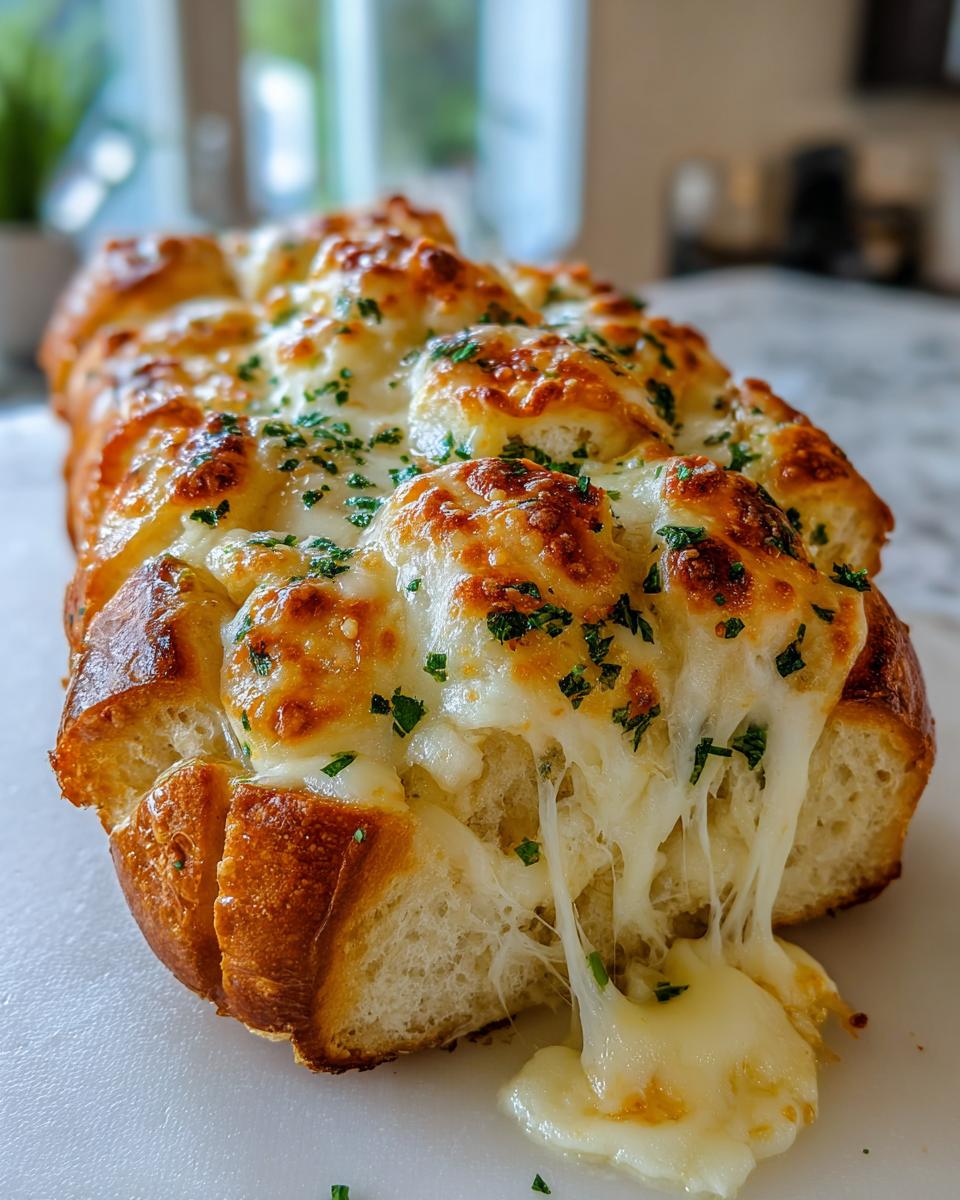
Brush half that garlic butter right over the cut tops. Go generously! Then, sprinkle on all your mozzarella and Parmesan cheese. See how cheesy this gets? Drizzle the rest of that gorgeous butter right over the cheese—it melts down into all those nooks. Cover the whole tray loosely with foil, and bake for 10 minutes. After those ten minutes, rip that foil off and let it bake uncovered for another 5 to 7 minutes. We want that cheese bubbly, golden, and irresistible! Let them cool just slightly before you start pulling them apart!
If you want to see another one of my favorite crispy sides that use Parmesan, check out how I make my crispy Parmesan garlic potato stacks!
Expert Tip: The Flavor Infusion Trick for Perfect Hawaiian Roll Garlic Bread
This is the move that takes these from ‘good’ to ‘viral sensation.’ I learned this from a friend who swore by it, and now I preach it to everyone! After you slice the rolls horizontally, grab a toothpick—yes, a simple wooden toothpick—and gently poke down into those cuts all over the loaf. You don’t need to stab deeply, just enough to create tiny little tunnels.
Why do we do this? Because when you pour that glorious garlic butter over the top, those little holes act like straws, pulling that melted power straight down into the soft center of every single roll. If you skip this, the butter mostly sits on top. By poking them, you ensure that every single bite of your **Hawaiian Roll Garlic Bread** is completely saturated with buttery, garlicky goodness right down to the bottom. Trust me on this one; you won’t skip this step again!
Serving Suggestions for Your Sweet and Savory Bread
Honestly, you don’t even need an excuse to serve this bread. It disappears whether it’s a Tuesday or Christmas Eve! Because these are sweet rolls baked savory, they pair perfectly with dishes that have a bit of tang or a creamy richness. They somehow manage to balance everything out on the table.
If you are serving a lighter meal, these make the best **Comfort Food Dinner Side**. They are wonderful dipped into a hearty minestrone or a creamy tomato soup—the sweetness of the roll is just divine against the acidity of the tomatoes. They soak up broth like little sponges!
They are also my first choice when I serve anything pasta-based. Italian dishes beg for garlic bread, and these are just *better* than the standard options. Try making a batch alongside my simple creamy chicken alfredo. The richness of the alfredo, undercut by the slight sweetness of the rolls? Unbelievable.
But listen, you don’t always need a full meal! These are the ultimate **Quick Appetizer Idea**. Set out the platter while you’re finishing dinner prep, and watch them vanish before you even sit down. I also love making a batch just to serve alongside a simple side salad when I don’t want to commit to making a casserole or main dish. Sometimes, good bread *is* the main event!
If you’re looking for a great soup pairing for this bread, you absolutely must check out my easy creamy zucchini soup recipe for dipping!
Storage and Reheating Instructions for Leftover Garlic Butter Baked Rolls
Now, I really hope you manage to have leftovers because hoarding these things is a crime! But life happens, and sometimes you need to save some of that cheesy, garlicky goodness for lunch the next day. Since these are made with sweet rolls, they can sometimes dry out quicker than traditional bread if stored improperly, so we need to be smart.
If you have any **Garlic Butter Baked Rolls** left, let them cool completely on the counter first. Once they are cool, pack them tightly into an airtight container. You can store them on the counter for maybe half a day if your kitchen isn’t too warm, but honestly, your best bet is the refrigerator, especially if it’s a humid day. They’ll keep nicely in the fridge for about three days this way.
Reheating is where we bring them back to life! Forget the microwave if you want that nice soft texture combined with a hint of crust—it just turns them spongy. The oven is your friend here. Wrap the portion you plan to eat in aluminum foil, keeping it bundled up tight. Heat it in a 300°F (150°C) oven for about 8 to 10 minutes. The foil traps the steam and rehydrates the bread while the heat warms everything through!
If you are in a massive rush and only need one or two rolls, the microwave works in a pinch, but you have to be quick about it. Zap them for about 15 to 20 seconds max. Any longer, and that sweet bread gets tough really fast. I generally stick to the oven method for the best texture restoration!
Frequently Asked Questions About Hawaiian Roll Garlic Bread
I get so many messages after people try this recipe for the first time, and most of them are about swapping ingredients or making it for different events! It’s great to see everyone getting creative with this base recipe. Here are some of the most common questions I hear about transforming these rolls into the ultimate side dish.
Can I use this method for a Cheesy Roll Appetizer without the cheese?
Absolutely, you can! Remember, this recipe shines because of the **sweet and savory bread** contrast, and that comes purely from the garlic butter soaking into the sweet roll itself. If you skip the mozzarella and Parmesan, you still end up with amazing **Garlic Butter Baked Rolls**!
The only major difference is the structure and the gooeyness, obviously! Since you won’t have the cheese acting as a slight barrier and insulator on top, you’ll want to shorten the second bake time. I’d go back to just 4 or 5 minutes uncovered, or until the rolls are just warmed through and slightly golden at the edges. Your **Flavor Infused Sweet Rolls** will be softer since there’s less weight on top, but they’ll still be fantastic for dipping!
I don’t have Hawaiian rolls. Can I use generic sweet dinner rolls?
That’s a fair question! While you certainly can substitute them, you’ll lose the signature element that makes this recipe so beloved—that unmistakable hint of sweetness that balances the garlic. Generic rolls are usually dryer and less soft inside. If you use them, you might want to up the butter slightly, maybe just a tablespoon more, to compensate for that dryer crumb. For the best result, though, stick to the genuine article for the ultimate **King’s Hawaiian Roll Hack**!
How do I make this recipe spicy? I love heat!
Oh, I love a little kick too! This is simple: just add some heat directly into your garlic butter mixture. My favorite way is adding just a tiny pinch (start small!) of red pepper flakes. If you want more depth, a small dash of cayenne pepper works wonders. You can even drizzle a little hot honey over the very top *after* it comes out of the oven. That sweet and spicy combo is truly addictive and makes these rolls instant party food!
Is this recipe good for meal prepping or making ahead of time?
For the best flavor, I really recommend assembling it right before you bake it, especially since this is such a **Quick Dinner Inspiration Rolls** solution. The longer the garlic butter sits on the rolls before they go into the oven, the soggier the exterior can get if the rolls start absorbing too much moisture without heat. If you absolutely must prep ahead, mix the garlic butter and keep it in the fridge, but don’t brush it on the rolls until 20 minutes before you intend to bake!
Can I make this in an air fryer?
You can definitely try it, especially if you just have a small batch! If you want to make a full 12-count batch, the air fryer might struggle with even cooking. For a smaller batch (maybe 4 or 6 rolls), toss them in an air fryer basket. Cook at 320°F for maybe 5 minutes covered, then 3 more minutes uncovered. It’s a great alternative if you’re making a small snack and don’t want to heat up the whole oven! If you’re looking for other quick recipes, check out my air fryer pizza bagels for another quick fix.
Nutritional Estimate for One Serving of Hawaiian Roll Garlic Bread
Because we are dealing with butter, cheese, and sweet rolls, this is definitely a treat, not an everyday staple! But hey, everything in moderation, right? Because ingredients can vary wildly depending on the exact brand of rolls or butter you use, please remember that these numbers are just an estimate based on the ingredient list provided.
- Serving Size: 1 roll
- Calories: 220
- Fat: 12g
- Saturated Fat: 7g
- Carbohydrates: 24g
- Sugar: 10g
- Protein: 6g
This is just calculated data based on standard averages, so please don’t use this as a strict guide, especially if you follow strict dietary plans. It’s just a helpful little snapshot for your awareness!
Share Your Easy Garlic Bread Recipe Experience
Seriously, I need to know what you think! This **Easy Garlic Bread Recipe** is such a game-changer for me, and I’m certain it’ll be a staple in your rotation too. Did you use the toothpick trick? Did you add extra spices? Did you serve it with chili or spaghetti?
Hop down into the comments below, leave a star rating, and tell me how it went! I love seeing pictures of how you’ve served these rolls up for your family gatherings or just as a quick little splurge. If you want more simple, show-stopping recipes like this one, make sure you check out my famous fudgy chocolate crinkle cookies!
Nutritional Estimate for One Serving of Hawaiian Roll Garlic Bread
Because we are dealing with butter, cheese, and sweet rolls, this is definitely a treat, not an everyday staple! But hey, everything in moderation, right? Because ingredients can vary wildly depending on the exact brand of rolls or butter you use, please remember that these numbers are just an estimate based on the ingredient list provided. It’s so important to me that you trust the food you are making, so treat these figures as a helpful starting point rather than a scientific guarantee!
- Serving Size: 1 roll
- Calories: 220
- Fat: 12g
- Saturated Fat: 7g
- Carbohydrates: 24g
- Sugar: 10g
- Protein: 6g
This is just calculated data based on standard averages, so please don’t use this as a strict guide, especially if you follow strict dietary plans. It’s just a helpful little snapshot for your awareness!
Share Your Easy Garlic Bread Recipe Experience
Seriously, I need to know what you think! This **Easy Garlic Bread Recipe** is such a game-changer for me, and I’m certain it’ll be a staple in your rotation too. Did you use the toothpick trick? Did you add extra spices? Did you serve it with chili or spaghetti?
Hop down into the comments below, leave a star rating, and tell me how it went! I love seeing pictures of how you’ve served these rolls up for your family gatherings or just as a quick little splurge. If you want more simple, show-stopping recipes like this one, make sure you check out my famous fudgy chocolate crinkle cookies!
PrintCheesy Pull-Apart Hawaiian Roll Garlic Bread

Make this easy, cheesy pull-apart garlic bread using Hawaiian sweet rolls. It transforms simple rolls into a buttery, savory, and slightly sweet side dish or appetizer in under 20 minutes.
- Prep Time: 10 min
- Cook Time: 17 min
- Total Time: 27 min
- Yield: 12 rolls 1x
- Category: Side Dish
- Method: Baking
- Cuisine: American
- Diet: Vegetarian
Ingredients
- 1 package (12 count) Hawaiian sweet rolls
- 1/2 cup unsalted butter, melted
- 4 cloves garlic, minced
- 2 tablespoons fresh parsley, chopped
- 1/2 teaspoon dried oregano
- 1/4 teaspoon salt
- 1/4 teaspoon black pepper
- 1 cup shredded mozzarella cheese
- 1/4 cup grated Parmesan cheese
Instructions
- Preheat your oven to 350°F (175°C). Keep the Hawaiian rolls connected in their original packaging or baking tray.
- In a small bowl, combine the melted butter, minced garlic, chopped parsley, oregano, salt, and pepper. Mix well to create the garlic butter.
- Using a sharp knife, cut the entire block of rolls horizontally, cutting through the middle of the rolls, but keep the bottom half intact in the tray. Do not cut all the way through the bottom layer.
- Pour or brush half of the garlic butter mixture evenly over the cut tops of the rolls.
- Sprinkle the mozzarella cheese and Parmesan cheese over the buttered tops.
- Pour or brush the remaining garlic butter mixture over the cheese layer.
- Cover the tray loosely with aluminum foil.
- Bake for 10 minutes.
- Remove the foil and bake for another 5 to 7 minutes, or until the cheese is melted and bubbly and the edges are lightly golden.
- Let it cool for a few minutes before pulling the rolls apart to serve.
Notes
- For maximum flavor infusion, use the poking trick: After cutting the rolls horizontally, use a toothpick to poke holes down into the cuts before adding the butter mixture.
- If you prefer a stronger garlic flavor, increase the minced garlic to 5 or 6 cloves.
- This recipe works well as a quick appetizer idea for parties or a comfort food dinner side.
Nutrition
- Serving Size: 1 roll
- Calories: 220
- Sugar: 10
- Sodium: 350
- Fat: 12
- Saturated Fat: 7
- Unsaturated Fat: 5
- Trans Fat: 0.5
- Carbohydrates: 24
- Fiber: 1
- Protein: 6
- Cholesterol: 25