
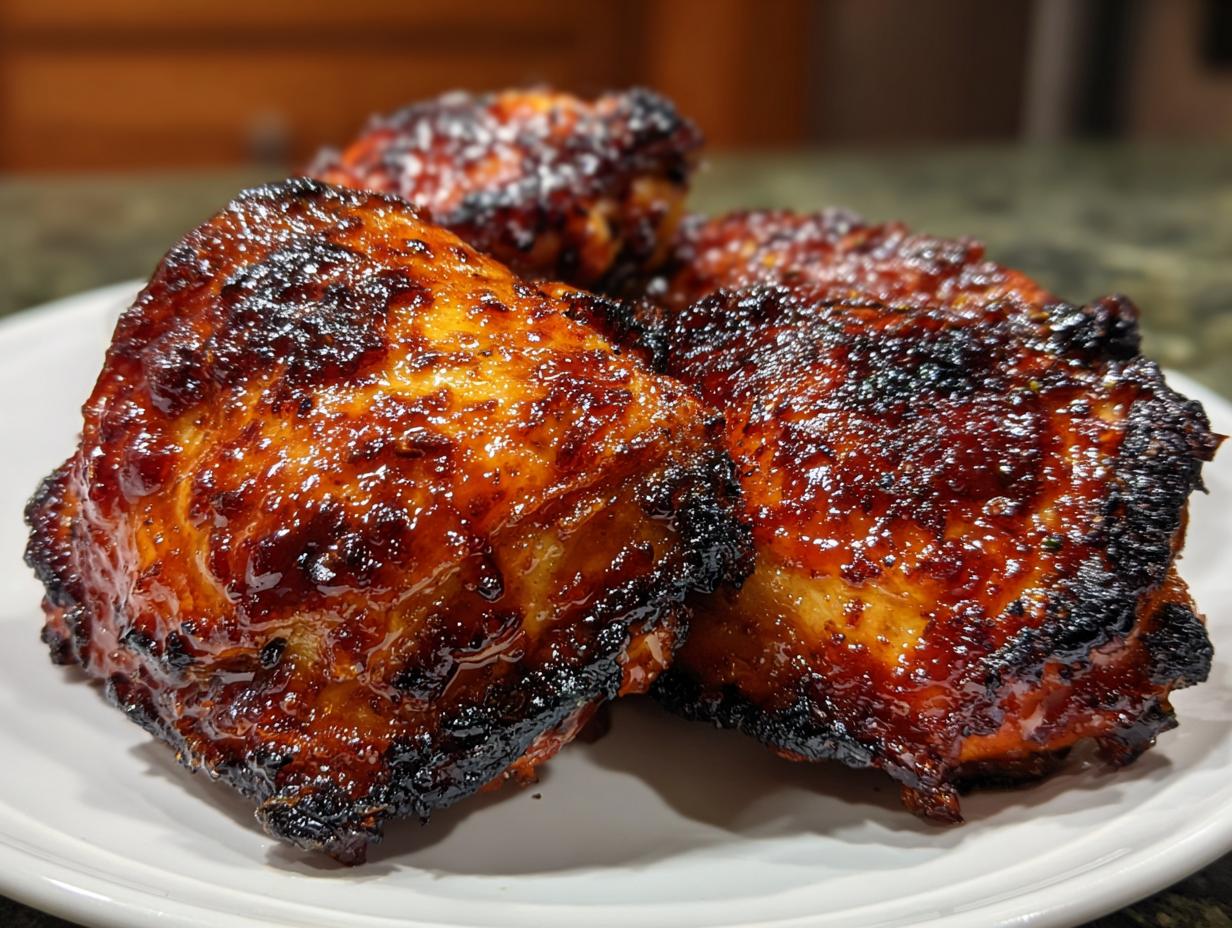
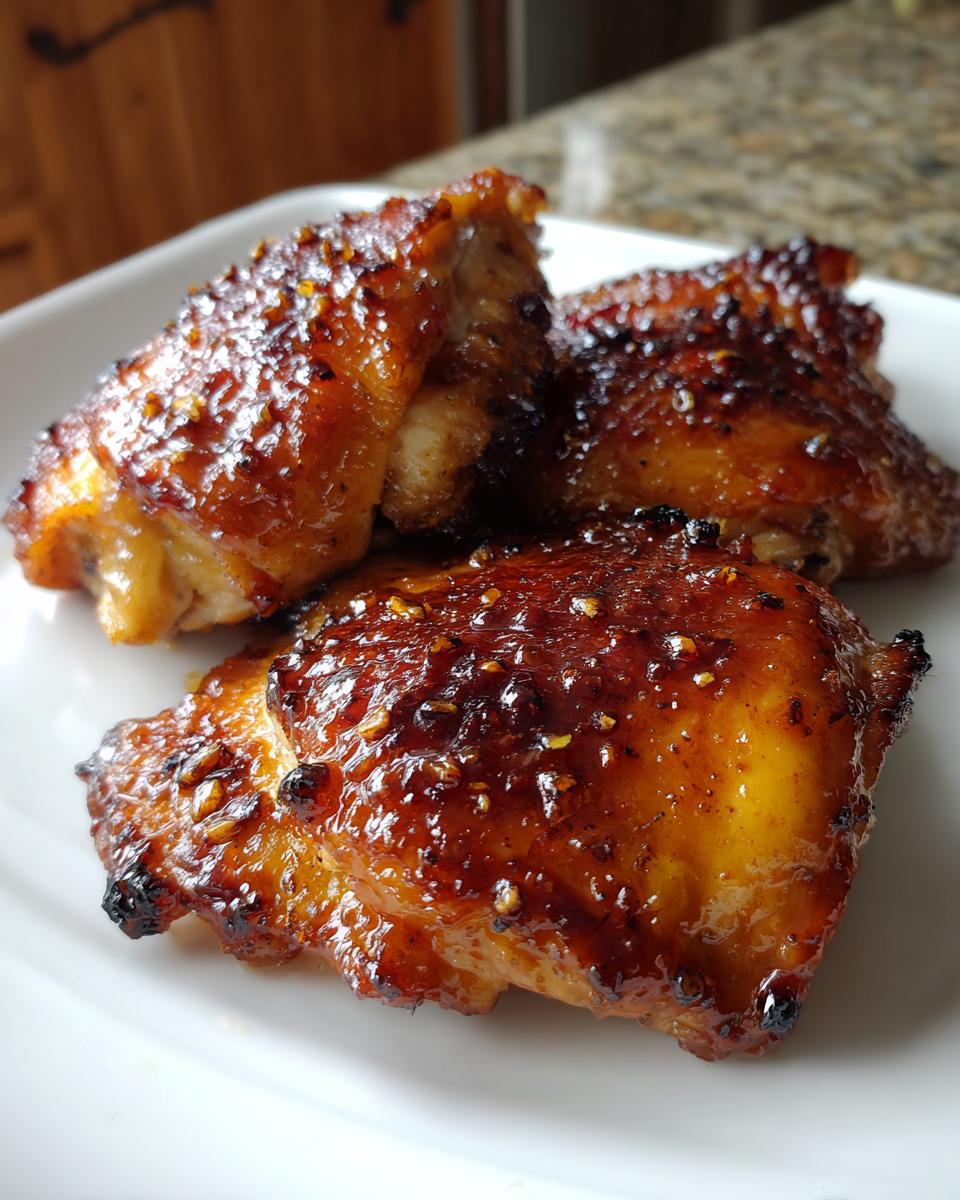
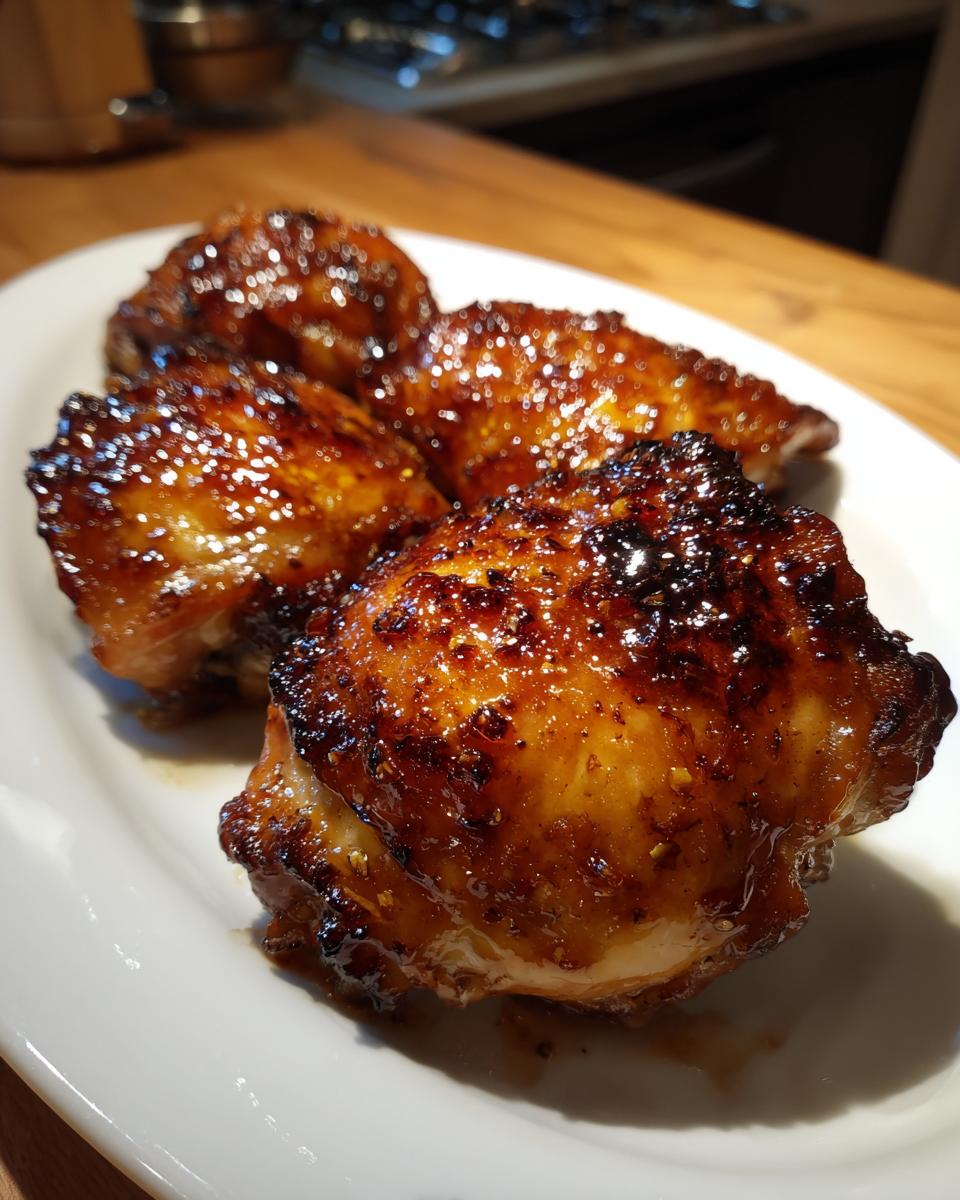
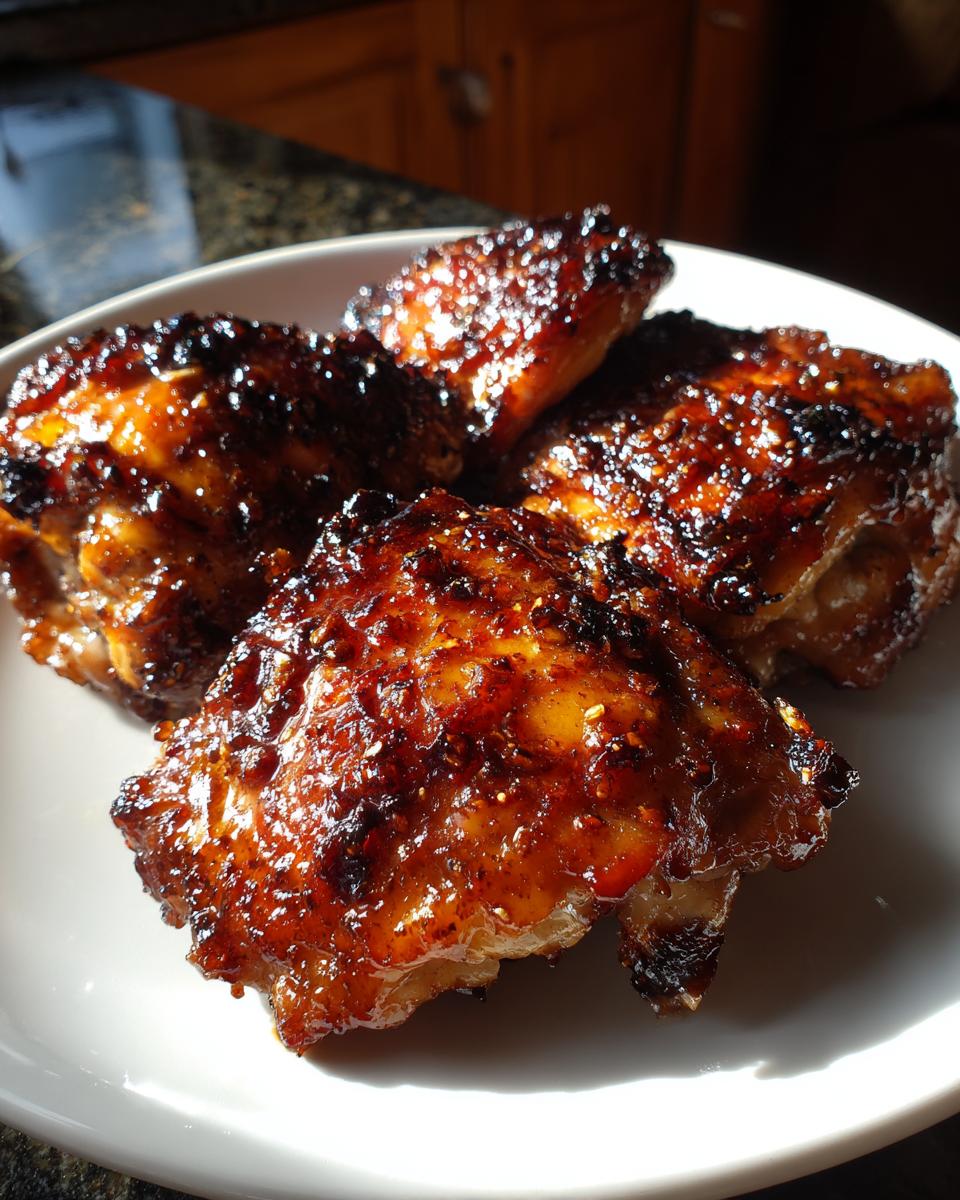
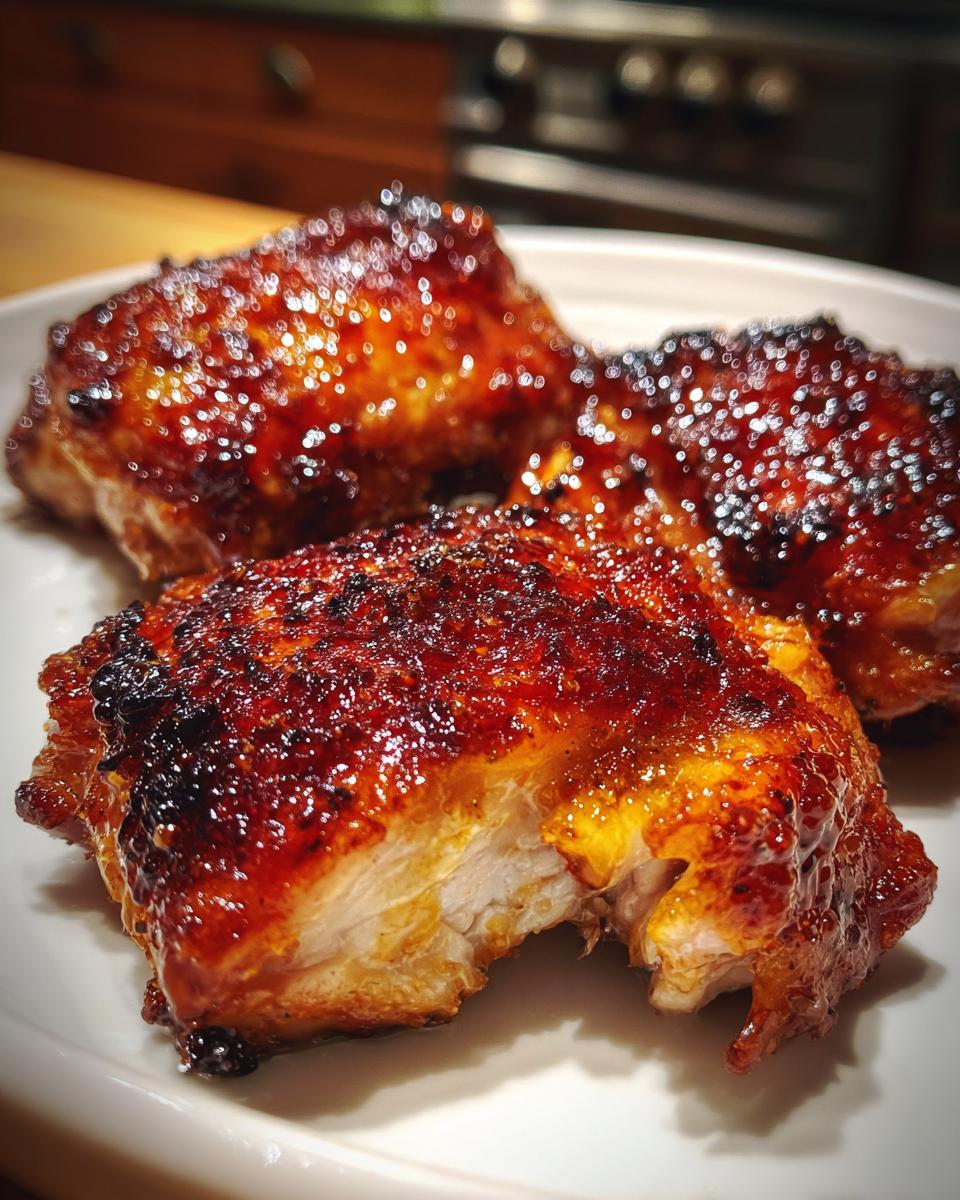
Oh, if I had a dollar for every time I stared into the fridge at 5:30 PM, completely defeated, wondering what quick chicken dinner idea I could whip up. It’s the eternal struggle, right? We want that fantastic flavor you see online, but we need it done before the evening melts away. Well, friends, I’m Aria, and I promise you, I’ve solved the weeknight dilemma with these Crispy Baked Honey Garlic Chicken Thighs. This is my absolute favorite easy chicken thighs recipe because it nails the texture trifecta: shatteringly crispy skin, impossibly juicy meat, and a sticky glaze that makes everyone ask for seconds. Trust me; this recipe is pure home-cook magic born from necessity, not from a fancy culinary school! For more inspiration on making quick meals seamless, check out my guide to simple weeknight dinners.
- Why Crispy Baked Honey Garlic Chicken Thighs Are Your New Weeknight Chicken Dinner Staple
- Ingredients for the Best Baked Honey Garlic Chicken Thighs
- How to Prepare Crispy Skin Chicken Thighs Perfectly
- Tips for Success with Your Honey Garlic Chicken Thighs Recipe
- Serving Suggestions for this Savory Chicken Dinner
- Storing and Reheating Your Flavorful Chicken Thighs
- Frequently Asked Questions About Cooking Chicken Thighs
- Understanding the Nutrition in These Chicken Thighs
- Share Your Honey Garlic Chicken Thighs Success
Why Crispy Baked Honey Garlic Chicken Thighs Are Your New Weeknight Chicken Dinner Staple
I know what you’re thinking—honey and garlic sound fancy, but this recipe is the definition of quick, dependable weeknight charm. We’re talking about turning basic chicken thighs into glorious oven baked comfort food chicken without needing to hover over the stovetop. This method has earned its spot in my personal kitchen rotation because it simply works, delivering on every single promise.
- It’s fast! Prep is under 10 minutes, and most of the cooking happens while you set the table.
- The flavor combination is universally loved—sweet, savory, and deeply savory.
- It gives you juicy chicken thighs guaranteed without any messy frying.
Achieving Guaranteed Juicy Chicken Thighs
Look, I know chicken thighs have a reputation for being forgiving, but we want *excellent*, not just *fine*. That’s why I insist on using bone-in, skin-on cuts here. The bone acts like a little internal heat conductor, helping the meat cook evenly, and the fat renders perfectly around it, bathing the meat in moisture. My one rule for maintaining that juicy interior? Never, ever cook past 165°F internally. It’ll keep cooking slightly after it comes out, so pull them right on time!
The Magic of Crispy Skin Chicken Thighs
This is where we separate the okay chicken from the showstopper! The secret weapon here—and this is key for building trust in your cooking—is the equipment setup. You absolutely need to pat your chicken thighs bone-dry with paper towels first. Seriously, dry skin equals crispy skin. Then, we use a wire rack set over foil. That rack lifts the skin out of contact with the pan drippings, letting the hot air circulate all around. It sounds simple, but it creates that perfect crackle that makes this an easy chicken thighs recipe worth raving about.
If you want to see another incredible sweet and sticky bake, check out my easy homemade teriyaki sauce recipe!
Ingredients for the Best Baked Honey Garlic Chicken Thighs
When dealing with something as perfect as baked chicken, precision matters, especially when you want that sticky glaze to adhere just right. I always lay everything out before I start—it’s what keeps me calm when dinner needs to happen fast! You need a good base for the seasoning and then the components that make up that famous sweet and savory sauce. This recipe truly sings because we use the right cuts and we prep the aromatics correctly for our chicken thighs.
For the main event, you’ll want six bone-in, skin-on chicken thighs. Seriously, stick to bone-in if you want that amazing texture! You’ll need one tablespoon of good olive oil to get the spices to stick. Then, for seasoning, keep it simple but robust: one teaspoon of salt, half a teaspoon of pepper, half a teaspoon of garlic powder, and half a teaspoon of paprika. These dry spices create a beautiful base layer under the glaze.
Components for the Honey Garlic Chicken Thighs Oven Glaze
The glaze is the star here, and it’s what makes this recipe such a fantastic savory chicken dinner. You’re going to mix a quarter-cup of honey—use the real stuff, it melts better!—with a quarter-cup of low-sodium soy sauce. I prefer low-sodium because it gives me control over the final saltiness, especially since these are chicken thighs we’re glazing.
Next up, add two tablespoons of apple cider vinegar. That little bit of acid cuts through the sweetness perfectly! And please, please, don’t skimp on the garlic. You need four cloves, and they must be minced finely. I’m talking tiny little bits so they dissolve into the sauce and don’t burn on the skin. If you have some fresh ginger (about one teaspoon grated), throw it in—it adds a wonderful depth that makes people guess your secret! If you’re looking for another recipe that uses this sweet and savory profile, you should check out my guide to roasted carrots with honey garlic butter.
How to Prepare Crispy Skin Chicken Thighs Perfectly
Alright, this is where the magic—and the science—happens. We’re turning out crispy skin chicken thighs that are juicy inside, and it all comes down to setup. Don’t rush this prep, because getting moisture off the skin is non-negotiable if you want that crackle you’re dreaming of. This process guarantees you get the best results from your chicken thighs every single time.
Prepping the Chicken and Setting Up for Crispy Skin
First thing’s first: crank that oven up to 400°F (200°C). While it’s warming, grab your baking sheet and line it with foil. Now, here’s the authority-building part: you *must* place a wire rack on top of that foil. This arrangement is crucial because it allows air to flow completely around the bottom of the chicken, preventing steaming. Next, grab your paper towels. I mean it, pat those chicken thighs until they literally squeak! Excess moisture turns into steam, steam melts fat, and melted fat means soggy skin. We need them bone-dry before we even think about touching the oil or spices.
Baking and Glazing the Honey Garlic Chicken Thighs
Once they’re dry and seasoned, nestle them skin-side up on that rack. They go into the oven for about 25 minutes just to start rendering that fat. Then, pull them out carefully—the pan will be hot! Brush about half of that gorgeous honey garlic sauce over the tops. Now, back they go for another 10 to 15 minutes. You’re looking for that internal temperature to hit 165°F (74°C); use a quick-read thermometer if you have one! Once they hit temp, pull those beautiful chicken thighs out. Brush on the remaining sauce right away so that beautiful heat helps it stick and caramelize. Don’t serve them immediately, though! Like any good meat, they need to rest for about five minutes so all those juices redistribute throughout the meat.
If you are looking for a deeper dive into the fundamentals of cooking poultry perfectly, check out my guide on how to cook chicken thighs perfectly!
Tips for Success with Your Honey Garlic Chicken Thighs Recipe
You’ve mastered the main bake, but as any seasoned home cook knows, sometimes we need a little tweak when things aren’t totally perfect right out of the oven. I developed these tips over years of making this easy chicken thighs recipe over and over again for my family. These little adjustments are how we go from good to truly memorable, especially when juggling busy schedules.
Don’t forget that sticking to the right temperature and using quality ingredients are what separates a simple weeknight meal from something you truly brag about. These tips focus on ensuring your chicken thighs deliver maximum flavor and texture every single time you make them!
Troubleshooting Soggy Skin on Chicken Thighs
Okay, let’s talk reality: sometimes that skin still comes out a little… floppy. It happens to everyone! If your chicken is fully cooked (165°F) but the skin isn’t giving you that satisfying crackle, don’t panic. I use the broiler trick, which needs your full attention, so stand right by the oven door. Turn the broiler on high, move your pan to the very top rack, and watch it like a hawk—and I mean hawk! It only takes 60 to 120 seconds for that skin to crisp up beautifully. If you walk away for two seconds, you’ll end up with charcoal, so proceed with caution!
Adapting for Boneless Skinless Chicken Thighs Recipes
I totally get it; sometimes you just don’t have the bone-in cuts on hand, or maybe you’re focused on speed and want a specific variation in your lineup of boneless skinless chicken thighs recipes. If you switch to boneless, skinless thighs, you can skip the wire rack, but you still need to pat them super dry. The biggest change is time—you’ll need to reduce the total baking time significantly. Since they are thinner, they cook faster. I usually shave off about 10 minutes total, checking their internal temperature right around the 30-minute mark to make sure they stay juicy and don’t dry out!
For more glaze ideas that work just as well on bone-in or boneless cuts, take a peek at my notes on easy homemade teriyaki sauce.
Serving Suggestions for this Savory Chicken Dinner
The honey garlic glaze is rich, sticky, and wonderfully deep, which means we need some side dishes that can handle that bold flavor without getting lost. When I’m serving this up as a weeknight chicken thigh meal, I like to keep things either creamy to soak up the sauce or bright and fresh to cut through the sweetness. It’s all about balance, which is the foundation of any great plate!
My absolute go-to, when I have an extra ten minutes, is a side of something starchy and soft. You need a vehicle for that leftover glaze, right? That’s why I lean heavily on classic comfort sides. If you want something truly decadent, you simply can’t beat a serving of creamy mashed potatoes. They are practically begging to be smothered in whatever sticky sauce drips off the meat!
If you’re trying to keep things lighter, especially if you loaded up on the honey, you need some crisp green vegetables. Steamed broccoli is always great, but if you’re feeling adventurous, roasted asparagus tossed with just a squeeze of lemon juice offers a lovely bitterness that pairs beautifully with the savory notes in the glaze. And for folks watching carbs, trust me on this one: whip up some cauliflower rice; it soaks up that sauce just as well as the grains!
Storing and Reheating Your Flavorful Chicken Thighs
The best part about cooking up a big batch of these honey garlic chicken thighs is definitely having leftovers the next day! Honestly, I think the flavor deepens overnight. But we have to treat leftovers right, especially when we’ve worked so hard to get that skin crispy. The key to reheating is recognizing that the skin—bless its heart—will never be quite as perfect as it was right out of the oven, but we can get really close!
When you store them, you want to keep the chicken thighs in an airtight container, of course. If you have lots of extra glaze or pan drippings left over, save those too! You can pour them right over the meat before you chill it; that extra moisture barrier helps immensely when reheating.
For reheating, forget the microwave if you can. The microwave is brilliant for speed, but it steams the chicken and turns that beautiful skin instantly rubbery. I strongly recommend either reheating them low and slow in a conventional oven or using an air fryer if you have one! Set your oven to a low temperature, maybe 300°F (150°C), and place the chicken thighs on a baking sheet, maybe even uncovered if you want to try to revive the crispiness slightly. It takes about 10 to 12 minutes to warm them through thoroughly.
If you are using the air fryer, just 350°F for about 5 minutes usually does the trick. It really crisps up the exterior again! If you decide to use the reserved glaze, warm it up quickly on the stove or in the microwave first, then brush it lightly over the chicken halfway through reheating. That extra step brings back that sticky, sweet coating beautifully.
Frequently Asked Questions About Cooking Chicken Thighs
I get so many emails asking for clarifications after people have tried this recipe, and honestly, I love hearing from you! Most questions boil down to temperature control and substitutions, which makes perfect sense when you’re trying to nail that perfect, juicy chicken thighs guaranteed result. Here are the things I hear most often, and my home-cook advice for sorting them out!
Can I use a different cut of meat instead of chicken thighs?
Yes, you absolutely can! The flavor profile of honey garlic works on just about anything, but cooking times will change drastically. If you use boneless, skinless chicken breasts, you’ll need to check them closer to the 20-minute mark because they dry out so fast. If you decide to use drumsticks instead, just know they might need an extra 5 to 10 minutes in the oven since they are smaller cuts!
What is the safest internal temperature for these chicken thighs?
This is the most important question! For poultry, the USDA recommends 165°F (74°C) as the baseline safe internal temperature. However, for these chicken thighs, I recommend pulling them off the heat when your thermometer reads 162°F. Why? Because they are going to keep cooking for a few minutes while they rest outside the oven—that’s called carryover cooking. Resting is non-negotiable because it allows those juices that were pushed to the center by the heat to redistribute back through the meat fibers, ensuring you get that tender bite.
How can I make a quick chicken dinner idea using this base flavor?
If you are looking for a one-dish wonder—a true one pan chicken and rice situation—this flavor base is perfect! I usually skip the initial rack setup for this variation. Instead, after seasoning the chicken (Step 4), I nestle them skin-side up in a baking dish. Then, I toss 1/12 cups of raw white rice with about 2 cups of chicken broth, a pinch of salt, and maybe some chopped onions right into the pan *around* the chicken. The glaze goes on as instructed (after the first 25 minutes). The simmering liquid keeps everything moist, and you’ve got your starch cooked right alongside your main protein for an incredible, easy meal!
If you want to pivot entirely and explore a different texture, like a decadent sauce, remember my guide to a quick chicken piccata shows just how versatile quick chicken dinners can be!
Understanding the Nutrition in These Chicken Thighs
I always appreciate when a fantastic-tasting meal doesn’t guilt-trip me into never cooking again! Now, I’m not a nutritionist—I am Aria, a passionate home cook who tests recipes until they are perfect for your Tuesday night table. So please take this information as a good guideline, not gospel truth. Because we are using bone-in, skin-on cuts, the fat content is naturally a bit higher than boneless, skinless variations, but that’s what gives us that incredible, juicy texture we talked about!
Based on the ingredients in this recipe, here are the estimated nutritional breakdowns per serving (which is one chicken thigh). Remember, this estimate doesn’t account for any sides you add onto your plate, so if you serve this with a huge portion of roasted potatoes, you’ll need to crunch those numbers separately!
- Serving Size: 1 thigh
- Calories: Approximately 380
- Protein: A hefty 30g! That’s great for keeping you full.
- Total Fat: Around 22g (this includes that delicious, flavorful skin fat).
- Carbohydrates: About 15g, mostly coming from the honey in that gorgeous glaze.
- Sugar: Roughly 12g. This is definitely on the sweeter side, thanks to the honey, but worth every bite!
- Sodium: We aimed for about 650mg, which is why using low-sodium soy sauce is a little trick I sneak in!
See? It’s totally balanced for a satisfying dinner. You get good protein, and you get amazing flavor. That’s what Cooking Zenith is all about—elevating the everyday!
Share Your Honey Garlic Chicken Thighs Success
I truly hope that reading through this has convinced you to give these perfect chicken thighs a try this week! Honestly, I get the biggest kick out of hearing from you all when you make one of my absolute favorites. Cooking isn’t just about following steps; it’s about sharing the joy when something turns out better than you hoped.
So, once you’ve pulled them out of the oven, the skin is perfectly crisp, and you’ve confirmed that the meat is unbelievably juicy, please come back down here and let me know! Did the honey garlic glaze truly caramelize? How did your family react to this new easy chicken dinner idea?
Drop a comment below with your ratings and any little tweaks you made because I’m always learning from my community, too! If you snapped a picture of your beautiful, sticky honey garlic masterpiece, tag me on social media—I treasure seeing your home cooking successes.
If you want to jump into another recipe using just as much love (though maybe without the sticky glaze!), you absolutely have to try my recipe for the best soft and chewy Snickerdoodles. Happy cooking, friends!
P.S. If you are still browsing for flavor inspiration after making these, one of my favorite recipes from a fellow food lover uses a similar sticky theme, which you can check out over here: Honey Garlic Chicken recipe.
PrintCrispy Baked Honey Garlic Chicken Thighs: Juicy and Flavorful Weeknight Dinner

Achieve perfectly juicy chicken thighs with shatteringly crispy skin using this simple oven-baked honey garlic recipe. This easy chicken thighs recipe delivers a sweet and savory glaze that makes it a family favorite weeknight chicken dinner idea.
- Prep Time: 10 min
- Cook Time: 40 min
- Total Time: 50 min
- Yield: 6 servings 1x
- Category: Dinner
- Method: Baking
- Cuisine: American
- Diet: Low Fat
Ingredients
- 6 bone-in, skin-on chicken thighs
- 1 tablespoon olive oil
- 1 teaspoon salt
- 1/2 teaspoon black pepper
- 1/2 teaspoon garlic powder
- 1/2 teaspoon paprika
- 1/4 cup honey
- 1/4 cup soy sauce (low sodium preferred)
- 2 tablespoons apple cider vinegar
- 4 cloves garlic, minced
- 1 teaspoon fresh ginger, grated (optional)
Instructions
- Preheat your oven to 400°F (200°C). Line a baking sheet with foil and place a wire rack on top of the foil. This setup helps air circulate for crispy skin chicken thighs.
- Pat the chicken thighs completely dry using paper towels. This step is crucial for achieving crispy skin.
- In a small bowl, mix the honey, soy sauce, apple cider vinegar, minced garlic, and grated ginger (if using) to create the honey garlic sauce.
- Rub the chicken thighs all over with olive oil. Season generously with salt, pepper, garlic powder, and paprika.
- Place the seasoned chicken thighs skin-side up on the wire rack.
- Bake for 25 minutes.
- Remove the pan from the oven and brush half of the honey garlic sauce evenly over the chicken thighs.
- Return the chicken to the oven and bake for another 10-15 minutes, or until the internal temperature reaches 165°F (74°C) and the skin is deeply golden brown and crisp.
- Remove the chicken from the oven. Brush the remaining sauce over the hot chicken thighs. Let the chicken rest on the rack for 5 minutes before serving.
Notes
- For extra crispy skin chicken thighs, you can briefly place the chicken under the broiler for the last 1-2 minutes, watching carefully to prevent burning.
- If you prefer boneless skinless chicken thighs recipes, reduce the baking time by about 10 minutes, checking for doneness sooner.
- This recipe works well as a sheet pan chicken thighs meal if you add sturdy vegetables like broccoli or potatoes to the pan around the rack.
Nutrition
- Serving Size: 1 thigh
- Calories: 380
- Sugar: 12
- Sodium: 650
- Fat: 22
- Saturated Fat: 6
- Unsaturated Fat: 16
- Trans Fat: 0
- Carbohydrates: 15
- Fiber: 0
- Protein: 30
- Cholesterol: 110