
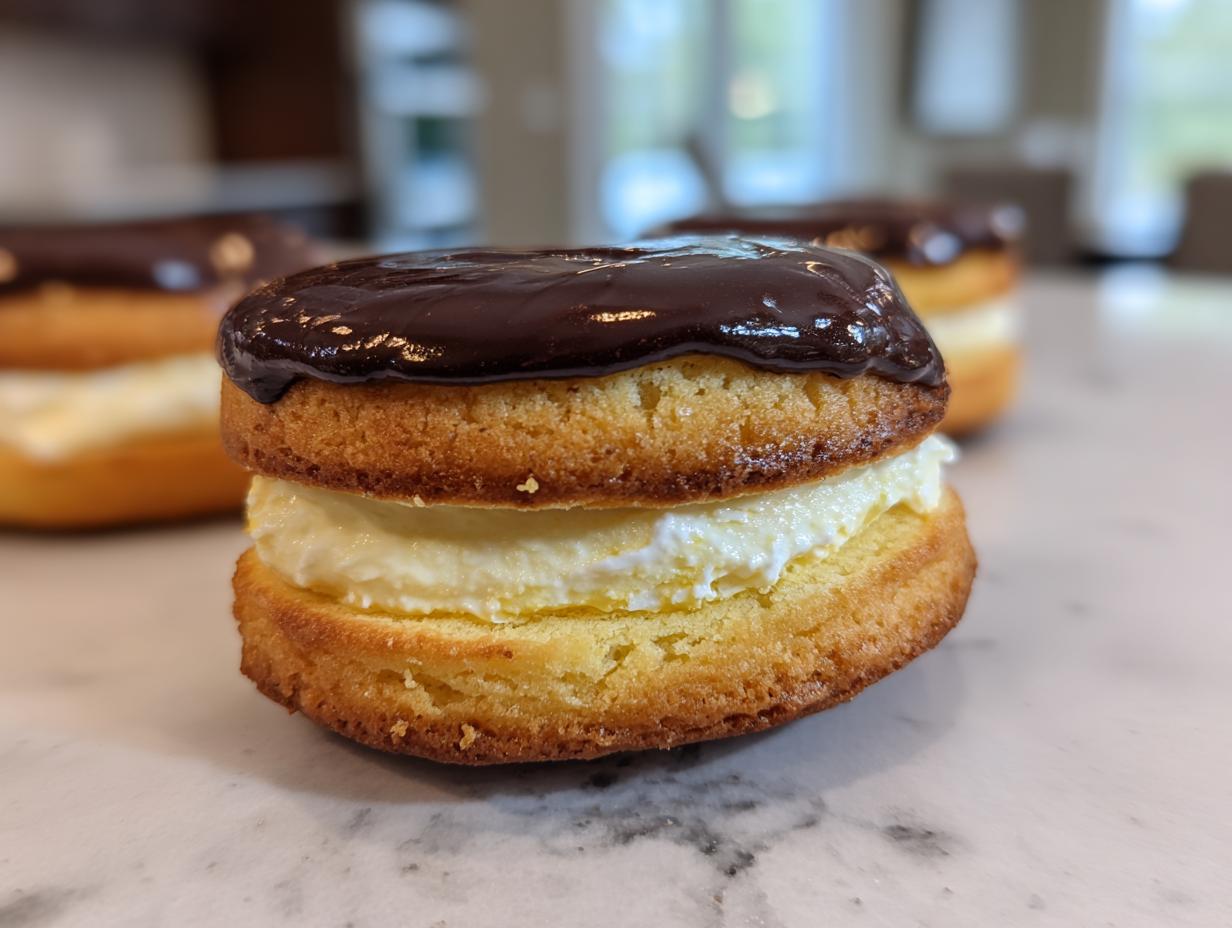
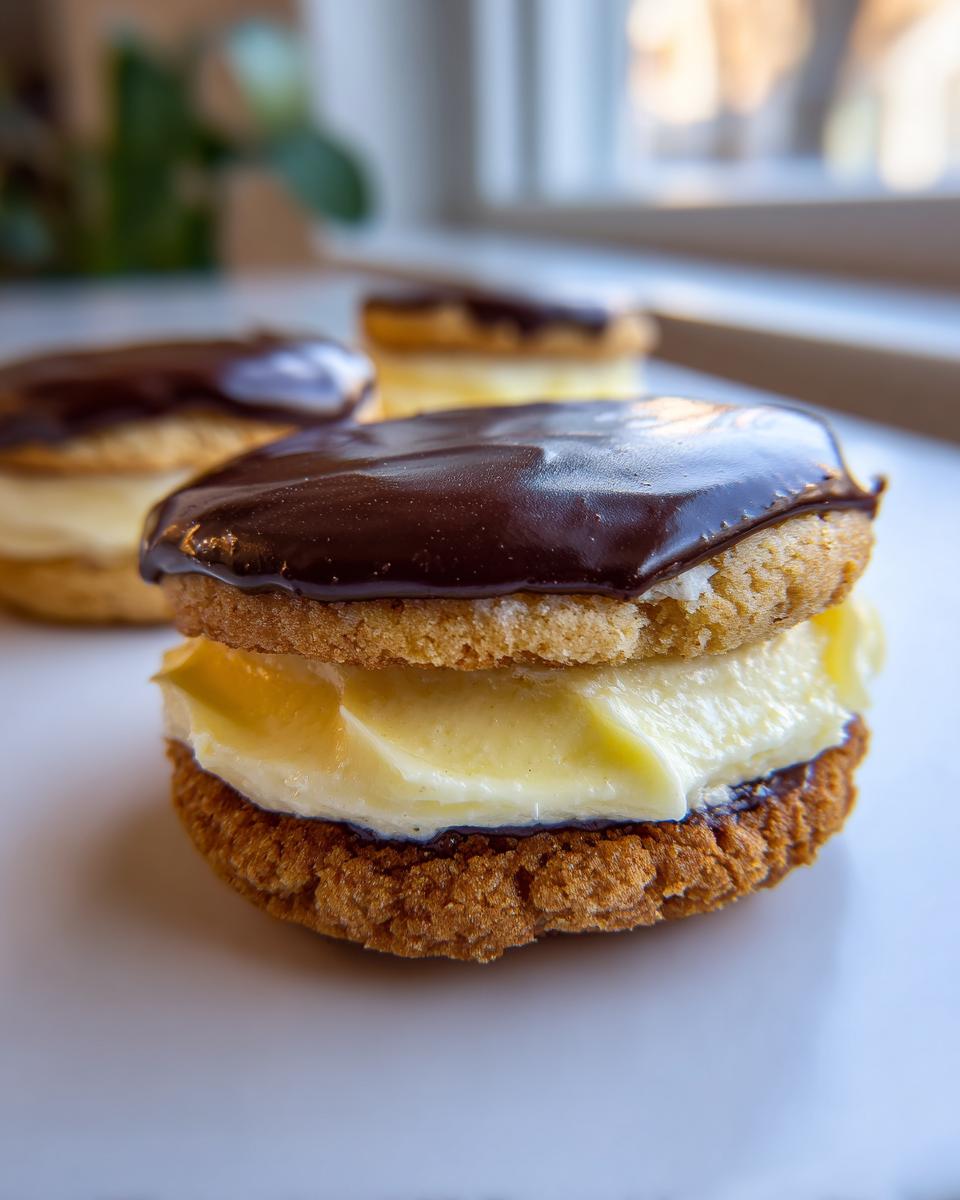
Oh, I absolutely love a good dessert mashup! Taking two amazing things and smashing them together? That’s my kind of culinary adventure. If you’ve ever stared longingly at a slice of classic Boston Cream Pie but wished you could pack that magic into your lunch bag, then I have the perfect answer for you. We are talking decadent flavors here—that soft, cake-like vanilla base, that rich, creamy filling, and that glossy chocolate top—all miniaturized into the most incredible boston cream pie cookies.
Don’t let the pie name scare you! My philosophy at Cooking Zenith is built around making those gourmet flavors accessible, and these cookies prove it. We’re skipping the finicky pie crust and diving straight into easy baking techniques. You’re going to feel like a baking genius when you taste how true these copycat treats are to the original.
- Why You Need These boston cream pie cookies Today
- Essential Components for Perfect boston cream pie cookies
- Gathering Ingredients for Your boston cream pie cookies
- Step-by-Step Tutorial for boston cream pie cookies
- Tips for Success with boston cream pie cookies
- Storage and Reheating Instructions for boston cream pie cookies
- Answering Common Questions about Custard Filled Cookie Recipe
- Estimated Nutritional Data for boston cream pie cookies
- Share Your Homemade boston cream pie cookies Creations
Why You Need These boston cream pie cookies Today
I know you have a ton of cookie recipes to choose from, but trust me on this one. These aren’t just another drop cookie; these are a celebration of layers and texture packed into one handheld bite. They solve so many dessert dilemmas!
- Total Portability: Forget messy slices! You get all the flavor of the famous pie without needing a fork or a plate. These are perfect for potlucks, school lunches, or sneaking one late at night. Talk about rich handheld pies!
- The Ultimate Flavor Dupe: If you’re hunting for true copycat pie cookies, this is it. We nailed the balance between the soft vanilla sponge experience and that chocolate topping. Honestly, they taste just like Aunt Carol’s famous Boston Cream Pie, only better because they’re cookies!
- Impressive, But Easy: These look like something you’d find at one of those high-end bakeries—definite showstoppers. But the base recipe is surprisingly straightforward, proving that you don’t need to be a pastry chef to create decadent dessert cookie ideas.
- No More Soggy Crust Worries: That notorious soggy bottom pie crust? Gone! Our cookie base is sturdy enough to hold all that creamy filling but soft enough that it melts in your mouth. It’s the structural integrity you dream of in custard filled cookie recipes.
If you enjoy blending different classic desserts, you absolutely have to try these. They have that inventive spirit, kind of like when I figured out how to turn tiramisu into easy-to-eat cookie cups. These fit right into that category of fun, elevated baking!
Essential Components for Perfect boston cream pie cookies
To really nail that Boston Cream Pie experience in cookie form, you can’t skimp on the three main structural pieces. It’s a balancing act, honestly! My goal here was creating something that screams ‘pie’ but handles like a sturdy, decadent cookie. When you understand what each part is supposed to do, you gain the confidence to know when things are going right in the mixing bowl.
The Soft Vanilla Cookie Base: Mimicking Cake Texture
First up is the foundation, and we want soft, plump, and cakey—not thin, crispy, or crumbly. Think of it like a miniature, dense vanilla pound cake that’s just sturdy enough. The secret to keeping it soft is simple: whatever you do, do NOT overmix once that flour goes in! Overmixing develops gluten like crazy, and suddenly your cake-like cookie turns tough. After mixing, a good long chill is non-negotiable; it helps keep those bases from spreading into those sad, flat pancakes in the oven.
Crafting the Creamy Pastry Cream Cookies Filling
This is where the magic happens! Anyone can use store-bought frosting, but for a true imitation of a pie, you need proper pastry cream. It has to be thick, rich, and absolutely freezing cold before you even think about piping it. If it’s warm or loose, it’s just going to ooze out, and suddenly you have a puddle, not a perfect sandwich cookie. Now, if you’re in a rush and need easy custard fillings for cookies, you can absolutely lean on a high-quality vanilla pudding mix, just thin it slightly less than the package calls for.
Achieving the Signature Chocolate Glaze Topping for boston cream pie cookies
The final layer has to set up nicely so you can actually pick the cookie up without getting chocolate all over your face—though, honestly, that’s half the fun! We use heavy cream to melt the chocolate chips down into a luxurious ganache. If you want that super professional, mirror-like shine you see in bakery cases, adding just a tiny drizzle of light corn syrup works wonders. It helps the chocolate set beautifully firm, but it’s totally optional if you like a slightly softer finish.
Gathering Ingredients for Your boston cream pie cookies
Okay, time to hit the pantry! Since this recipe has three distinct layers—the cookie, the cream, and the topping—we need three distinct ingredient lists. I always lay everything out before I start mixing because I don’t want to realize halfway through that I’m out of eggs or, worse, heavy cream! Seriously, the structure of these boston cream pie cookies depends on having things at the right temperature, so double-check your butter status!
For the Vanilla Cookie Base
This is our ‘cake’ layer, so we want the ingredients cooperative! For the creaming part, your butter absolutely *has* to be softened—like, easily dented but not melted at all. And remember, those eggs should come out of the fridge about 30 minutes before you want to start mixing; cold eggs can accidentally shock the creamed butter and make it separate. That would be a tragedy!
- 1 cup unsalted butter, softened
- 1 cup granulated sugar
- 2 large eggs (room temperature, please!)
- 1 teaspoon vanilla extract
- 2 3/4 cups all-purpose flour
- 1 teaspoon baking powder
- 1/2 teaspoon salt
For the Pastry Cream Filling
If you want that professional, thick pastry cream that holds its shape beautifully when piped, pay attention to the cornstarch—that’s our thickening powerhouse. Also, notice there’s butter listed here, but it is added *cold* at the very end. This is what gives the finished cream a gorgeous, rich mouthfeel once it chills down. It’s a tiny step that makes a huge difference in texture for your cream filling!
- 1 1/2 cups whole milk
- 1/2 cup granulated sugar
- 3 large egg yolks
- 1/4 cup cornstarch
- 1 teaspoon vanilla extract
- 2 tablespoons unsalted butter, cold
For the Chocolate Glaze
This is your final touch, and we’re aiming for glossy, not dull! The heavy cream is essential here—it’s what melts the chocolate chips into a smooth ganache rather than just a melted, clumpy mess. The corn syrup is optional, but if you want a truly stunning chocolate topping for your cookies, toss it in!
- 1 cup semi-sweet chocolate chips
- 1/2 cup heavy cream
- 1 tablespoon light corn syrup (optional, for shine)
Step-by-Step Tutorial for boston cream pie cookies
Alright, deep breaths! I know this looks like a multi-stage process marrying a cookie and a pie, but we’re going to tackle this one section at a time. If you follow these steps exactly, you’ll have incredible boston cream pie cookies that are perfectly soft, perfectly filled, and perfectly glossy. Remember, patience here means a spectacular result later. Don’t rush the cooling; that’s my biggest piece of advice!
Making and Chilling the Cookie Dough
We start with the base, which needs air whipped into it right from the beginning. In a large bowl, you’re going to cream that softened butter and sugar until it’s truly light and fluffy—I mean, it should lighten up in color, almost pale yellow. Then, beat in those room-temperature eggs one by one. When you add the dry mixture (flour, baking powder, salt), mix on low speed, or even by hand, until you just see no more flour streaks remaining. Seriously, stop mixing then! Overdeveloping the gluten will ruin that soft cake texture we’re aiming for. Once it’s barely combined, cover that dough tightly and get it into the fridge for at least a full hour. Chilling prevents excessive spreading!
Preparing and Cooling the Pastry Cream
While that dough is chilling, let’s conquer the filling. This is the part that intimidates people, but it’s mostly about attention! Heat your milk until it’s just steaming but not quite boiling. In a separate bowl, whisk your yolks, sugar, and cornstarch until they are super pale and smooth—no granules allowed! Now, the crucial bit: tempering. You have to slowly pour about a cup of that hot milk into your egg mixture while whisking nonstop. If you just dump it in, you’ll just end up with scrambled eggs, and nobody wants that in their custard filled cookie recipe. Once tempered, pour the whole thing back into the saucepan and cook over medium heat, whisking constantly, until it swallows a spoon and starts bubbling heavily. Let it boil for a solid minute—that activates the cornstarch! Take it off the heat, whisk in that vanilla and the cold butter until it melts in beautifully. Put plastic wrap directly onto the surface of the cream—like, touching it—and chill it completely. Seriously, two hours minimum. It needs to be pipeable!
Baking the Cookie Base
Get that oven preheated to 350°F (175°C). Line your sheets with parchment paper, which makes cleanup a breeze. Scoop out rounded tablespoon-sized mounds of the chilled dough. You want them spaced out because they will spread just a little bit. Bake for about 10 to 12 minutes. You’re looking for lightly golden edges, but the centers should still look set—if they look wet or jiggly, give them two more minutes. They finish baking on the hot sheet! Let them cool on the sheet for about five minutes before gently transferring them to a wire rack to cool completely. If they’re warm when you fill them, the pastry cream turns into soup, and we can’t have that!
Assembling the Custard Filled cookie recipe
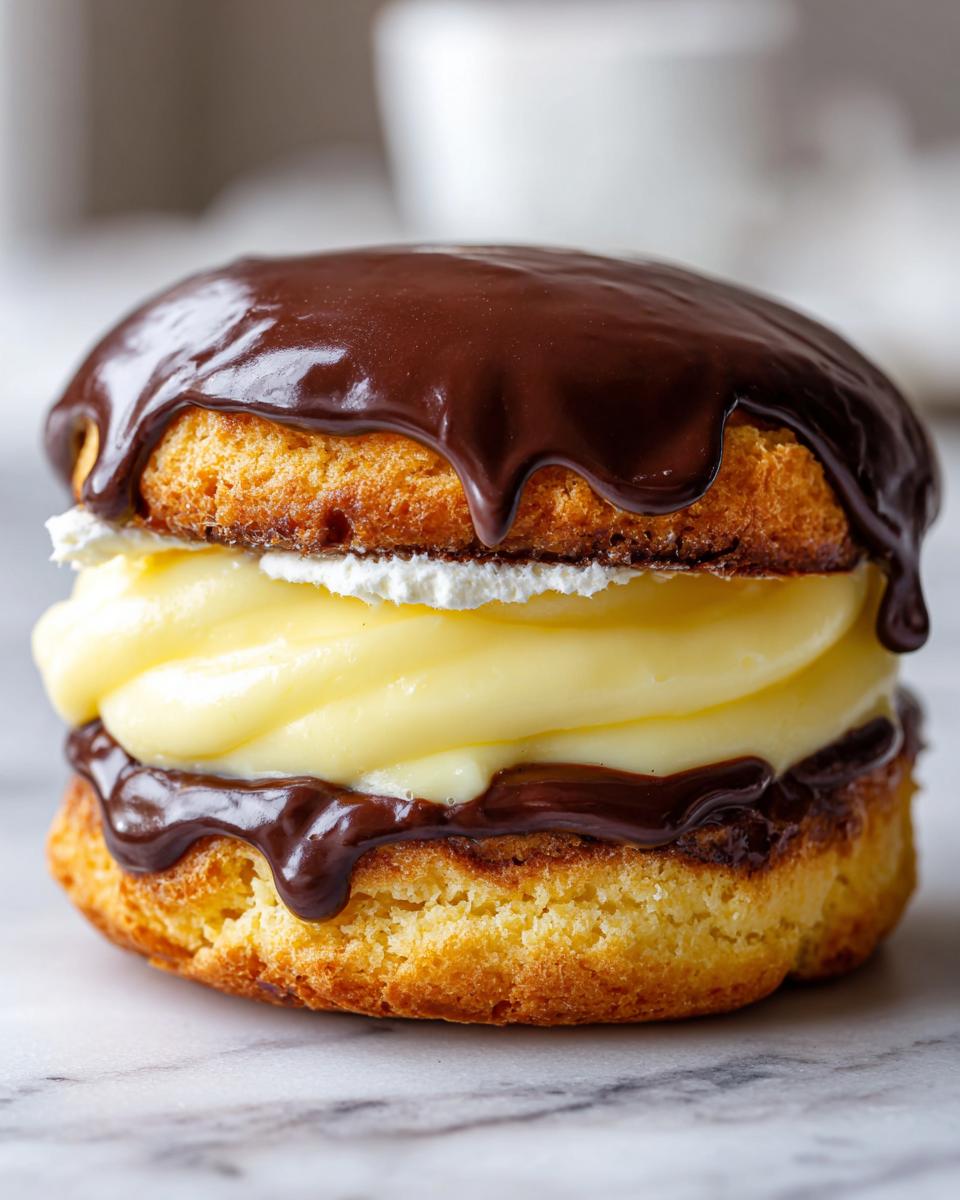
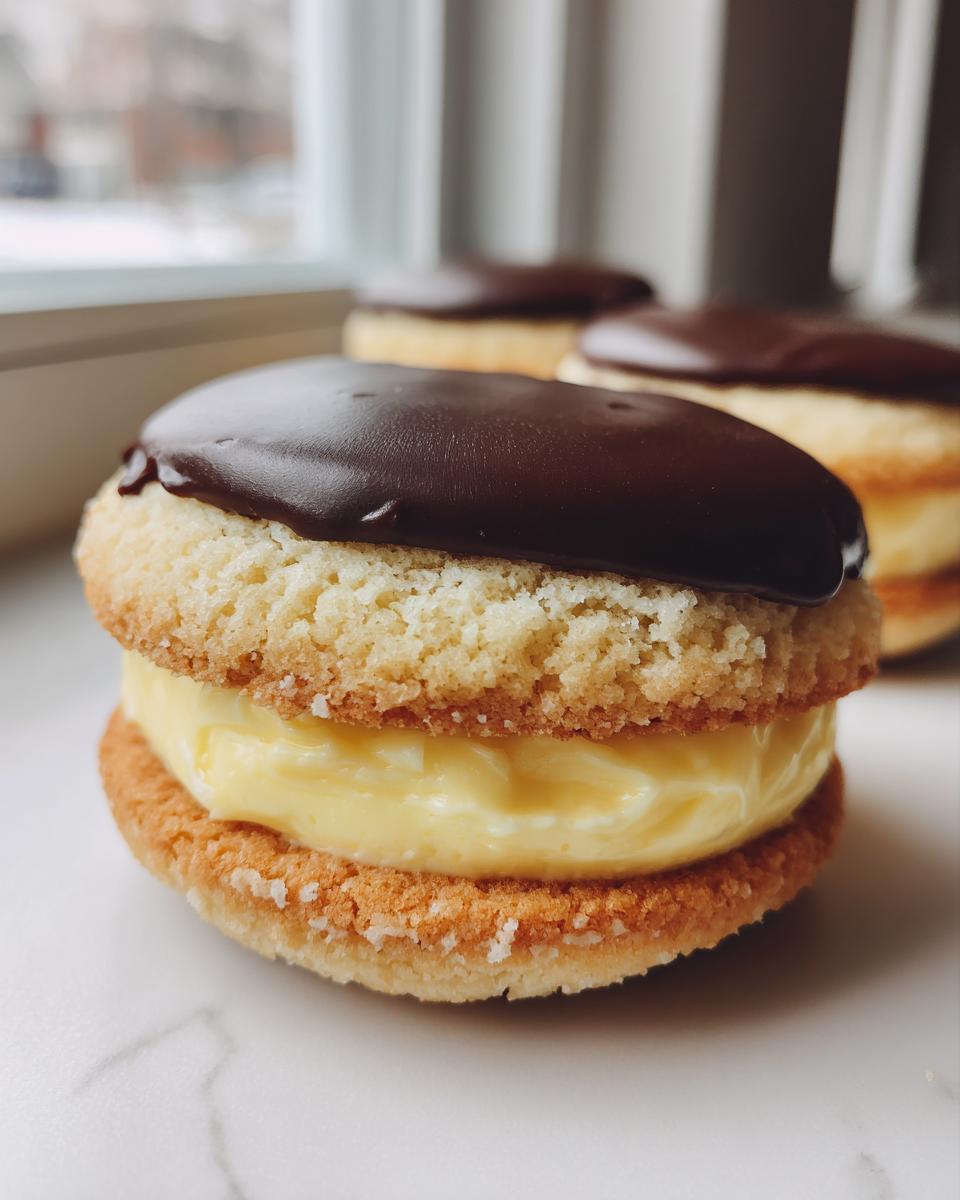
Once everything is totally cool, grab the cookies designated as the ‘bottoms.’ Using a small round cutter or a sharp paring knife, carefully cut a shallow circle out of the center top, like you’re digging a small crater. Save those little tops—maybe eat them later? Transfer your super-cold pastry cream into a piping bag fitted with a large round tip. Pipe a generous dollop right into the well you made in the base cookie. Now, take a matching ‘uncut’ cookie and gently set it right on top, pressing just lightly until the cream puffs out a little bit around the edges. These little sandwich cookies are ready for their chocolate hat!
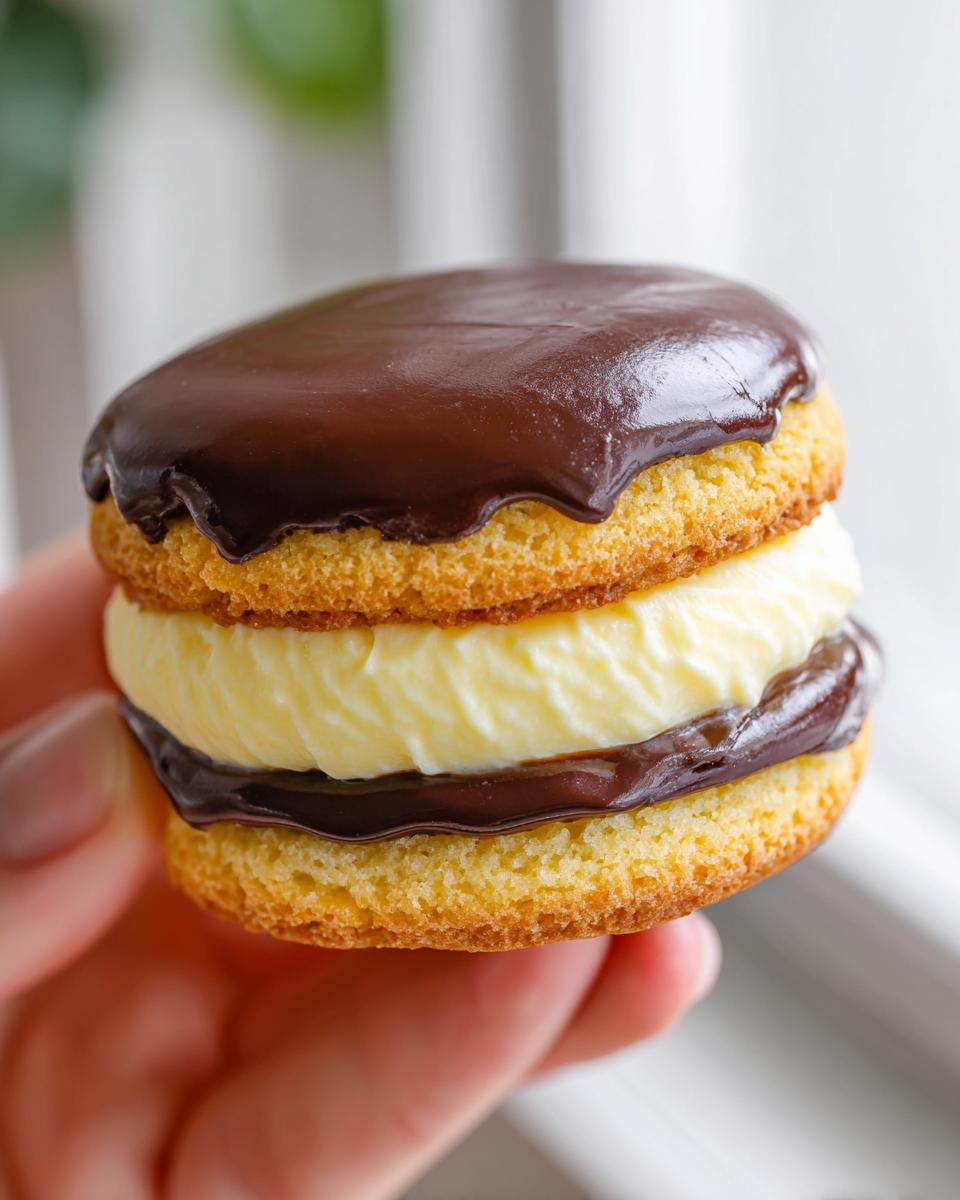
Glazing and Setting the boston cream pie cookies
For the chocolate topping, just heat your cream (and that optional corn syrup) until it simmers, then pour it right over your chocolate chips in a bowl. Let it sit untouched for five minutes—don’t stir yet! After five minutes, whisk it gently until it’s perfectly smooth and glossy. Allow the glaze to cool just slightly so it’s warm, but not piping hot. Dip the top half of each assembled cookie sandwich into the warm chocolate, lifting it straight up and letting the extra drip back into the bowl. Place them back on the rack to set. I always let these set up at room temperature; refrigerating them can sometimes give that shiny chocolate a dull, streaky look. You can even add a dollop of vanilla buttercream frosting on top of the chocolate if you’re feeling extra decadent!
Tips for Success with boston cream pie cookies
Creating these boston cream pie cookies is all about temperature management, I’m telling you. If the components aren’t right, the whole thing falls apart, literally! I learned this the hard way early on. My first batch looked great coming out of the oven, but by the time I piped the filling, the cookie bases started collapsing on me. They were almost mushy!
What fixed it? Two things, both related to chilling the dough. First, I found that chilling the cookie dough for way longer than the minimum hour really helped firm up that vanilla base so it wouldn’t absorb the moisture from the pastry cream too quickly. I now advocate for at least 90 minutes, sometimes longer—it makes for a much cleaner cookie that handles the assembly process better. You can find out more about how dough temperature impacts cookie structure when I talk about my soft sugar cookies!
Second, that pastry cream must be ice-cold. That recipe note about pressing plastic wrap directly onto the surface? That’s crucial. If you skip it, you get a heavy, dense ‘skin’ on top of your cream, and when you try to stir it back in, you deflate all the air, making it sloppy. Once it’s refrigerated, it should be so stiff you can barely scoop it into the piping bag. If you are ever unsure about dough chilling, just remember my lesson: cold dough equals structure, and structure equals success in these gourmet filled cookies for holidays! This is similar to the science behind keeping my thick and chewy chocolate chip cookies from spreading too thin.
Finally, don’t forget the quick-fix option I mentioned! If making pastry cream from scratch feels like too much fuss one afternoon, using a good, thick vanilla pudding mix following the notes is a perfectly respectable shortcut for those dessert hybrid recipes. Just remember the guiding principle: colder and thicker is always better when filling cookies!
Storage and Reheating Instructions for boston cream pie cookies
Since we used real milk and egg yolks in that heavenly pastry cream filling, these boston cream pie cookies need a little extra care compared to your standard chocolate chip batch. If you can, the absolute best way to eat them is the day they are made, once that chocolate glaze has set up at room temperature. If you do have leftovers, you really should pop them into an airtight container and refrigerate them. The cold helps stabilize that rich custard filling.
Just a heads up: the glaze might look a little dull or slightly softer after being in the cold. Don’t worry about it! Before serving any refrigerated cookies, let them sit on the counter for about 15 to 20 minutes to lose that chill. Avoid microwaving them at all costs—it turns the cookie base hard and melts the filling into soup. Eat them cool, but not ice-cold!
Answering Common Questions about Custard Filled Cookie Recipe
I get so many lovely emails after people try one of these unique cookie mashups! Since these boston cream pie cookies involve a few different textures—the soft cookie, the creamy filling, and the set glaze—there are always a few key things people want to double-check to ensure they get that perfect result. Let’s clear up some of those lingering questions so you feel 100% confident!
How do I stop my boston cream pie cookies from getting soggy?
That is the number one fear when making any type of custard filled cookie recipe, right? You want that soft, cakey base, but if it sits too long, it soaks up the moisture. The key here is preparation and patience! First, your cookie bases must be completely, 100% cool before you pipe on that filling—I mean room temperature cool, not just ‘not hot.’ Secondly, make sure your pastry cream is absolutely rock solid chilled. When the cream is stiff, it transfers less immediate moisture to the cookie. If you’re worried, you can even spread a *very* thin layer of melted chocolate on the bottom of the cookie before filling; it acts as a moisture barrier between the cookie and the cream. You can see more advice on handling fillings in my guide to easy custard fillings for cookies.
Can I make the pastry cream ahead of time for these dessert hybrid recipes?
Absolutely! In fact, I highly recommend cooking your pastry cream the day before. It needs those hours in the fridge to set up correctly anyway. Once it is completely chilled and stiff, store it in an airtight container. It will keep perfectly well in the refrigerator for up to three days. If it stiffens up too much after sitting overnight, just give it a really vigorous whisk—like aggressively whisk it—to bring the smoothness back before you transfer it to your piping bag. That stiffness is exactly what we want for these dessert hybrid recipes!
What is the best way to get a bakery style cookie finish?
If you’re striving for that best bakery style cookies look, it comes down to two things: uniformity and that beautiful chocolate cap. For uniformity, try to scoop all your cookie dough balls to the same size before baking; this ensures they are all the same thickness for sandwiching. For the topping, the secret is the temperature of the glaze when you dip. If the glaze is too thin (too hot), it runs right off. If it’s too thick (too cold), it looks lumpy and heavy. You want it warm enough to coat easily but cool enough that it doesn’t soak into the cookie. Dip, lift straight up, and hold it over the rack for a few seconds to let the excess drip away cleanly. That’s how you get that flawless, glossy chocolate layer!
Estimated Nutritional Data for boston cream pie cookies
Now, I have to be transparent here—nutrition facts always feel a bit clinical compared to the joy of baking! These numbers are just my best estimate based on serving sizes and standard ingredient databases. Because these are gourmet filled cookies, they are definitely an indulgence, but worth every fantastic bite!
Keep in mind that every ingredient choice, from the fat content of your milk to the brand of chocolate chips you use, will shift these figures slightly. This data reflects a single, assembled cookie based on the recipe yielding 18 portions.
- Serving Size: 1 cookie
- Calories: 350
- Sugar: 30g
- Sodium: 150mg
- Fat: 20g
- Saturated Fat: 12g
- Unsaturated Fat: 8g
- Trans Fat: 0.5g
- Carbohydrates: 40g
- Fiber: 1g
- Protein: 5g
- Cholesterol: 80mg
If you’re watching your sugar intake, remember that the biggest contributors are the vanilla cookie base and the thick pastry cream. But honestly, when you’re creating something this close to a real Boston Cream Pie, you’re meant to enjoy it fully!
Share Your Homemade boston cream pie cookies Creations
Now that you’ve conquered the art of creating these amazing boston cream pie cookies, I truly want to see what you and your kitchen have made! My biggest hope for Cooking Zenith is building a community where we cheer each other on, even when we tackle something as ambitious as a dessert hybrid.
Did the chocolate glaze set up perfectly shiny for you? Did your pastry cream hold its shape just like mine did? I’d be so grateful if you could drop a rating below—a five-star review means the world to me because it tells me I’ve succeeded in making that intimidating pie flavor accessible in cookie form!
If you ran into any snags, or if you found a brilliant way to tweak the recipe that I haven’t thought of yet, please, drop a comment! Questions are always welcome; that’s how we all learn and grow into better home cooks together. If you need to reach out directly about an order or a bulk baking question, you can always find my team and me over on the Contact page, but for recipe chat, the comments section is the best spot!
Happy baking, and enjoy every single, decadent layer of your copycat pie cookies!
PrintBoston Cream Pie Cookies with Vanilla Custard Filling

Create decadent, handheld cookies that capture the classic flavors of Boston Cream Pie, featuring a soft vanilla cookie base, creamy homemade pastry cream filling, and a rich chocolate glaze topping.
- Prep Time: 45 min
- Cook Time: 25 min
- Total Time: 190 min
- Yield: 18 cookies 1x
- Category: Dessert
- Method: Baking
- Cuisine: American
- Diet: Vegetarian
Ingredients
- For the Vanilla Cookie Base:
- 1 cup unsalted butter, softened
- 1 cup granulated sugar
- 2 large eggs
- 1 teaspoon vanilla extract
- 2 3/4 cups all-purpose flour
- 1 teaspoon baking powder
- 1/2 teaspoon salt
- For the Pastry Cream Filling:
- 1 1/2 cups whole milk
- 1/2 cup granulated sugar
- 3 large egg yolks
- 1/4 cup cornstarch
- 1 teaspoon vanilla extract
- 2 tablespoons unsalted butter, cold
- For the Chocolate Glaze:
- 1 cup semi-sweet chocolate chips
- 1/2 cup heavy cream
- 1 tablespoon light corn syrup (optional, for shine)
Instructions
- Prepare the Cookie Dough: In a large bowl, cream together the softened butter and sugar until light and fluffy. Beat in the eggs one at a time, then stir in the vanilla extract.
- In a separate bowl, whisk together the flour, baking powder, and salt. Gradually add the dry ingredients to the wet ingredients, mixing until just combined. Do not overmix.
- Chill the dough for at least 1 hour.
- Make the Pastry Cream: Heat the milk in a saucepan over medium heat until simmering. While the milk heats, whisk the sugar and egg yolks in a separate bowl until pale. Whisk in the cornstarch until smooth.
- Slowly temper the hot milk into the egg mixture, whisking constantly. Pour the entire mixture back into the saucepan.
- Cook over medium heat, whisking constantly, until the cream thickens significantly and comes to a boil. Boil for 1 minute, still whisking.
- Remove from heat. Whisk in the vanilla extract and the cold butter until smooth. Transfer the pastry cream to a shallow dish, press plastic wrap directly onto the surface, and chill completely (at least 2 hours).
- Bake the Cookies: Preheat your oven to 350°F (175°C). Line baking sheets with parchment paper.
- Scoop rounded tablespoons of chilled dough onto the prepared sheets, leaving space between them. Bake for 10 to 12 minutes, or until the edges are lightly golden and the centers are set. They should remain soft. Let cool completely on the baking sheet for 5 minutes before moving to a wire rack to cool fully.
- Assemble the Cookies: Once the cookies are cool, use a small round cutter or knife to carefully remove a shallow circle from the center top of half of the cookies, creating a well.
- Transfer the chilled pastry cream to a piping bag fitted with a large round tip. Pipe a generous amount of filling into the well of the cut cookies.
- Top each filled cookie with a matching, uncut cookie to create a sandwich. Gently press to slightly flatten.
- Make the Chocolate Glaze: Place chocolate chips in a heatproof bowl. Heat the heavy cream and corn syrup (if using) in a small saucepan until just simmering. Pour the hot cream over the chocolate chips. Let stand for 5 minutes, then whisk until smooth and glossy.
- Dip the top of each assembled cookie sandwich into the warm chocolate glaze, allowing excess to drip off. Place cookies back on the wire rack to allow the glaze to set before serving.
Notes
- For a faster filling, you can use high-quality vanilla pudding mix prepared according to package directions, but reduce the liquid slightly to make it thicker for piping.
- If you prefer a flatter cookie, chill the dough longer or slightly flatten the dough balls before baking.
- The chocolate glaze sets best at room temperature; avoid placing the cookies in the refrigerator immediately after glazing, as this can cause the chocolate to streak.
Nutrition
- Serving Size: 1 cookie
- Calories: 350
- Sugar: 30
- Sodium: 150
- Fat: 20
- Saturated Fat: 12
- Unsaturated Fat: 8
- Trans Fat: 0.5
- Carbohydrates: 40
- Fiber: 1
- Protein: 5
- Cholesterol: 80