
There’s just something about desserts that taste exactly like childhood, isn’t there? For me, that taste is the unmistakable crunch of Oreos mixed with sweet, impossibly creamy filling. Forget the fuss of actual baking; we’re here for the magic of the refrigerator! This is my personal, perfected recipe for the ultimate **dirt cake**—it’s no-bake, ridiculously easy, and I’ve been bringing it to every family gathering since I first figured out the perfect ratio.
Trust me, this isn’t just some muddy-looking pudding dish; it’s a carefully constructed, four-layer adventure in chocolate and cream that always disappears first at any party. As a dedicated home cook, I know what truly matters in a crowd-pleaser, and this **dirt cake** always delivers comfort and joy without stressing me out in the kitchen. Get ready to impress everyone with minimal effort!

- Why This Classic Dirt Cake Recipe Is Your New Favorite Easy Party Dessert
- Gathering Ingredients for the Ultimate No-Bake Oreo Dirt Cake
- Step-by-Step Instructions for Perfect Dirt Cake Layers
- Expert Tips for Making the Best Dirt Cake
- Dirt Cake Variations and Serving Suggestions
- Storage and Make Ahead Chilled Dessert Guidelines
- Frequently Asked Questions About This No Bake Layered Dessert
- Estimated Nutritional Profile for Classic Dirt Cake
- Share Your Dirt Cake Creations
Why This Classic Dirt Cake Recipe Is Your New Favorite Easy Party Dessert
When I bring this to a gathering, I almost never have leftovers. That tells you everything you need to know! This isn’t just a good dessert; it’s legendary party food because it hits all the right notes without ever needing an oven. It’s the ultimate easy party dessert that guarantees happy faces.
- It’s completely no bake layered dessert magic—zero oven required!
- It’s designed to be made ahead of time, which is a lifesaver when you’re hosting.
- The rich flavor combination ensures everyone asks you for the recipe later.
Quick Assembly for Your Next Potluck Dessert Ideas
We’re talking maybe 25 minutes of active mixing time, tops! While the mixing is fast, the best part is that once you get it into the dish, you completely forget about it. It chills and sets up while you’re busy setting the table or greeting guests. You can always find my tips for other speedy desserts over here at my favorite no-bake pie recipe, but this takes the crown for simplicity.
The Creamy Chocolate Dessert Cups Experience
The texture is what sets this apart from just mixing pudding and cookies. We build these luscious layers—one is that buttery, tangy cream cheese base, followed by the puddings. It makes for such a luxurious, fluffy chocolate dessert. And honestly, serving it in individual containers as creamy chocolate dessert cups is so fun, especially when you skip the big dish!
Gathering Ingredients for the Ultimate No-Bake Oreo Dirt Cake
You know me; I don’t like fancy shopping trips when I’m making a comfort dessert like this! The best thing about this classic cookie dessert is that you probably already have most of this stuff sitting in your pantry. When I developed this recipe, I wanted it to be dependable, so using readily available instant mixes was key. It makes preparing this refrigerator cake so much less stressful.
If you’re gathering your supplies, make sure you’ve got everything set out before you start mixing your layers. A little prep work here saves a huge headache later! You can check out some other simple recipes where I use similar pantry staples over at this easy no-bake pie post, but let’s focus on getting these ingredients just right for our decadent chocolate treat.
Essential Components for Your Dirt Cake
Remember, the texture relies so much on having the right consistency for your cream cheese layer. That means your butter and cream cheese absolutely *must* be softened to room temperature. I’ve linked to folks who use different approaches to this dessert, like this lovely version, but these measurements are what I trust for that perfect flippable layer.
- 1 package (14.3 ounces) Oreo cookies (Don’t worry about removing the cream filling—we want it all!)
- 1 cup unsalted butter, softened
- 8 ounces cream cheese, softened
- 1 cup powdered sugar
- 1 container (12 ounces) frozen whipped topping, thawed (Make sure this is fully thawed but still cool!)
- 2 packages (3.9 ounces each) instant chocolate pudding mix
- 3 cups cold milk (Use the cold milk specified for the chocolate mix!)
- 1 package (3.4 ounces) instant vanilla pudding mix
- 2 cups cold milk (Yes, we need two different amounts of milk!)
- Gummy worms, for decoration (Don’t forget these—they are the best part of the presentation!)
Step-by-Step Instructions for Perfect Dirt Cake Layers
Alright, grab your big mixing bowls because now we put this masterpiece together! Since this is a no-bake recipe, timing is everything—we work fast once the puddings start setting up. Keep your distractions away; we’re building this delicious **dirt cake** layer by layer, and precision matters here for that clean-looking slice later on! You can find some of my speedier preparation tips (like how I manage timings when making my no-bake Oreo pie) if you need a quick reference.
Preparing the Oreo Cookie Crumble Dessert
First things first, we get the “dirt” ready. Take out about two cups of those glorious Oreos—whole or roughly broken is fine—and set those aside in a bowl. Those are for the gorgeous topping later! Now, toss the rest of the cookies into your food processor and pulse them until they look like fine, dark soil. Don’t second-guess yourself; we want that texture to be powdery for the base layers.
Creating the Creamy Filling for This Fluffy Chocolate Dessert
Time for the heart of the cake. In your biggest bowl, beat that softened butter, softened cream cheese, and powdered sugar until it’s totally smooth—no lumps allowed! Once that base is beautiful, gently, *gently* fold in your thawed whipped topping. I mean it, use a spatula and fold it slowly. If you whip it now, you’ll deflate all the air, and we want this layer to be light and fluffy, not dense!
While that’s waiting, make your two puddings separately following the package directions, using the exact amount of cold milk specified for each. Whisk them well until they thicken up, which happens super quick with instant mixes, and let them sit for about five minutes.
Assembling and Chilling the Classic Cookie Dessert
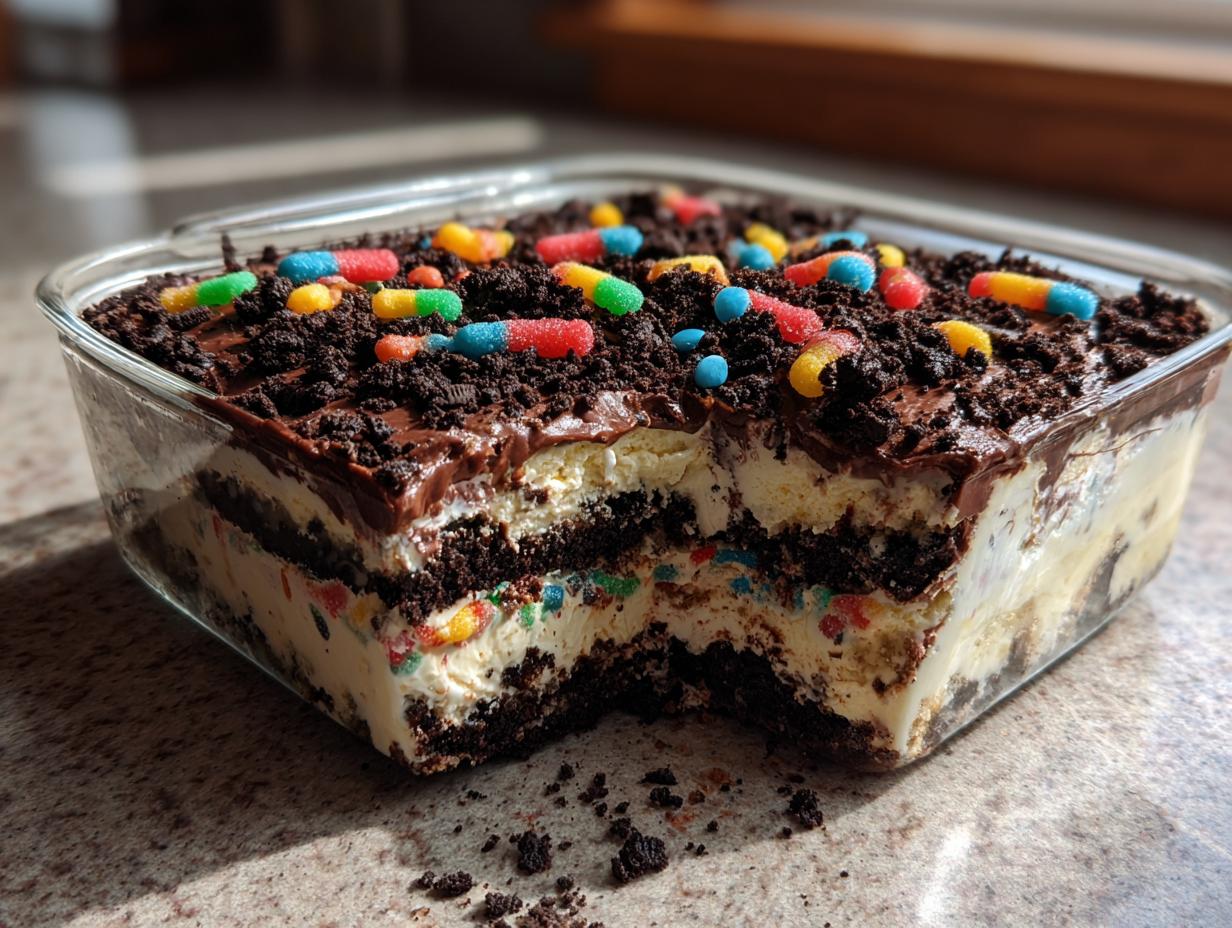
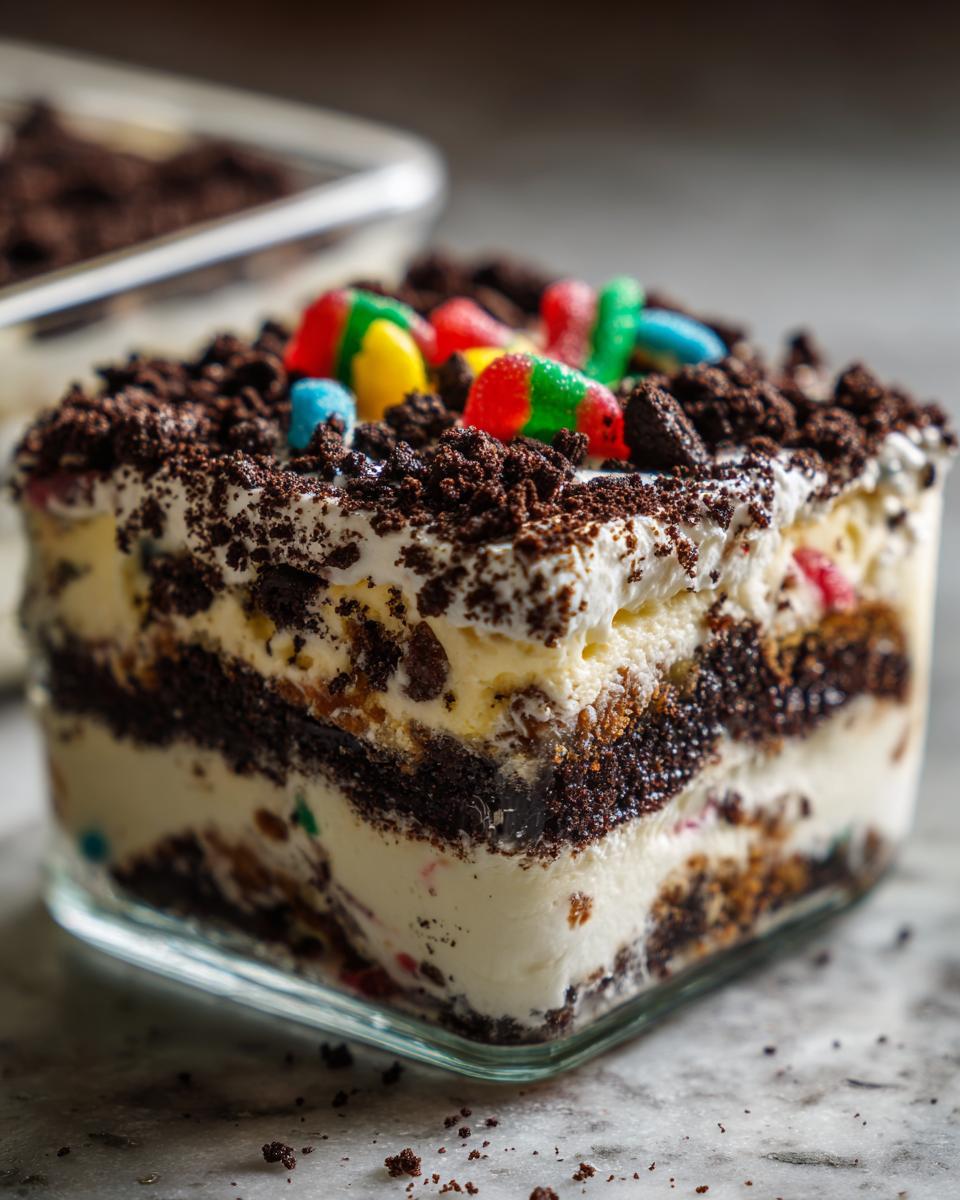
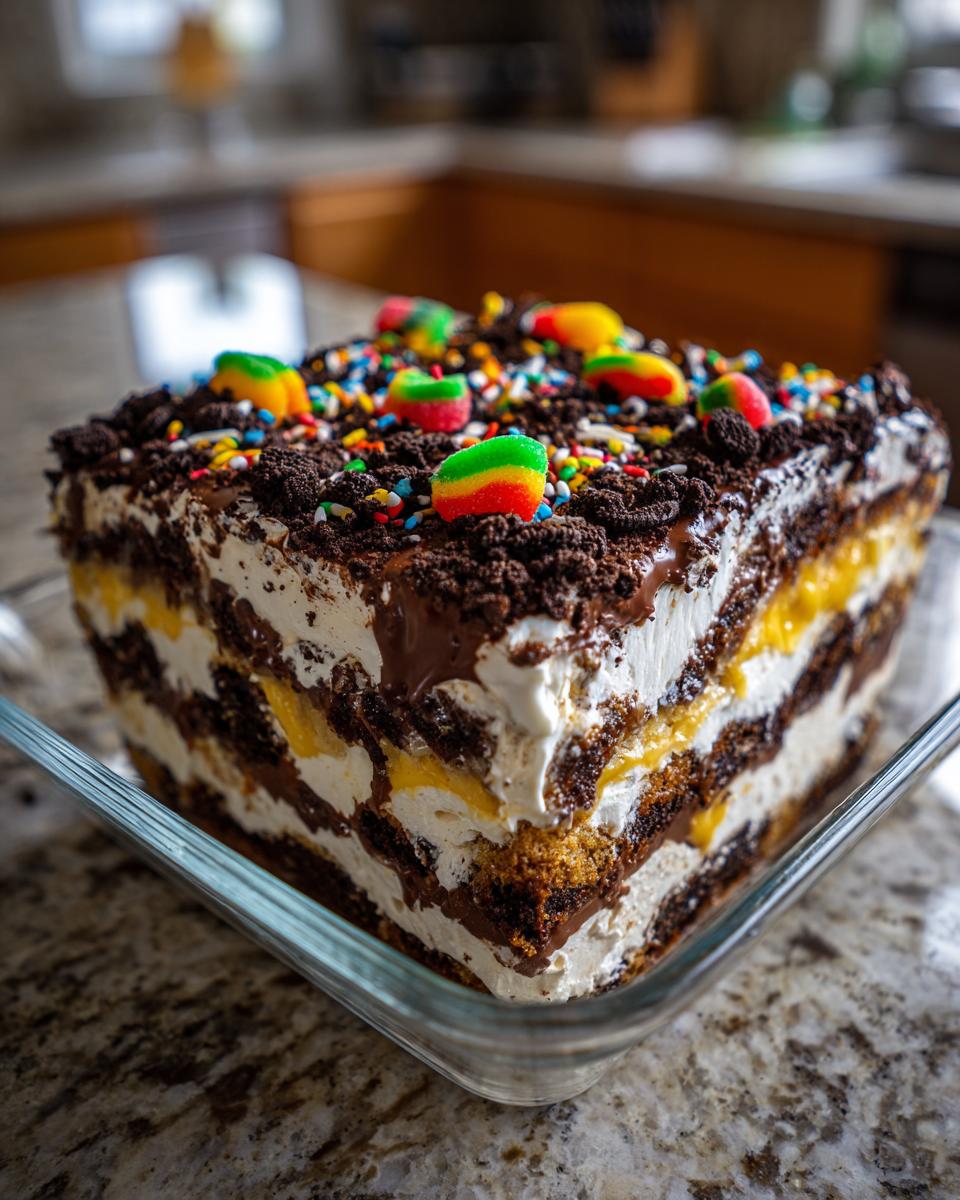
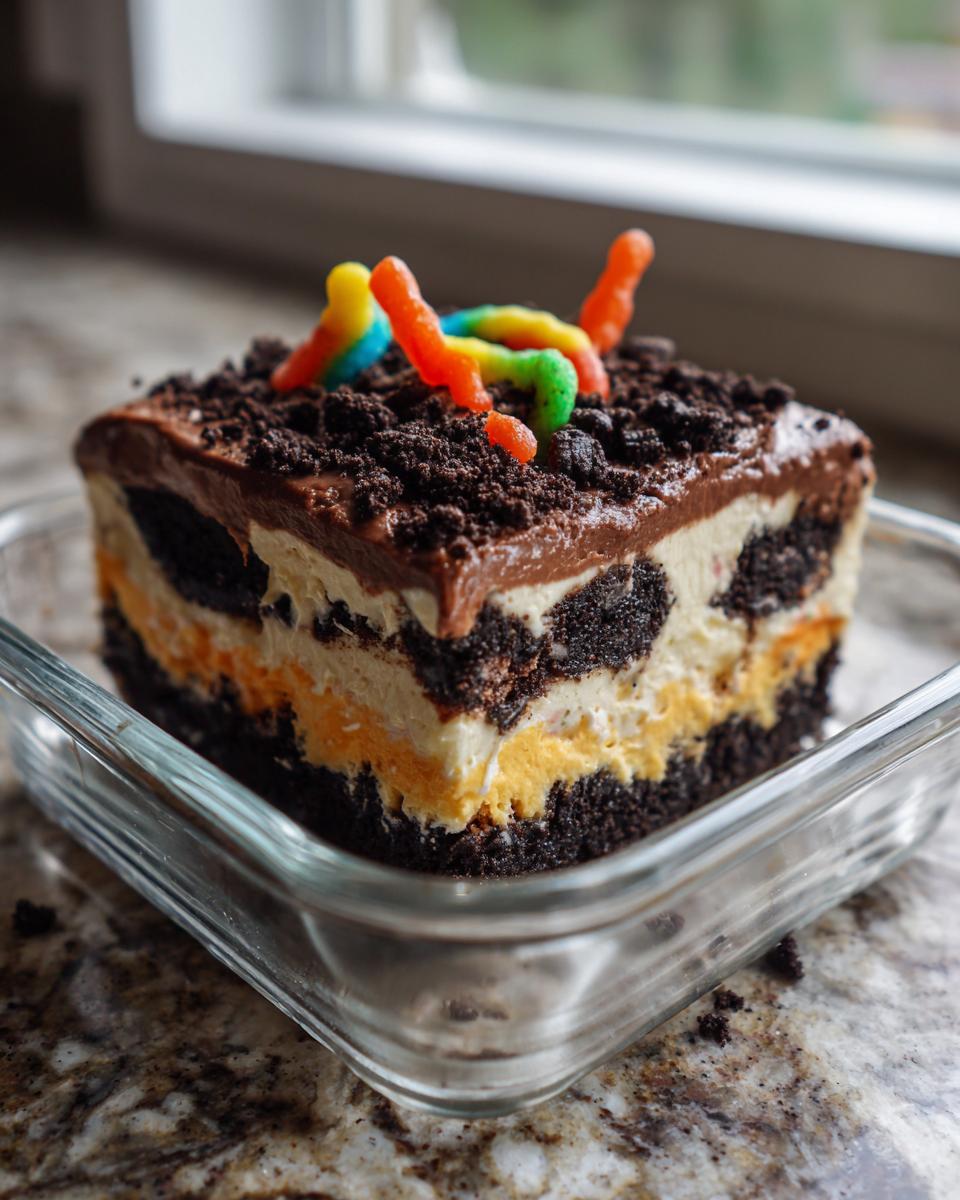
Now for the fun part: layering! Spread half of your crushed Oreo crumbs into the bottom of your 9×13 dish. Next, spread that entire cream cheese mixture evenly over the crumbs. After that goes in the chocolate pudding, followed immediately by the vanilla pudding layer right on top of the chocolate. Finally, take those reserved crumbs and sprinkle them generously over the very top. Cover it tight—plastic wrap right on the surface prevents a skin from forming—and this **dirt cake** needs a good minimum of four hours in the fridge. Honestly, overnight is even better!
Expert Tips for Making the Best Dirt Cake
I want you to have the absolute best experience with this recipe, so let me share a few insider secrets I picked up over the years making this **dirt cake** for birthdays and summer BBQs. Following the instructions is great, but these little touches take it from good to legendary territory. Honestly, mastering this dessert is why I started sharing my home-cooking secrets in the first place! You can always see what else I’m tweaking in my latest posts, like my thoughts on my other favorite no-bake Oreo pie.
Achieving the Perfect Dirt Cake Texture
You absolutely must use full-fat cream cheese here. If you try to use the low-fat version, the cream cheese layer won’t have the structure it needs to hold up against the cookie crumbs and pudding. Also, a quick reminder from the ingredient list: make sure you’re using *instant* pudding mixes. If you try to use cook-and-serve, you’ll end up with a thin, runny mess that won’t set up in the fridge properly.
Presentation: Mastering the Gummy Worm Dessert Look
This is my favorite part! Making this a true **gummy worm dessert** means technique matters. If you stick those little guys in when the dessert finishes chilling and then try to move the pan, they are going to flop over. My trick is to wait until the absolute last minute—just before you bring the pan to the table—to press them into the top layer of crumbs. As the folks over at The Best Cake Recipes know, presentation is key for a fun treat like this!
Dirt Cake Variations and Serving Suggestions
Sometimes you want the big slab for easy slicing at a crowd gathering, but other times, presentation really calls for something individual. I love playing around with this recipe while keeping the core flavors intact. That’s the beauty of this **dirt cake**—it’s totally adaptable for whatever party you’re hosting! If you want more ideas on how to tackle other no-bake desserts, check out my favorite no-bake Oreo pie recipe.
Don’t feel locked into the 9×13 pan! If you want something that looks extra cute on a dessert table or for easy handing out, individual cups are the way to go. They also chill faster, which is a bonus if you’re running short on time.
Turning Dirt Cake into Individual Creamy Chocolate Dessert Cups
If you want to make these into those adorable **creamy chocolate dessert cups**, the layering process is exactly the same, just scaled down. Grab some clear plastic cups or small mason jars. You’ll still want to start with a spoon of crushed Oreos at the bottom. Then, layer in small amounts of the cream cheese mixture, followed by the chocolate pudding, then the vanilla. Repeat until the cup is full, reserving your final Oreo topping for the very top layer.
This method is wonderful because everyone gets a perfect ratio in every serving, and you don’t have to worry about cutting clean squares.
Pairing This Decadent Chocolate Treat
Since this is such a rich, sweet, and **decadent chocolate treat**, you need something bold to cut through that richness. Usually, people are grabbing these at the end of a meal when they’re already full, so a heavy pairing won’t work well.
My go-to is always a strong, freshly brewed black coffee. The slight bitterness of the coffee is just magic against the sweetness of the pudding and cream cheese layers in the **dirt cake**. If coffee isn’t your thing, a really tall, ice-cold glass of whole milk works just as well to cleanse the palate between bites!
Storage and Make Ahead Chilled Dessert Guidelines
One of the biggest perks of this amazing **dirt cake** is how much it loves the refrigerator. It truly shines when you give it time to chill! Because this is a no-bake layered dessert, it needs that time for the puddings to firm up and for the crusts to absorb just a little moisture from the creamy layers. Trust me, waiting is hard, but it’s worth it for that perfect texture.
You want to cover your dish tightly, and I mean *tightly*. Plastic wrap pressed directly onto the surface of the top Oreo layer is the way to go. This keeps everything fresh and stops any weird smells from the fridge clinging to your dessert. I always aim to make this the day before we serve it. Overnight chilling is the sweet spot—it lets the flavors marry beautifully, and the cookie crumbs soften just enough to be tender but not soggy.
If you’re prepping for a big event, you can safely pull this out whenever you need it. It holds up really well for up to three days in the fridge. Honestly, the texture is best on day one or two, but save any leftovers, because even on day three, it’s still way better than anything store-bought! If you want to see how I handle chilling times for similar recipes, check out my guide on making my easy no-bake Oreo pie; the rules for a successful make ahead chilled dessert are pretty similar!
Frequently Asked Questions About This No Bake Layered Dessert
I get so many questions about this recipe once people see how much I love making it! It’s so popular that folks always want to know the quickest tweaks or fixes. Since this is such a classic, dependable **no bake layered dessert**, I figured I’d tackle the most common things people ask me about. You know I love talking kitchen tricks, so here are the answers to keep your **Oreo pudding dessert** perfect!
Can I use homemade chocolate pudding instead of instant for my dirt cake?
Oh, you absolutely can! If you prefer making your pudding completely from scratch, go for it. However, I really stick to the instant boxes for this particular **dirt cake** because the stovetop method adds so much time. If you use cooked pudding, you have to make sure it’s totally cooled down—like, completely cold—before you layer it on the cream cheese mixture. Otherwise, that warm pudding will melt your beautiful base layer right into soup! That extra cooling time usually adds an hour or two to the total prep.
What is the best way to crush Oreos without a food processor?
Don’t stress if your food processor is taking a cleaning break or if you don’t own one! I’ve done this countless times. Just grab a sturdy, zip-top freezer bag—the heavy-duty ones hold up best—toss the cookies in, seal it up, and push out as much air as you can. Then, grab a rolling pin or the flat bottom of a heavy saucepan and just go to town! It’s actually a great stress reliever, honestly. Remember to save out that small portion for the top layer before you process the main batch!
How long can I keep this Oreo pudding dessert refrigerated?
Since this is a **make ahead chilled dessert**, people want to know the shelf life. I always say this **Oreo pudding dessert** is at its absolute peak on day one or day two. Why? Because on day one, you get that wonderful contrast: nice cold pudding layers, a sturdy cream layer, and a topping that still has a little bit of crunch from those reserved crumbs. By day three, the cookies soften up quite a bit, turning into more of a tender, cake-like texture. It’s still completely safe and delicious for up to three days, but for that perfect texture, I aim to serve it within 48 hours. If you want more tips on making desserts that last, you can always check out my pointers on slowing down the moisture absorption in my recipes!
Estimated Nutritional Profile for Classic Dirt Cake
Look, I’m not a nutritionist, not by a long shot, but I totally get that when you’re making something this wonderfully delicious, you might want a rough idea of what you’re diving into! Since this **dirt cake** is packed with cream cheese, butter, and Oreos, it’s certainly a treat, not an everyday snack. Transparency is key here at Cooking Zenith, so I always try to give my readers the full picture, even if the numbers look a little high!
These numbers are just estimates, of course. They are based on the standard ingredient measurements for one slice out of the 12 servings listed in the recipe. If you cut bigger portions (and trust me, I’ve never seen anyone cut a small piece of this!), or if you use a different brand of whipped topping or cookies, the actual values will shift a bit. But this gives you a good baseline for planning your indulgent moment!
| Nutrient | Amount Per Serving |
|---|---|
| Serving Size | 1 slice |
| Calories | 450 |
| Sugar | 45g |
| Sodium | 350mg |
| Fat | 25g |
| Saturated Fat | 14g |
| Unsaturated Fat | 11g |
| Trans Fat | 0.5g |
| Carbohydrates | 55g |
| Fiber | 2g |
| Protein | 5g |
| Cholesterol | 45mg |
See? It’s a decadent chocolate treat, for sure! But honestly, when you’re celebrating or just need that major comfort hit, a slice of homemade, **no bake layered dessert** like this is worth every single delicious bite. Enjoy it guilt-free—it’s homemade, and you made it with love!
Share Your Dirt Cake Creations
Now that you have your pan of magnificent **dirt cake** chillling, I truly want to know how it turned out! Creating these recipes isn’t just about testing ratios in my own kitchen; it’s about building a community where we can all share joy over food. When you bring this to your next gathering, I hope people dig in with as much excitement as mine does!
Please, don’t be shy! If you make this **Oreo pudding dessert**, snap a photo and tag me on social media—I absolutely adore seeing my recipes come to life in your homes. Whether you went classic with the gummy worms or added your own spin to this **refrigerator cake**, your feedback matters so much to me. It helps me keep refining and sharing the best of my home cooking adventures!
If you loved how simple this was, leave a quick rating right here on the page, or drop a comment below telling me what your favorite layer was. Every question, every success story, makes this whole journey worthwhile. You can always learn more about my mission to elevate home cooking over at the About Page. Happy baking—or, well, happy *no-baking*!
PrintUltimate No-Bake Oreo Dirt Cake

Make this classic, creamy Dirt Cake using crushed Oreos, chocolate pudding, and a cream cheese layer. This easy, no-bake layered dessert is perfect for parties and potlucks.
- Prep Time: 25 min
- Cook Time: 0 min
- Total Time: 4 hr 25 min
- Yield: 12 servings 1x
- Category: Dessert
- Method: No-Bake Chilling
- Cuisine: American
- Diet: Vegetarian
Ingredients
- 1 package (14.3 ounces) Oreo cookies
- 1 cup unsalted butter, softened
- 8 ounces cream cheese, softened
- 1 cup powdered sugar
- 1 container (12 ounces) frozen whipped topping, thawed
- 2 packages (3.9 ounces each) instant chocolate pudding mix
- 3 cups cold milk
- 1 package (3.4 ounces) instant vanilla pudding mix
- 2 cups cold milk
- Gummy worms, for decoration
Instructions
- Set aside about 2 cups of whole or roughly crushed Oreo cookies for the topping. Place the remaining cookies into a food processor and pulse until you have fine crumbs that resemble dirt.
- In a large bowl, beat the softened butter, softened cream cheese, and powdered sugar together until the mixture is smooth and creamy. This forms the base of your rich layer.
- Gently fold in the thawed whipped topping until just combined. Do not overmix.
- In a separate bowl, whisk together the instant chocolate pudding mix and 3 cups of cold milk until the mixture thickens, about 2 minutes. Let it stand for 5 minutes.
- In another bowl, whisk together the instant vanilla pudding mix and 2 cups of cold milk until thickened. Let it stand for 5 minutes.
- In a large trifle dish or 9×13 inch pan, begin layering the dessert. Spread half of the crushed Oreo crumbs on the bottom.
- Spread the entire cream cheese mixture evenly over the first layer of crumbs.
- Spread the chocolate pudding mixture over the cream cheese layer.
- Spread the vanilla pudding mixture over the chocolate layer.
- Top the entire dessert with the remaining crushed Oreo crumbs. Press lightly.
- Cover the dish and chill in the refrigerator for at least 4 hours, or preferably overnight, to allow the layers to set.
- Before serving, press gummy worms into the top layer of crumbs for decoration. Slice and serve this easy party dessert.
Notes
- For individual servings, assemble this recipe in clear plastic cups to create fun Dirt Cups.
- If you prefer a richer chocolate flavor in the middle layer, substitute the vanilla pudding with an additional package of chocolate pudding.
- You can make this dessert up to 24 hours in advance; the chilling time helps the flavors blend.
Nutrition
- Serving Size: 1 slice
- Calories: 450
- Sugar: 45
- Sodium: 350
- Fat: 25
- Saturated Fat: 14
- Unsaturated Fat: 11
- Trans Fat: 0.5
- Carbohydrates: 55
- Fiber: 2
- Protein: 5
- Cholesterol: 45