
You know that sharp, tangy crunch you get from the best deli pickles? The kind that makes your eyes water just a tiny bit? I promise you, those aren’t the ones you buy off the shelf soaked in vinegar. Those are the real deal—the ones forged through natural **fermented pickles**.
When I first started exploring preservation, I thought it felt intimidating, honestly. But taking on true lacto-fermentation changed everything for me. It’s pure magic, watching salt, water, and vegetables turn into a complex, probiotic powerhouse right on your counter. This isn’t just about making sour cucumbers; it’s about rediscovering food the way our grandparents did.
This guide is everything I wish I knew when I started. We’re stripping away the complexity so you can master making your own crisp, tangy, traditional **fermented pickles** using just simple brine. Forget the quick refrigerator stuff; we are going for the profound, gut-healthy flavor that only time and good bacteria can give you. Trust me, once you taste the difference, you’ll never go back. I’ve included a link for a refrigerator pickle option if you’re in a major hurry, but hang tight for the real experience: quick pickled carrots.
- Why Real Fermented Pickles Are Worth the Wait
- Gathering Your Supplies for Perfect Fermented Pickles
- The Best Salt Brine Ratio for Vegetable Fermentation
- Homemade Fermented Pickles Recipe: Ingredient Prep
- How to Make Naturally Fermented Pickles: The Process
- Troubleshooting Common Issues with Your Fermented Pickles
- Achieving Traditional Sour Pickles Making Flavor
- Storage and Long Term Storage for Probiotic Pickles
- Frequently Asked Questions About Fermentation
Why Real Fermented Pickles Are Worth the Wait
I know, I know. Waiting a whole week for pickles feels like an eternity when you can run to the store right now. But let me tell you why these slow-fermented beauties beat the quick-brine, vinegar-soaked versions every single time. It’s about quality, not speed, and that’s where the magic is.
The difference you taste is huge. Think about it—the brine process actually *changes* the cucumber. Here’s what you gain by letting the good bacteria do their work:
- Texture: Fermented pickles hold onto their crunch! They stay firm and snappy because the sugars are consumed by the bacteria, not broken down by harsh acids.
- Flavor Profiles of Real Fermented Pickles: You get depth! It’s sour, yes, but it’s also earthy, complex, and savory—not just sharp pure vinegar taste.
- Probiotic Power: These are alive! They are packed with beneficial bacteria that are fantastic for your gut health. You just don’t get that from jarred shelf pickles.
Honestly, once you experience that clean, complex tang, you’ll understand why we embrace the wait. It’s cooking with nature, and it’s so worth the patience.
Gathering Your Supplies for Perfect Fermented Pickles
Okay, before we get to the fun part of mixing salt and water, we need the right gear. Don’t worry; you probably own most of this already! For successful **fermented pickles**, organization is key because we need to keep everything submerged and air out.
The most important thing? Water. You absolutely must use filtered or non-chlorinated water. Chlorine kills the good bacteria we need to start the lacto-fermentation process. Tap water is a no-go unless you boil it first and let it cool completely. Seems fussy, but trust me on this one!
Essential Equipment for Lacto Fermented Cucumbers Step by Step
Here’s what you’ll need ready to go BEFORE you start washing cukes. Wide-mouth glass jars are the easiest to work with. You also need something heavy, like a glass fermentation weight, to push the vegetables below the brine line—this is crucial! If you get really into this hobby, look into using fermentation airlocks for pickles; they let gas out but keep air completely out. It makes the process totally foolproof. If you’re looking for a different kitchen staple, I have a great easy homemade mayonnaise recipe too, but for now, focus on the weights!

The Best Salt Brine Ratio for Vegetable Fermentation
This right here is where most people panic, but I promise you, it is pure math, and it is simple!
If you mess up the salt ratio, you either end up with soft, mushy pickles (too little salt) or pickles that taste way too salty (too much salt). We are aiming for that sweet spot where the salt is high enough to stop the bad bacteria but low enough to encourage the good lacto-bacilli to thrive. We need the **Best salt brine ratio for vegetable fermentation** to be precise.
For this recipe, which uses one full gallon of water, we use exactly 3 tablespoons of pickling salt. Please make sure you are using pickling salt or pure sea salt—never use table salt with iodine or anti-caking agents in it! Those additives mess with our good bacteria big time, which stops your **fermented pickles** from working their magic.
Just dissolve those 3 tablespoons completely into your gallon of filtered water. Stir it until it’s crystal clear. That gives us a perfectly safe 2.25% salt solution. If you’re using a smaller jar, just scale it down—but that gallon ratio is your golden standard. It’s so reliable; I rarely even measure the water anymore; I just go by the salt weight!
Homemade Fermented Pickles Recipe: Ingredient Prep
Alright, now that our brine is ready to go, it’s time to get those cucumbers prepped! Remember, the secret to getting amazing, crisp **fermented pickles** starts right here with the raw ingredients. You cannot use old, floppy cucumbers, folks. You want them fresh from the garden or the market, ideally picked within the last day.
Give everything a super good scrub. But here’s the real pro tip: you have to trim off the blossom end of the cucumber—that little circular bit on the opposite end from the stem. That part contains natural enzymes that fight fermentation and are the leading cause of mushy pickles later on. Cut a tiny slice off both ends, but focus especially on that blossom end to keep everything firm!
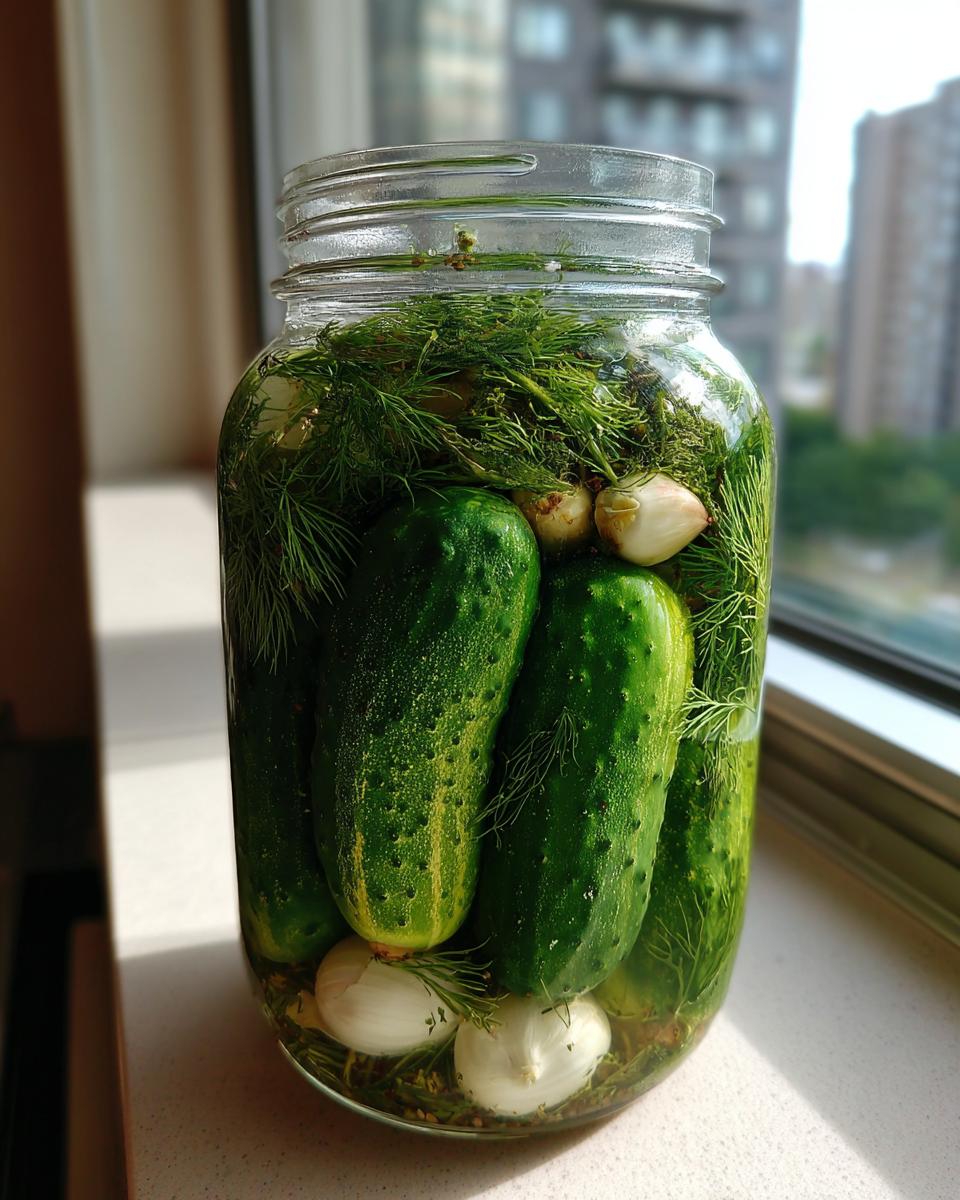
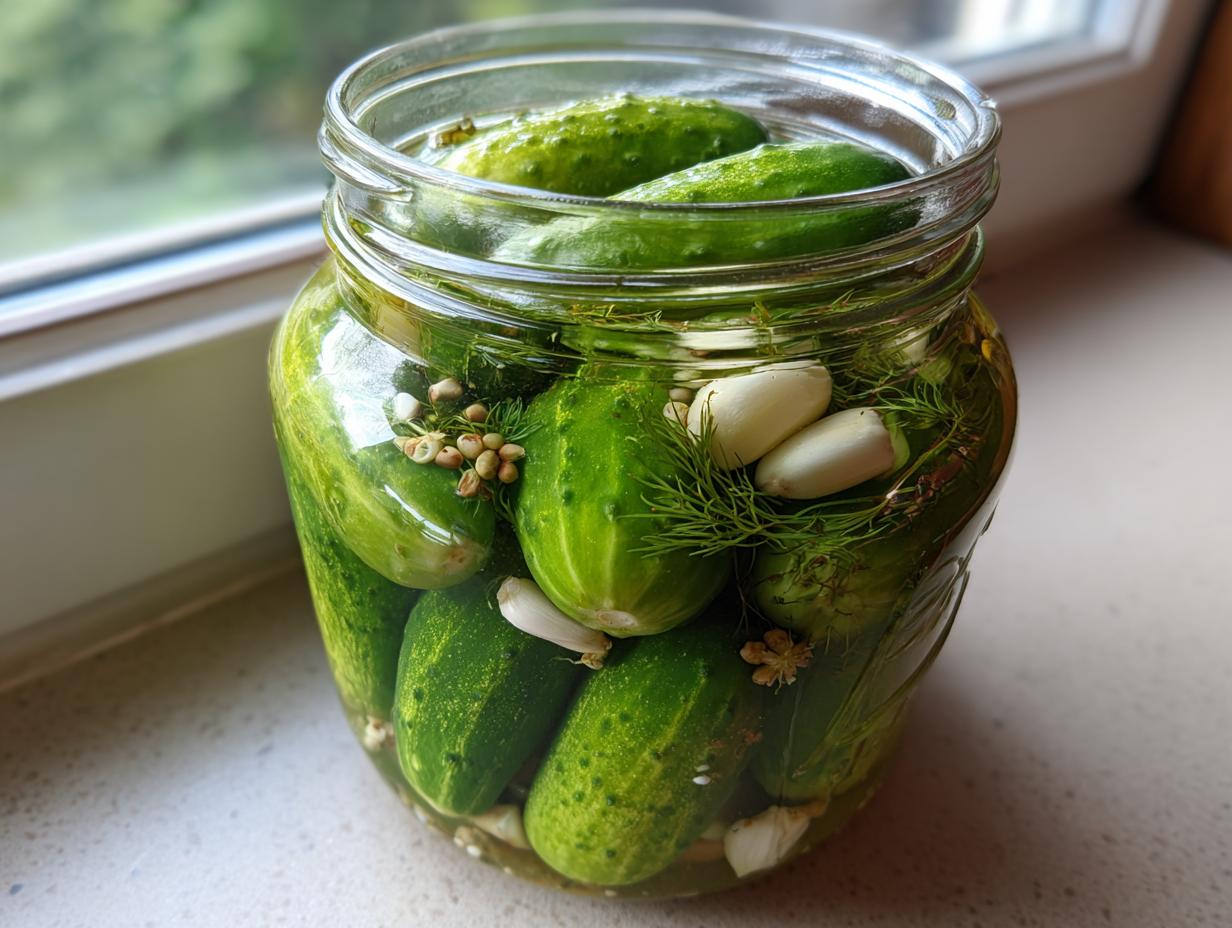
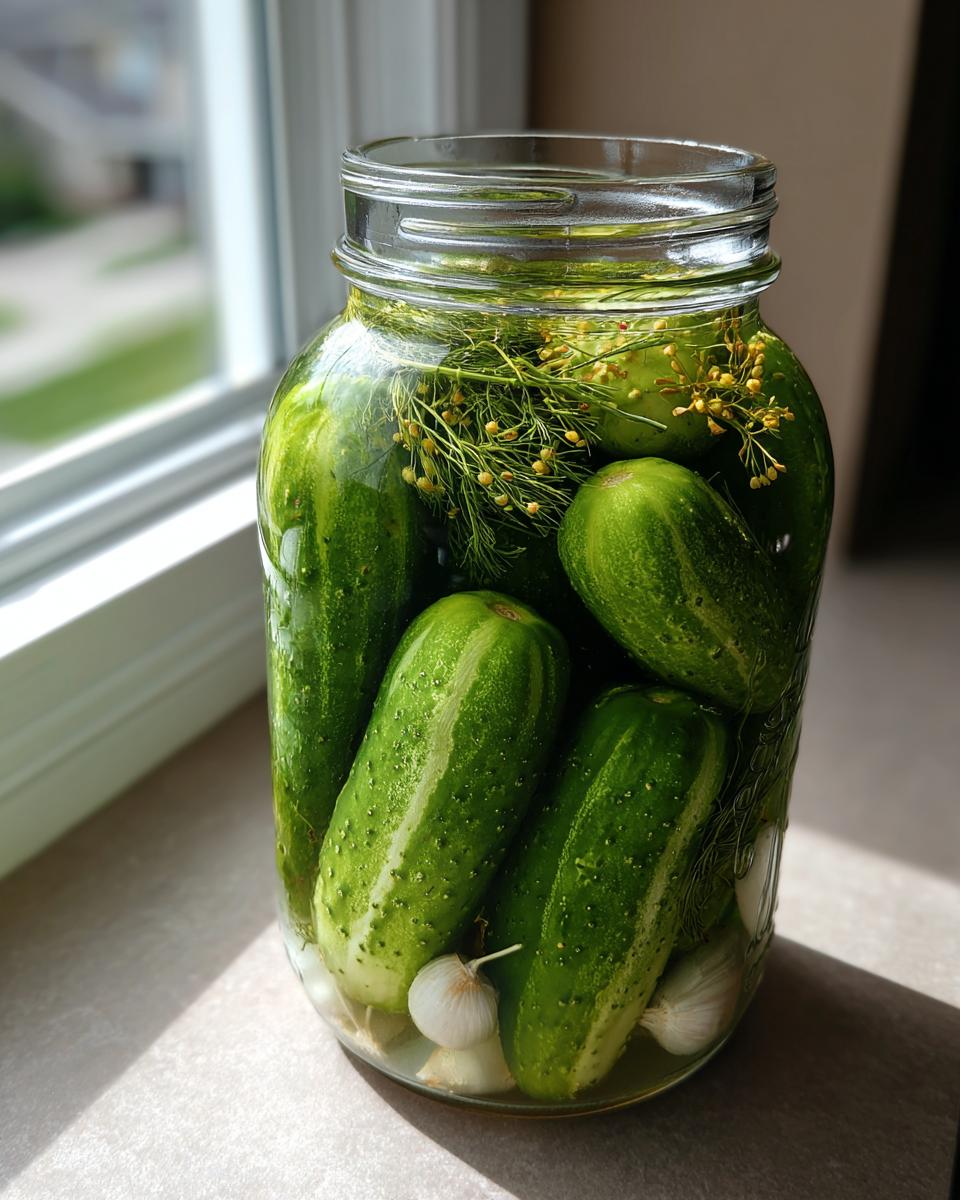
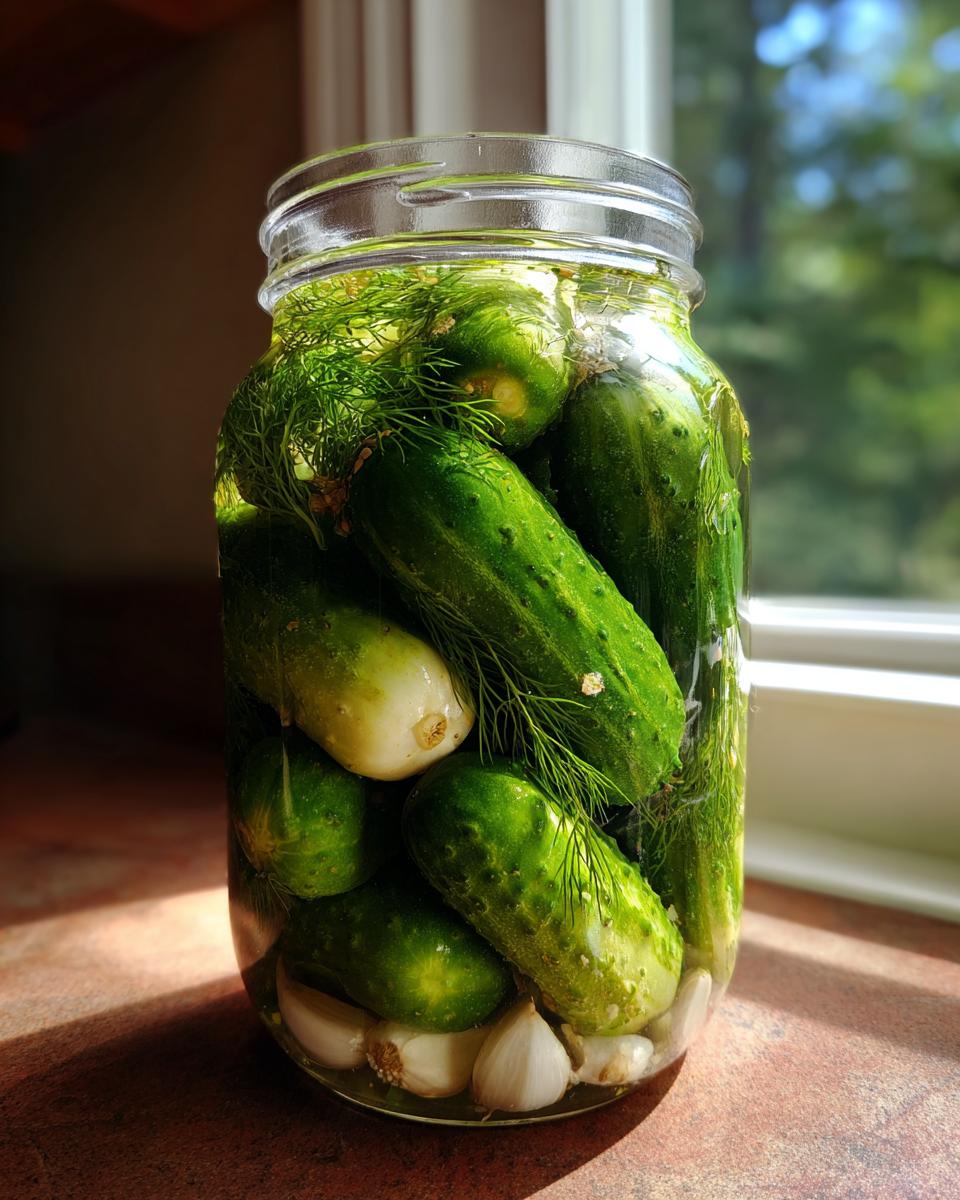
If you want those classic sour flavors, toss in your flavor elements now: garlic cloves, peppercorns, and some fresh dill heads. I also link to my easy homemade mayonnaise recipe because I love sharing those foundational recipes, but today, we stick to the dill! Pack those cucumbers snuggly into your clean jars.
How to Make Naturally Fermented Pickles: The Process
Now we put it all together! This is the main event. If you’ve got your brine ready and your cucumbers packed tight with your spices, you’re about to start the real magic of creating **lacto fermented cucumbers step by step**.
First, take that gallon of brine you mixed up (remember, 3 tablespoons of salt to a gallon of water?) and pour it right over those packed cucumbers. You need to make sure every single piece of cucumber is completely covered by the liquid. If they aren’t submerged, they can spoil instead of fermenting! If you want to see how I use jars for other recipes, check out my easy homemade mayonnaise recipe, but for pickles, the immersion is key!
Leave about an inch of space at the very top of your jar for expansion. Then, you must weigh them down. I use glass fermentation weights because they are heavy and non-reactive. You want those cukes held firmly under the brine line. This stops air from getting in, which is vital for safety and flavor development in your **fermented pickles**.
Next is sealing. If you’re using an airlock lid system, seal it up tight according to the directions. If you’re using a standard mason jar lid, just screw it on loosely—don’t crank it down! The bacteria create gas, and that gas needs a small way out, or you’ll have a jar explosion, and nobody wants that mess.
Now, walk them over to a spot where they can chill out but stay warm. We want them fermenting at room temperature, ideally between 65 and 75 degrees Fahrenheit. A dark cupboard or a corner away from the window works perfectly. Don’t put them in direct sunlight; it heats them unevenly and can go bad fast!
Cucumber Fermentation at Room Temperature Monitoring
This is the fun waiting game! Within about 24 to 48 hours, you should see little signs of life—tiny bubbles popping up in the brine. That’s happiness! That means those helpful lactic acid bacteria are eating the sugars and doing their stinky, wonderful work. Don’t freak out if the brine turns cloudy, either. That is completely normal for **homemade fermented pickles recipe** success.
The warmer your room is, the faster they will work. So, if your kitchen is cozy, they might be ready sooner. I usually start sneaking a taste after day three, just poking one with a fork. Only pull them out when the flavor is exactly what you want—maybe slightly tangy, maybe really sour. Once they hit that perfect spot, seal them up tight and pop them straight into the fridge to slow everything down. I wish I could give you one perfect time frame, but it’s all about taste!
Troubleshooting Common Issues with Your Fermented Pickles
If you’re new to making **fermented pickles**, it’s easy to get spooked by things that are actually totally normal! Let’s talk about the worrisome stuff so you can keep your confidence up.
The biggest fear is always texture. If you’re asking, “Why are my fermented pickles soft?” the answer usually lies in two places. First, did you trim off that blossom end of the cucumber? That end is sneaky and promotes sliminess if left on. Second, did you use good, firm cucumbers right away? Pre-bagged, old cukes just won’t cut it here.
Then there’s the brine itself. Seeing cloudy brine is usually a great sign of active lacto-bacteria—that’s good! But if you are **troubleshooting cloudy pickle brine** that looks murky *before* you even see bubbles, double-check that you used non-iodized salt. Iodine absolutely halts the good process before it can even start.
And please, always keep those cukes submerged! Mold is fuzzy and colorful. If you see Kahm yeast—that thin white film—just skim it off the top. But if you see anything fuzzy or green, it’s time to toss that jar. That’s why we use weights!
Achieving Traditional Sour Pickles Making Flavor
This part is truly an art, not just a science. We’ve done the prep work, and now those little bacteria are doing the heavy lifting, transforming simple water and salt into that amazing, complex sour flavor profile we crave. This is the key to **traditional sour pickles making**.
How long does it take to hit peak deliciousness for your **fermented pickles**? Honestly, it’s a range, and temperature is the biggest deciding factor. If your kitchen is on the warmer side—closer to 75°F—you might be ready to taste test by day three or four. If your spot is cool, say 65°F, you might need a full 10 days or even two weeks to reach that full, satisfyingly sour stage.
My advice? Be a tasting scientist! Don’t rely on the calendar alone. Every day after day three, just sneak one out, take a tiny bite, and see where it sits on the sour-to-crisp scale for you. Are they tangy enough? Do they still have that great pickle crunch? Once you hit that perfect spot, that’s when you pull them out for storage. When they taste perfect to you, that’s when they are done!
Storage and Long Term Storage for Probiotic Pickles
Wonderful! Your **fermented pickles** have reached the exact point of sour deliciousness you were aiming for. This means those little bacteria have done their job perfectly, and now we need to hit the brakes so they don’t turn into overly sour mush!
The very moment you love the flavor—maybe day 5, maybe day 8—you need to move them straight into the refrigerator. Pull out those weights, secure the lids tightly (no more loose tops!), and get them cold. The cold temperature dramatically slows down the fermentation process. It essentially puts the bacteria into a deep, chilly slumber.
This cold storage is exactly what gives you great **long term storage for probiotic pickles**. If they stay cold, they’ll keep developing very slowly. Most folks find that their pickles are excellent for at least three to six months in the fridge. They might get slightly softer over time, but the flavor stays beautifully complex and tangy because the bacteria aren’t dead—they’re just napping!
Remember to always keep the jar full of brine, even in the fridge. If the brine level drops too much, top it off with a tiny bit of fresh 2.25% brine you can whip up easily. But honestly, once they are chilled, these homemade beauties keep longer and taste so much better than anything you buy.
Frequently Asked Questions About Fermentation
I always get so many questions when people start their first batch of **fermented pickles**! It’s new territory, and it’s easy to get stuck on little details. Here are some of the things I hear most often when folks are trying to master **how to make naturally fermented pickles**.
Can I just use tap water for my brine?
Oh, please don’t! This is one of the biggest mistakes I see beginners make. Tap water almost always contains chlorine, and chlorine is designed to kill bacteria—that includes the good lacto-bacilli we need for successful fermentation. You need filtered water, or you can boil your tap water aggressively for about 10 minutes and then let it cool completely on the counter before you mix your salt in. Remember, we want happy, thriving bacteria, not chlorine enemies!
I see a white film on top. Is my batch ruined?
This is where folks panic about **troubleshooting cloudy pickle brine** or surface films. If you see a thin, dusty white film floating on the surface after a few days, that’s usually Kahm yeast. It’s harmless, though it can sometimes impart a mild flavor. If you see it, just grab a clean spoon and gently skim it right off the top. If you wait too long, it can get thick. However, if you see anything fuzzy, colored (like blue or green), or black, that’s full-on mold, and sadly, you must toss that jar. Always keep those weights submerged! Cooking is all about learning to spot the difference between harmless funk and actual spoilage—kind of like when you’re making my easy homemade mayonnaise recipe and you worry about the egg yolk, but it usually turns out fine!
How long until they are ready to eat?
That’s the million-dollar question! For crisp, slightly sour **homemade fermented pickles recipe** flavor, you want to start tasting around day three. But honestly, they are ready when they taste right *to you*. If you like them just lightly tangy, you might be done in 5 days. If you prefer that deep, traditional sour flavor, you might need 10 or even 14 days, especially if your kitchen is cooler. That’s why tasting daily is the best way to manage the process!
What if my pickles are getting soft instead of staying crisp?
Ah, the texture struggle! If you’re asking, “Why are my **fermented pickles** soft?” nine times out of ten it’s because you skipped trimming the blossom end off the cucumber right before jarring. That end has enzymes that actively fight crispness. Also, make sure your salt concentration is correct—too little salt and the bad bacteria can take over and break down texture. Always use fresh cukes and trim those ends!
PrintTraditional Lacto-Fermented Pickles: A Beginner’s Guide

Learn how to make naturally fermented pickles using a simple salt brine. This guide covers the step-by-step process for lacto fermentation, ensuring you achieve crisp, flavorful, probiotic pickles at home.
- Prep Time: 20 min
- Cook Time: 0 min
- Total Time: 20 min (plus 5-10 days fermentation)
- Yield: Approximately 4 quarts 1x
- Category: Preserves
- Method: Fermentation
- Cuisine: American
- Diet: Vegan
Ingredients
- 3 pounds fresh pickling cucumbers (Kirby or similar)
- 1 gallon filtered, non-chlorinated water
- 3 tablespoons pickling salt (non-iodized)
- Optional: 4 cloves garlic, peeled
- Optional: 1 teaspoon black peppercorns
- Optional: 1 teaspoon fresh dill heads or 1 tablespoon dill seed
Instructions
- Clean your cucumbers thoroughly. Trim the blossom end off each cucumber, as this end contains enzymes that can cause softness.
- Prepare the brine: Dissolve the 3 tablespoons of pickling salt into 1 gallon of filtered water. Stir until the salt is completely dissolved. This creates a 2.25% brine solution, which is ideal for vegetable fermentation.
- Prepare your jars: Use clean, wide-mouth glass jars (quart or half-gallon size). If using, place the garlic, peppercorns, and dill into the bottom of each jar. Pack the cucumbers tightly into the jars, standing them upright if possible.
- Pour the prepared brine over the cucumbers, ensuring they are completely submerged. Leave at least 1 inch of headspace at the top of the jar.
- Weigh the cucumbers down: Place a fermentation weight (glass or ceramic) on top of the cucumbers to keep them below the brine level. This prevents exposure to air, which can lead to spoilage.
- Cover the jar: If using an airlock lid system, secure it now. If using a standard lid, screw it on loosely to allow gases to escape, or cover the opening with a piece of cheesecloth secured with a rubber band.
- Ferment at room temperature: Place the jars in a cool, dark spot away from direct sunlight (65 to 75 degrees Fahrenheit is ideal).
- Monitor the process: Within 24 to 48 hours, you should see small bubbles forming, indicating active fermentation. The brine may become cloudy; this is normal for lacto fermented pickles.
- Taste test: Begin tasting the pickles after 3 days. The fermentation time depends on the temperature; warmer rooms ferment faster. For a crisp, slightly sour pickle, fermentation usually takes 5 to 10 days.
- Store: Once the flavor is to your liking, remove the weights, seal the jars tightly, and transfer them to the refrigerator. Refrigeration stops the fermentation process.
Notes
- Use only non-iodized salt. Iodine can inhibit the beneficial bacteria growth needed for successful fermentation.
- If you see white, harmless yeast film (kahm yeast) on the surface, skim it off. If you see fuzzy, colored mold, discard the batch.
- For the best texture, use fresh, firm cucumbers picked within 24 hours of making the pickles.
- If you are new to this, start with a smaller batch to understand the process before committing to a large volume.
Nutrition
- Serving Size: 1 pickle
- Calories: 5
- Sugar: 0.2
- Sodium: 150
- Fat: 0.1
- Saturated Fat: 0.0
- Unsaturated Fat: 0.1
- Trans Fat: 0.0
- Carbohydrates: 1.2
- Fiber: 0.3
- Protein: 0.2
- Cholesterol: 0