

Oh, how many times have I sighed, pulling a tray of flat, sad puddles out of the oven? Seriously, the flat sad pancake masquerading as a side dish is the ultimate Sunday roast tragedy! But listen up, because I’ve cracked the code. This isn’t just another recipe; this is the definitive, foolproof technique guide to making truly tall, beautifully crispy yorkshire pudding every single time. As a home cook like you, I learned that mastery comes from nailing the heat, not following some fussy instructions. I promise, by the end of this guide, you’ll be making puffy bread bowls with confidence that would make any professional proud.
- Why You Must Master the Technique for Puffy Yorkshire Puddings
- The Easy Batter Recipe: Mixing for Maximum Rise in Your Yorkshire Pudding
- The Ultimate Heat Shock: Preparing Your Tin for Crispy Yorkshire Pudding Recipe
- Step-by-Step Instructions: How to Make Yorkshire Puddings Rise Tall
- Troubleshooting Common Issues with Puffy Bread Bowls
- Serving Suggestions for your yorkshire pudding: Beyond the Sunday Roast Essentials
- Storage & Reheating Instructions for Golden Brown Puddings
- Frequently Asked Questions about Crispy Yorkshire Pudding Recipe
- Understanding the Estimated Nutrition for This Classic Savory Puff
- Share Your Perfect Yorkshire Pudding Creations
Why You Must Master the Technique for Puffy Yorkshire Puddings
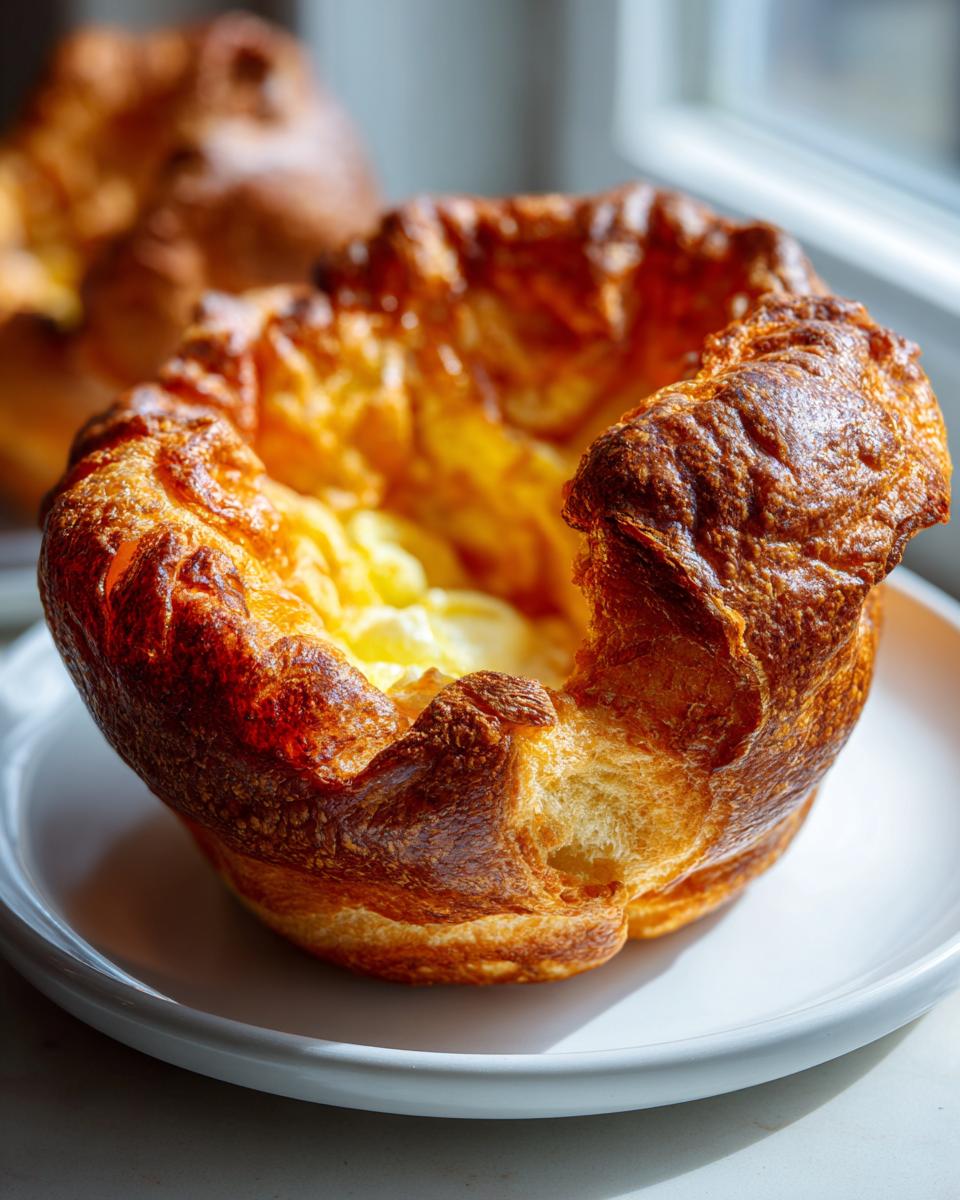
Look, you want height. Who doesn’t? We are aiming for that glorious contrast: edges so shatteringly crispy they crunch when you bite them, but a center so soft and light it melts when the gravy hits it. That perfect structure—what some folks call those fluffy side dishes—isn’t magic; it’s pure, simple technique for puffy puddings. I want you to experience foolproof baking victory! I remember the first time I finally got them right. They rose so dramatically my husband actually walked into the kitchen to see if I’d accidentally put a small bread bowl in the oven instead of a pudding. It was glorious!
The Essential Ingredients for Perfect Yorkshire Puddings
The beauty of these classic savory puffs is how basic the list is. You don’t need anything fancy, which is why this is such a cost-effective classic! You’ll need four large eggs, one cup of plain flour, one cup of milk—and please, use whole milk if you can, it makes a difference!—and just a half teaspoon of salt. That’s it! Seriously, don’t mess with the ratio here. These four things are the backbone of your rise, and the salt just helps wake everything up before it hits that hot tin.
The Easy Batter Recipe: Mixing for Maximum Rise in Your Yorkshire Pudding
When it comes to the mix, you have to trust me on this: less is more! This easy batter recipe is all about gently combining things, not whipping them into submission. Dump your eggs, flour, milk, and salt right into a big bowl. Now, grab your whisk, but don’t go crazy! You only need to whisk until everything is *just* combined into something smooth. If you obsess over getting rid of every single tiny lump, guess what? You’re developing gluten, and gluten makes tough puddings, not fluffy ones. We want the consistency to look like thin cream—runny, almost watery, but definitely smooth enough to pour easily.
Crucial Step: Resting the yorkshire pudding Batter Overnight
This is where so many people drop the ball! You absolutely must let this batter rest. I know, I know, you’re eager to eat, but popping it in the fridge for at least thirty minutes, or even better, overnight, makes a world of difference. Resting lets the flour fully hydrate. When the flour soaks up all that liquid properly, it sets you up for that incredible oven spring later. Think of it as preparing your make ahead yorkshire batter for maximum performance. Trust me, cold batter hitting smoking hot fat gives you a much wilder, taller puff than room temperature batter ever will!
The Ultimate Heat Shock: Preparing Your Tin for Crispy Yorkshire Pudding Recipe
Okay, this is the part where we separate the flat failures from the magnificent, sky-scraping triumphs! This technique is non-negotiable if you want genuinely crispy Yorkshire pudding recipe results. Forget everything you think you know about baking prep for a second; we need fire! You absolutely have to preheat your oven to a blistering 450°F (or 230°C). But the real kick comes from the fat in that tin. You need to put your muffin tin—or whatever specific tray you use—into that preheating oven. You can check out my thoughts on kitchen safety over at the privacy policy page, because handling smoking fat requires caution!

Add just a tiny bit of fat to each hole. I always use vegetable oil, but if you’re going traditional, beef dripping is amazing! You only need about a teaspoon per cup, which is why this ends up being such a ridiculously cheap bake, sometimes only costing about 8p per batch! You leave that tin in there—fat melting and heating—for a solid ten minutes after the oven says it’s ready. When you pull that tin out, that fat needs to be practically smoking. That shock of icy cold batter hitting that screaming hot fat is what forces that immediate, dramatic rise!
Equipment Needed for Perfect Yorkshire Puddings
You probably have all this lying around, which is perfect for that home-cook feel. You definitely need a whisk for the initial batter mix, which hopefully you already did! For baking the yorkshire pudding, a standard 12-hole muffin tin works like a charm. If you want super high sides, sometimes a dedicated deep pudding tin is great, but honestly, any sturdy metal tin will do the job as long as it gets screaming hot. Don’t worry about fancy equipment; just worry about that heat!
Step-by-Step Instructions: How to Make Yorkshire Puddings Rise Tall
Now we put everything together, and this part needs speed and confidence! This is where you put all that preparation into action to learn exactly how to make yorkshire puddings that fly off the tin. Remember:
- Combine your cold batter (from the resting phase) with that screaming hot, smoking fat.
- Work fast! You cannot let that heat escape.
Because you’ve done the prep right, this process is almost theatrical. Carefully, using really good oven mitts, pull that blazing hot tin of smoking fat out of the oven. Don’t dawdle! Quickly pour the cold batter into each hole, going about one-third full. Work methodically from one end to the other so the first ones stay hotter than the last ones. As soon as the last one is poured, slide that tin right back into the 450°F oven where it belongs. You need that intense, even heat for the final, beautiful puff!
Baking Secrets: Do Not Open the Oven Door for yorkshire pudding
This is my biggest, loudest warning. For the love of all things fluffy and golden, resist the urge! Once that tin goes in, you absolutely cannot open the oven door for at least 15 minutes. I mean it! If you peek, even for a second, that blast of cool air hits the rising puddings, and they deflate instantly. That structural integrity they’ve built up? Gone. Poof! You’ll be left with those sad, flat disks all over again. Just trust the process, let the heat do its job, and wait until you see them beautifully golden brown before even considering looking!
When they’re looking ready—big, dark gold, and seeming solid—you can check. They should take about 20 to 25 minutes total. If you want more recipe testing inspiration, check out the amazing work over at Serious Eats, but I bet mine are puffier!
Troubleshooting Common Issues with Puffy Bread Bowls
So, if you followed everything and still ended up with something closer to a pancake than one of those glorious puffy bread bowls, don’t panic or toss the batter! It happens to the best of us, and 99% of the time, it comes down to just one thing: heat. Did you rush the preheat? If your oven wasn’t at a screaming 450°F when the tin went in, they won’t puff. Solution: Use an oven thermometer! Another common killer is checking too early. I cannot stress this enough—opening the door before the 15-minute mark lets all the built-up steam escape, and your beautiful rise collapses instantly.

If you used cold batter, which is what I recommend, but your fat wasn’t quite smoking hot when you poured, you lost that crucial thermal shock. If you suspect your fat wasn’t hot enough, try putting those sad puddings back in for another five minutes on high heat; sometimes a quick blast rescues them! Remember, perfection is all about that initial blast of intense heat straight to the batter.
Serving Suggestions for your yorkshire pudding: Beyond the Sunday Roast Essentials
Right, once you’ve got these magnificent, towering creations out of the oven, the job isn’t quite done! While our yorkshire pudding is absolutely required for any proper Sunday roast essentials—think roast beef and mountains of rich gravy—they are so versatile. Don’t be shy about using them as the ultimate best gravy soakers around; that soft center is designed for it!

But honestly, these classic savory puffs can be used for anything! If you’re feeling super inspired, you can turn them into savory bowls. Imagine filling one of those big hollows with cottage pie filling, pulled pork, or even creamy scrambled eggs for a fantastic weekend brunch. They puff up so beautifully, they act like edible plates. Just make sure whatever you fill them with is piping hot when it goes in so you don’t deflate your hard work!
Storage & Reheating Instructions for Golden Brown Puddings
Now, the sad truth about truly phenomenal yorkshire pudding is that they are absolutely at their peak the moment they come out of that hot oven. They are meant to be enjoyed fresh! That said, if you have leftovers, don’t just trash them! Once they are completely cooled down, stack them gently in an airtight container. They’ll keep decent for day one.
When you get ready to reheat those golden brown puddings, skip the microwave! Microwaves are the enemy of crispiness; they’ll just make them soggy. Pop them back into a hot oven—about 375°F (190°C)—for about 5 to 7 minutes. This warms them through and brings a lot of that outside crispness right back. They won’t be quite as magnificent as fresh from the tin, but they are still miles better than store-bought!
Frequently Asked Questions about Crispy Yorkshire Pudding Recipe
I get so many questions about this recipe because everyone wants those perfect, light and airy bakes! It’s funny how such simple ingredients can cause so much confusion, but trust me, once you follow the heat rules, you’re set. I’ve gathered the most common things folks ask about my crispy yorkshire pudding recipe right here so we can clear up any lingering doubts.
Can I use water instead of milk?
Please, please, please don’t substitute water for milk, especially if you are aiming for the absolute best results! Milk contains fat and proteins that help give the pudding structure and that beautiful golden color when it bakes. If you use water, you’re going to get a much flatter, pale imitation. We are making true yorkshire pudding here, not some sort of sad water cracker!
Can I use cold batter in the hot fat?
Yes, you absolutely should! I actually insist on it! Remember how I mentioned resting the batter overnight? That means you are intentionally using cold batter. The difference between cold batter hitting screaming hot fat versus room temperature batter hitting hot fat is night and day. That super-cold shock is a huge part of what forces those wonderful, dramatic puffs. If you want those tall sides for your fluffy side dishes, keep that batter chilled right up until the second you pour it!
What is the best fat to use for that perfect rise?
Okay, this is a fun debate! For the best, most traditional flavor—the kind that tastes exactly like they do in England—you want beef dripping. It has a super high smoke point, which is perfect for our high-heat method. If you aren’t cooking beef or simply prefer a vegetarian option, using a neutral oil with a high smoke point like sunflower or refined avocado oil works wonders too. Either way, the melted fat in the tin needs to be violently hot, smoking hot, for that dramatic effect!
Can I use the batter for homemade popovers?
That’s a smart question, because honestly, they are basically cousins to each other! Yes, the batter ratio here follows the classic technique for American homemade popovers. If you love the technique for these perfect yorkshire puddings, you’ll find those techniques translate perfectly if you switch up the flavorings for sweet popovers. It’s the exact same principle: cold batter, scorching hot oil!
Can I use beef dripping for the best yorkshire pudding results?
Absolutely! If you want that authentic, deep, savory flavor that tells everyone you’re serious about your Sunday roast, beef dripping is the absolute top tier choice. Beyond flavor, dripping is fantastic because it handles intense heat so well without breaking down or burning too quickly. That high smoke point is crucial when you are trying to achieve those amazing, tall risers. If you’re already making beef for your roast, just skim a little fat off the joint before it cools—it’s free flavor!
Understanding the Estimated Nutrition for This Classic Savory Puff
Now, I need to be super upfront here. I am a home cook, not a registered dietitian, so these numbers are rough estimates based on the core ingredients I use and are really just for general guidance. My focus is always on flavor and that amazing rise, but I know some of you appreciate knowing the basics!
These values are calculated per single pudding, assuming a serving size of one small puff. If you eat three—which, let’s be honest, I often do—you simply multiply those numbers! Remember, this doesn’t include the extra calories, fat, or sodium you’re adding when you drench them in gravy, but isn’t that the whole point?
- Serving Size: 1 pudding
- Calories: 110
- Fat: 5g (with 1.5g saturated)
- Carbohydrates: 13g
- Protein: 4g
- Sugar: 2g
- Sodium: 150mg
It’s pretty amazing that such a fluffy, satisfying side dish that brings so much joy to a British roast dinner comes from such simple pantry staples, right? Just keep in mind that the fat you use for baking (dripping versus oil) and the exact type of milk will slightly shift these numbers. Don’t stress too much about the math; just stress about getting that oven hot enough!
Share Your Perfect Yorkshire Pudding Creations
Well, now you have all my closely guarded secrets for achieving those magnificent, towering yorkshire pudding results! I genuinely hope you run to your kitchen and test this out immediately. When you pull that tray out and see those golden crowns puffing up way past the edges of the tin, you have to tell me about it!
Seriously, I want to hear every detail. Did you nail the heat shock? Did the batter rest overnight? Drop a rating down below—let me know how many stars these British baking recipes earned in your house. Even better, if you snap a photo of your puffy loaves—or if you ran into a snag and need a quick tip—tag me on social media! Connecting with all of you and seeing your kitchen successes is seriously the best part of sharing my cooking journey.
Don’t forget, the best recipes are the ones that get used and loved. Let’s celebrate this incredible British standard together and make sure every roast dinner has the perfect, gravity-defying side dish it deserves!
PrintThe Ultimate Foolproof Guide to Perfect Puffy Yorkshire Puddings

Learn the technique to make light, tall, and crispy Yorkshire puddings with soft centers every time, the essential side for your Sunday roast.
- Prep Time: 10 min
- Cook Time: 25 min
- Total Time: 35 min (plus resting time)
- Yield: 12 medium puddings 1x
- Category: Side Dish
- Method: Baking
- Cuisine: British
- Diet: Vegetarian
Ingredients
- 4 large eggs
- 1 cup all-purpose flour
- 1 cup milk (whole milk works best)
- 1/2 teaspoon salt
- Vegetable oil or beef dripping (for the tin)
Instructions
- Combine the ingredients: Place the eggs, flour, milk, and salt into a large bowl. Whisk until you have a smooth batter, similar in consistency to thin cream. Do not overmix; a few small lumps are acceptable.
- Rest the batter: Cover the bowl and place the batter in the refrigerator for at least 30 minutes, or ideally overnight. Resting the batter is crucial for a good rise.
- Preheat the oven and tin: Place a 12-hole muffin tin (or a specific Yorkshire pudding tin) into the oven. Add about 1 teaspoon of oil or beef dripping into each cup. Preheat the oven to 450°F (230°C). The oven and the fat must be extremely hot.
- Heat the fat: Allow the tin and fat to heat in the oven for at least 10 minutes until the fat is smoking hot. This high temperature shock causes the puddings to puff.
- Pour the batter: Carefully remove the hot tin from the oven. Quickly and evenly pour the cold batter into the hot fat, filling each cup about one-third full. Work fast to keep the heat in the tin.
- Bake immediately: Return the tin to the hot oven immediately. Do not open the oven door for the first 15 minutes of cooking.
- Cook until golden: Bake for 20 to 25 minutes, or until the puddings are dramatically risen, deep golden brown, and crispy on the edges.
- Serve hot: Remove from the oven and serve immediately with your roast dinner and gravy.
Notes
- For the tallest rise, the fat must be smoking hot when the batter hits it. This is the most important step for puffy bread bowls.
- If you want to make ahead, the batter can rest in the refrigerator for up to 24 hours. Bring it close to room temperature before using, but do not reheat it.
- Use beef dripping if you want the most traditional flavor for these classic savory puffs.
- If your puddings collapse, it usually means the oven temperature dropped too much or you opened the door too soon.
Nutrition
- Serving Size: 1 pudding
- Calories: 110
- Sugar: 2
- Sodium: 150
- Fat: 5
- Saturated Fat: 1.5
- Unsaturated Fat: 3.5
- Trans Fat: 0
- Carbohydrates: 13
- Fiber: 0.5
- Protein: 4
- Cholesterol: 60