
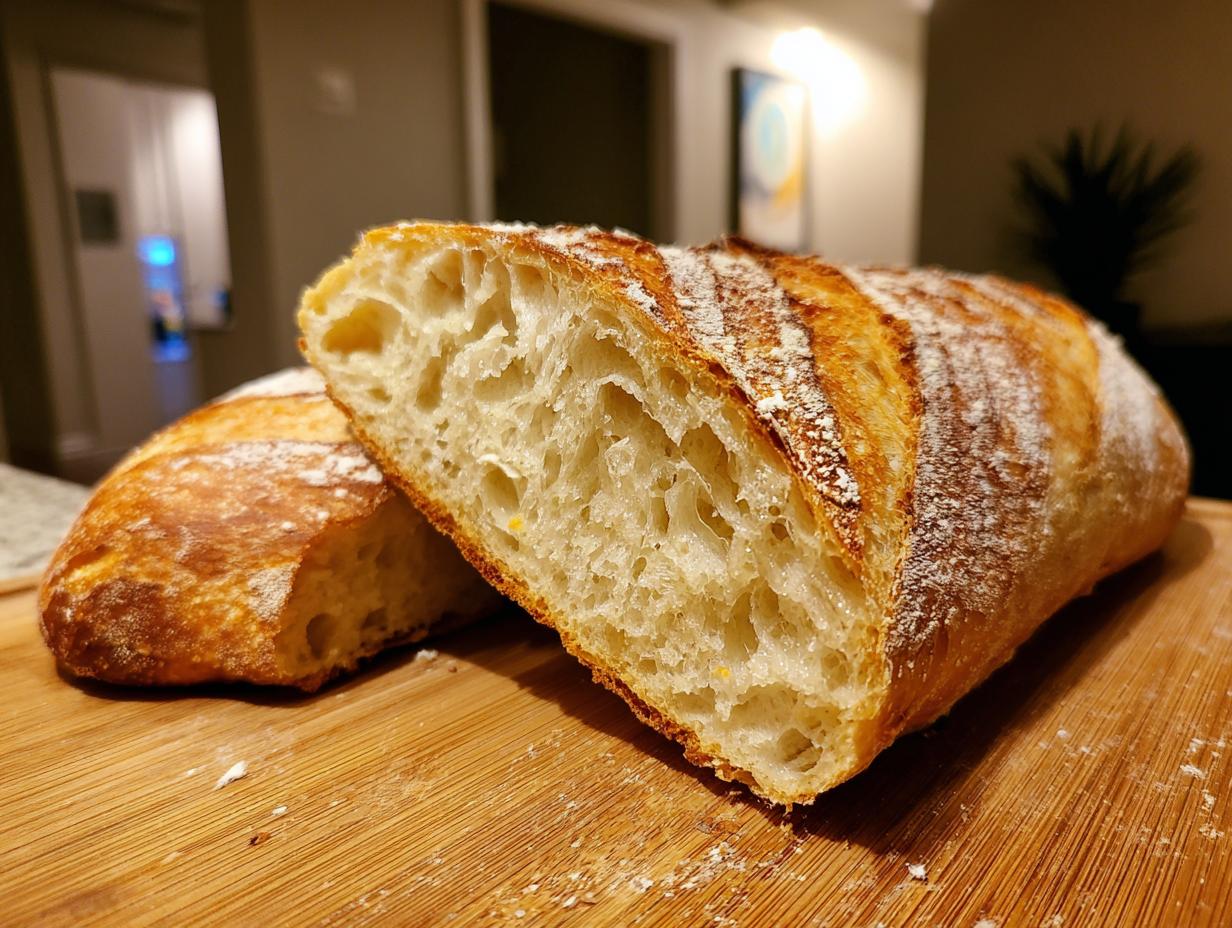
Oh, the smell! Is there anything better than walking into your own kitchen when freshly baked bread is cooling on the rack? Seriously, that yeasty, warm, toasty aroma just stops you in your tracks. I know so many of you think making great bread—especially that gorgeous, crackly loaf you usually buy at the bakery—is super complicated, but I’m here to change your mind! This Easy 1-Hour Homemade French Bread recipe is my answer to those busy weeknights when you want real, quality dinner bread fast.
When I started Cooking Zenith because I wanted to empower home cooks, bread was a big focus. It felt intimidating! But after countless tests, I figured out the timing to get a beautiful crust and a soft, pillowy interior in about 60 minutes. Trust me, if you can mix water and flour, you can master this simple bread making. You won’t need a whole afternoon; you’ll have perfect french bread ready before dinner even gets rolling!
- Why This Easy French Bread Recipe Works for Beginners
- Ingredients for Your Homemade French Bread Recipe
- Essential Equipment for Perfect French Bread
- Step-by-Step Instructions for Quick French Bread
- Tips for Success with Your Easy French Bread
- Storing and Reheating Homemade French Bread
- Frequently Asked Questions About Making French Bread
- Estimated Nutritional Data for This French Bread
- Share Your Homemade French Bread Creations
Why This Easy French Bread Recipe Works for Beginners
I get it—baking can look scary! But I promise this recipe is my no-fail approach to getting amazing bakery style bread at home without spending all day babysitting the dough. We designed this to be fast and fuss-free. You get all the flavor goodness without the multi-hour wait.
- It requires only pantry staples, so you don’t need a specialized grocery run.
- The kneading is straightforward, giving you great results without tough technique.
- It delivers that amazing combination of crusty exterior and soft fluffy french bread inside!
Achieving Bakery Style Bread At Home Quickly
Our main goal here was speed! I spent ages testing different yeast temperatures and rise times because, let’s be honest, who has five hours for bread? This magic works because we use warm water to wake up the yeast fast, giving us a truly quick french bread experience. It’s a genuine one hour bread recipe, even accounting for shaping time.
The Secret to Soft Fluffy French Bread Texture
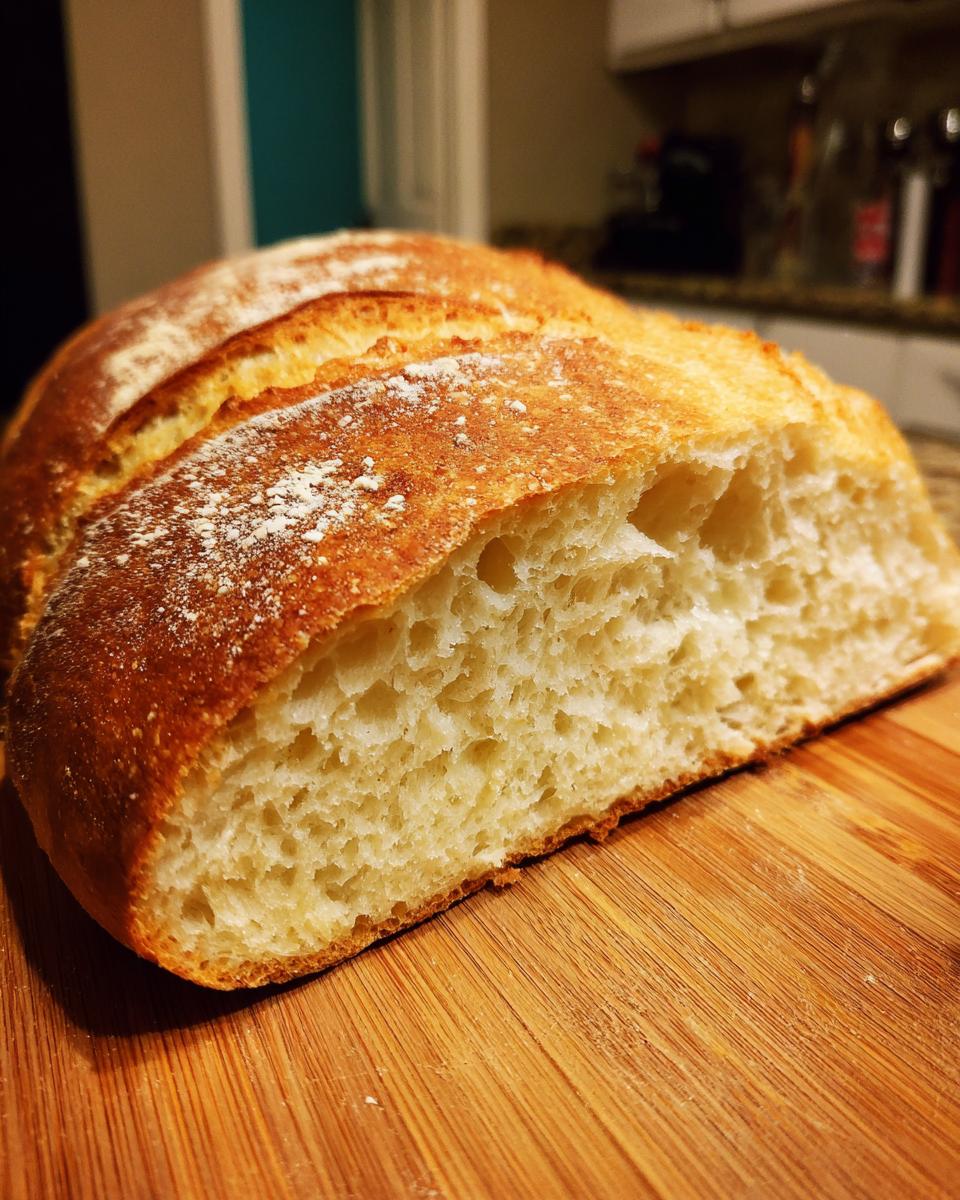
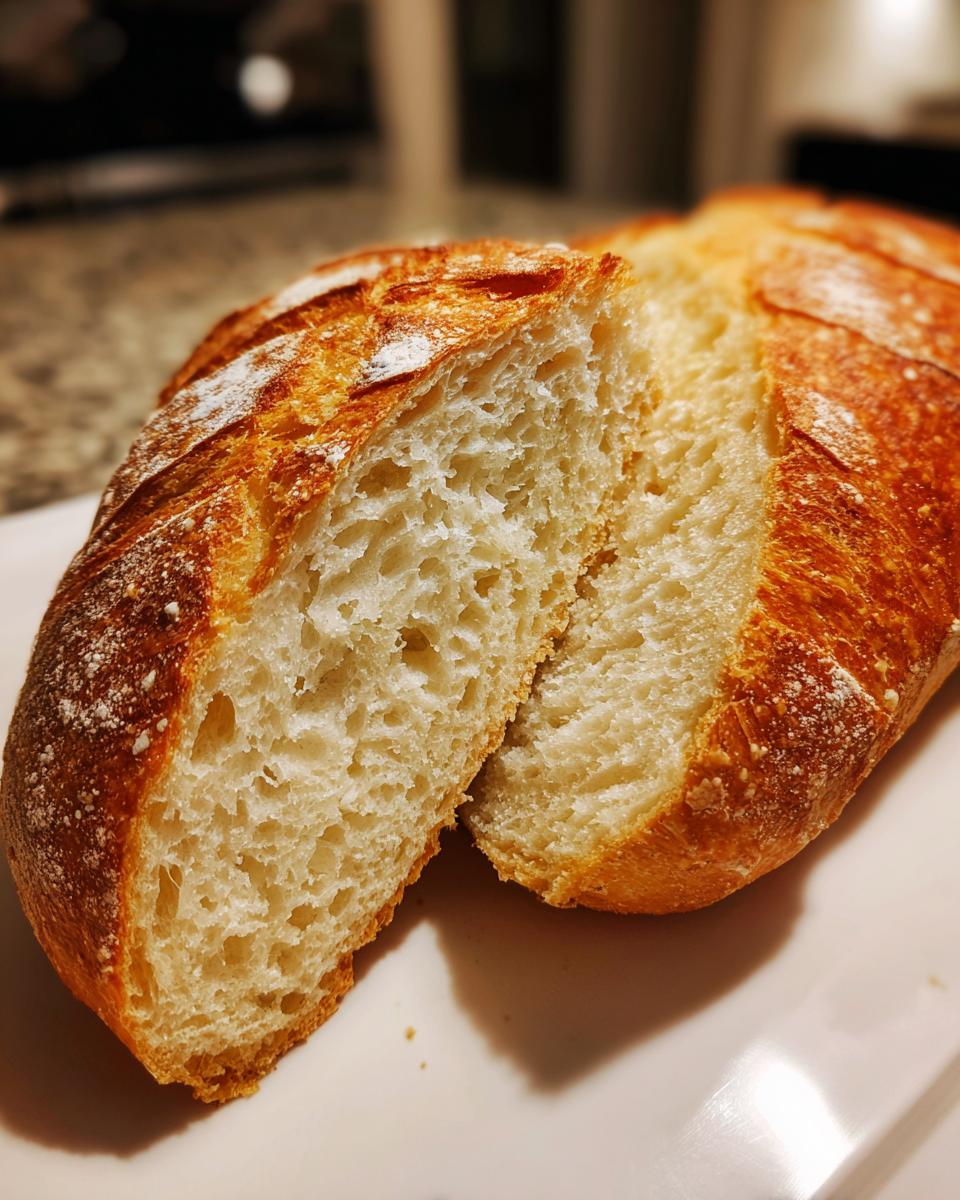
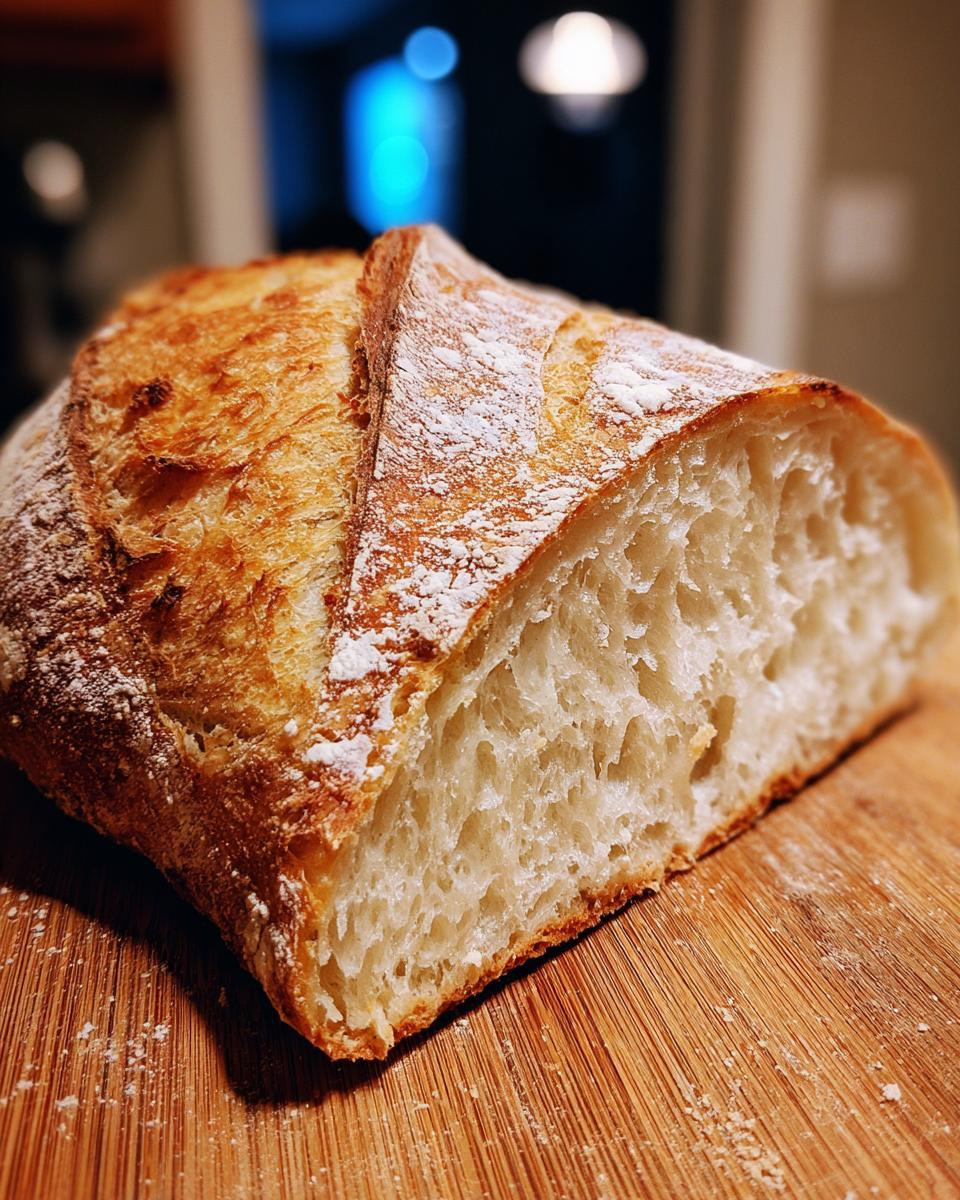
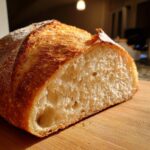
The real trick comes down to balance. You want that great, shattering crust for your homemade french bread, which needs intense heat and steam. But you also want that soft, airy interior! I found that brushing the tops with a tiny bit of oil before baking, combined with that steamy oven atmosphere, gives you the perfect hybrid texture. The steam keeps the crust from setting too hard too fast, letting the inside puff up beautifully.
Ingredients for Your Homemade French Bread Recipe
When you’re aiming for that authentic, crusty loaf, you need to trust your ingredients. The great news here is that this recipe doesn’t ask for anything crazy—seriously, you probably have everything needed in your pantry right now! We’re using basic flour, yeast, and salt to create our homemade yeast bread. Keeping these measurements accurate, especially the water temperature, is key to making sure this turns into the easy French bread you’ve dreamed of.
- 3 cups all-purpose flour
- 1 packet active dry yeast (that’s 2 1/4 teaspoons, in case your packet is loose!)
- 1 1/2 teaspoons salt
- 1 teaspoon sugar
- 1 1/4 cups warm water (you want it about 105–115°F, not too hot!)
- 1 tablespoon olive oil (just for brushing the tops before baking)
- A little extra water, which we need later for creating that steamy oven environment.
Essential Equipment for Perfect French Bread
Okay, before we dive into that shaggy dough, let’s make sure your kitchen is set up for success. When you’re aiming for that bakery style bread at home, having the right tools, even simple ones, makes the process foolproof. This isn’t about buying fancy machines; it’s about grabbing things you already have! If you’re new to this, having this equipment ready means you won’t have to stop halfway through kneading wondering where to stick the dough.
For this quick french bread, you really only need a few things. I find that having these set aside makes my whole process smoother, especially when I’m trying to get the loaves done in under an hour!
- A big, sturdy mixing bowl. You need room for that dough to double in size, so don’t use your smallest cereal bowl!
- A baking sheet. This is where your French bread dreams become reality.
- Parchment paper. Honestly, this is my secret weapon for easy cleanup. You just lift the bread right off the pan when it’s done!
- A very sharp knife or a razor blade (a lame). You need this for scoring the tops of the dough before it goes into the oven. Don’t skip this part; it lets the bread expand properly!
- A small, oven-safe pan. This goes on the bottom rack to hold the hot water for our steam bath. That pan is crucial for that crusty exterior we talked about.
Step-by-Step Instructions for Quick French Bread
Alright, deep breaths! This is where the magic truly happens, and it goes faster than you think. We’re moving from a shaggy mess to two gorgeous loaves of homemade french bread in no time flat. Remember what I said in the About section? It’s all about demystifying the process; I’ve broken down the essential steps here so you can nail this on your very first try. Following these timings ensures you get that perfect texture we’re aiming for.
Mixing and Kneading the French Bread Dough
First things first, grab that big bowl! Mix all your dry stuff—flour, yeast, salt, and sugar—right in there. Once that’s combined, pour in your warm water. Don’t be shy; stir it up good with a spoon until you’ve got what I call a “shaggy dough.” It looks messy, I know, but that’s okay! Turn it out onto a lightly floured surface and start kneading. This is important: you need to work that dough for a solid five to seven minutes. Keep going until it feels smooth and bouncy. That elasticity is what gives your final french bread that wonderfully soft texture.
The Rapid Rise for This French Bread Fast Recipe
Now for the time saver! Grab a clean bowl and give it a slick coat of oil. Tuck your smooth dough in there, let it swirl around so it’s coated, and cover it up tight with plastic wrap or a damp towel. Pop it somewhere warm—the top of your fridge works great, or just a spot away from any chilly drafts. This dough only needs about 30 minutes to double in size for this quick french bread fast recipe. Because we used perfectly warm water, the yeast gets happy and works overtime! Set a timer and try not to peek too much.
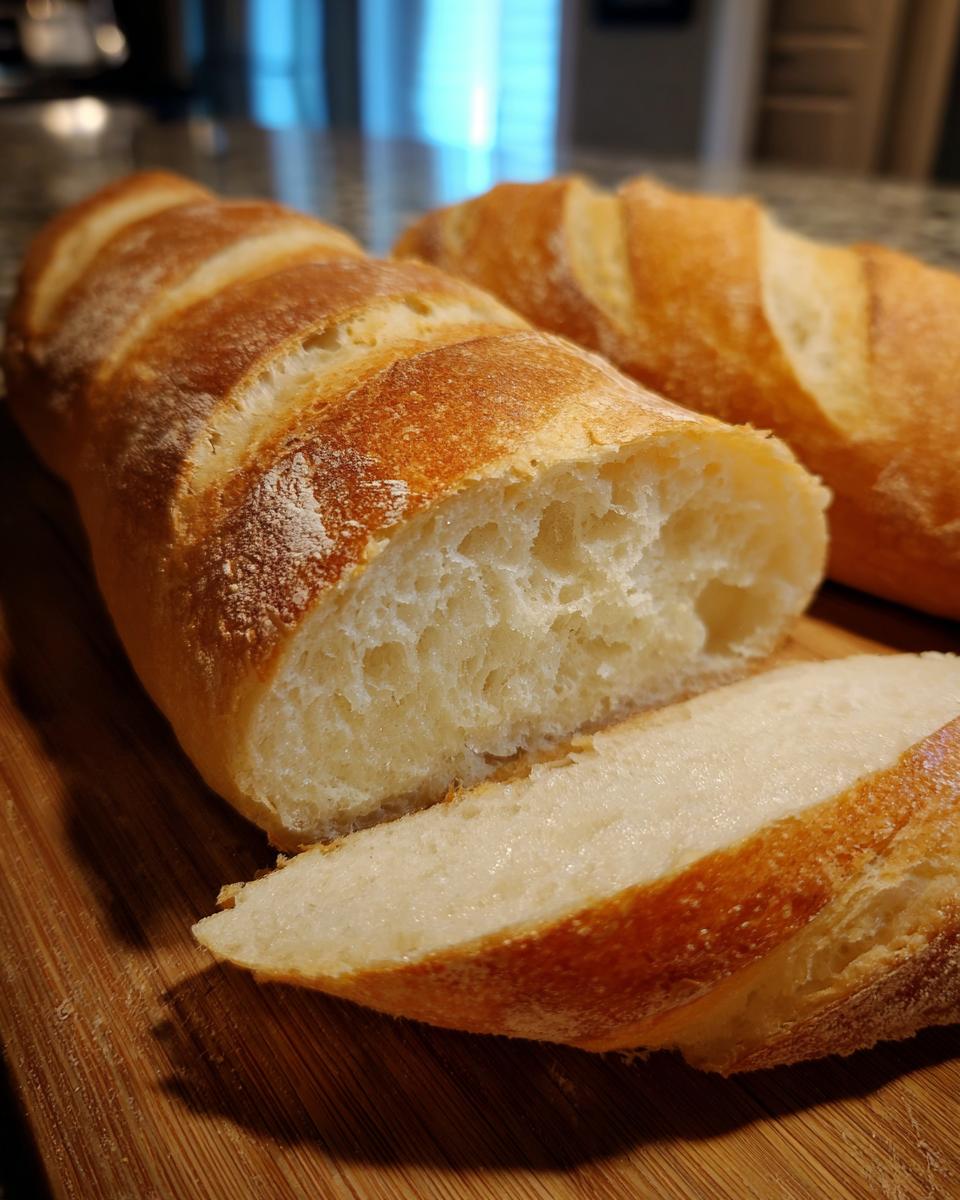
Shaping and Scoring Your Loaves of French Bread
Once it’s puffy, gently punch that air out—it feels so good! Divide that dough right down the middle, making two equal pieces. Now, take one piece and start rolling and tucking it into a long, thin shape, like a classic baguette. Don’t stress if it’s not perfect; that’s the charm of homemade! Place them onto your parchment-lined baking sheet. Let them rest for just 10 minutes while your oven gets screaming hot. Before baking, brush the tops lightly with olive oil, and then—this is key for the look—score the tops 3 or 4 times diagonally with your sharp knife. Little slashes are great; they give you those lovely ridges.
Baking the French Bread with Steam for Crust
Preheat your oven to 425°F, and don’t forget that shallow pan on the bottom rack! When you’re ready to bake, slide your baking sheet in, and then quickly—and I mean *quickly*—pour about a cup of hot water into that bottom pan. Slam that door shut right away! That steam traps moisture and is how we get that beautiful, crackly crust on our homemade french bread. Bake for about 20 to 25 minutes. You know it’s done when the crust looks golden brown all over and, if you carefully tap the bottom, it sounds hollow. Remove them immediately and let them cool on a wire rack. Slice it while it’s warm—that is non-negotiable!
Tips for Success with Your Easy French Bread
We’ve got the speed, we’ve got the shape, but now we fine-tune the texture! Since everyone’s kitchen—and bakery preference—is slightly different, I want to make sure you know how to control the exterior of your homemade French bread. This is where you can really customize the loaf to be exactly what you want for that night’s dinner. Don’t worry if you prefer something softer than a super-shattery crust; we have options!
Adjusting Crust Texture on Your French Bread
Remember how we used steam to get that great crunch? Well, if you are aiming for something truly crackly, like a real baguette, you can push that envelope even further. For the *crustiest* french bread possible, try spraying the inside walls of your hot oven with a bit of water every five minutes during the initial 10 minutes of baking. Be careful when you open the door just slightly to spray; you want quick bursts, not steam pouring out!
Now, if your family prefers that soft, slightly chewy texture—maybe for making great little sandwiches—you can skip the steam bath entirely! Seriously, just nix step 10. Instead, immediately when the loaves come out of the oven, brush them all over with some melted butter. That melts right into the golden crust and keeps the exterior wonderfully tender. It’s an easy swap that completely changes the experience of your easy French bread!
If you’re struggling with getting that perfect shatter, check out what my friend at Taste Within Aya does for her mini baguettes. Sometimes just seeing another method can click something into place! Getting that perfect shatter takes practice, but these adjustments should get you really close!
Storing and Reheating Homemade French Bread
So, you made two loaves of amazing french bread because, frankly, you can never have enough, right? Now comes the tough part: letting it last past two hours! Because this is such a quick recipe, the bread is naturally best eaten the very day it comes out of the oven, especially if you went for that crusty option. But don’t worry, we can revive it easily!
When storing, never stick your french bread in a plastic bag. Nope! That traps moisture and immediately makes that beautiful, golden crust all soft and sad. Instead, wrap your cooled loaves tightly in aluminum foil. This keeps the interior soft while allowing just a little bit of air circulation to prevent the crust from getting instantly gummy.
How to Bring Back the Crunch After Day One
If you wake up the next morning and your loaf has gone a bit limp—and trust me, even my best batches do this—we just need to trick the oven into baking it for three more minutes! Unwrap the loaf completely from the foil. Pop the entire naked loaf directly onto the middle rack of your oven. Turn the oven on to about 350°F (175°C). Let it sit in there for just 3 to 5 minutes. You want to hear it start gently crackling again.
This quick blast of dry heat evaporates that moisture that caused the softening. When you pull it out, the interior will be warm and fluffy again, and that crust you loved so much will have snapped right back! It’s like recycling bread magic right in your own kitchen. If you notice the crust is still a bit tough after reheating, just brush a tiny bit of water over the top before you pop it back in for those few minutes.
Freezing for Later Dinner Bread
If you know you won’t eat it within a day or two, it’s best to freeze it right away. After the bread has cooled down completely—and I mean totally cool!—wrap each loaf extremely securely in both plastic wrap and then a layer of aluminum foil. This double barrier stops freezer burn. It keeps beautifully for about three months.
When you are ready to eat it weeks later, take it out of the freezer and leave it still wrapped in the foil. Pop that foil-wrapped beauty right into a 350°F oven for about 15 minutes. The foil traps the steam inside, essentially re-steaming your bread. When you unwrap it, it’s just about as good as fresh! It becomes the perfect easy dinner bread for an unexpected weeknight meal.
Frequently Asked Questions About Making French Bread
I always get so many questions after people try this for the first time! It’s exciting to see so many of you making incredible homemade yeast bread. Sometimes those little details are the things that make or break your loaf, so let’s clear up a few of the most common hurdles so you can feel confident that you have a no-fail French bread recipe on your hands!
Can I use bread flour instead of all-purpose flour for this french bread recipe?
Oh, that’s a fantastic question! Yes, you absolutely can substitute bread flour for the all-purpose flour called for here. Bread flour has a higher protein content, which means it develops more gluten during kneading. What does that mean for you? Your final loaf will be slightly chewier and might have a little more structure than what you’d expect from the softer version we are aiming for here. It’s still completely delicious, but if you are chasing that super soft fluffy French bread interior, stick with the all-purpose flour for the very first time.
Why is my homemade French bread dough not rising fast enough?
If your dough is being slow, nine times out of ten it has to do with the water temperature! Remember, we need it warm—105°F to 115°F—to really wake up the yeast. If it’s too cold, they just wake up grumpy and slow. If it’s too hot, sadly, you might have accidentally killed them off, and then you’re starting from scratch! Also, check where you put it to rise. If your kitchen is drafty or cold, the yeast struggles. Pop it in the oven with just the light on, or on top of the fridge, to keep that happy warmth going so we can stick to our quick French bread timeline!
What is the best way to serve this dinner bread recipe?
Honestly, my favorite way to serve this tender, crusty bread is super simply: sliced thick, still a little warm, with nothing but good salted butter melting into the crumb. It’s the perfect accompaniment for soup or a hearty stew. But since this makes two lovely loaves that bake up so fast, you have leftovers for great sandwiches the next day! If you’re planning a big spread, look up some dipping ideas—it’s wonderful dipped in olive oil mixed with herbs and balsamic vinegar. It really shines as one of those versatile dinner bread recipes that nobody turns down.
Estimated Nutritional Data for This French Bread
Now, listen, I’m Aria, not a nutritionist! I’m way more comfortable with flour dust than I am with complex charts, so please take these numbers with a giant grain of salt! These figures are just standard estimates I pulled together based on the ingredients we used, serving size being one slice of bread. They are just a guideline, not a guarantee, since flour brands and oil amounts can always vary a tiny bit. If you are tracking things super closely, you’ll want to check the specific nutrition labels on your own products.
But for the sake of having a little idea of what we are eating when we devour this delicious homemade French bread, here’s the rundown. Remember, this recipe yields two full loaves, so these numbers are based on slicing one loaf thinly!
- Serving Size: 1 slice
- Calories: About 150
- Fat: Just around 1 gram
- Carbohydrates: 31 grams
- Protein: 4 grams
- Sugar: 1 gram
- Sodium: About 300mg
- Saturated Fat: Very low, close to 0 (since we are using oil, not huge amounts of butter!)
This is simple, wonderful bread making, and I wouldn’t want anyone worrying too much about the exact numbers! If you want to read the fine print about how we handle user data and privacy here on the site, you can check out our policy right here. For now, let’s just focus on how amazing it smells!
Share Your Homemade French Bread Creations
Now that you’ve pulled those golden loaves out of the oven and inhaled deeply because, let’s be real, that smell alone is worth the entire effort, I would absolutely love to hear about it! This whole process, from mixing the yeast to the final crackle of the crust, is about bringing that bakery magic right into your home kitchen. That’s what Cooking Zenith is all about—building confidence and sharing those wins.
Don’t be shy! Whether this was your very first attempt at homemade yeast bread or you’re a seasoned baker just looking for a quick version, please let me know how it went down. Did your steam pan work perfectly? Did you sneak a piece while it was still too hot to handle? Tell me everything!
Leave a comment below telling me how you served your french bread—maybe dipped in soup, or slathered with butter the moment it cooled just enough? Also, if you snap a beautiful picture of your crusty, soft creation, tag me on social media! Seeing your success stories really does make my day and proves that this recipe works for everyone.
If you have any follow-up questions that didn’t make it into the FAQ, drop those below too! I read every comment and I always try to hop in and help. If you need to reach out directly for anything else, the best place to find me is through the contact page. Happy baking, and I can’t wait to see your perfect loaves!
PrintEasy 1-Hour Homemade French Bread
Make soft, fluffy French bread with a golden, crusty exterior in about one hour. This beginner-friendly recipe uses simple ingredients for bakery-style quality at home.
- Prep Time: 15 min
- Cook Time: 25 min
- Total Time: 50 min
- Yield: 2 loaves 1x
- Category: Dinner
- Method: Baking
- Cuisine: French
- Diet: Vegetarian
Ingredients
- 3 cups all-purpose flour
- 1 packet active dry yeast (2 1/4 teaspoons)
- 1 1/2 teaspoons salt
- 1 teaspoon sugar
- 1 1/4 cups warm water (about 105-115°F)
- 1 tablespoon olive oil (for brushing)
- Water (for steam bath)
Instructions
- In a large bowl, mix the flour, yeast, salt, and sugar.
- Pour in the warm water and mix with a spoon until a shaggy dough forms.
- Turn the dough out onto a lightly floured surface and knead for 5 to 7 minutes until the dough is smooth and elastic.
- Lightly oil a clean bowl. Place the dough in the bowl, turning to coat. Cover the bowl with plastic wrap or a clean towel.
- Let the dough rise in a warm place for 30 minutes, or until it has doubled in size. This is the quick rise time.
- Preheat your oven to 425°F (220°C). Place a shallow pan on the bottom rack to create steam later.
- Gently punch down the dough. Divide it in half. Shape each half into a long, thin loaf (a baguette shape).
- Place the loaves on a baking sheet lined with parchment paper. Cover loosely and let rest for 10 minutes.
- Brush the tops of the loaves lightly with olive oil. Score the tops of each loaf 3 to 4 times diagonally with a sharp knife.
- Carefully pour 1 cup of hot water into the preheated shallow pan on the bottom rack to create steam. Quickly close the oven door.
- Bake for 20 to 25 minutes, or until the crust is golden brown and the bread sounds hollow when tapped.
- Remove the bread from the oven and let it cool on a wire rack before slicing and serving warm.
Notes
- For a crustier exterior, spray the sides of the oven with water 2-3 times during the first 10 minutes of baking.
- If you prefer a softer crust, skip the steam bath step and brush the loaves with melted butter immediately after removing them from the oven.
- This recipe is excellent for making homemade French bread for dinner.
Nutrition
- Serving Size: 1 slice
- Calories: 150
- Sugar: 1
- Sodium: 300
- Fat: 1
- Saturated Fat: 0
- Unsaturated Fat: 1
- Trans Fat: 0
- Carbohydrates: 31
- Fiber: 1
- Protein: 4
- Cholesterol: 0